Page 197 of 408
Features of your vehicle
118
4
In case the iPod exclusive cable is con-
nected to the multiple terminal inside the
consol on the right hand side of the dri-
ver's seat. When the iPod is connected,
the 'iPod' icon will be displayed on the top
left corner of the display screen.
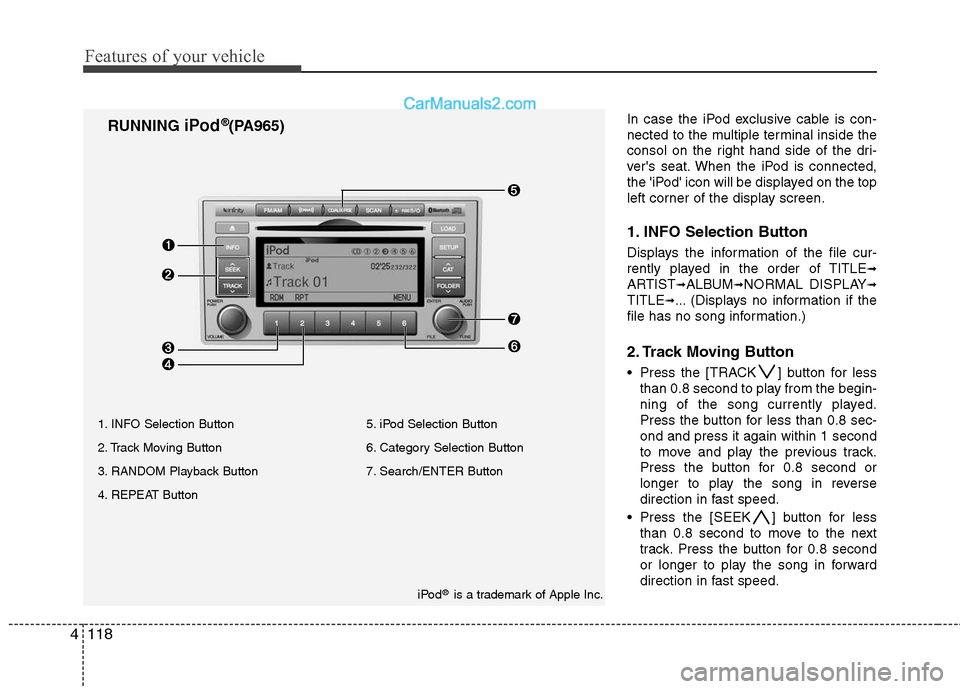
1. INFO Selection Button
Displays the information of the file cur-
rently played in the order of TITLE
➟
ARTIST➟ALBUM➟NORMAL DISPLAY➟
TITLE➟... (Displays no information if the
file has no song information.)
2. Track Moving Button
Press the [TRACK ] button for less than 0.8 second to play from the begin-
ning of the song currently played.
Press the button for less than 0.8 sec-
ond and press it again within 1 second
to move and play the previous track.
Press the button for 0.8 second or
longer to play the song in reverse
direction in fast speed.
Press the [SEEK ] button for less than 0.8 second to move to the next
track. Press the button for 0.8 second
or longer to play the song in forward
direction in fast speed.
RUNNING iPod®(PA965)
1. INFO Selection Button
2. Track Moving Button
3. RANDOM Playback Button
4. REPEAT Button 5. iPod Selection Button
6. Category Selection Button
7. Search/ENTER Button
iPod
®is a trademark of Apple Inc.
Page 198 of 408
4119
Features of your vehicle
3. RANDOM Playback Button
Press the button for less than 0.8 second
to activate or deactivate the random play-
back of the songs within the current cat-
egory. Press the button for longer than
0.8 second to randomly play all songs in
the entire album of the iPod. Press the
button once again to cancel the mode.
4. REPEAT Button
Repeats the song currently played.
5. iPod Selection Button
If iPod is connected, it switches to the
iPod mode from the CD mode to play the
song files stored in the iPod. If no CD and
auxiliary device is not connected, it dis-
plays "NO Media" for 3 seconds and
returns to the previous mode.
6. Category Selection Button
Moves to the upper category from cur-
rently played category of the iPod.
To move to (play) the category (song)
displayed, MENU (preset6) You will be
able to search through the lower catego-
ry of the selected category. The order of
iPod's category is SONG, ALBUMES
ARTISTS, GENRES, and iPod.
7. Search/ENTER Button
When you turn the button clockwise, it
will display the songs (category) next to
the song currently played (category in
the same level).
Also, when you turn the button counter-
clockwise, it will display the songs (cate-
gory) before the song currently played
(category in the same level).
If you want to listen to the song displayed
in the song category, press the button,
then it will skip to the selected song and
play.
Page 199 of 408
Features of your vehicle
120
4
✽
✽
NOTICE FOR USING iPod
DEVICE
• Some iPod models might not sup- port the communication protocol
and the files will not be played.
(iPod models supported: Mini, 4G,
Photo, Nano, 5G)
• The order of search or playback of songs in the iPod can be different
from the order searched in the
audio system.
• If the iPod crashes due to its own trouble, reset iPod. (Reset: Refer to
iPod manual)
• iPod may not operate normally on low battery.
(Continued)
When the iPod cable is connected, the system can be switched to theAUX mode even without the iPoddevice and can cause noise.Disconnect iPod cable when youare not using the iPod device.
When the iPod is not used at audio system, iPod cable has tobe separate from iPod device.Origin display of iPod may not bedisplayed.CAUTION IN USING
iPod DEVICE
You need the power cable exclu-
sive for iPod in order to operateiPod with the buttons on the audiosystem. The PC cable provided byApple may cause malfunction anddo not use it for vehicle use.
When connecting the device with iPod cable, push in the jack fullynot to interfere with communica-tion.
When adjusting the sound effects of iPod and the audio system, thesound effects of both devices willoverlap each and might causereduce or distort the quality of thesound.
Deactivate (turn off) the equalizer function of iPod when adjustingthe audio system’s volume, andturn off the equalizer of the audiosystem when using the equalizerof iPod.
(Continued)
Page 201 of 408
Features of your vehicle
122
4
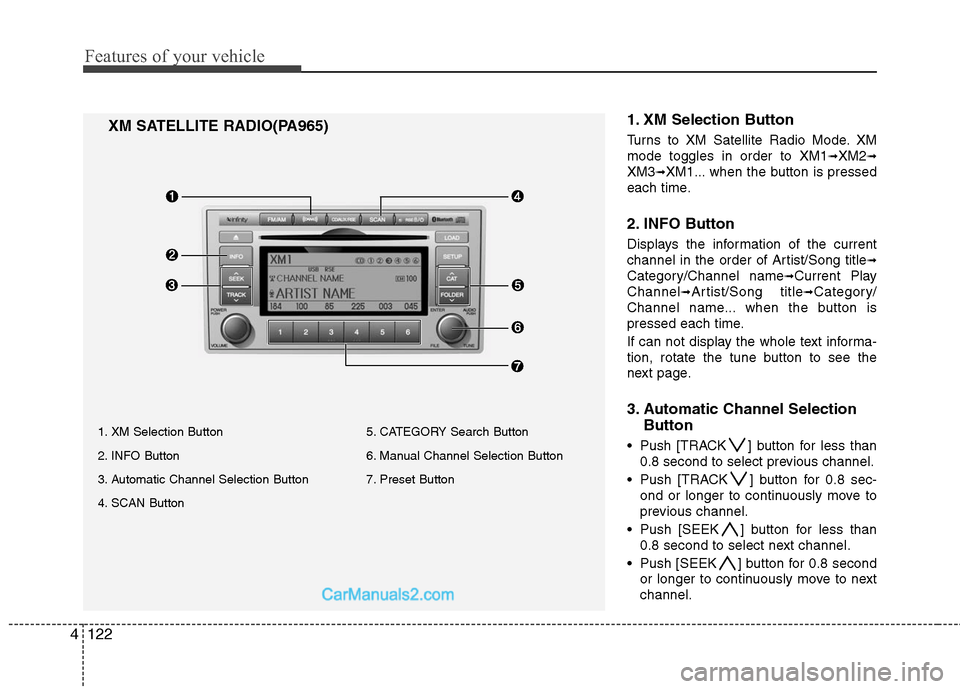
1. XM Selection Button
Turns to XM Satellite Radio Mode. XM
mode toggles in order to XM1
➟XM2➟
XM3➟XM1... when the button is pressed
each time.
2. INFO Button
Displays the information of the current
channel in the order of Artist/Song title
➟
Category/Channel name➟Current Play
Channel
➟Artist/Song title➟Category/
Channel name... when the button is
pressed each time.
If can not display the whole text informa-
tion, rotate the tune button to see the
next page.
3. Automatic Channel Selection Button
Push [TRACK ] button for less than
0.8 second to select previous channel.
Push [TRACK ] button for 0.8 sec- ond or longer to continuously move to
previous channel.
Push [SEEK ] button for less than 0.8 second to select next channel.
Push [SEEK ] button for 0.8 second or longer to continuously move to next
channel.
XM SATELLITE RADIO(PA965)
1. XM Selection Button
2. INFO Button
3. Automatic Channel Selection Button
4. SCAN Button 5. CATEGORY Search Button
6. Manual Channel Selection Button
7. Preset Button
Page 202 of 408
4123
Features of your vehicle
Radio ID : Seek or Tune to XM channel0 to display the Radio ID.
4. SCAN Button
Press to hear a brief sampling of all
channel. To cancel the scan mode, press
the button once again.
5. CATEGORY Search Button
Push [FOLDER ] button to searchprevious category.
Push [CAT ] button to search next category. To listen to the displayed cat-
egory, press the TUNE/SETUP button.
To scan channel in displayed category,
press the scan button. To search chan-
nel in displayed category, press seek
buttons or turn the tune button clock-
wise/counterclockwise.(CATEGORY
icon is will be turned on in Category
mode)
6. Manual Channel Selection Button
While listening to XM broadcast, rotate
this control to the right or left to search
other channels while listening to current
channel. (Turn to the right to searchhigh-
er channels and left, lower channels)
7. Preset Button
Push [1]~[6] buttons less than 0.8 sec-
ond to play the channel saved in each
button. Push Preset button for 0.8 sec-
ond or longer to save current channel to
the respective button with a beep.
Page 204 of 408
4125
Features of your vehicle
3. RSE Hold and RSE Power Off
If you press and hold this button for less
than 0.8 second, the LED of the button
will light and RSE unit will be locked. If
you press and hold this button for more
than 0.8 second, RSE unit will be turned
off with a beep and [RSE] will disappear
from LCD.
4. Folder Moving Button
Press [FOLDER ] button to play theprevious track.
Press [CAT ] button to play the next
track.
CAUTION IN USING
RSE DEVICE
When listening to the CD on the
H/UNIT in RSE, the mode cannot beconverted to USB on the H/UNIT and will be displayed on the LCD.
Page 206 of 408
4127
Features of your vehicle
will announce what commands are
available.
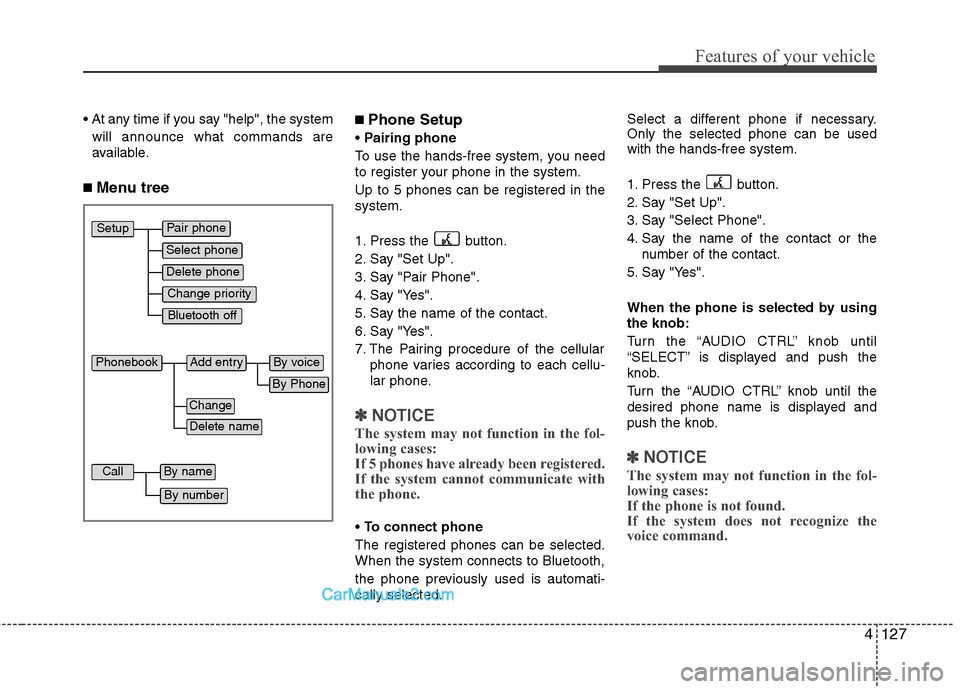
■ Menu tree
■Phone Setup
Pairing phone
To use the hands-free system, you need
to register your phone in the system.
Up to 5 phones can be registered in the
system.
1. Press the button.
2. Say "Set Up".
3. Say "Pair Phone".
4. Say "Yes".
5. Say the name of the contact.
6. Say "Yes".
7. The Pairing procedure of the cellular phone varies according to each cellu-
lar phone.
✽ ✽NOTICE
The system may not function in the fol-
lowing cases:
If 5 phones have already been registered.
If the system cannot communicate with
the phone.
To connect phone
The registered phones can be selected.
When the system connects to Bluetooth,
the phone previously used is automati-
cally selected. Select a different phone if necessary.
Only the selected phone can be used
with the hands-free system.
1. Press the button.
2. Say "Set Up".
3. Say "Select Phone".
4. Say the name of the contact or the
number of the contact.
5. Say "Yes".
When the phone is selected by using
the knob:
Turn the “AUDIO CTRL” knob until
“SELECT” is displayed and push the
knob.
Turn the “AUDIO CTRL” knob until the
desired phone name is displayed and
push the knob.
✽ ✽ NOTICE
The system may not function in the fol-
lowing cases:
If the phone is not found.
If the system does not recognize the
voice command.
Pair phone
Select phone
Change priority
Delete phone
Bluetooth off
Setup
Add entry
Phonebook
Change
Delete name
By Phone
By voice
Call
By name
By number
Page 207 of 408
Features of your vehicle
128
4
Deleting phone
The registered phones can be deleted.
1. Press the button.
2. Say "Set Up".
3. Say "Delete Phone".
4. Say the name of the contact, the num- ber of the contact or "Delete all
phone".
5. Say "Yes".
When the phone is deleted by using
the knob:
Turn the “AUDIO CTRL” knob until
“DELETE” is displayed and push the
knob.
Turn the “AUDIO CTRL” knob until the
desired phone name is displayed and
push the knob.
Changing Priority
The connection priority for registered
phones can be changed.
1. Press the button.
2. Say "Set Up".
3. Say "Change Priority".
4. Say the name of the contact or the number of the contact.
5. Say "Yes". When the phone is changed by using
the knob:
Turn the “AUDIO CTRL” knob until “PRI-
ORITY” is displayed and push the knob.
Turn the “AUDIO CTRL” knob until the
desired phone name is displayed and
push the knob.
Turning Bluetooth on / off
Bluetooth function can be switched ON/
OFF. initial status : Bluetooth ON
1. Press the button.
2. Say "Set Up".
3. Say "Bluetooth off".
4. Say "Yes".
Turning Bluetooth on
1. Press the send or button.
2. Say "yes".
3. The Bluetooth will be turned on.
When Bluetooth is off by using the
knob:
Turn the “AUDIO CTRL” knob until
“BLUETOOTH OFF” is displayed and
push the knob. After announcement say
“yes” to confirm.■ Phone Book
Adding Entry
Phone numbers and voice tags can be
registered. Entries registered in the
phone can also be transferred.
Adding Entry by Voice
1. Press the button.
2. Say "phonebook".
3. Say "add entry".
4. Say "by voice".
5. Say the name of the contact.
6. Say "yes".
7. Say the phone number.
8. Say "store".
9. Say "Home", "Office", "Mobile", "Other" or "default".
10. Say "Yes" to store an additional loca- tion for this contact.
Adding Entry by phone
1. Press the button.
2. Say "phonebook".
3. Say "add entry".
4. Say "by phone".
5. Say "yes".
6. Transfer procedures may vary depend- ing on the cellular phone.
✽ ✽NOTICE