2011 Hyundai Santa Fe engine
[x] Cancel search: enginePage 133 of 408
Features of your vehicle
54
4
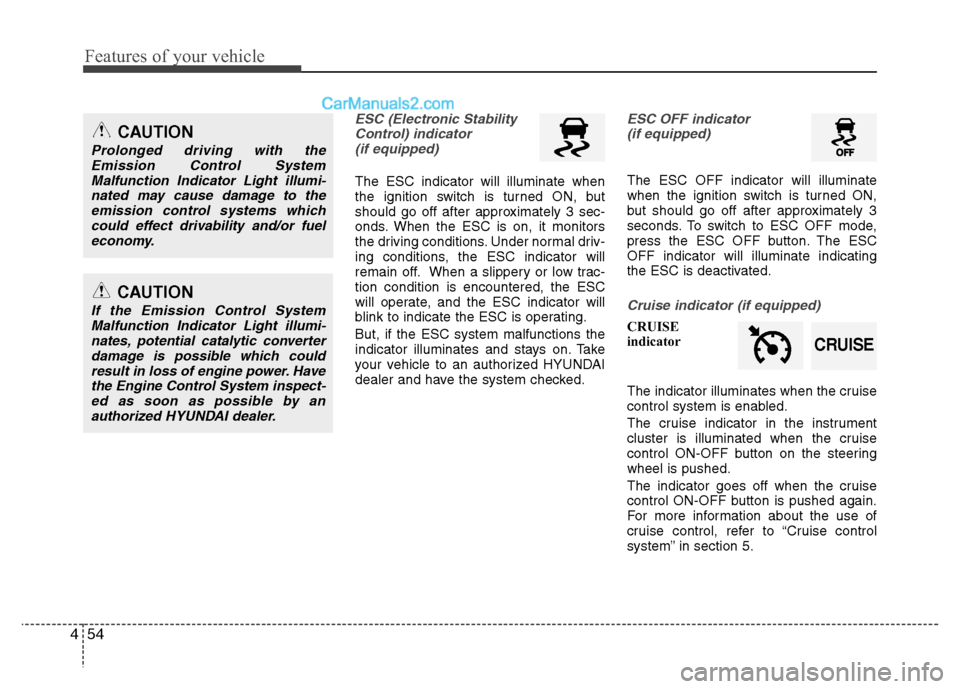
ESC (Electronic Stability
Control) indicator(if equipped)
The ESC indicator will illuminate when
the ignition switch is turned ON, but
should go off after approximately 3 sec-
onds. When the ESC is on, it monitors
the driving conditions. Under normal driv-
ing conditions, the ESC indicator will
remain off. When a slippery or low trac-
tion condition is encountered, the ESC
will operate, and the ESC indicator will
blink to indicate the ESC is operating.
But, if the ESC system malfunctions the
indicator illuminates and stays on. Take
your vehicle to an authorized HYUNDAI
dealer and have the system checked.
ESC OFF indicator (if equipped)
The ESC OFF indicator will illuminate
when the ignition switch is turned ON,
but should go off after approximately 3
seconds. To switch to ESC OFF mode,
press the ESC OFF button. The ESC
OFF indicator will illuminate indicating
the ESC is deactivated.
Cruise indicator (if equipped)
CRUISE
indicator
The indicator illuminates when the cruise
control system is enabled.
The cruise indicator in the instrument
cluster is illuminated when the cruise
control ON-OFF button on the steering
wheel is pushed.
The indicator goes off when the cruise
control ON-OFF button is pushed again.
For more information about the use of
cruise control, refer to “Cruise control
system” in section 5.
CAUTION
Prolonged driving with the
Emission Control SystemMalfunction Indicator Light illumi-nated may cause damage to theemission control systems whichcould effect drivability and/or fuel economy.
CAUTION
If the Emission Control SystemMalfunction Indicator Light illumi-nates, potential catalytic converterdamage is possible which couldresult in loss of engine power. Havethe Engine Control System inspect- ed as soon as possible by anauthorized HYUNDAI dealer.
CRUISE
Page 138 of 408
459
Features of your vehicle
D190500AUN
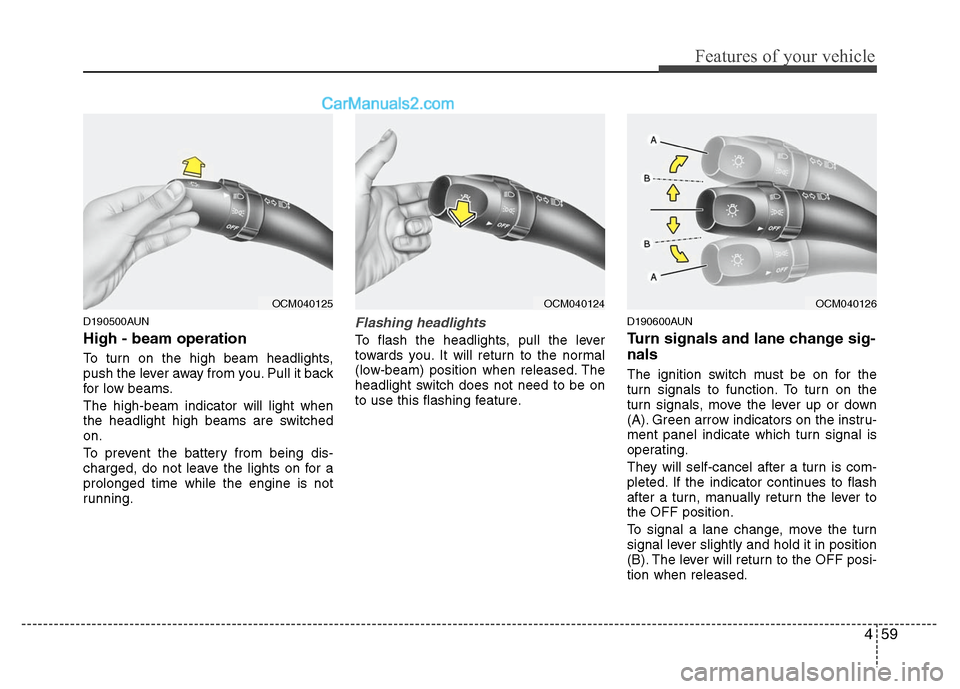
High - beam operation
To turn on the high beam headlights,
push the lever away from you. Pull it back
for low beams.
The high-beam indicator will light when
the headlight high beams are switched
on.
To prevent the battery from being dis-
charged, do not leave the lights on for a
prolonged time while the engine is not
running.
Flashing headlights
To flash the headlights, pull the lever
towards you. It will return to the normal
(low-beam) position when released. The
headlight switch does not need to be on
to use this flashing feature.
D190600AUN
Turn signals and lane change sig-
nals
The ignition switch must be on for the
turn signals to function. To turn on the
turn signals, move the lever up or down
(A). Green arrow indicators on the instru-
ment panel indicate which turn signal is
operating.
They will self-cancel after a turn is com-
pleted. If the indicator continues to flash
after a turn, manually return the lever to
the OFF position.
To signal a lane change, move the turn
signal lever slightly and hold it in position
(B). The lever will return to the OFF posi-
tion when released.
OCM040125
OCM040124
OCM040126
Page 139 of 408
Features of your vehicle
60
4
If an indicator stays on and does not
flash or if it flashes abnormally, one of the
turn signal bulbs may be burned out and
will require replacement.
✽ ✽
NOTICE
If an indicator flash is abnormally quick
or slow, bulb may be burned out or have
a poor electrical connection in the cir-
cuit.
D190700AFD
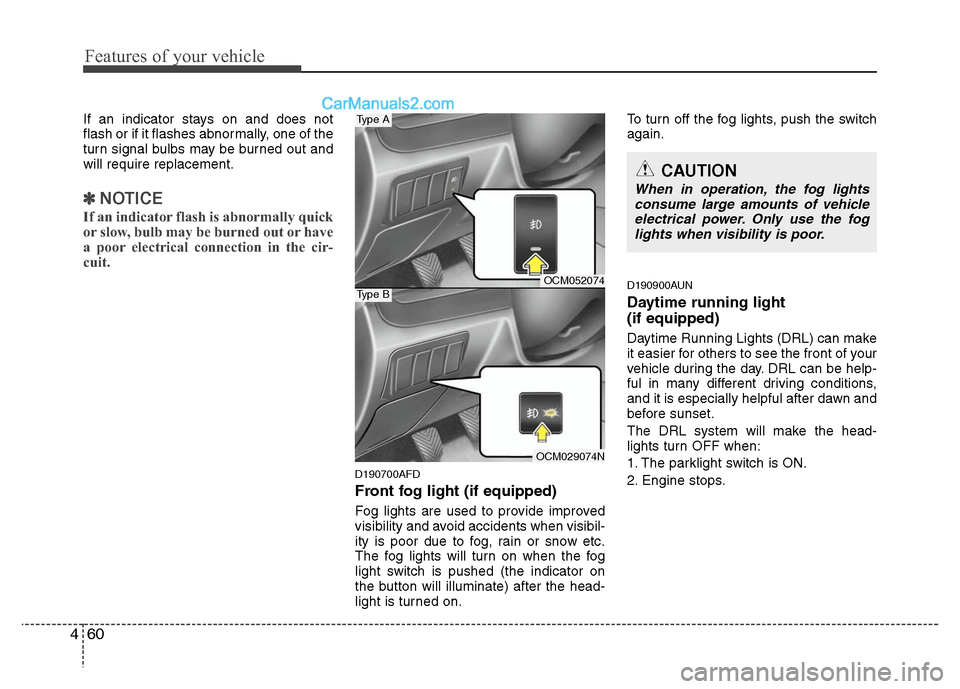
Front fog light (if equipped)
Fog lights are used to provide improved
visibility and avoid accidents when visibil-
ity is poor due to fog, rain or snow etc.
The fog lights will turn on when the fog
light switch is pushed (the indicator on
the button will illuminate) after the head-
light is turned on. To turn off the fog lights, push the switch
again.
D190900AUN
Daytime running light
(if equipped)
Daytime Running Lights (DRL) can make
it easier for others to see the front of your
vehicle during the day. DRL can be help-
ful in many different driving conditions,
and it is especially helpful after dawn and
before sunset.
The DRL system will make the head-
lights turn OFF when:
1. The parklight switch is ON.
2. Engine stops.
CAUTION
When in operation, the fog lights
consume large amounts of vehicleelectrical power. Only use the foglights when visibility is poor.
OCM052074
OCM029074N
Type A
Type B
Page 141 of 408
Features of your vehicle
62
4
D200200AFD
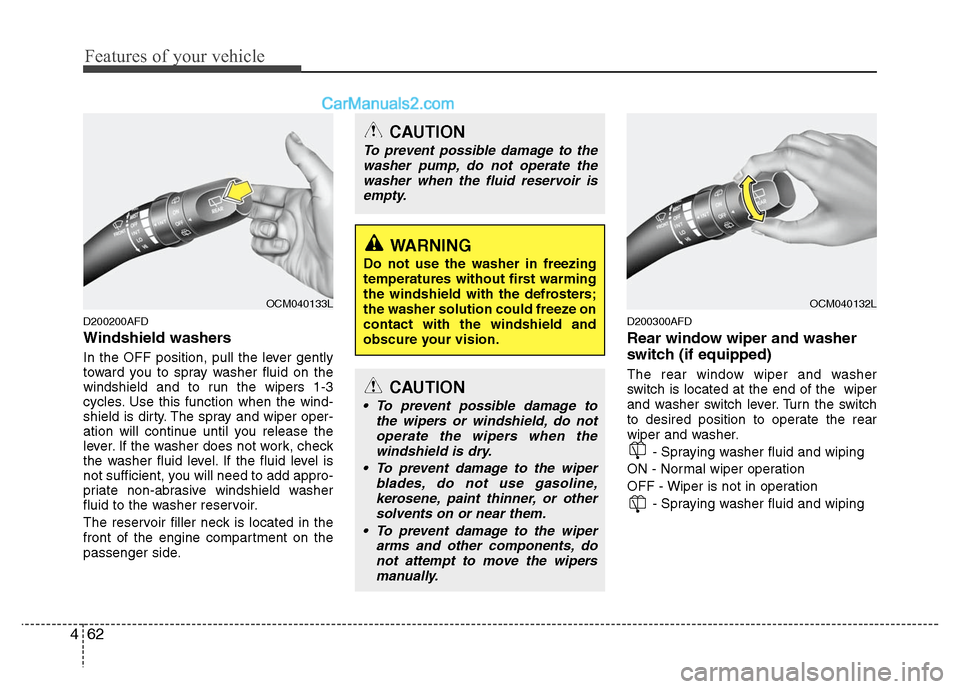
Windshield washers
In the OFF position, pull the lever gently
toward you to spray washer fluid on the
windshield and to run the wipers 1-3
cycles. Use this function when the wind-
shield is dirty. The spray and wiper oper-
ation will continue until you release the
lever. If the washer does not work, check
the washer fluid level. If the fluid level is
not sufficient, you will need to add appro-
priate non-abrasive windshield washer
fluid to the washer reservoir.
The reservoir filler neck is located in the
front of the engine compartment on the
passenger side.
D200300AFD
Rear window wiper and washer
switch (if equipped)
The rear window wiper and washer
switch is located at the end of the wiper
and washer switch lever. Turn the switch
to desired position to operate the rear
wiper and washer.
- Spraying washer fluid and wiping
ON - Normal wiper operation
OFF - Wiper is not in operation - Spraying washer fluid and wiping
OCM040133L
CAUTION
To prevent possible damage to thewasher pump, do not operate thewasher when the fluid reservoir isempty.
WARNING
Do not use the washer in freezing
temperatures without first warming
the windshield with the defrosters;
the washer solution could freeze on
contact with the windshield and
obscure your vision.
CAUTION
To prevent possible damage to the wipers or windshield, do notoperate the wipers when thewindshield is dry.
To prevent damage to the wiper blades, do not use gasoline,kerosene, paint thinner, or other solvents on or near them.
To prevent damage to the wiper arms and other components, donot attempt to move the wipersmanually.
OCM040132L
Page 142 of 408
463
Features of your vehicle
D210000AUN
Automatic turn off function
(if equipped)
The interior lights automatically turn off
approximately 20 minutes after the igni-
tion switch is turned off.
If your vehicle is equipped with the theft
alarm system, the interior lights automat-
ically turn off approximately 3 seconds
after the system is armed.
D210100AFD
Map lamp
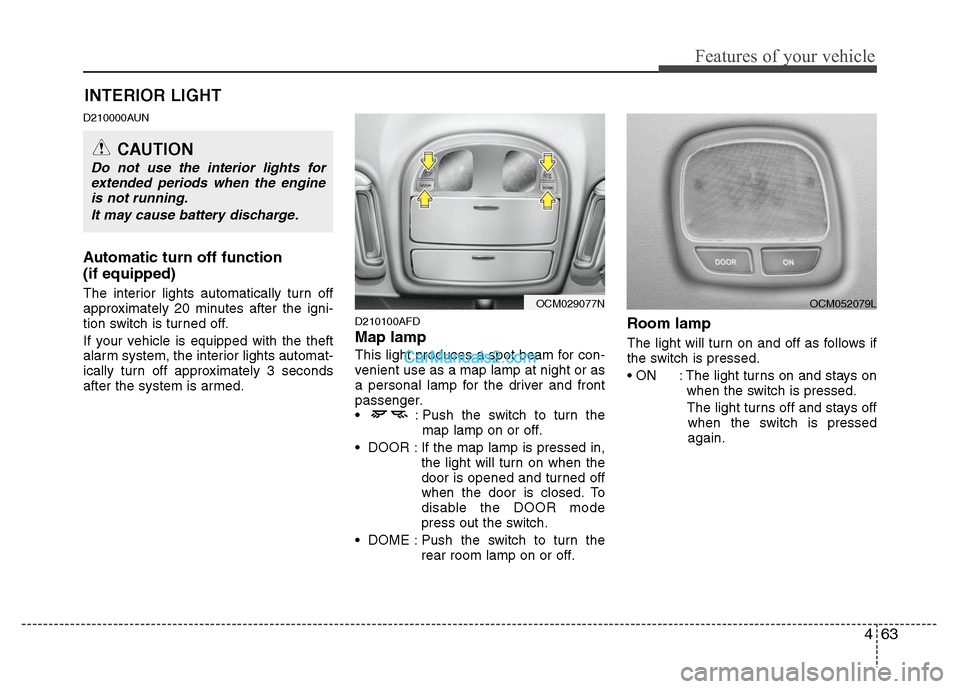
This light produces a spot beam for con-
venient use as a map lamp at night or as
a personal lamp for the driver and front
passenger.
: Push the switch to turn themap lamp on or off.
DOOR : If the map lamp is pressed in, the light will turn on when the
door is opened and turned off
when the door is closed. To
disable the DOOR mode
press out the switch.
DOME : Push the switch to turn the rear room lamp on or off.
Room lamp
The light will turn on and off as follows if
the switch is pressed.
: The light turns on and stays onwhen the switch is pressed.
The light turns off and stays off when the switch is pressed
again.
INTERIOR LIGHT
CAUTION
Do not use the interior lights for extended periods when the engineis not running.
It may cause battery discharge.
OCM029077N
OCM052079L
Page 145 of 408
Features of your vehicle
66
4
D220000AUN
✽
✽
NOTICE
If you want to defrost and defog on the
front windshield, refer to “Windshield
Defrosting and Defogging” in this sec-
tion.
D220100AUN
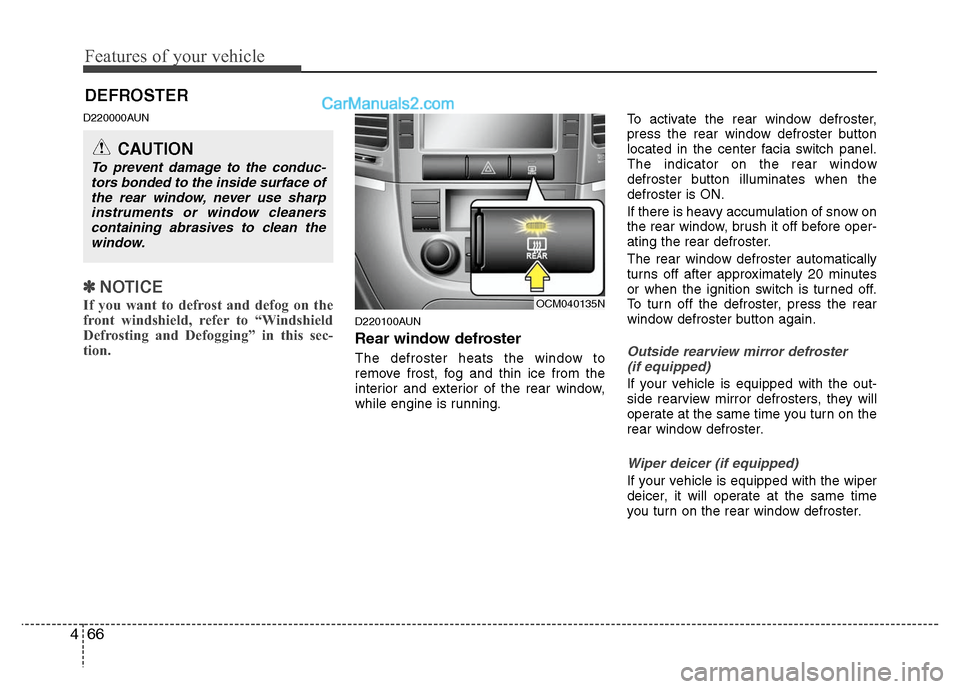
Rear window defroster
The defroster heats the window to
remove frost, fog and thin ice from the
interior and exterior of the rear window,
while engine is running. To activate the rear window defroster,
press the rear window defroster button
located in the center facia switch panel.
The indicator on the rear window
defroster button illuminates when the
defroster is ON.
If there is heavy accumulation of snow on
the rear window, brush it off before oper-
ating the rear defroster.
The rear window defroster automatically
turns off after approximately 20 minutes
or when the ignition switch is turned off.
To turn off the defroster, press the rear
window defroster button again.Outside rearview mirror defroster
(if equipped)
If your vehicle is equipped with the out-
side rearview mirror defrosters, they will
operate at the same time you turn on the
rear window defroster.
Wiper deicer (if equipped)
If your vehicle is equipped with the wiper
deicer, it will operate at the same time
you turn on the rear window defroster.
DEFROSTER
CAUTION
To prevent damage to the conduc- tors bonded to the inside surface ofthe rear window, never use sharpinstruments or window cleaners containing abrasives to clean thewindow.
OCM040135N
Page 147 of 408
Features of your vehicle
68
4
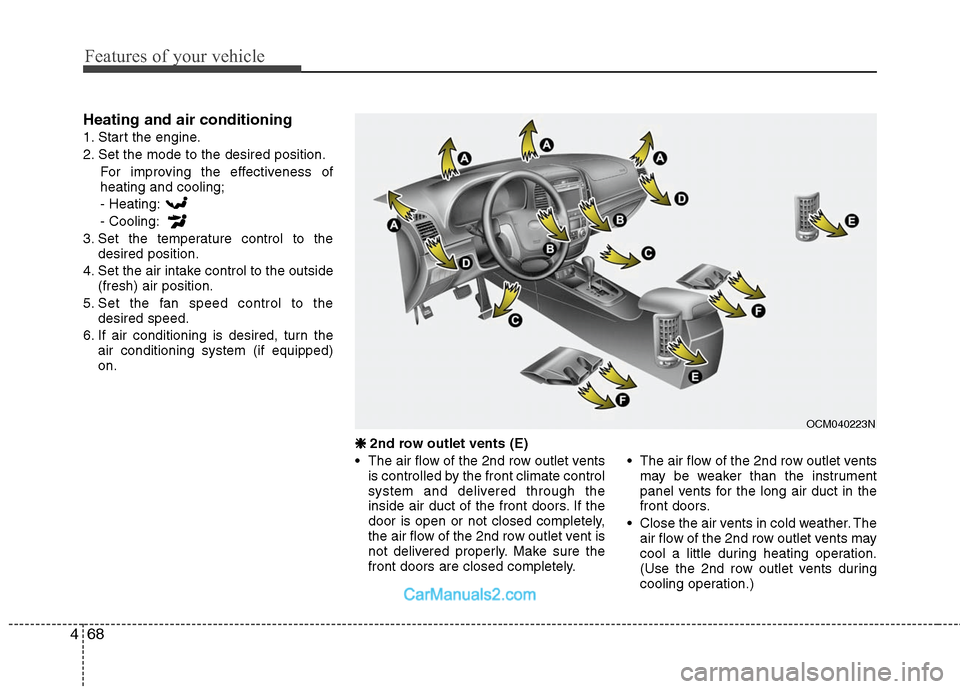
Heating and air conditioning
1. Start the engine.
2. Set the mode to the desired position.
For improving the effectiveness of
heating and cooling;
- Heating:
- Cooling:
3. Set the temperature control to the desired position.
4. Set the air intake control to the outside (fresh) air position.
5. Set the fan speed control to the desired speed.
6. If air conditioning is desired, turn the air conditioning system (if equipped)
on.
❈ ❈
2nd row outlet vents (E)
• The air flow of the 2nd row outlet vents is controlled by the front climate control
system and delivered through the
inside air duct of the front doors. If the
door is open or not closed completely,
the air flow of the 2nd row outlet vent is
not delivered properly. Make sure the
front doors are closed completely. The air flow of the 2nd row outlet vents
may be weaker than the instrument
panel vents for the long air duct in the
front doors.
Close the air vents in cold weather. The air flow of the 2nd row outlet vents may
cool a little during heating operation.
(Use the 2nd row outlet vents during
cooling operation.)
OCM040223N
Page 152 of 408
473
Features of your vehicle
Operation Tips
To keep dust or unpleasant fumes fromentering the vehicle through the venti-
lation system, temporarily set the air
intake control to the recirculated air
position. Be sure to return the control
to the fresh air position when the irrita-
tion has passed to keep fresh air in the
vehicle. This will help keep the driver
alert and comfortable.
Air for the heating/cooling system is drawn in through the grilles just ahead
of the windshield. Care should be
taken that these are not blocked by
leaves, snow, ice or other obstructions.
To prevent interior fog on the wind- shield, set the air intake control to the
fresh air position and fan speed to the
desired position, turn on the air condi-
tioning system, and adjust the temper-
ature control to desired temperature.D230503AFD
Air conditioning (if equipped)
All HYUNDAI Air Conditioning Systems
are filled with environmentally friendly
R-134a refrigerant which does not dam-
age to the ozone layer.
1. Start the engine. Push the air condi- tioning button.
2. Set the mode to the position.
3. Set the air intake control to the outside air or recirculated air position.
4. Adjust the fan speed control and tem- perature control to maintain maximum
comfort.
When maximum cooling is desired, set the temperature control to the extreme
left position then set the fan speed
control to the highest speed.
✽ ✽ NOTICE
• When using the air conditioning sys-
tem, monitor the temperature gauge
closely while driving up hills or in
heavy traffic when outside tempera-
tures are high. Air conditioning sys-
tem operation may cause engine over-
heating. Continue to use the blower
fan but turn the air conditioning sys-
tem off if the temperature gauge indi-
cates engine overheating.
• When opening the windows in humid weather air conditioning may create
water droplets inside the vehicle.
Since excessive water droplets may
cause damage to electrical equipment,
air conditioning should only be used
with the windows closed.