Page 44 of 211

1FEATURES OF YOUR HYUNDAI
32
NOTE: Any alteration of the odometer may void your warranty coverage. 2,3 Trip odometer Records the distance of 2 trips in kilo- meters or miles.TRIP A: First distance you have trav-
eled from your origination point to a firstdestination.TRIP B: Second distance from the first
destination to the final destination. To shift from TRIP A to TRIP B, press the reset switch. When it pressed for more than 1 second, the trip odometerwill reset to 0.COMBINATION TURN SIGNAL, HEADLIGHT AND HIGH-BEAMSWITCH
B340A01A-AAT Turn Signal Operation Pulling down on the lever causes the turn signals on the left side of the car toblink. Pushing upwards on the lever causes the turn signals on the right side of the car to blink. As the turn iscompleted, the lever will automatically return to the center position and turn off the turn signals at the same time. Ifeither turn signal indicator light blinks more rapidly than usual, goes on but does not blink, or does not go on at all,there is a malfunction in the system. Check for a burned-out fuse or bulb or see your Hyundai dealer.
Function of digital odometer/trip odometer
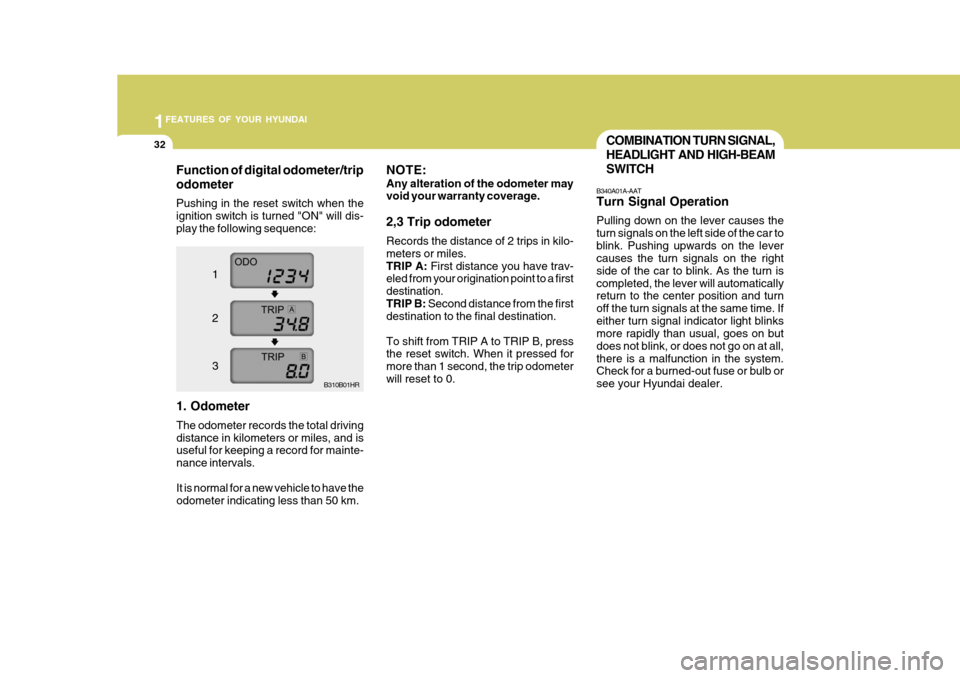
Pushing in the reset switch when the ignition switch is turned "ON" will dis-play the following sequence:
1. Odometer The odometer records the total driving distance in kilometers or miles, and is useful for keeping a record for mainte- nance intervals. It is normal for a new vehicle to have the odometer indicating less than 50 km. B310B01HR
1 2 3
Page 99 of 211

2
DRIVING YOUR HYUNDAI
3
!
TO START THE ENGINEBEFORE STARTING THE EN- GINE
C020A02A-AAT Before you start the engine, you should always:
1. Look around the vehicle to be sure
there are no flat tires, puddles of oil, water or other indications of pos- sible trouble.
2. After entering the car, check to be sure the parking brake is engaged.
3. Check that all windows, and lights are clean.
4. Check that the interior and exterior
mirrors are clean and in position.
5. Check your seat, seatback and headrest to be sure they are in theirproper positions.
6. Lock all the doors.
7. Fasten your seat belt and be sure
that all other occupants have fas- tened theirs.
8. Turn off all lights and accessories
that are not needed.
9. When you turn the ignition switch to "ON", check that all appropriatewarning lights are operating andthat you have sufficient fuel.
10.Check the operation of warning
lights and all bulbs when key is inthe "ON" position. C030A03HR-GAT COMBINATION IGNITION SWITCH
o Place the shift lever in neutral and
depress the clutch pedal fully.
o To start the engine, insert the igni- tion key and turn it to the "START" position. Release it as soon as theengine starts. Do not hold the key in the "START" position for more than 15 seconds.
!WARNING:
To ensure that sufficient vacuum exists within the brake system dur-ing cold weather start-up condi- tions, it is necessary to run the engine at idle for several secondsafter starting the engine.
WARNING:
Always wear appropriate shoes when operating your vehicle. Unsuitable shoes (high heels, ski boots,etc.)may interfere with your ability to use the brake and accelerator pedal, and the clutch (if installed).
!WARNING:
When you intend to park or stop the vehicle with the engine on, be care- ful not to depress the acceleratorpedal for a long period of time. It may overheat the engine or exhaust sys- tem and cause fire.
Page 152 of 211

Front Open Service Panel ............................................ 6-2
Engine Compartment .................................................... 6-3
General Checks ........................................................... 6-5
Checking the Engine Oil ............................................... 6-6
Changing the Oil and Filter ........................................... 6-8
Checking and Changing the Engine Coolant ...............6-10
Changing the Air Cleaner Filte r ....................................6-12
Checking the Transmission Oil (Manual) ....................6-15
Checking the Rear Axle Oil......................................... 6-16
Checking the B rakes ................................................... 6-17
Air Conditioning Care ................................................... 6-18
Checking the Climate Control Air Filter
(For Evaporator and Blower U nit) .............................6-19
Checking Drive Belts................................................... 6-21
Checking and Replacing Fuses .................................. 6-22
Checking the Battery ................................................... 6-24
Power Steering Fluid Level .......................................... 6-26
Fuel Fil ter ..................................................................... 6-27
Replacement of Light Bulbs ......................................... 6-30
Bulb Wattages ............................................................. 6-37
Fuse Panel Description ............................................... 6-38
DO-IT-YOURSELF MAINTENANCE
6
6
Page 181 of 211

6 DO-IT-YOURSELF MAINTENANCE
30REPLACEMENT OF LIGHT BULBS
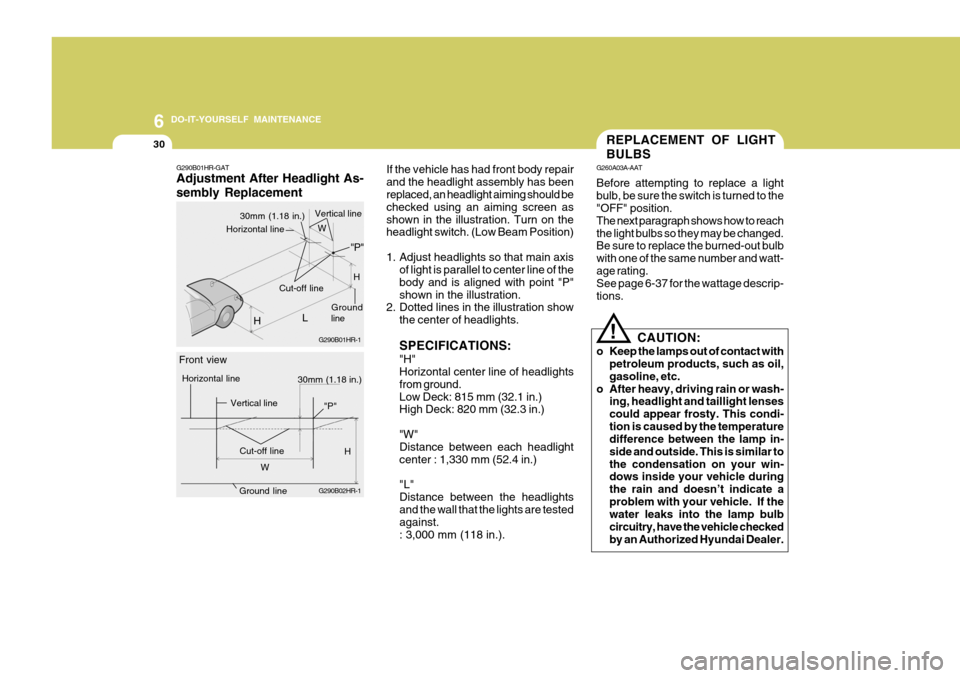
If the vehicle has had front body repair and the headlight assembly has been replaced, an headlight aiming should be checked using an aiming screen asshown in the illustration. Turn on the headlight switch. (Low Beam Position)
1. Adjust headlights so that main axis of light is parallel to center line of the body and is aligned with point "P"shown in the illustration.
2. Dotted lines in the illustration show
the center of headlights. SPECIFICATIONS: "H" Horizontal center line of headlights from ground.Low Deck: 815 mm (32.1 in.) High Deck: 820 mm (32.3 in.) "W" Distance between each headlight center : 1,330 mm (52.4 in.) "L" Distance between the headlightsand the wall that the lights are tested against. : 3,000 mm (118 in.). G260A03A-AAT Before attempting to replace a light bulb, be sure the switch is turned to the "OFF" position. The next paragraph shows how to reachthe light bulbs so they may be changed. Be sure to replace the burned-out bulb with one of the same number and watt-age rating. See page 6-37 for the wattage descrip- tions.
CAUTION:
o Keep the lamps out of contact with petroleum products, such as oil,gasoline, etc.
o After heavy, driving rain or wash- ing, headlight and taillight lensescould appear frosty. This condi-tion is caused by the temperature difference between the lamp in- side and outside. This is similar tothe condensation on your win- dows inside your vehicle during the rain and doesn’t indicate aproblem with your vehicle. If the water leaks into the lamp bulb circuitry, have the vehicle checkedby an Authorized Hyundai Dealer.
!
G290B01HR-GAT Adjustment After Headlight As- sembly Replacement
G290B01HR-1
H
Ground line
30mm (1.18 in.)
Vertical line
L
Cut-off line "P"
Horizontal line
G290B02HR-1
30mm (1.18 in.)
Front view
Horizontal line
Vertical line
Cut-off lineH
W H
W
Ground line
"P"
Page 182 of 211
6
DO-IT-YOURSELF MAINTENANCE
31
G270A02HR
G270A01HR-GAT Headlight Bulb
1. Allow the bulb to cool. Wear eye
protection.
2. Always grasp the bulb by its terminal plate base, avoid touching the glass.
3. Open the door and remove a head- light assembly mounting screw with a philips screwdriver.
4. Open the hood and remove a head-light assembly mounting bolt with a spanner.
5. Disconnect the power cord from the bulb base in the back of the head-light. G270A01HR
HHR5030 HHR5031
6. Remove the dust cover.
HHR5032
7. Push the bulb spring to remove the headlight bulb.
Page 183 of 211
6 DO-IT-YOURSELF MAINTENANCE
32
!
8. Remove the protective cap from the
replacement bulb and install the new bulb by matching the plastic basewith the headlight hole. Reattach the bulb spring and install the dust cover. Reconnect the power cord.
9. Use the protective cap and carton to dispose of the old bulb.
10.Check for proper headlight aim. HHR5033
WARNING:
The halogen bulb contains gas un-der pressure and if impacted couldshatter, resulting in flying fragments. Always wear eye protection when servicing the bulb. Protect the bulbagainst abrasions or scratches and against liquids when lighted. Turn the bulb on only when installed in aheadlight. Replace the headlight if damaged or cracked. Keep the bulb out of the reach of children and dis-pose of the used bulb with care. G270A03O
G270B01HR-GAT Front Turn Signal light / Position Light
G270A02HR
1. Open the door and remove a head- light assembly mounting screw with a philips screwdriver.
G270A01HR
Page 184 of 211
6
DO-IT-YOURSELF MAINTENANCE
33
2. Open the hood and remove a head-
light assembly mounting bolt with a spanner.
3. Disconnect the power cord from the bulb. HHR5034
4. To replace the front turn signal light
(1) or position light (2), take it out from the bulb holder by turning it counterclockwise.
5. Install the new bulb. HHR5035(1)
(2) G270D01HR-GAT Rear Combination Light
G270D01HR
1. Disconnect the power cord from the bulb.
G270D02HR
2. Remove the cover by pressing the both sides of the cover.
Page 185 of 211
6 DO-IT-YOURSELF MAINTENANCE
34
3. To replace the rear combination light
(stop/tail light, turn signal light or back-up light), take it out from the bulb holder by turning it counter-clockwise.
(1) Turn Signal Light(2) Stop/Tail Light (3) Back-up Light
4. Install the new bulb. HHR5038
(1) (2)
(3)G270I01HR-GAT License Plate Light
1. Remove the mounting screws of the
license plate light with a phillips screwdriver. OHR0581002. Take the bulb out from the bulb
holder by turning it counterclockwiseand disconnect the power code.
3. Install the new bulb.
OHR058101 G270E01A-GAT Side Repeater (If Installed)
G270E01HR
1. Push the cover toward the front of vehicle and remove it.