2011 Hyundai H-1 (Grand Starex) Reverse
[x] Cancel search: ReversePage 219 of 338
531
Driving your vehicle
E110100AUN
Hazardous driving conditions
When hazardous driving conditions are
encountered such as water, snow, ice,
mud, sand, or similar hazards, follow
these suggestions:
• Drive cautiously and allow extra dis-
tance for braking.
• Avoid sudden movements in braking or
steering.
• When braking with non-ABS brakes
pump the brake pedal with a light up-
and-down motion until the vehicle is
stopped.• If stalled in snow, mud, or sand, use
second gear. Accelerate slowly to
avoid spinning the drive wheels.
• Use sand, rock salt, tire chains, or
other non-slip material under the drive
wheels to provide traction when stalled
in ice, snow, or mud.
E110200ATQ
Rocking the vehicle
If it is necessary to rock the vehicle to
free it from snow, sand, or mud, first turn
the steering wheel right and left to clear
the area around your front wheels. Then,
shift back and forth between 1st (First)
and R (Reverse) in vehicles equipped
with a manual transmission or R
(Reverse) and any forward gear in vehi-
cles equipped with an automatic trans-
mission. Do not race the engine, and
spin the wheels as little as possible. If
you are still stuck after a few tries, have
the vehicle pulled out by a tow vehicle to
avoid engine overheating and possible
damage to the transmission.
SPECIAL DRIVING CONDITIONS
WARNING - ABS
Do not pump the brake pedal on a
vehicle equipped with ABS.
WARNING - Downshifting
Downshifting with an automatic
transmission, while driving on slip-
pery surfaces can cause an acci-
dent. The sudden change in tire
speed could cause the tires to skid.
Be careful when downshifting on
slippery surfaces.
CAUTION
Prolonged rocking may cause
engine over-heating, transmission
damage or failure, and tire damage.
Page 227 of 338
539
Driving your vehicle
E120600AUN
To keep locks from freezing
To keep the locks from freezing, squirt an
approved de-icer fluid or glycerine into
the key opening. If a lock is covered with
ice, squirt it with an approved de-icing
fluid to remove the ice. If the lock is
frozen internally, you may be able to thaw
it out by using a heated key. Handle the
heated key with care to avoid injury.
E120700AEN
Use approved window washer
anti-freeze in system
To keep the water in the window washer
system from freezing, add an approved
window washer anti-freeze solution in
accordance with instructions on the con-
tainer. Window washer anti-freeze is
available from an authorized HYUNDAI
dealer and most auto parts outlets. Do
not use engine coolant or other types of
anti-freeze as these may damage the
paint finish.
E120800AUN
Don't let your parking brake
freeze
Under some conditions your parking
brake can freeze in the engaged position.
This is most likely to happen when there
is an accumulation of snow or ice around
or near the rear brakes or if the brakes
are wet. If there is a risk the parking
brake may freeze, apply it only temporar-
ily while you put the gear selector lever in
P (automatic transmission) or in first or
reverse gear (manual transmission) and
block the rear wheels so the car cannot
roll. Then release the parking brake.
E120900AUN
Don't let ice and snow accumu-
late underneath
Under some conditions, snow and ice
can build up under the fenders and inter-
fere with the steering. When driving in
severe winter conditions where this may
happen, you should periodically check
underneath the car to be sure the move-
ment of the front wheels and the steering
components is not obstructed.
E121000AUN
Carry emergency equipment
Depending on the severity of the weath-
er where you drive your car, you should
carry appropriate emergency equipment.
Some of the items you may want to carry
include tire chains, tow straps or chains,
flashlight, emergency flares, sand, a
shovel, jumper cables, a window scraper,
gloves, ground cloth, coveralls, a blanket,
etc.
Page 232 of 338
Driving your vehicle
44 5
5. Start the vehicle, hold the brakes, shift
to neutral, release the parking brake
and slowly release the brakes until the
trailer chocks absorb the load.
6. Reapply the brakes, reapply the park-
ing brake and shift the vehicle to R
(Reverse) for manual transmission or
P (Park) automatic transmission.
7. Shut off the vehicle and release the
vehicle brakes but leave the parking
brake set.
When you are ready to leave after park-
ing on a hill
1. With the manual transmission in
Neutral or automatic transmission in P
(Park), apply your brakes and hold the
brake pedal down while you:
• Start your engine;
• Shift into gear; and
• Release the parking brake.2. Slowly remove your foot from the
brake pedal.
3. Drive slowly until the trailer is clear of
the chocks.
4. Stop and have someone pick up and
store the chocks.
E140500AUN
Maintenance when trailer towing
Your vehicle will need service more often
when you regularly pull a trailer.
Important items to pay particular atten-
tion to include engine oil, automatic
transmission fluid, axle lubricant and
cooling system fluid. Brake condition is
another important item to frequently
check. Each item is covered in this man-
ual, and the Index will help you find them
quickly. If you’re trailering, it’s a good idea
to review these sections before you start
your trip.
Don’t forget to also maintain your trailer
and hitch. Follow the maintenance
schedule that accompanied your trailer
and check it periodically. Preferably, con-
duct the check at the start of each day’s
driving. Most importantly, all hitch nuts
and bolts should be tight.
WARNING- Parking brake
It can be dangerous to get out of
your vehicle if the parking brake is
not firmly set.
If you have left the engine running,
the vehicle can move suddenly. You
or others could be seriously or
fatally injured.
CAUTION
• Due to higher load during trailer
usage, overheating might occur
in hot days or during uphill driv-
ing. If the coolant gauge indicates
over-heating, switch off the A/C
and stop the vehicle in a safe area
to cool down the engine.
• When towing check transmission
fluid more frequently.
• If your vehicle is not equipped
with the air conditioner, you
should install a condenser fan to
improve engine performance
when towing a trailer.
Page 238 of 338
63
What to do in an emergency
2. When the car is stopped, turn on your
emergency hazard flashers, set the
parking brake and put the transmission
in P (automatic transmission) or
reverse (manual transmission).
3. Have all passengers get out of the car.
Be sure they all get out on the side of
the car that is away from traffic.
4. When changing a flat tire, follow the
instruction provided later in this sec-
tion.
F020300AEN
If engine stalls while driving
1. Reduce your speed gradually, keeping
a straight line. Move cautiously off the
road to a safe place.
2. Turn on your emergency flashers.
3. Try to start the engine again. If your
vehicle will not start, contact an
authorized HYUNDAI dealer or seek
other qualified assistance.
F030100AUN
If engine doesn't turn over or
turns over slowly
1. If your car has an automatic transmis-
sion, be sure the gear selector lever is
in N (Neutral) or P (Park) and the
emergency brake is set.
2. Check the battery connections to be
sure they are clean and tight.
3. Turn on the interior light. If the light
dims or goes out when you operate the
starter, the battery is discharged.
4. Check the starter connections to be
sure they are securely tightened.
5. Do not push or pull the vehicle to start
it. See instructions for "Jump starting".
F030200AEN
If engine turns over normally but
does not start
1. Check fuel level.
2. With the ignition switch in the LOCK
position, check all connectors at the
ignition coils and spark plugs.
Reconnect any that may be discon-
nected or loose.
3. Check the fuel line in the engine com-
partment.
4. If the engine still does not start, call an
authorized HYUNDAI dealer or seek
other qualified assistance.
IF THE ENGINE WILL NOT START
WARNING
If the engine will not start, do not
push or pull the car to start it. This
could result in a collision or cause
other damage. In addition, push or
pull starting may cause the catalyt-
ic converter to be overloaded and
create a fire hazard.
Page 239 of 338
What to do in an emergency
4 6
EMERGENCY STARTING
F040000AUN
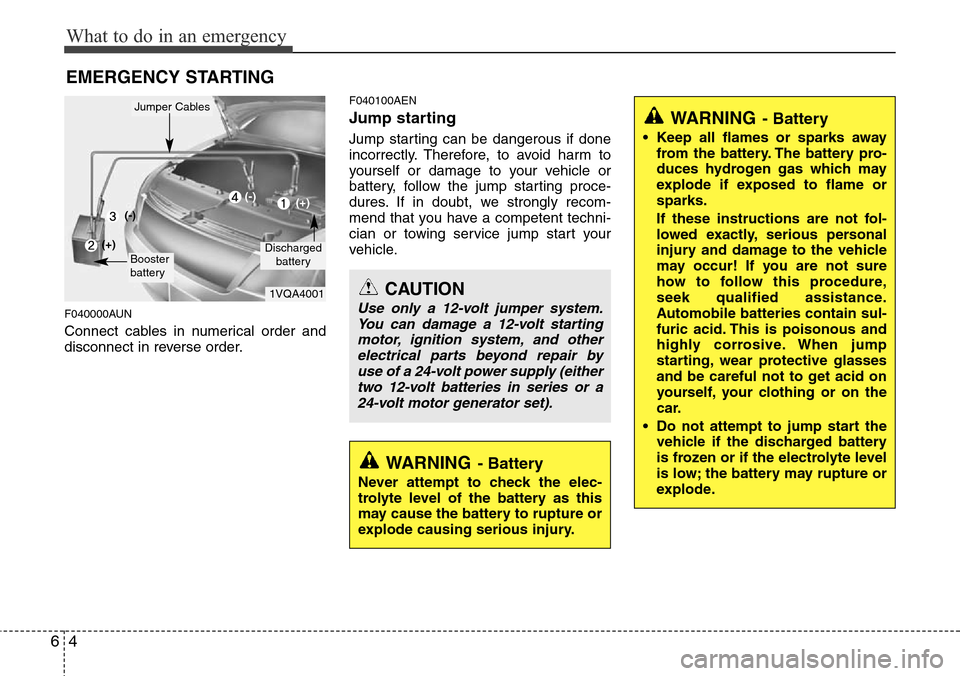
Connect cables in numerical order and
disconnect in reverse order.
F040100AEN
Jump starting
Jump starting can be dangerous if done
incorrectly. Therefore, to avoid harm to
yourself or damage to your vehicle or
battery, follow the jump starting proce-
dures. If in doubt, we strongly recom-
mend that you have a competent techni-
cian or towing service jump start your
vehicle.
CAUTION
Use only a 12-volt jumper system.
You can damage a 12-volt starting
motor, ignition system, and other
electrical parts beyond repair by
use of a 24-volt power supply (either
two 12-volt batteries in series or a
24-volt motor generator set).
WARNING- Battery
• Keep all flames or sparks away
from the battery. The battery pro-
duces hydrogen gas which may
explode if exposed to flame or
sparks.
If these instructions are not fol-
lowed exactly, serious personal
injury and damage to the vehicle
may occur! If you are not sure
how to follow this procedure,
seek qualified assistance.
Automobile batteries contain sul-
furic acid. This is poisonous and
highly corrosive. When jump
starting, wear protective glasses
and be careful not to get acid on
yourself, your clothing or on the
car.
• Do not attempt to jump start the
vehicle if the discharged battery
is frozen or if the electrolyte level
is low; the battery may rupture or
explode.
WARNING- Battery
Never attempt to check the elec-
trolyte level of the battery as this
may cause the battery to rupture or
explode causing serious injury.
1VQA4001
Discharged
battery
Jumper Cables
Booster
battery
(-)
(+)
(+)(-)
Page 244 of 338
69
What to do in an emergency
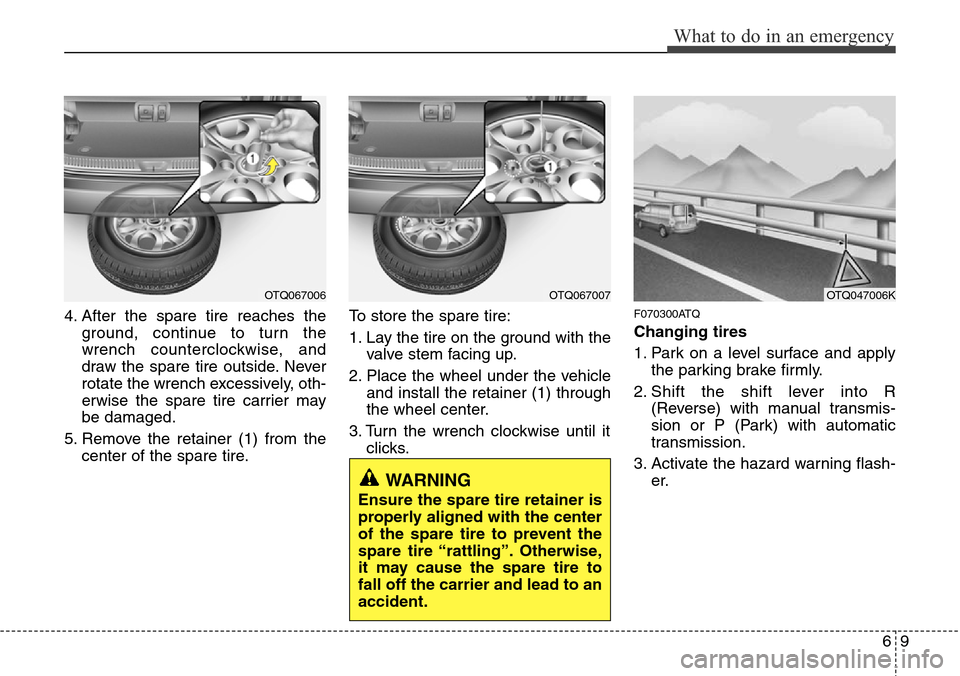
4. After the spare tire reaches the
ground, continue to turn the
wrench counterclockwise, and
draw the spare tire outside. Never
rotate the wrench excessively, oth-
erwise the spare tire carrier may
be damaged.
5. Remove the retainer (1) from the
center of the spare tire.To store the spare tire:
1. Lay the tire on the ground with the
valve stem facing up.
2. Place the wheel under the vehicle
and install the retainer (1) through
the wheel center.
3. Turn the wrench clockwise until it
clicks.F070300ATQ
Changing tires
1. Park on a level surface and apply
the parking brake firmly.
2. Shift the shift lever into R
(Reverse) with manual transmis-
sion or P (Park) with automatic
transmission.
3. Activate the hazard warning flash-
er.
OTQ067006OTQ067007
WARNING
Ensure the spare tire retainer is
properly aligned with the center
of the spare tire to prevent the
spare tire “rattling”. Otherwise,
it may cause the spare tire to
fall off the carrier and lead to an
accident.
OTQ047006K
Page 290 of 338
Maintenance
36 7
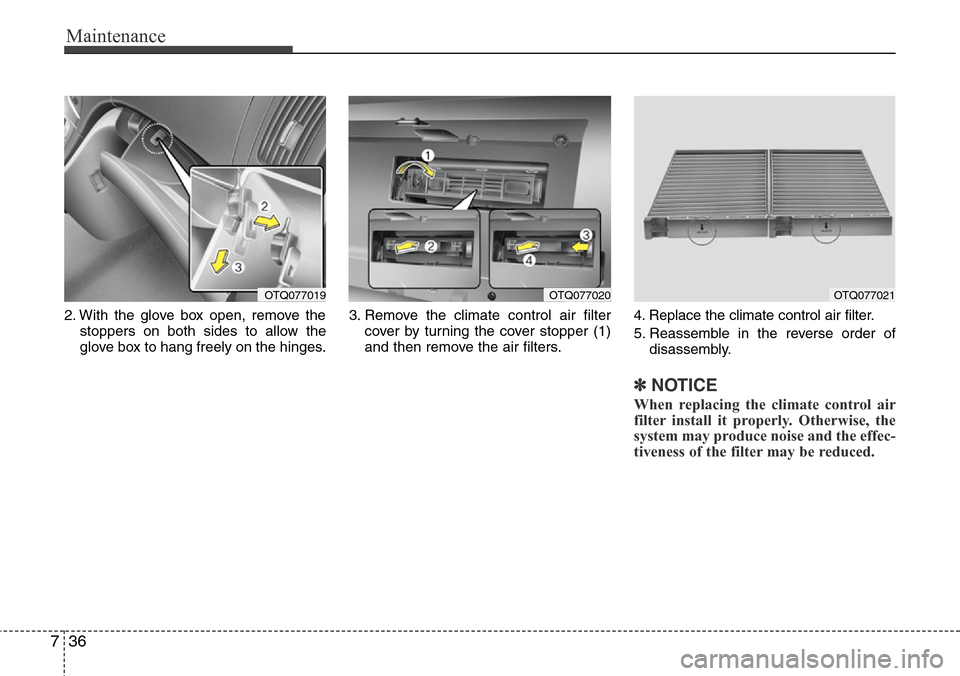
2. With the glove box open, remove the
stoppers on both sides to allow the
glove box to hang freely on the hinges.3. Remove the climate control air filter
cover by turning the cover stopper (1)
and then remove the air filters.4. Replace the climate control air filter.
5. Reassemble in the reverse order of
disassembly.
✽NOTICE
When replacing the climate control air
filter install it properly. Otherwise, the
system may produce noise and the effec-
tiveness of the filter may be reduced.
OTQ077019OTQ077020OTQ077021
Page 292 of 338
Maintenance
38 7
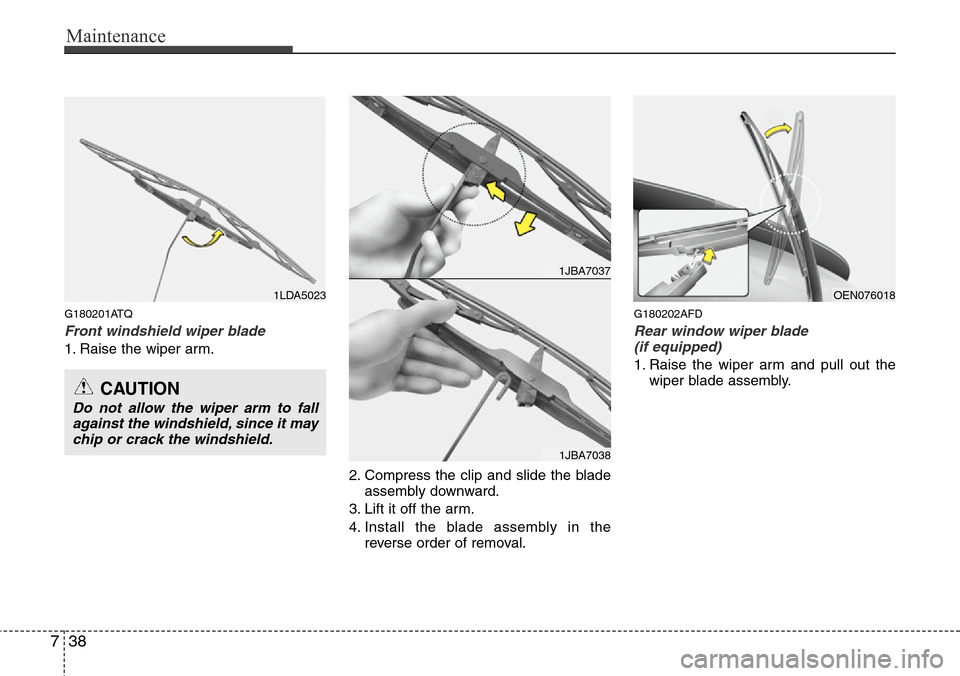
G180201ATQ
Front windshield wiper blade
1. Raise the wiper arm.
2. Compress the clip and slide the blade
assembly downward.
3. Lift it off the arm.
4. Install the blade assembly in the
reverse order of removal.
G180202AFD
Rear window wiper blade
(if equipped)
1. Raise the wiper arm and pull out the
wiper blade assembly.
1LDA5023
CAUTION
Do not allow the wiper arm to fall
against the windshield, since it may
chip or crack the windshield.
1JBA7037
1JBA7038
OEN076018