2011 Hyundai H-1 (Grand Starex) Reverse
[x] Cancel search: ReversePage 170 of 338
Features of your vehicle
100 4
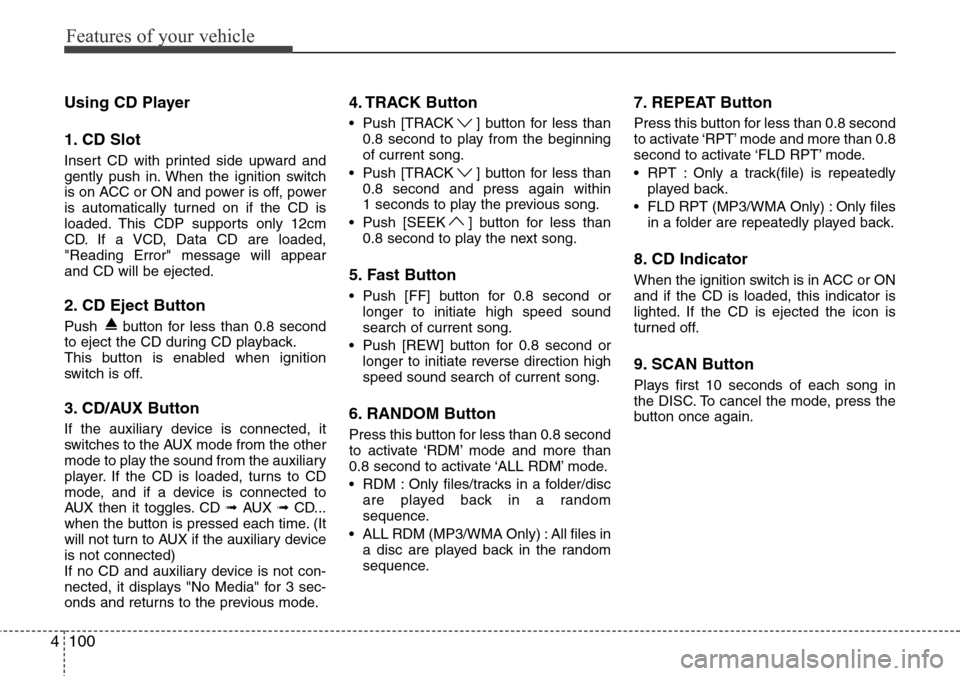
Using CD Player
1. CD Slot
Insert CD with printed side upward and
gently push in. When the ignition switch
is on ACC or ON and power is off, power
is automatically turned on if the CD is
loaded. This CDP supports only 12cm
CD. If a VCD, Data CD are loaded,
"Reading Error" message will appear
and CD will be ejected.
2. CD Eject Button
Push button for less than 0.8 second
to eject the CD during CD playback.
This button is enabled when ignition
switch is off.
3. CD/AUX Button
If the auxiliary device is connected, it
switches to the AUX mode from the other
mode to play the sound from the auxiliary
player. If the CD is loaded, turns to CD
mode, and if a device is connected to
AUX then it toggles. CD ➟AUX ➟CD...
when the button is pressed each time. (It
will not turn to AUX if the auxiliary device
is not connected)
If no CD and auxiliary device is not con-
nected, it displays "No Media" for 3 sec-
onds and returns to the previous mode.
4. TRACK Button
• Push [TRACK ] button for less than
0.8 second to play from the beginning
of current song.
• Push [TRACK ] button for less than
0.8 second and press again within
1 seconds to play the previous song.
• Push [SEEK ] button for less than
0.8 second to play the next song.
5. Fast Button
• Push [FF] button for 0.8 second or
longer to initiate high speed sound
search of current song.
• Push [REW] button for 0.8 second or
longer to initiate reverse direction high
speed sound search of current song.
6. RANDOM Button
Press this button for less than 0.8 second
to activate ‘RDM’ mode and more than
0.8 second to activate ‘ALL RDM’ mode.
• RDM : Only files/tracks in a folder/disc
are played back in a random
sequence.
• ALL RDM (MP3/WMA Only) : All files in
a disc are played back in the random
sequence.
7. REPEAT Button
Press this button for less than 0.8 second
to activate ‘RPT’ mode and more than 0.8
second to activate ‘FLD RPT’ mode.
• RPT : Only a track(file) is repeatedly
played back.
• FLD RPT (MP3/WMA Only) : Only files
in a folder are repeatedly played back.
8. CD Indicator
When the ignition switch is in ACC or ON
and if the CD is loaded, this indicator is
lighted. If the CD is ejected the icon is
turned off.
9. SCAN Button
Plays first 10 seconds of each song in
the DISC. To cancel the mode, press the
button once again.
Page 174 of 338
![Hyundai H-1 (Grand Starex) 2011 Owners Manual Features of your vehicle
104 4
9. Fast Button
• Push [FF] button for 0.8 second or
longer to initiate high speed sound
search of current song.
• Push [REW] button for 0.8 second or
longer to initi Hyundai H-1 (Grand Starex) 2011 Owners Manual Features of your vehicle
104 4
9. Fast Button
• Push [FF] button for 0.8 second or
longer to initiate high speed sound
search of current song.
• Push [REW] button for 0.8 second or
longer to initi](/manual-img/35/14839/w960_14839-173.png)
Features of your vehicle
104 4
9. Fast Button
• Push [FF] button for 0.8 second or
longer to initiate high speed sound
search of current song.
• Push [REW] button for 0.8 second or
longer to initiate reverse direction high
speed sound search of current song.
Page 178 of 338
Features of your vehicle
108 4
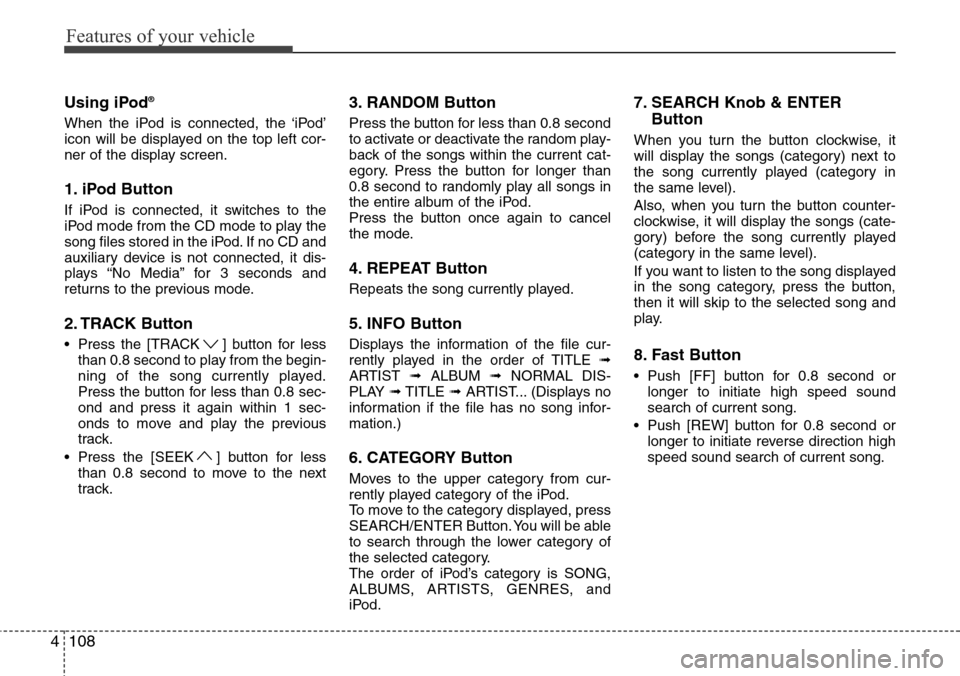
Using iPod®
When the iPod is connected, the ‘iPod’
icon will be displayed on the top left cor-
ner of the display screen.
1. iPod Button
If iPod is connected, it switches to the
iPod mode from the CD mode to play the
song files stored in the iPod. If no CD and
auxiliary device is not connected, it dis-
plays “No Media” for 3 seconds and
returns to the previous mode.
2. TRACK Button
• Press the [TRACK ] button for less
than 0.8 second to play from the begin-
ning of the song currently played.
Press the button for less than 0.8 sec-
ond and press it again within 1 sec-
onds to move and play the previous
track.
• Press the [SEEK ] button for less
than 0.8 second to move to the next
track.
3. RANDOM Button
Press the button for less than 0.8 second
to activate or deactivate the random play-
back of the songs within the current cat-
egory. Press the button for longer than
0.8 second to randomly play all songs in
the entire album of the iPod.
Press the button once again to cancel
the mode.
4. REPEAT Button
Repeats the song currently played.
5. INFO Button
Displays the information of the file cur-
rently played in the order of TITLE ➟
ARTIST ➟ALBUM ➟NORMAL DIS-
PLAY ➟TITLE ➟ARTIST... (Displays no
information if the file has no song infor-
mation.)
6. CATEGORY Button
Moves to the upper category from cur-
rently played category of the iPod.
To move to the category displayed, press
SEARCH/ENTER Button. You will be able
to search through the lower category of
the selected category.
The order of iPod’s category is SONG,
ALBUMS, ARTISTS, GENRES, and
iPod.
7. SEARCH Knob & ENTER
Button
When you turn the button clockwise, it
will display the songs (category) next to
the song currently played (category in
the same level).
Also, when you turn the button counter-
clockwise, it will display the songs (cate-
gory) before the song currently played
(category in the same level).
If you want to listen to the song displayed
in the song category, press the button,
then it will skip to the selected song and
play.
8. Fast Button
• Push [FF] button for 0.8 second or
longer to initiate high speed sound
search of current song.
• Push [REW] button for 0.8 second or
longer to initiate reverse direction high
speed sound search of current song.
Page 183 of 338
4113
Features of your vehicle
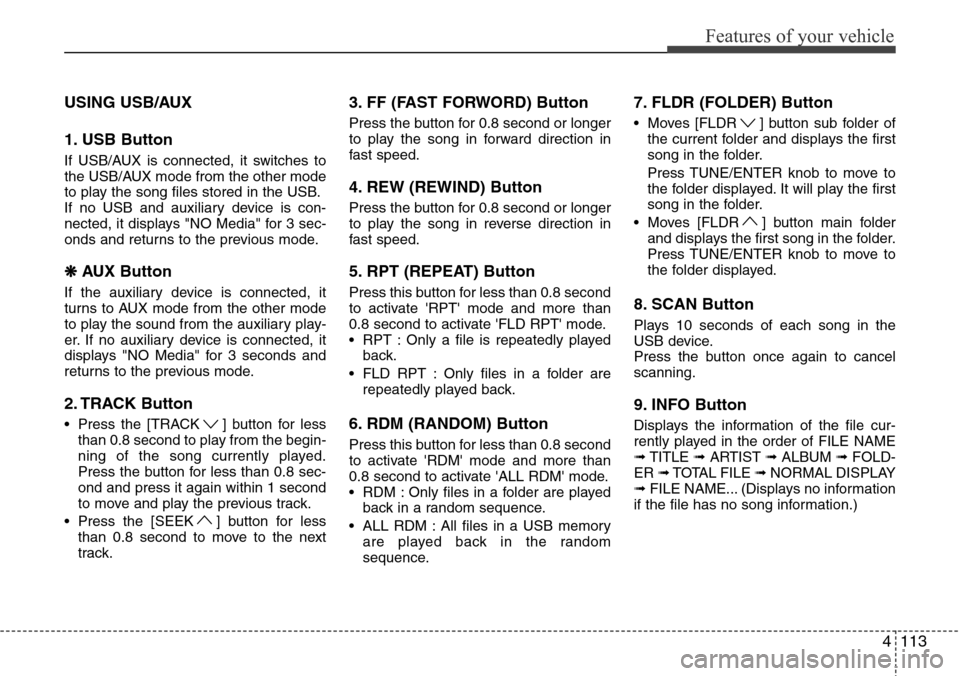
USING USB/AUX
1. USB Button
If USB/AUX is connected, it switches to
the USB/AUX mode from the other mode
to play the song files stored in the USB.
If no USB and auxiliary device is con-
nected, it displays "NO Media" for 3 sec-
onds and returns to the previous mode.
❋ AUX Button
If the auxiliary device is connected, it
turns to AUX mode from the other mode
to play the sound from the auxiliary play-
er. If no auxiliary device is connected, it
displays "NO Media" for 3 seconds and
returns to the previous mode.
2. TRACK Button
• Press the [TRACK ] button for less
than 0.8 second to play from the begin-
ning of the song currently played.
Press the button for less than 0.8 sec-
ond and press it again within 1 second
to move and play the previous track.
• Press the [SEEK ] button for less
than 0.8 second to move to the next
track.
3. FF (FAST FORWORD) Button
Press the button for 0.8 second or longer
to play the song in forward direction in
fast speed.
4. REW (REWIND) Button
Press the button for 0.8 second or longer
to play the song in reverse direction in
fast speed.
5. RPT (REPEAT) Button
Press this button for less than 0.8 second
to activate 'RPT' mode and more than
0.8 second to activate 'FLD RPT' mode.
• RPT : Only a file is repeatedly played
back.
• FLD RPT : Only files in a folder are
repeatedly played back.
6. RDM (RANDOM) Button
Press this button for less than 0.8 second
to activate 'RDM' mode and more than
0.8 second to activate 'ALL RDM' mode.
• RDM : Only files in a folder are played
back in a random sequence.
• ALL RDM : All files in a USB memory
are played back in the random
sequence.
7. FLDR (FOLDER) Button
• Moves [FLDR ] button sub folder of
the current folder and displays the first
song in the folder.
Press TUNE/ENTER knob to move to
the folder displayed. It will play the first
song in the folder.
• Moves [FLDR ] button main folder
and displays the first song in the folder.
Press TUNE/ENTER knob to move to
the folder displayed.
8. SCAN Button
Plays 10 seconds of each song in the
USB device.
Press the button once again to cancel
scanning.
9. INFO Button
Displays the information of the file cur-
rently played in the order of FILE NAME
➟TITLE ➟ARTIST ➟ALBUM ➟FOLD-
ER ➟TOTAL FILE ➟NORMAL DISPLAY
➟FILE NAME... (Displays no information
if the file has no song information.)
Page 187 of 338

4117
Features of your vehicle
USING iPod®
When the iPod is connected, the 'iPod'
icon will be displayed on the top left cor-
ner of the display screen.
1. iPod Button
If iPod is connected, it switches to the
iPod mode from the Radio mode to play
the song files stored in the iPod. If iPod is
not connected, it displays "NO Media" for
3 seconds and returns to the previous
mode.
2. TRACK Button
• Press the [TRACK ] button for less
than 0.8 second to play from the begin-
ning of the song currently played.
Press the button for less than 0.8 sec-
ond and press it again within 1 second
to move and play the previous track.
Press the button for 0.8 second or
longer to play the song in reverse
direction in fast speed.
• Press the [SEEK ] button for less
than 0.8 second to move to the next
track. Press the button for 0.8 second
or longer to play the song in forward
direction in fast speed.
3. RDM (RANDOM) Button
Press the button for less than 0.8 second
to activate or deactivate the random play-
back of the songs within the current cat-
egory. Press the button for longer than
0.8 second to randomly play all songs in
the entire album of the iPod.
Press the button once again to cancel
the mode.
4. RPT (REPEAT) Button
Repeats the song currently played.
5. MENU Button
Moves to the upper category from cur-
rently played category of the iPod.
To move to (play) the category (song)
displayed, MENU (preset6) You will be
able to search through the lower catego-
ry of the selected category.
The order of iPod's category is SONG,
ALBUMS, ARTISTS, GENRES, and
iPod.
6. INFO Button
Displays the information of the file cur-
rently played in the order of TITLE ➟
ARTIST ➟ALBUM ➟NORMAL DIS-
PLAY ➟TITLE ➟... (Displays no informa-
tion if the file has no song information.)
7. TUNE Knob & ENTER Button
When you turn the button clockwise, it
will display the songs (category) next to
the song currently played (category in
the same level).
Also, when you turn the button counter-
clockwise, it will display the songs (cate-
gory) before the song currently played
(category in the same level).
If you want to listen to the song displayed
in the song category, press the button,
then it will skip to the selected song and
play.
Page 191 of 338
53
Driving your vehicle
E020100AUN
Before entering vehicle
• Be sure that all windows, outside mir-
ror(s), and outside lights are clean.
• Check the condition of the tires.
• Check under the vehicle for any sign of
leaks.
• Be sure there are no obstacles behind
you if you intend to back up.
E020200BUN
Necessary inspections
Fluid levels, such as engine oil, engine
coolant, brake fluid, and washer fluid
should be checked on a regular basis,
with the exact interval depending on the
fluid. Further details are provided in sec-
tion 7, “Maintenance”.
E020300AUN
Before starting
• Close and lock all doors.
• Position the seat so that all controls are
easily reached.
• Adjust the inside and outside rearview
mirrors.
• Be sure that all lights work.
• Check all gauges.
• Check the operation of warning lights
when the ignition switch is turned to
the ON position.
• Release the parking brake and make
sure the brake warning light goes out.
For safe operation, be sure you are famil-
iar with your vehicle and its equipment.
BEFORE DRIVING
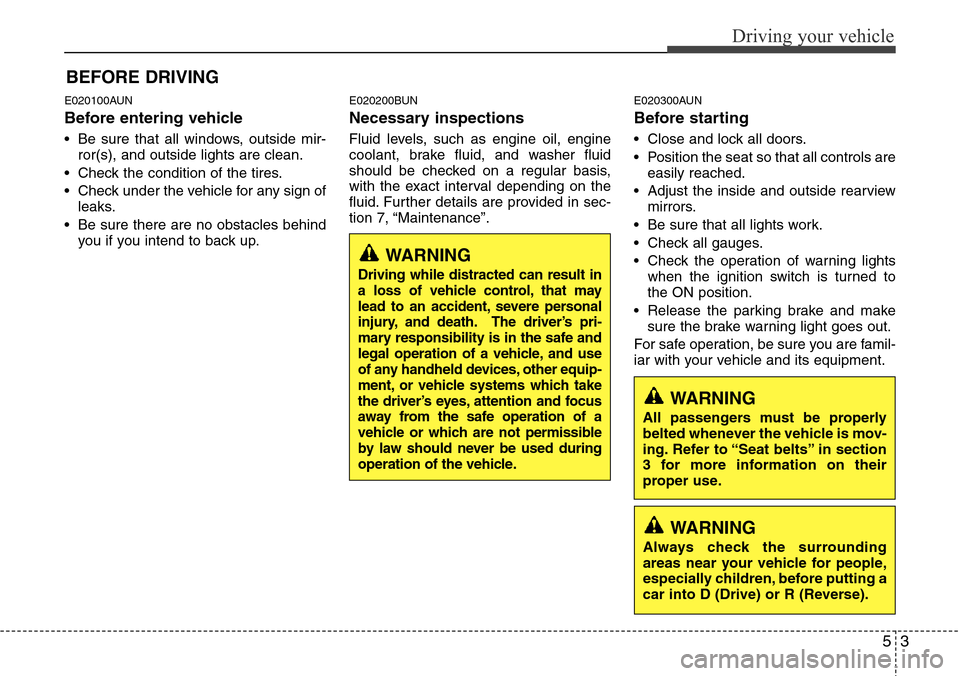
WARNING
All passengers must be properly
belted whenever the vehicle is mov-
ing. Refer to “Seat belts” in section
3 for more information on their
proper use.
WARNING
Always check the surrounding
areas near your vehicle for people,
especially children, before putting a
car into D (Drive) or R (Reverse).
WARNING
Driving while distracted can result in
a loss of vehicle control, that may
lead to an accident, severe personal
injury, and death. The driver’s pri-
mary responsibility is in the safe and
legal operation of a vehicle, and use
of any handheld devices, other equip-
ment, or vehicle systems which take
the driver’s eyes, attention and focus
away from the safe operation of a
vehicle or which are not permissible
by law should never be used during
operation of the vehicle.
Page 196 of 338
Driving your vehicle
8 5
MANUAL TRANSMISSION (IF EQUIPPED)
E050100CTQ
Manual transmission operation
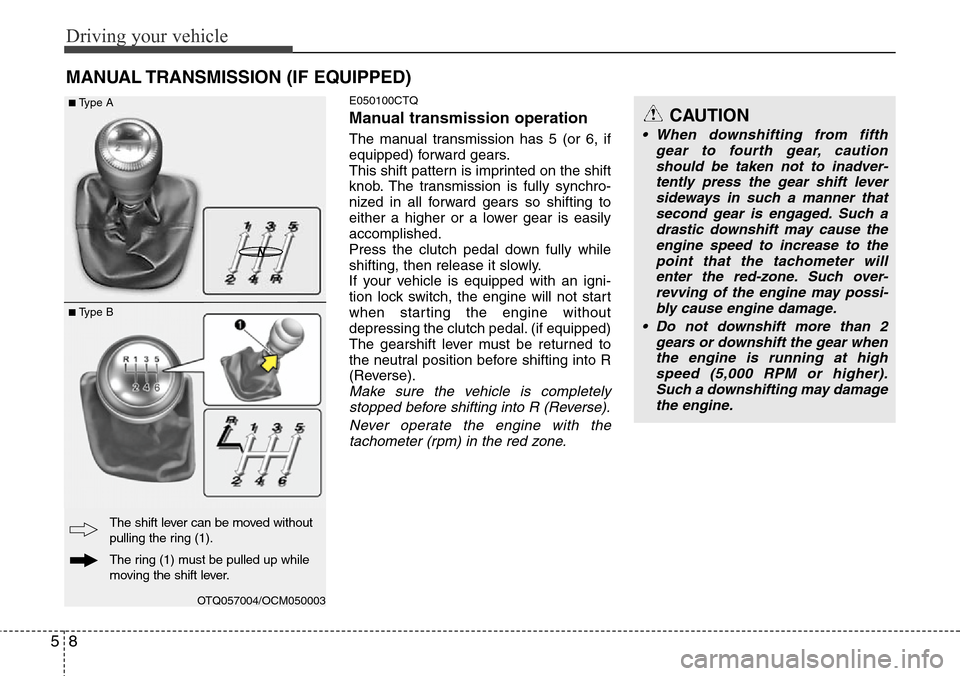
The manual transmission has 5 (or 6, if
equipped) forward gears.
This shift pattern is imprinted on the shift
knob. The transmission is fully synchro-
nized in all forward gears so shifting to
either a higher or a lower gear is easily
accomplished.
Press the clutch pedal down fully while
shifting, then release it slowly.
If your vehicle is equipped with an igni-
tion lock switch, the engine will not start
when starting the engine without
depressing the clutch pedal. (if equipped)
The gearshift lever must be returned to
the neutral position before shifting into R
(Reverse).
Make sure the vehicle is completely
stopped before shifting into R (Reverse).
Never operate the engine with the
tachometer (rpm) in the red zone.
CAUTION
• When downshifting from fifth
gear to fourth gear, caution
should be taken not to inadver-
tently press the gear shift lever
sideways in such a manner that
second gear is engaged. Such a
drastic downshift may cause the
engine speed to increase to the
point that the tachometer will
enter the red-zone. Such over-
revving of the engine may possi-
bly cause engine damage.
• Do not downshift more than 2
gears or downshift the gear when
the engine is running at high
speed (5,000 RPM or higher).
Such a downshifting may damage
the engine.
OTQ057004/OCM050003
The ring (1) must be pulled up while
moving the shift lever. The shift lever can be moved without
pulling the ring (1).
■Type A
■Type B
N
Page 197 of 338
59
Driving your vehicle
• During cold weather, shifting may be
difficult until the transmission lubricant
is warmed up. This is normal and not
harmful to the transmission.
• If you've come to a complete stop and
it's hard to shift into 1st or R(Reverse),
leave the shift lever at N(Neutral) posi-
tion and release the clutch. Press the
clutch pedal back down, and then shift
into 1st or R(Reverse) gear position.E050101AUN
Using the clutch
The clutch should be pressed all the way
to the floor before shifting, then released
slowly. The clutch pedal should always be
fully released while driving. Do not rest
your foot on the clutch pedal while driv-
ing. This can cause unnecessary wear.
Do not partially engage the clutch to hold
the car on an incline. This causes unnec-
essary wear. Use the foot brake or park-
ing brake to hold the car on an incline. Do
not operate the clutch pedal rapidly and
repeatedly.
E050102AUN
Downshifting
When you must slow down in heavy traf-
fic or while driving up steep hills, down-
shift before the engine starts to labor.
Downshifting reduces the chance of
stalling and gives better acceleration
when you again need to increase your
speed. When the vehicle is traveling
down steep hills, downshifting helps
maintain safe speed and prolongs brake
life.
CAUTION
• To avoid premature clutch wear
and damage, do not drive with
your foot resting on the clutch
pedal. Also, don’t use the clutch
to hold the vehicle stopped on an
uphill grade, while waiting for a
traffic light, etc.
• Do not use the shift lever as a
handrest during driving, as this
can result in premature wear of
the transmission shift forks.
WARNING
• Before leaving the driver’s seat,
always set the parking brake fully
and shut the engine off. Then
make sure the transmission is
shifted into 1st gear when the
vehicle is parked on a level or
uphill grade, and shifted into R
(Reverse) on a downhill grade.
Unexpected and sudden vehicle
movement can occur if these pre-
cautions are not followed in the
order identified.
• If your vehicle has a manual
transmission not equipped with a
ignition lock switch, it may move
and cause a serious accident
when starting the engine without
depressing the clutch pedal while
the parking brake is released and
the shift lever not in the
N(Neutral) position.