2011 Hyundai H-1 (Grand Starex) engine
[x] Cancel search: enginePage 118 of 346
Features of your vehicle
48
4
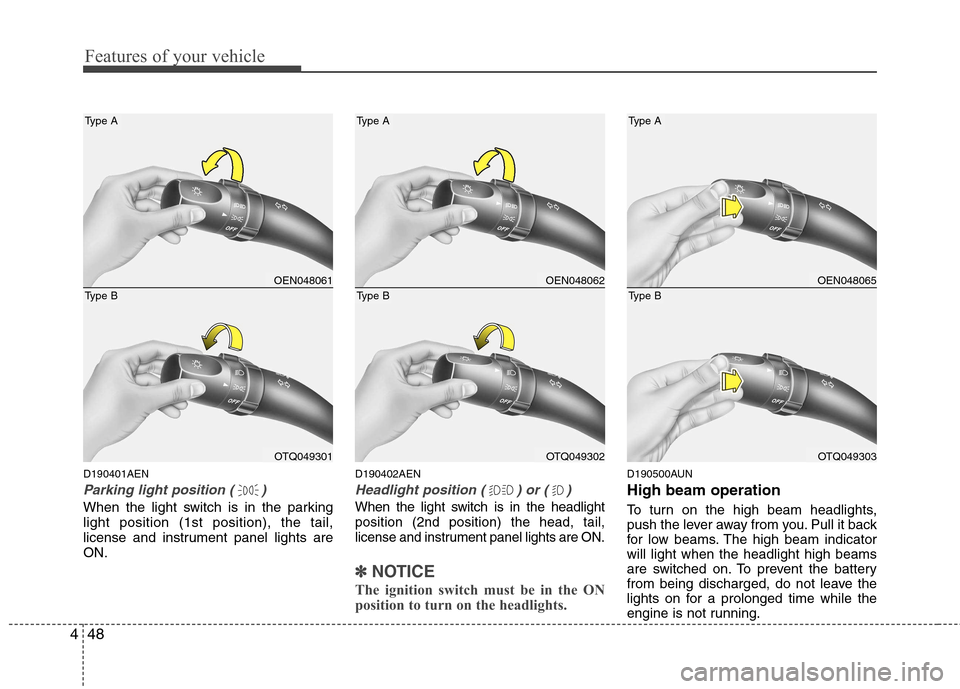
D190401AEN
Parking light position ( )
When the light switch is in the parking light position (1st position), the tail,
license and instrument panel lights areON. D190402AEN
Headlight position ( ) or ( )
When the light switch is in the headlight position (2nd position) the head, tail,
license and instrument panel lights are ON.
✽✽
NOTICE
The ignition switch must be in the ON
position to turn on the headlights.
D190500AUN High beam operation
To turn on the high beam headlights,
push the lever away from you. Pull it back
for low beams. The high beam indicatorwill light when the headlight high beams
are switched on. To prevent the battery
from being discharged, do not leave the
lights on for a prolonged time while the
engine is not running.
OEN048061
OTQ049301
Type B
Type A
OEN048062
OTQ049302
Type B
Type A
OEN048065
OTQ049303
Type B
Type A
Page 121 of 346

451
Features of your vehicle
The rear fog lights turn on when the rear
fog switch is pressed after the front fog
switch is turned to ON and the headlight
switch to the parklight position. (ifequipped)
To turn the rear fog lights off, press the
rear fog light switch again or turn the
headlight switch to the OFF position.
D190900AUN
Daytime running light (if equipped)
Daytime Running Lights (DRL) can make
it easier for others to see the front of your
vehicle during the day. DRL can be help-
ful in many different driving conditions,
and it is especially helpful after dawn and
before sunset.
The DRL system will make the head-
lights turn OFF when:
1. The parklight switch is ON.
2. Engine stops.Headlight leveling device (if equipped)
D191001ATQ
Manual type
To adjust the headlight beam level
according to the number of the passen-
gers and the loading weight in the lug-
gage area, turn the beam leveling switch.The higher the number of the switch
position, the lower the headlight beam
level. Always keep the headlight beam at
the proper leveling position, or headlights
may dazzle other road users.
Listed below are the examples of proper
switch settings. For loading conditions
other than those listed below, adjust the
switch position so that the beam level
may be the nearest as the conditionobtained according to the list.
OTQ047133
OTQ047133R
Right-Hand drive type
Left-Hand drive type
Loading condition
Driver only
Driver + Front passenger
Driver + Front passenger
+ 4th row passengerFull passengers
(including driver)Full passengers (including
driver) + Maximum per-
missible loading
Driver + Maximum per-
missible loading
Switch position
Wagon Van 0000 1- 1- 21 31
Page 123 of 346
453
Features of your vehicle
D200100BTQ
Windshield wipers
Operates as follows when the ignition
switch is turned ON./ MIST: For a single wiping cycle,
push the lever upward and
release it with the lever in the
OFF (0) position. The wipers
will operate continuously if
the lever is pushed upwardand held.
OFF (0) : Wiper is not in operation
INT (---) : Wiper operates intermittently at the same wiping intervals.
Use this mode in a light rain or
mist. To vary the speed setting,
turn the speed control knob.
LO (1) : Normal wiper speed
HI (2) : Fast wiper speed✽✽ NOTICE
If there is heavy accumulation of snow
or ice on the windshield, defrost the
windshield for about 10 minutes, or
until the snow and/or ice is removed
before using the windshield wipers to
ensure proper operation.
✽
✽ NOTICE
When you operate the wipers, if your vehicle has a problem in any part of
the wiper operation system, the wiper
may operate in the LO mode regard-
less of the wiper switch position. In
this case, have your vehicle checked
by an authorized HYUNDAI dealer as
soon as possible.
When the ignition key is removed, the
wiper blade sometimes may move to
properly position slightly for reducing
the deterioration of the windshield
wipers.
D200200AUN
Windshield washers
In the OFF (0) position, pull the lever
gently toward you to spray washer fluid
on the windshield and to run the wipers
1-3 cycles. Use this function when the windshield is
dirty.
The spray and wiper operation will con-
tinue until you release the lever.
If the washer does not work, check the
washer fluid level. If the fluid level is not
sufficient, you will need to add appropri-
ate non-abrasive windshield washer fluid
to the washer reservoir.
The reservoir filler neck is located in the
front of the engine compartment on the
passenger side.
CAUTION
To prevent possible damage to the
washer pump, do not operate the washer when the fluid reservoir isempty.
Page 126 of 346
Features of your vehicle
56
4
D210000AEN
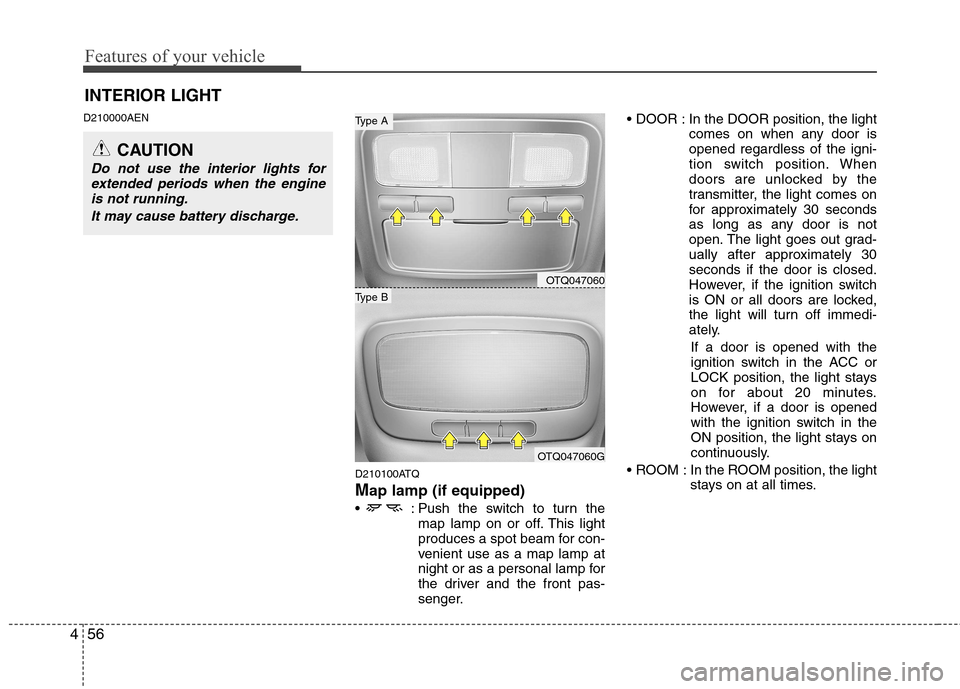
D210100ATQ Map lamp (if equipped)
: Push the switch to turn the map lamp on or off. This light
produces a spot beam for con-
venient use as a map lamp at
night or as a personal lamp for
the driver and the front pas-
senger. In the DOOR position, the light
comes on when any door isopened regardless of the igni-
tion switch position. When
doors are unlocked by the
transmitter, the light comes on
for approximately 30 seconds
as long as any door is not
open. The light goes out grad-
ually after approximately 30seconds if the door is closed.
However, if the ignition switch
is ON or all doors are locked,
the light will turn off immedi-
ately.
If a door is opened with the
ignition switch in the ACC or
LOCK position, the light stays
on for about 20 minutes.
However, if a door is opened
with the ignition switch in the
ON position, the light stays on
continuously.
ROOM : In the ROOM position, the light stays on at all times.
INTERIOR LIGHT
CAUTION
Do not use the interior lights for
extended periods when the engineis not running.
It may cause battery discharge.
OTQ047060
OTQ047060G
Type B
Type A
Page 128 of 346
Features of your vehicle
58
4
DEFROSTER (IF EQUIPPED)
➃ MOOD : Push the switch to turn the
mood lamp on when the
room lamp is off. Once themood lamp is on, each time
you press the button the color
of the light will change. The
mood lamp will turn off when
the button is pressed againafter the last color or when
the mood lamp button is
pressed for approximately 4
seconds or when the ROOM,
DOOR or DIMMER button ispressed.
➄ DIMMER : Whenever you push this
button when the room lamp
is turned on, the brightnessof the room lamp will
change within 3 level. D220000AUN
✽✽
NOTICE
If you want to defrost and defog the
front windshield, refer to “Windshield
defrosting and defogging” in this sec-
tion.
D220100AUN
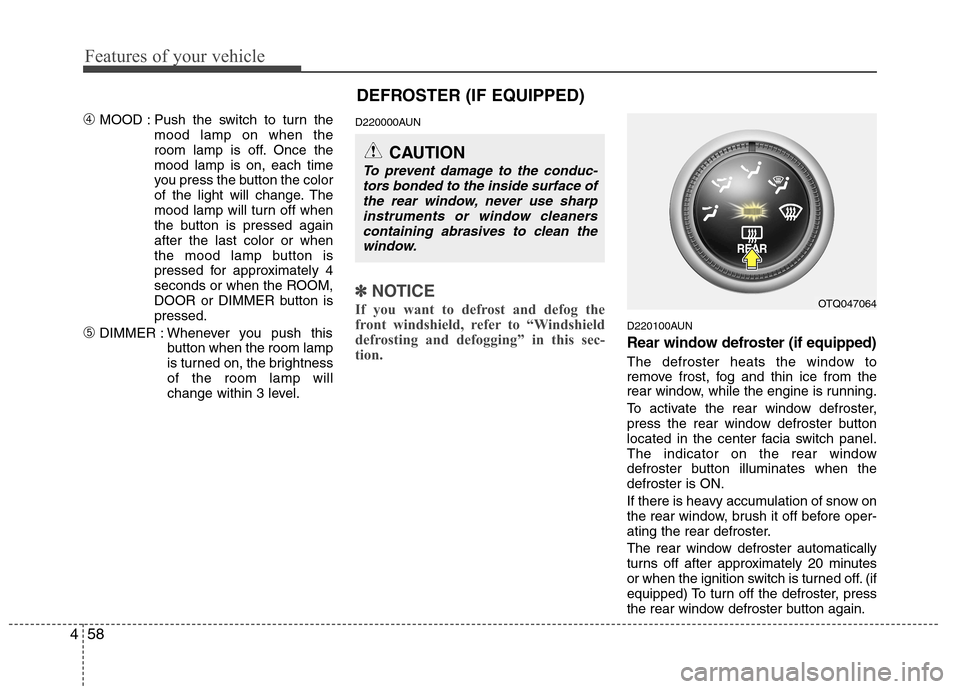
Rear window defroster (if equipped)
The defroster heats the window to
remove frost, fog and thin ice from the
rear window, while the engine is running.
To activate the rear window defroster,
press the rear window defroster button
located in the center facia switch panel.
The indicator on the rear window
defroster button illuminates when thedefroster is ON.
If there is heavy accumulation of snow on
the rear window, brush it off before oper-
ating the rear defroster.
The rear window defroster automatically
turns off after approximately 20 minutes
or when the ignition switch is turned off. (if
equipped) To turn off the defroster, press
the rear window defroster button again.
OTQ047064
CAUTION
To prevent damage to the conduc- tors bonded to the inside surface of the rear window, never use sharp
instruments or window cleanerscontaining abrasives to clean thewindow.
Page 130 of 346
Features of your vehicle
60
4
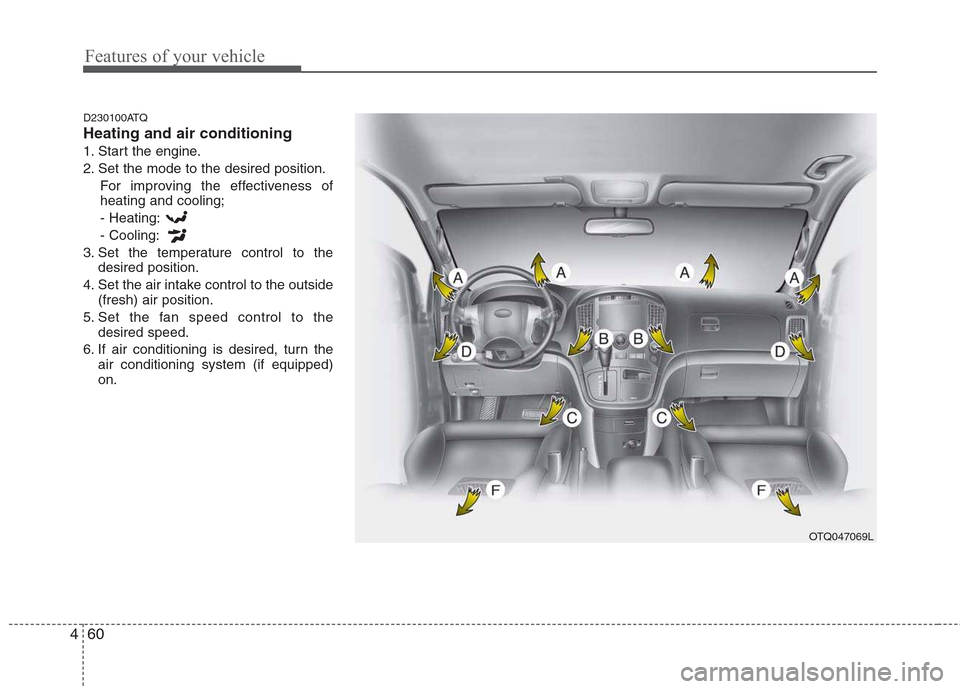
D230100ATQ Heating and air conditioning
1. Start the engine.
2. Set the mode to the desired position.
For improving the effectiveness of heating and cooling;- Heating: - Cooling:
3. Set the temperature control to the desired position.
4. Set the air intake control to the outside (fresh) air position.
5. Set the fan speed control to the desired speed.
6. If air conditioning is desired, turn the air conditioning system (if equipped) on.
OTQ047069L
Page 137 of 346
467
Features of your vehicle
D230503AFD
Air conditioning (if equipped)
All HYUNDAI Air Conditioning Systems
are filled with environmentally friendly
R-134a refrigerant which does not dam-
age the ozone layer.
1. Start the engine. Push the air condi-tioning button.
2. Set the mode to the position.
3. Set the air intake control to the outside air or recirculated air position.
4. Adjust the fan speed control and tem- perature control to maintain maximum
comfort.
When maximum cooling is desired, set the temperature control to the extreme
left position, then set the fan speedcontrol to the highest speed.
✽✽ NOTICE
When using the air conditioning sys- tem, monitor the temperature gauge
closely while driving up hills or in
heavy traffic when outside tempera-
tures are high. Air conditioning sys-
tem operation may cause engine over-
heating. Continue to use the blower
fan but turn the air conditioning sys-
tem off if the temperature gauge indi-
cates engine overheating.
When opening the windows in humid weather air conditioning may create
water droplets inside the vehicle.
Since excessive water droplets may
cause damage to electrical equipment,
air conditioning should only be run
with the windows closed.Air conditioning system operation tips
If the vehicle has been parked in direct
sunlight during hot weather, open the
windows for a short time to let the hot
air inside the vehicle escape.
To help reduce moisture inside of the windows on rainy or humid days,
decrease the humidity inside the vehi-
cle by operating the air conditioningsystem.
During air conditioning system opera- tion, you may occasionally notice aslight change in engine speed as the
air conditioning compressor cycles.
This is a normal system operation
characteristic.
Use the air conditioning system every month only for a few minutes to ensure
maximum system performance.
Page 138 of 346
Features of your vehicle
68
4
When using the air conditioning sys-
tem, you may notice clear water drip-
ping (or even puddling) on the ground
under the passenger side of the vehi-
cle. This is a normal system operation
characteristic.
Operating the air conditioning system in the recirculated air position provides
maximum cooling, however, continual
operation in this mode may cause the
air inside the vehicle to become stale.
During cooling operation, you may occasionally notice a misty air flow
because of rapid cooling and humid air
intake. This is a normal system opera-
tion characteristics. D230504ATQ Fuel-fired Heater (If Equipped) This fuel-fired heater supplies additional
heat to the interior compartment with a
low fuel consumption to compensate the
heat provided by engine alone.
The following 3 conditions should be
meet at the same time for automatic
operation of the fuel-fired heater.
68°C.
A cleaning process of the fuel-fired
heater will be performed automatically
when the heater is not operated due to
increase of coolant temperature and igni-
tion off.
During cleaning process, supplied fuel in
the heater will be burnt completely and
any smoke will be expelled. It is a neces-
sary process for next operation and dura-
bility of the heater and takes about 1~3
minutes.✽✽ NOTICE
The following symptoms will occur and it is normal.
- A white smoke may come out fromthe fuel-fired heater exhaust pipe
during operation of the heater.
However, when an excessive black
smoke is discharged, the fuel-fired
heater should be inspected.
- A “buk-buk” noise from the heater is a noise to form flame for combus-
tion.
- When the heater is operated at full
load, a “Wooing” noise occurs.
- When shutting off the engine during
heater operation, a “Wing” noise
occurs to perform the cleaning
process.
When refueling, stop operation of the
fuel-fired heater by shutting off the
engine.