2011 Hyundai H-1 (Grand Starex) buttons
[x] Cancel search: buttonsPage 147 of 346
477
Features of your vehicle
D280600AEN
Digital clock (if equipped)
Whenever the battery terminals or relat-
ed fuses are disconnected, you must
reset the time.
When the ignition switch is in the ACC or
ON position, the clock buttons operate as
follows:D280601AUN
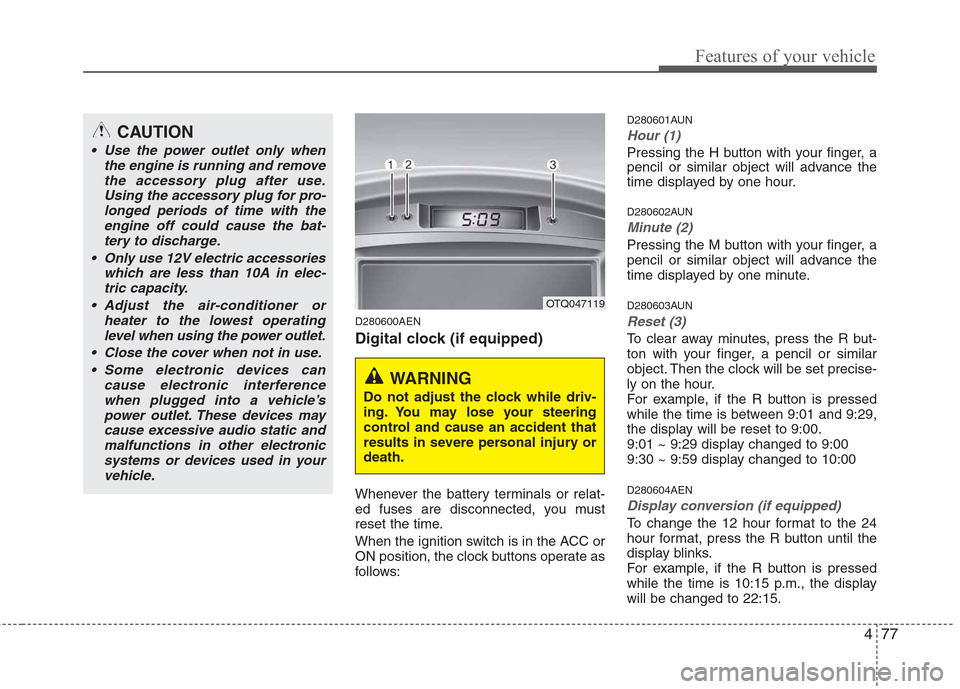
Hour (1)
Pressing the H button with your finger, a
pencil or similar object will advance the
time displayed by one hour.
D280602AUN
Minute (2)
Pressing the M button with your finger, a
pencil or similar object will advance the
time displayed by one minute.
D280603AUN
Reset (3)
To clear away minutes, press the R but-
ton with your finger, a pencil or similar
object. Then the clock will be set precise-
ly on the hour.
For example, if the R button is pressed
while the time is between 9:01 and 9:29,
the display will be reset to 9:00.
9:01 ~ 9:29 display changed to 9:00
9:30 ~ 9:59 display changed to 10:00 D280604AEN
Display conversion (if equipped)
To change the 12 hour format to the 24
hour format, press the R button until the
display blinks.
For example, if the R button is pressed
while the time is 10:15 p.m., the displaywill be changed to 22:15.
OTQ047119
WARNING
Do not adjust the clock while driv-
ing. You may lose your steering
control and cause an accident that
results in severe personal injury ordeath.
CAUTION
Use the power outlet only when the engine is running and remove
the accessory plug after use.Using the accessory plug for pro-longed periods of time with the engine off could cause the bat-
tery to discharge.
Only use 12V electric accessories which are less than 10A in elec-tric capacity.
Adjust the air-conditioner or heater to the lowest operatinglevel when using the power outlet.
Close the cover when not in use. Some electronic devices can cause electronic interference
when plugged into a vehicle’spower outlet. These devices may cause excessive audio static andmalfunctions in other electronic
systems or devices used in yourvehicle.
Page 150 of 346
Features of your vehicle
80
4
D300200ATQ
Steering wheel audio control (if equipped)
The steering wheel audio remote control
button is installed to promote safe driv-ing. D300204AHM
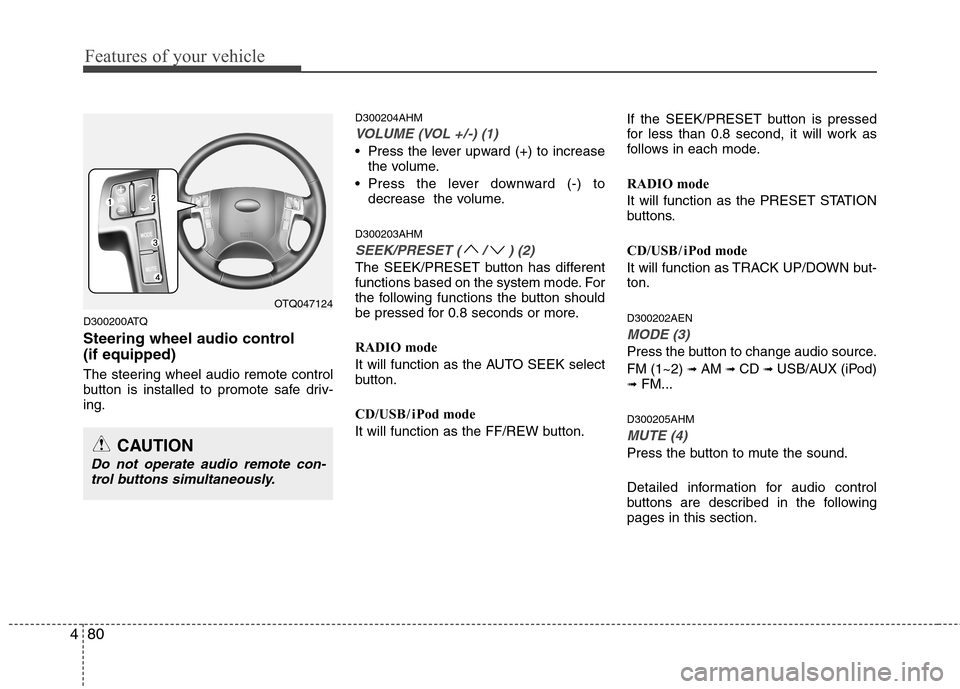
VOLUME (VOL +/-) (1)
• Press the lever upward (+) to increase
the volume.
Press the lever downward (-) to decrease the volume.
D300203AHM
SEEK/PRESET ( / ) (2)
The SEEK/PRESET button has different
functions based on the system mode. For
the following functions the button should
be pressed for 0.8 seconds or more.
RADIO mode
It will function as the AUTO SEEK select
button.
CD/USB / i Pod mode
It will function as the FF/REW button. If the SEEK/PRESET button is pressed
for less than 0.8 second, it will work as
follows in each mode.
RADIO mode
It will function as the PRESET STATION
buttons.
CD/USB / i Pod mode
It will function as TRACK UP/DOWN but- ton. D300202AEN
MODE (3)
Press the button to change audio source. FM (1~2)
➟ AM ➟ CD ➟ USB/AUX (iPod)
➟ FM...
D300205AHM
MUTE (4)
Press the button to mute the sound.
Detailed information for audio control
buttons are described in the followingpages in this section.
OTQ047124
CAUTION
Do not operate audio remote con- trol buttons simultaneously.
Page 154 of 346
Features of your vehicle
84
4
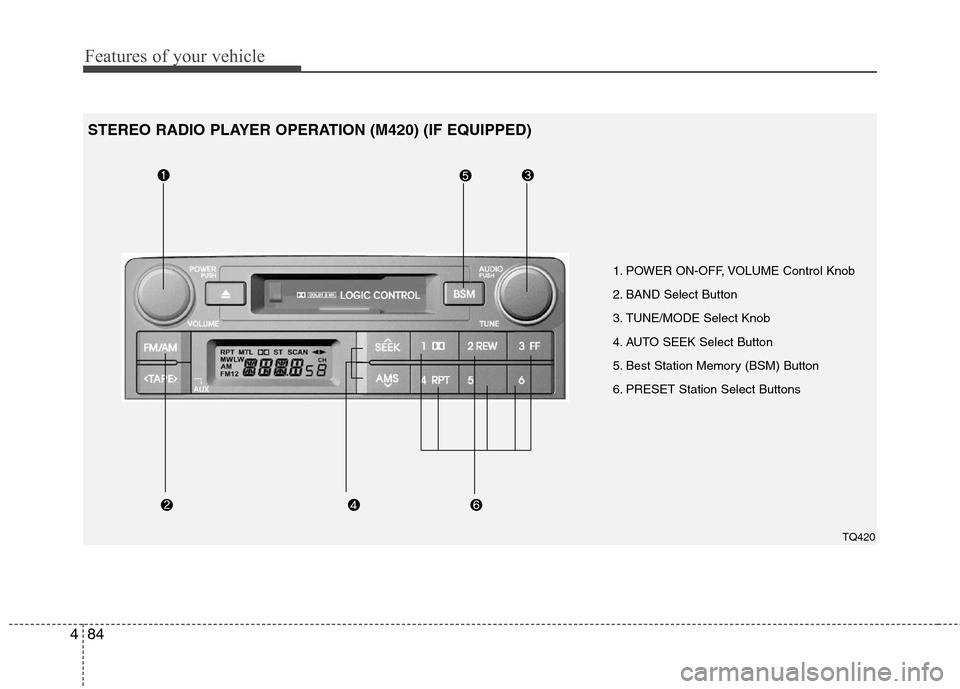
1. POWER ON-OFF, VOLUME Control Knob
2. BAND Select Button
3. TUNE/MODE Select Knob
4. AUTO SEEK Select Button
5. Best Station Memory (BSM) Button
6. PRESET Station Select Buttons
TQ420
STEREO RADIO PLAYER OPERATION (M420) (IF EQUIPPED)
Page 156 of 346
Features of your vehicle
86
4
4. AUTO SEEK Select Button
(Automatic Channel Selection)
Press the AUTO SEEK select button.
When the side is pressed, the unit
will automatically tune to the next higher
frequency and when the side ispressed, it will automatically tune to the
next lower frequency.
5. Best Station Memory (BSM) Button
When the BSM button is pressed, the six channels from the highest field intensity
are selected next and stored in memory.The stations selected are stored in thesequence of frequency from the first pre-
set key.
6. PRESET STATION Select Buttons
Six stations for AM(MW, LW), FM1 and
FM2 respectively can be preset in the
electronic memory circuit. HOW TO PRESET STATIONS
Six AM(MW, LW) and twelve FM stations
may be programmed into the memory of
the radio. Then, by simply pressing the
AM(MW, LW) / FM select button and/or
one of the six station select buttons, you
may recall any of these stations instantly.
To program the stations, follow thesesteps:
Press AM(MW, LW)/FM selector to set
the band for AM(MW, LW), FM1 and FM2.
Select the desired station to be stored by seek or manual tuning.
Determine the preset station select button you wish to use to access thatstation.
Press the station select button for more than two seconds. A select button indi-
cator will show in the display indicating
which select button you have
depressed. The frequency display willflash after it has been stored into the
memory. You should then release the
button, and proceed to program the
next desired station. A total of 24 sta-
tions can be programmed by selecting
one AM(MW, LW) and two FM station
per button. When completed, any preset station
may be recalled by selecting AM(MW,
LW), FM1 or FM2 band and the appro-
priate station button.
CAUTION
Do not place beverages close to
the audio system. The audio sys-
tem mechanism may be damagedif you spill them.
Do not strike or allow anything to impact the audio system, damageto the system mechanisms could
occur.
Page 159 of 346
489
Features of your vehicle
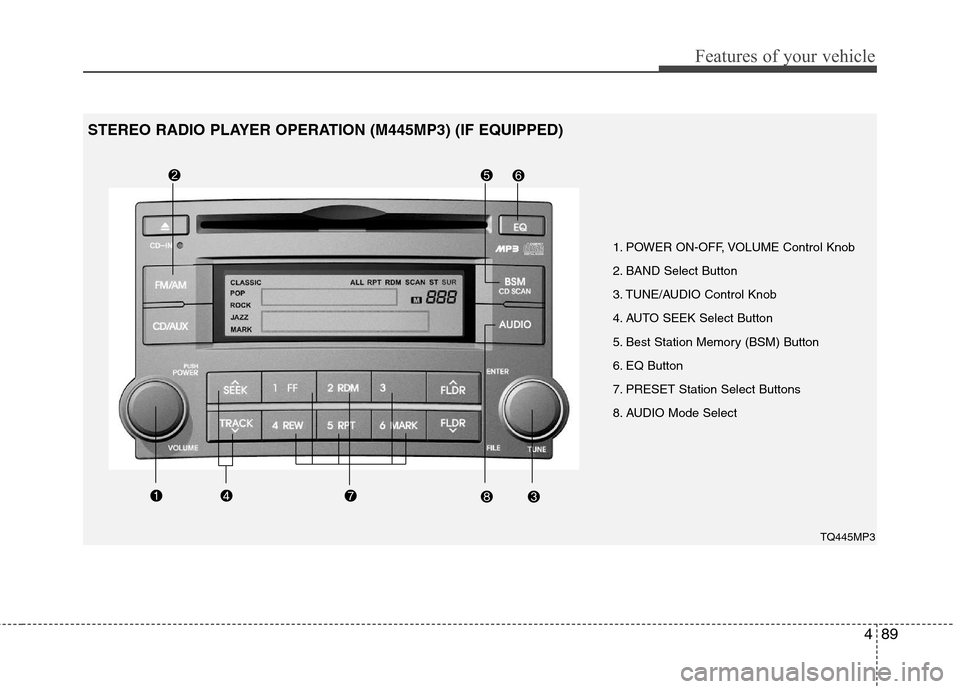
1. POWER ON-OFF, VOLUME Control Knob
2. BAND Select Button
3. TUNE/AUDIO Control Knob
4. AUTO SEEK Select Button
5. Best Station Memory (BSM) Button
6. EQ Button
7. PRESET Station Select Buttons
8. AUDIO Mode SelectTQ445MP3
STEREO RADIO PLAYER OPERATION (M445MP3) (IF EQUIPPED)
Page 161 of 346
491
Features of your vehicle
5. Best Station Memory (BSM)Button
When the BSM button is pressed, the six channels from the highest field intensity
are selected next and stored in memory.The stations selected are stored in thesequence frequency from the first preset
key.
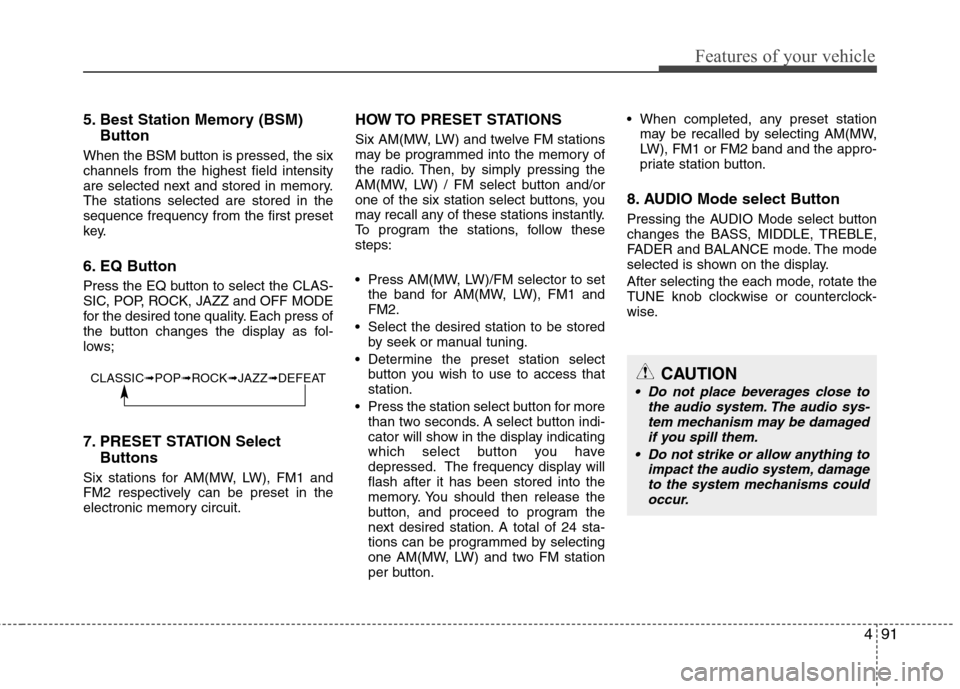
6. EQ Button
Press the EQ button to select the CLAS-
SIC, POP, ROCK, JAZZ and OFF MODE
for the desired tone quality. Each press of
the button changes the display as fol-
lows;
7. PRESET STATION Select Buttons
Six stations for AM(MW, LW), FM1 and
FM2 respectively can be preset in the
electronic memory circuit. HOW TO PRESET STATIONS
Six AM(MW, LW) and twelve FM stations
may be programmed into the memory of
the radio. Then, by simply pressing the
AM(MW, LW) / FM select button and/or
one of the six station select buttons, you
may recall any of these stations instantly.
To program the stations, follow thesesteps:
Press AM(MW, LW)/FM selector to set
the band for AM(MW, LW), FM1 and FM2.
Select the desired station to be stored by seek or manual tuning.
Determine the preset station select button you wish to use to access thatstation.
Press the station select button for more than two seconds. A select button indi-
cator will show in the display indicating
which select button you have
depressed. The frequency display willflash after it has been stored into the
memory. You should then release the
button, and proceed to program the
next desired station. A total of 24 sta-
tions can be programmed by selecting
one AM(MW, LW) and two FM station
per button. When completed, any preset station
may be recalled by selecting AM(MW,
LW), FM1 or FM2 band and the appro-
priate station button.
8. AUDIO Mode select Button
Pressing the AUDIO Mode select button
changes the BASS, MIDDLE, TREBLE,
FADER and BALANCE mode. The mode
selected is shown on the display.
After selecting the each mode, rotate the
TUNE knob clockwise or counterclock-
wise.
CLASSIC ➟POP ➟ROCK ➟JAZZ ➟DEFEATCAUTION
Do not place beverages close to
the audio system. The audio sys-tem mechanism may be damaged if you spill them.
Do not strike or allow anything to impact the audio system, damage
to the system mechanisms couldoccur.
Page 167 of 346
497
Features of your vehicle
Using RADIO, SETUP, VOLUME
and AUDIO CONTROL
1. Power ON/OFF Button & VolumeControl Button
Turns on/off the set when the IGNITION
SWITCH is on ACC or ON. If the button
is turned to the right, it increases the vol-
ume and left,decreases the volume.
Press this button to turn the audio sys- tem ON or OFF. (EUROPE MODEL
ONLY)
Depending on the model if the ignition switch is not on ACC or ON position.
The “Battery Discharge” warningappears on LCD after 10 seconds of
power-up, and automatically turns off
after 1 hours of operation.
Adjusts the volume of the car audio system. Rotate clockwise to increase
the volume or counterclockwise to
decrease.
2. FM Button
Turns to FM mode and toggles FM1and
FM2 when the button is pressed each
time. 3. AM Button
Pressing the [AM] button selects the AM
band. AM Mode is displayed on the LCD.
4. SEEK Button
When the [SEEK ] button is
pressed, it increases the band fre- quency to automatically select a chan-
nel. Stops at the previous frequency if
no channel is found.
When the [TRACK ] button is press- ed, it reduces the band frequency to
automatically select a channel. Stops
at the previous frequency if no channel
is found.
5. Preset Button
Push [1]~[6] buttons less than 0.8 sec-
ond to play the channel saved in each
button. Push Preset button for 0.8 sec-
ond or longer to save current channel to
the respective button with a beep. 6. AST (AUTO STORE) Button
When the button is pressed, it automati-
cally selects and saves channels with
high reception rate to PRESET buttons
[1]~[6] and plays the channel saved in
PRESET1. If no channel is saved after
AST, it will play the previous channel.
7. TUNE & Audio Control Button
Manual Channel Selection knob
Turn this control while listening to a radio
channel to manually adjust frequency.
Turn clockwise to increase frequency
and counterclockwise to reduce frequen-
cy. SETUP Button
Press this button to turn to the SCROLL
adjustment mode. If no action is taken for
5 seconds after pressing the button, it will
return to the play mode. (After entering
SETUP mode, PUSH functions of the
[TUNE] button to adjust SCROLL.)
Page 179 of 346
4109
Features of your vehicle
✽✽NOTICE FOR USING THE
iPod ®
DEVICE
Some iPod models might not support
the communication protocol and the
files will not be played.
Supported iPod models:
- iPod Mini
- iPod 4th (Photo) ~ 6th (Classic) gen-
eration
- iPod Nano 1st~4th generation
- iPod Touch 1st~2nd generation
The order of search or playback of songs in the iPod can be different
from the order searched in the audio
system.
If the iPod crashes due to its own mal- function, reset the iPod. (Reset: Refer
to iPod manual)
An iPod may not operate normally on
low battery.
Some iPod devices, such as the
iPhone, can be connected through the
Bluetooth interface. The device must
have audio Bluetooth capability (such
as for stereo headphone Bluetooth).
The device can play, but it will not be
controlled by the audio system.
(Continued)
Deactivate (turn off) the equalizer function of an iPod when adjust-ing the audio system’s volume,and turn off the equalizer of the
audio system when using theequalizer of an iPod.
When the iPod cable is connect- ed, the system can be switched to
the AUX mode even without theiPod device and may cause noise.Disconnect the iPod cable whenyou are not using the iPod device.
When not using iPod with car audio, detach the iPod cable fromiPod. Otherwise, the iPod may remain in accessory mode, andmay not work properly.CAUTION IN USING THE
iPod ®
DEVICE
The HYUNDAI iPod Power Cable
is needed in order to operate iPod
with the audio buttons on theaudio system. The USB cable pro-vided by Apple may cause mal- function and should not be used
for HYUNDAI vehicles.
❋
❋ The HYUNDAI iPod Power Cable
may be purchased through yourHYUNDAI Dealership.
When connecting the device with the iPod Power Cable, insert theconnector to the multimediasocket completely. If not inserted completely, communications
between iPod and audio may beinterrupted.
When adjusting the sound effects of the iPod and the audio system,the sound effects of both may
devices will overlap and might reduce or distort the quality of the sound.
(Continued)