Page 26 of 346
37
Safety features of your vehicle
Adjusting the height up and down
To raise the headrest, pull it up to the
desired position (1). To lower the head-
rest, push and hold the release button (2)
on the headrest support and lower theheadrest to the desired position (3).Removal
To remove the headrest, raise it as far as
it can go then press the release button (1)
while pulling upward (2).
To reinstall the headrest, put the head- rest poles (3) into the holes while press-
ing the release button (1). Then adjust it
to the appropriate height.C010108AUN
Seatback pocket (if equipped)
The seatback pocket is provided on the
back of the front passenger’s and driver’s
seatbacks.
OFD037037OFD039038
WARNING
- Seatback
pockets
Do not put heavy or sharp objects
in the seatback pockets. In an acci-
dent they could come loose from
the pocket and injure vehicle occu-pants.
OTQ037036
WARNING
Make sure the headrest locks in
position after adjusting it to proper-
ly protects the occupants.
3
Page 27 of 346
Safety features of your vehicle
8
3
Rear seat adjustment
C010301ATQ
Forward and backward (2nd and 3rd
row, if equipped)
To move the seat forward or backward:
1. Pull up the seat slide adjustment lever under the front edge of the seat cush- ion and hold it. 2. Slide the seat to the position you
desire.
3. Release the lever and make sure the seat is locked in place.
Adjust the seat before driving, and make
sure the seat is locked securely by trying
to move forward and backward without
using the lever. If the seat moves, it is not
locked properly.
C010302ATQ
Seatback angle (if equipped)
OTQ037011
OTQ037011G
Type B
Type A
OTQ037012
OTQ037012G
OTQ037015
Type A
Type B
Type C
Page 28 of 346
39
Safety features of your vehicle
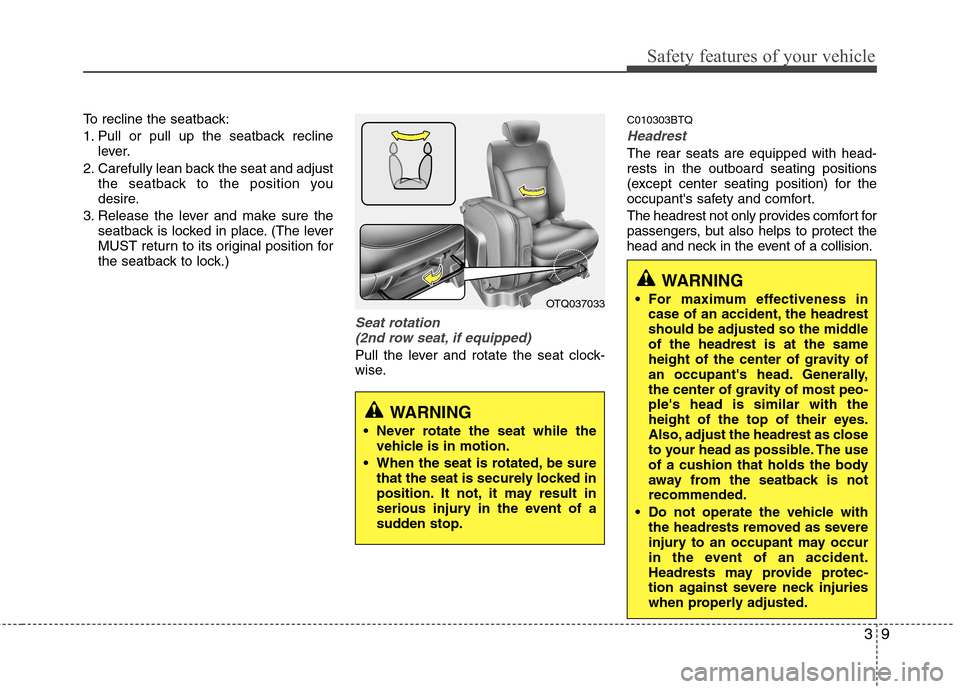
To recline the seatback:
1. Pull or pull up the seatback reclinelever.
2. Carefully lean back the seat and adjust the seatback to the position you
desire.
3. Release the lever and make sure the seatback is locked in place. (The lever
MUST return to its original position for
the seatback to lock.)
Seat rotation
(2nd row seat, if equipped)
Pull the lever and rotate the seat clock-
wise. C010303BTQ
Headrest
The rear seats are equipped with head- rests in the outboard seating positions
(except center seating position) for the
occupant's safety and comfort.
The headrest not only provides comfort for
passengers, but also helps to protect the
head and neck in the event of a collision.
WARNING
For maximum effectiveness in case of an accident, the headrest
should be adjusted so the middleof the headrest is at the same
height of the center of gravity of
an occupant's head. Generally,
the center of gravity of most peo-ple's head is similar with the
height of the top of their eyes.
Also, adjust the headrest as close
to your head as possible. The use
of a cushion that holds the body
away from the seatback is notrecommended.
Do not operate the vehicle with the headrests removed as severe
injury to an occupant may occur
in the event of an accident.
Headrests may provide protec-
tion against severe neck injuries
when properly adjusted.
OTQ037033
WARNING
Never rotate the seat while the vehicle is in motion.
When the seat is rotated, be sure that the seat is securely locked in
position. It not, it may result in
serious injury in the event of a
sudden stop.
Page 29 of 346
Safety features of your vehicle
10
3
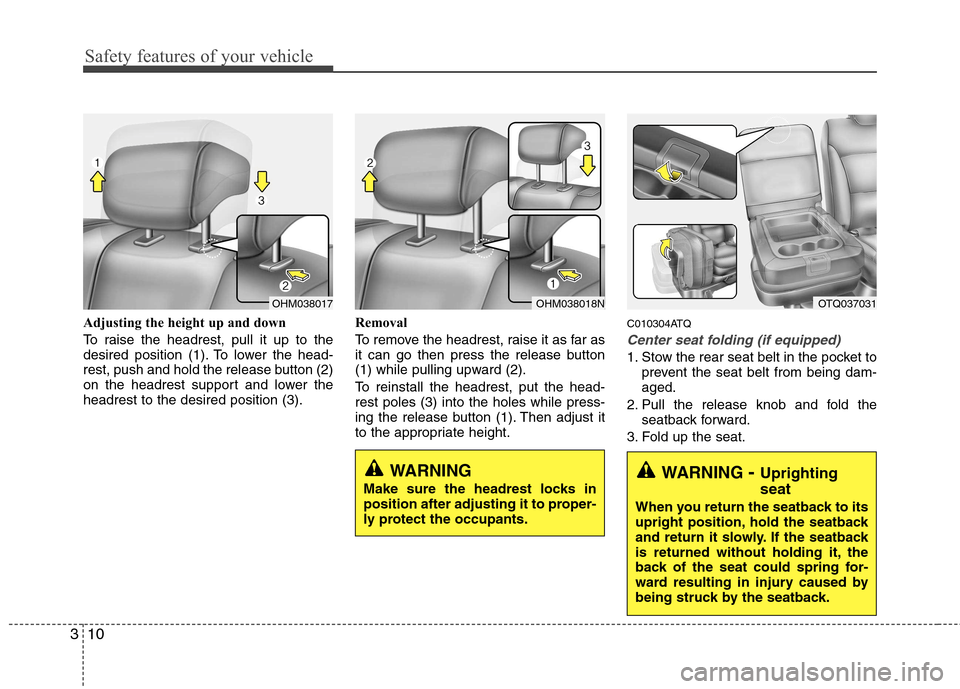
Adjusting the height up and down
To raise the headrest, pull it up to the
desired position (1). To lower the head-
rest, push and hold the release button (2)
on the headrest support and lower theheadrest to the desired position (3). Removal
To remove the headrest, raise it as far as
it can go then press the release button
(1) while pulling upward (2).
To reinstall the headrest, put the head- rest poles (3) into the holes while press-
ing the release button (1). Then adjust it
to the appropriate height.C010304ATQ
Center seat folding (if equipped)
1. Stow the rear seat belt in the pocket to
prevent the seat belt from being dam- aged.
2. Pull the release knob and fold the seatback forward.
3. Fold up the seat.
OHM038018NOTQ037031
WARNING - Uprighting seat
When you return the seatback to its
upright position, hold the seatback
and return it slowly. If the seatback
is returned without holding it, the
back of the seat could spring for-
ward resulting in injury caused by
being struck by the seatback.WARNING
Make sure the headrest locks in
position after adjusting it to proper-
ly protect the occupants.
OHM038017
Page 31 of 346
Safety features of your vehicle
12
3
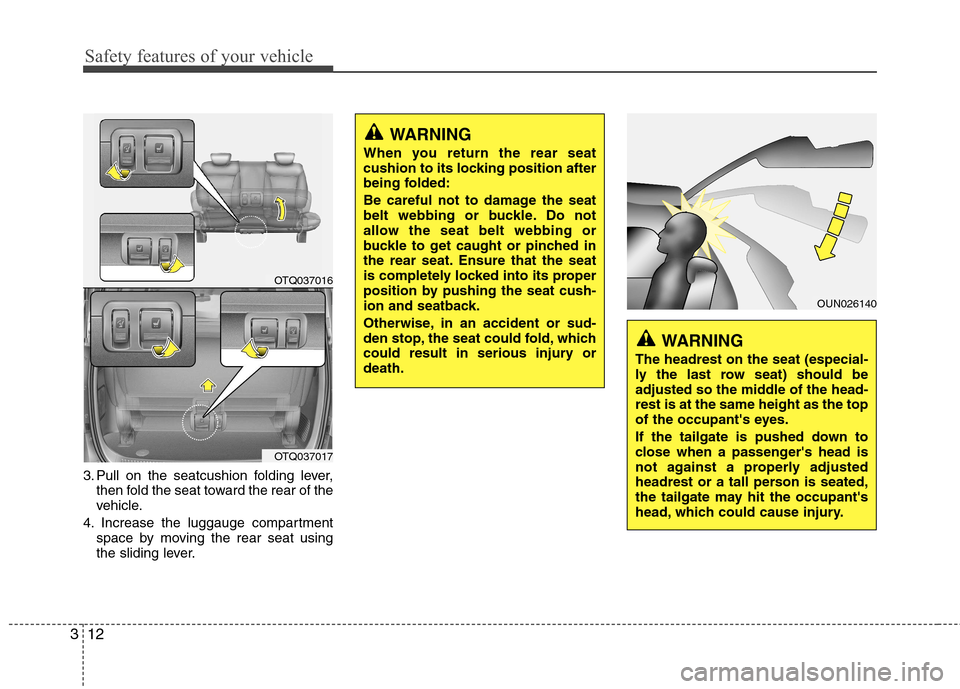
3. Pull on the seatcushion folding lever,
then fold the seat toward the rear of the
vehicle.
4. Increase the luggauge compartment space by moving the rear seat using
the sliding lever.
WARNING
When you return the rear seat
cushion to its locking position after
being folded:
Be careful not to damage the seat
belt webbing or buckle. Do not
allow the seat belt webbing or
buckle to get caught or pinched in
the rear seat. Ensure that the seat
is completely locked into its proper
position by pushing the seat cush-
ion and seatback.
Otherwise, in an accident or sud-
den stop, the seat could fold, which
could result in serious injury ordeath.
OUN026140
WARNING
The headrest on the seat (especial-
ly the last row seat) should be
adjusted so the middle of the head-rest is at the same height as the top
of the occupant's eyes.
If the tailgate is pushed down to
close when a passenger's head is
not against a properly adjusted
headrest or a tall person is seated,
the tailgate may hit the occupant's
head, which could cause injury.
OTQ037016
OTQ037017
Page 33 of 346
Safety features of your vehicle
14
3
D150302AEN-EE
Seat belt warning (if equipped)
As a reminder to the driver, the seat belt
warning light will blink for approximately
6 seconds each time you turn the ignition
switch ON regardless of belt fastening.
If the driver’s seat belt is unfastened after
the ignition switch is ON, the seat belt
warning light blinks again for approxi-
mately 6 seconds.
Seat belt warning chime (if equipped)
If the driver's seat belt is not fastened
when the ignition switch is turned ON or
if it is unfastened after the ignition switch
is ON, the seat belt warning chime will
sound for approximately 6 seconds. At
this time, if the seat belt is fastened, the
chime will stop at once. C020102AEN
Lap/shoulder belt
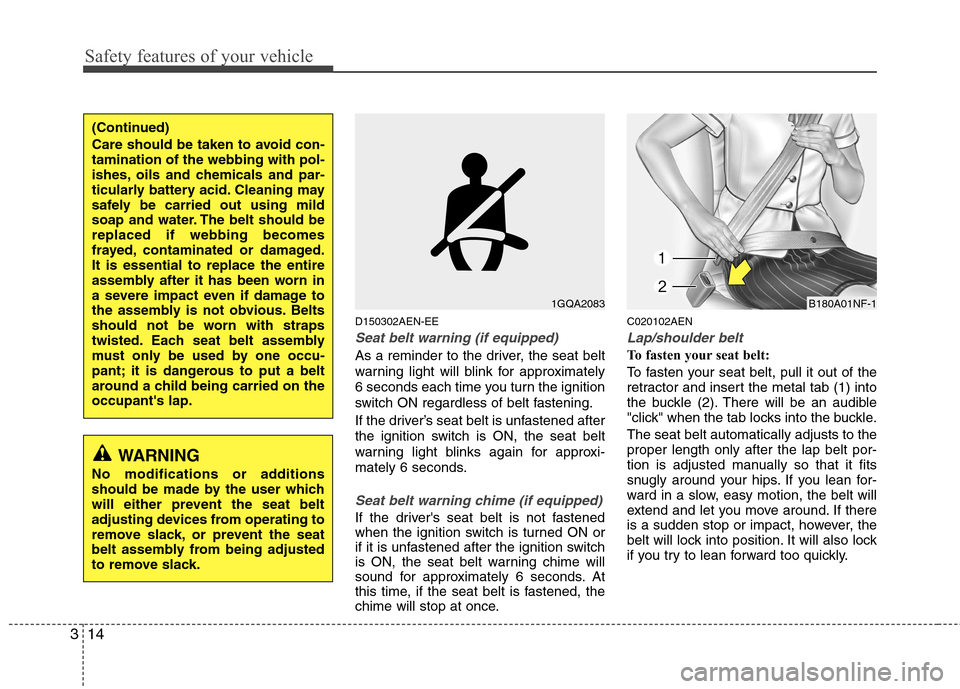
To fasten your seat belt:
To fasten your seat belt, pull it out of the
retractor and insert the metal tab (1) into
the buckle (2). There will be an audible
"click" when the tab locks into the buckle. The seat belt automatically adjusts to the proper length only after the lap belt por-
tion is adjusted manually so that it fits
snugly around your hips. If you lean for-
ward in a slow, easy motion, the belt will
extend and let you move around. If there
is a sudden stop or impact, however, the
belt will lock into position. It will also lock
if you try to lean forward too quickly.
1GQA2083B180A01NF-1
(Continued)
Care should be taken to avoid con- tamination of the webbing with pol-
ishes, oils and chemicals and par-
ticularly battery acid. Cleaning may
safely be carried out using mild
soap and water. The belt should bereplaced if webbing becomes
frayed, contaminated or damaged.It is essential to replace the entire
assembly after it has been worn in
a severe impact even if damage to
the assembly is not obvious. Belts
should not be worn with straps
twisted. Each seat belt assembly
must only be used by one occu-
pant; it is dangerous to put a belt
around a child being carried on theoccupant's lap.
WARNING
No modifications or additions
should be made by the user which
will either prevent the seat belt
adjusting devices from operating to
remove slack, or prevent the seat
belt assembly from being adjusted
to remove slack.
Page 35 of 346
Safety features of your vehicle
16
3
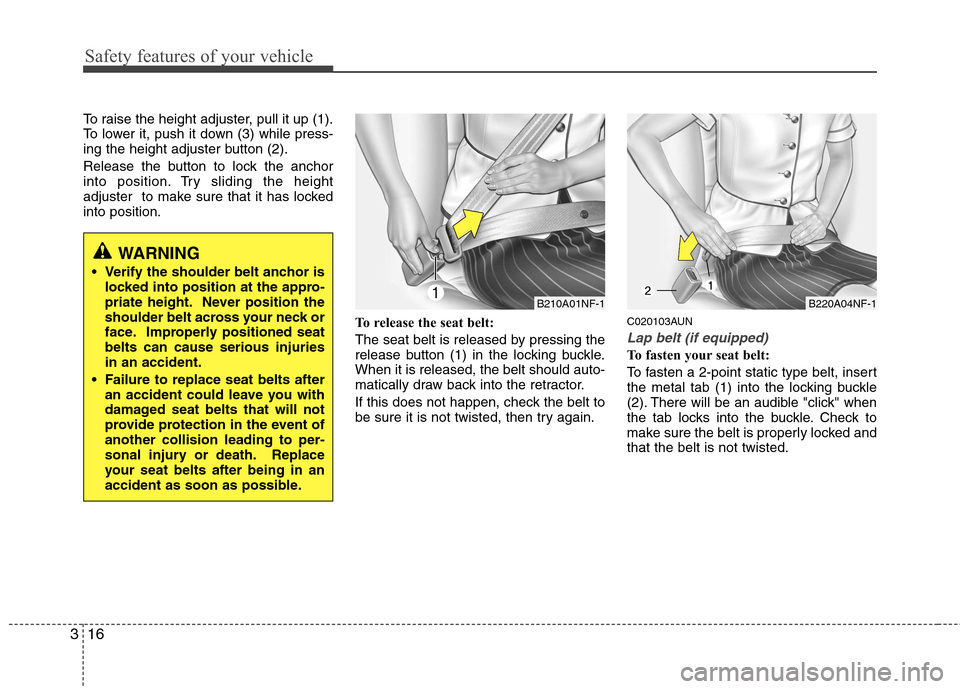
To raise the height adjuster, pull it up (1).
To lower it, push it down (3) while press-
ing the height adjuster button (2).
Release the button to lock the anchor
into position. Try sliding the height
adjuster to make sure that it has lockedinto position.
To release the seat belt:
The seat belt is released by pressing the
release button (1) in the locking buckle.When it is released, the belt should auto-
matically draw back into the retractor.
If this does not happen, check the belt to
be sure it is not twisted, then try again.C020103AUN
Lap belt (if equipped)
To fasten your seat belt:
To fasten a 2-point static type belt, insert
the metal tab (1) into the locking buckle
(2). There will be an audible "click" when
the tab locks into the buckle. Check to
make sure the belt is properly locked andthat the belt is not twisted.
B220A04NF-1B210A01NF-1
WARNING
Verify the shoulder belt anchor is locked into position at the appro-
priate height. Never position the
shoulder belt across your neck or
face. Improperly positioned seatbelts can cause serious injuriesin an accident.
Failure to replace seat belts after an accident could leave you with
damaged seat belts that will not
provide protection in the event ofanother collision leading to per-
sonal injury or death. Replace
your seat belts after being in an
accident as soon as possible.
Page 36 of 346
317
Safety features of your vehicle
With a 2-point static type seat belt, the
length must be adjusted manually so it
fits snugly around your body. Fasten thebelt and pull on the loose end to tighten.
The belt should be placed as low as pos-
sible on your hips, not on your waist. Ifthe belt is too high, it could increase the
possibility of your being injured in anaccident.When using the rear center seat belt, the
buckle with the “CENTER” mark must beused.
To release the seat belt:
When you want to release the seat belt,
press the button (1) in the locking buckle.
B210A02NF-1
WARNING
The center lap belt latching mecha-
nism is different from those for the
rear seat shoulder belts. When fas-tening the rear seat shoulder belts
or the center lap belt, make sure
they are inserted into the correct
buckles to obtain maximum protec-
tion from the seat belt system and
assure proper operation.
OEN036030
B220B01NF
Too high
ShortenCorrect
OTQ037020