2011 Hyundai Azera audio
[x] Cancel search: audioPage 207 of 403

4131
Features of your vehicle
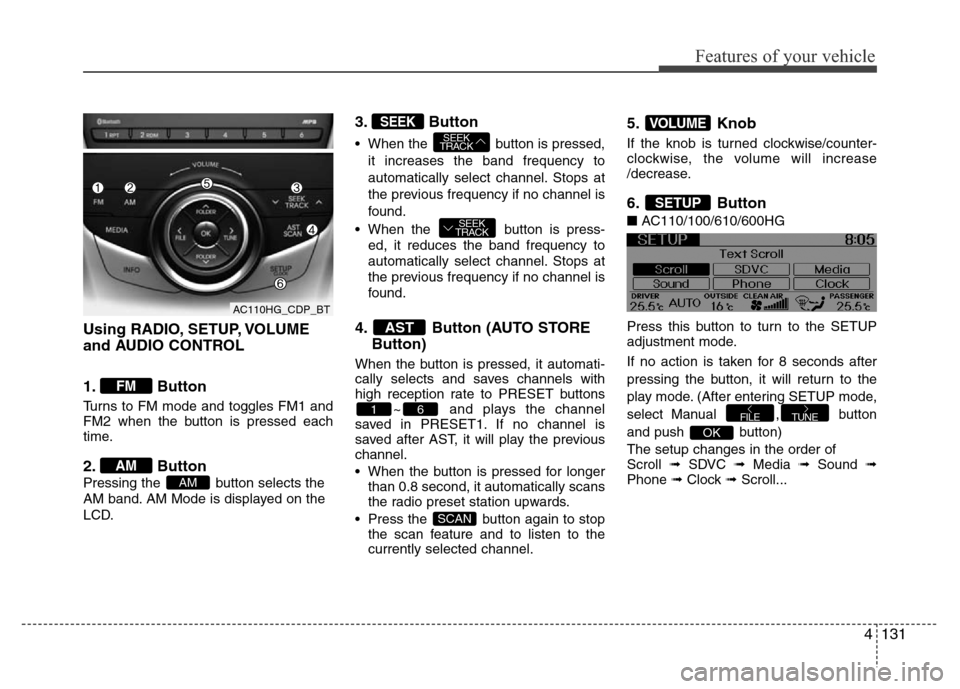
Using RADIO, SETUP, VOLUME
and AUDIO CONTROL
1. Button
Turns to FM mode and toggles FM1 and
FM2 when the button is pressed each
time.
2. Button
Pressing the button selects the
AM band. AM Mode is displayed on the
LCD.
3. Button
• When the button is pressed,
it increases the band frequency to
automatically select channel. Stops at
the previous frequency if no channel is
found.
• When the button is press-
ed, it reduces the band frequency to
automatically select channel. Stops at
the previous frequency if no channel is
found.
4. Button (AUTO STORE
Button)
When the button is pressed, it automati-
cally selects and saves channels with
high reception rate to PRESET buttons
~ and plays the channel
saved in PRESET1. If no channel is
saved after AST, it will play the previous
channel.
• When the button is pressed for longer
than 0.8 second, it automatically scans
the radio preset station upwards.
• Press the button again to stop
the scan feature and to listen to the
currently selected channel.
5. Knob
If the knob is turned clockwise/counter-
clockwise, the volume will increase
/decrease.
6. Button
■AC110/100/610/600HG
Press this button to turn to the SETUP
adjustment mode.
If no action is taken for 8 seconds after
pressing the button, it will return to the
play mode. (After entering SETUP mode,
select Manual , button
and push button)
The setup changes in the order of
Scroll ➟ SDVC ➟ Media ➟ Sound ➟
Phone ➟ Clock ➟ Scroll...
OK
TUNEFILE
SETUP
VOLUME
SCAN
61
AST
SEEK
TRACK
SEEK
TRACKSEEK
AM
AM
FM
AC110HG_CDP_BT
Page 209 of 403

4133
Features of your vehicle
MIDDLE Control
To increase the MIDDLE, press the right
button, while to decrease the MIDDLE,
press the left button.
TREBLE Control
To increase the TREBLE, press the right
button, while to decrease the TREBLE,
press the left button.
FADER Control
Press the right button to emphasize rear
speaker sound(front speaker sound will
be attenuated). When the left button is
pressed, front speaker sound will be
emphasized(rear speaker sound will be
attenuated).BALANCE Control
Press the right button to emphasize right
speaker sound(left speaker sound will be
attenuated). When the left button is
pressed, left speaker sound will be
emphasized(right speaker sound will be
attenuated).
• PHONE
(if equipped)
Select this item to enter PHONE setup
mode. Refer to “BLUETOOTH PHONE
OPERATION” section for detailed infor-
mation.
❈“PHONE” menu is not available if the
audio does not support
Bluetooth®
Wireless Technology features.• CLOCK
Select this item to enter Clock setup
mode. Adjust the hour using ,
button and press the
button.
Adjust the minute using ,
button and press the
button to complete and exit from clock
adjustment mode.
Press the button for more than 1
seconds while in power off/on, you can
enter the Clock setup mode directly.
• Return( )
This function displays the previous
MODE screen.
SETUP
OKFOLDERFOLDER
TUNEFOLDERFOLDER
AC110HG_CDP_BT
Page 215 of 403

4139
Features of your vehicle
CAUTION IN USING
USB DEVICE
• To use an external USB device,
make sure the device is not con-
nected when starting up the vehi-
cle. Connect the device after
starting up.
• If you start the engine when the
USB device is connected, it may
damage the USB device. (USB
flashdrives are very sensitive to
electric shock.)
• If the engine is started up or
turned off while the external USB
device is connected, the external
USB device may not work.
• It may not play inauthentic MP3 or
WMA files.
1) It can only play MP3 files with
the compression rate between
8Kbps~320Kbps.
2) It can only play WMA music
files with the compression rate
between 8Kbps~320Kbps.
• Take precautions for static electrici-
ty when connecting or disconnect-
ing the external USB device.
(Continued)
(Continued)
• An encrypted MP3 PLAYER is not
recognizable.
• Depending on the condition of
the external USB device, the con-
nected external USB device can
be unrecognizable.
• When the formatted byte/sector
setting of External USB device is
not either 512BYTE or 2048BYTE,
then the device will not be recog-
nized.
• Use only a USB device formatted
to FAT 12/16/32.
• USB devices without USB I/F
authentication may not be recog-
nizable.
• Make sure the USB connection
terminal does not come in contact
with the human body or other
objects.
• If you repeatedly connect or dis-
connect the USB device in a short
period of time, it may break the
device.
• You may hear a strange noise
when connecting or disconnect-
ing a USB device.
(Continued)(Continued)
• If you disconnect the external USB
device during playback in USB
mode, the external USB device can
be damaged or may malfunction.
Therefore, disconnect the external
USB device when the audio is
turned off or in another mode. (e.g,
Radio or CD)
• Depending on the type and capacity
of the external USB device or the
type of the files stored in the device,
there is a difference in the time
taken for recognition of the device.
• Do not use the USB device for pur-
poses other than playing music files.
• Playing videos through the USB is
not supported.
• Use of USB accessories such as
rechargers or heaters using USB
I/F may lower performance or
cause trouble.
• If you use devices such as a USB
hub purchased separately, the
vehicle’s audio system may not
recognize the USB device. In that
case, connect the USB device
directly to the multimedia termi-
nal of the vehicle.
(Continued)
Page 216 of 403

Features of your vehicle
140 4
(Continued)
• If the USB device is divided by
logical drives, only the music files
on the highest-priority drive are
recognized by car audio.
• Devices such as MP3 Player/
Cellular phone/Digital camera can
be unrecognizable by standard
USB I/F can be unrecognizable.
• Charging through the USB may
not be supported in some mobile
devices.
❋ A car exclusive cable (sold sep-
arately) is required to use the
iPod
®.
• Some non-standard USB devices
(METAL COVER TYPE USB) can
be unrecognizable.
• Some USB flash memory readers
(such as CF, SD, microSD, etc.) or
external-HDD type devices can be
unrecognizable.
• Music files protected by DRM
(DIGITAL RIGHTS MANAGEMENT)
are not recognizable.
• The data in the USB memory may
be lost while using this audio.
Always back up important data on
a personal storage device.
(Continued)
(Continued)
• A SD-to-USB adapter may not
work with the car audio system.
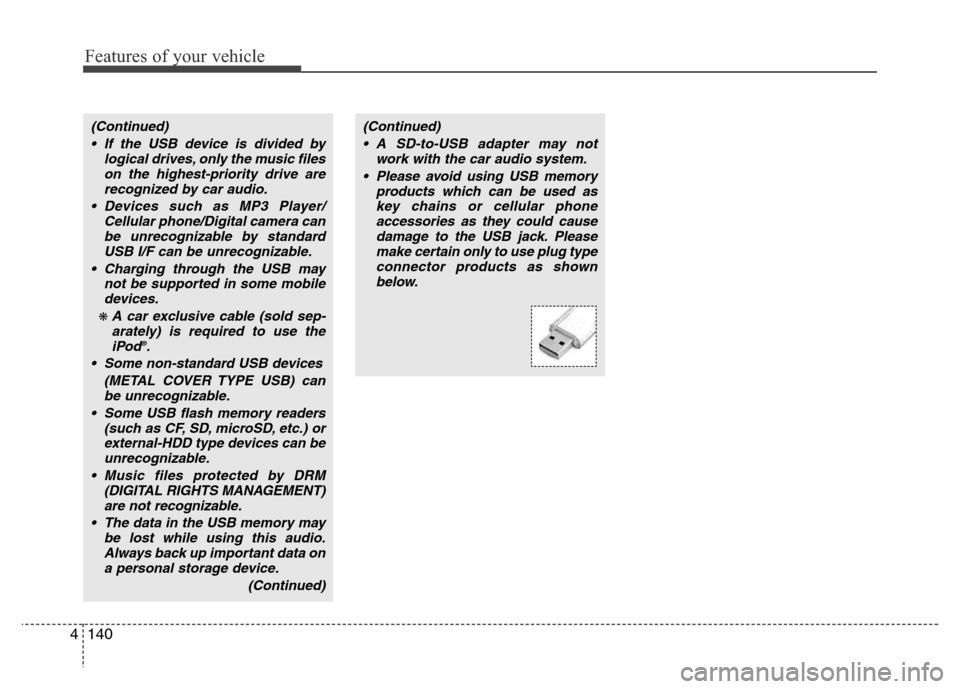
• Please avoid using USB memory
products which can be used as
key chains or cellular phone
accessories as they could cause
damage to the USB jack. Please
make certain only to use plug type
connector products as shown
below.
Page 218 of 403

Features of your vehicle
142 4
✽NOTICE FOR USING THE
iPod®DEVICE
• Some iPod®models might not support
the communication protocol and the
files will not be played.
Supported iPod
®models:
- iPod®Mini
- iPod®4th (Photo) ~ 6th (Classic) gen-
eration
- iPod
®Nano 1st~4th generation
- iPod®Touch 1st~2nd generation
• The order of search or playback of
songs in the iPod
®can be different
from the order searched in the audio
system.
• If the iPod
®disabled due to its own
malfunction, reset the iPod®. (Reset:
Refer to iPod®manual)
• An iPod®may not operate normally
on low battery.
• Some iPod
®devices, such as the
iPhone, can be connected through the
Bluetooth
®Wireless Technology inter-
face. The device must have audio
Bluetooth
®Wireless Technology capa-
bility (such as for stereo headphone
Bluetooth
®Wireless Technology). The
device can play, but it will not be con-
trolled by the audio system.
CAUTION IN USING THE
iPod®DEVICE
• The Hyundai iPod®Power Cable is
needed in order to operate iPod®
with the audio buttons on the
audio system. The USB cable pro-
vided by Apple may cause mal-
function and should not be used
for Hyundai vehicles.
❋ The Hyundai iPod®Power Cable
may be purchased through your
Hyundai Dealership.
• When connecting iPod
®with the
iPod®Power Cable, insert the con-
nector to the multimedia socket
completely. If not inserted com-
pletely, communications between
iPod
®and audio may be interrupt-
ed.
• When adjusting the sound effects of
the iPod
®and the audio system, the
sound effects of both devices will
overlap and might reduce or distort
the quality of the sound.
• Deactivate (turn off) the equalizer
function of an iPod
®when adjust-
ing the audio system’s volume,
and turn off the equalizer of the
audio system when using the
equalizer of an iPod
®.
(Continued)
(Continued)
• When the iPod®cable is connect-
ed, the system can be switched to
AUX mode even without iPod
®
device and may cause noise.
Disconnect the iPod®cable when
you are not using the iPod®
device.
• When not using iPod®with car
audio, detach the iPod®cable from
iPod. Otherwise, iPod®may remain
in accessory mode, and may not
work properly.
• Detachable USB/AUX
❋ When connecting
the iPod®, use the
USB/AUX terminals.
❋ When disconnect-
ing the iPod®, dis-
connect both the
USB/AUX terminal.
• All-in-one USB/AUX
❋ The iPod®exclusive
cable must be con-
nected to both the
USB/AUX terminals
for iPod
®charging
and operations to
be supported.
Page 219 of 403

4143
Features of your vehicle
BLUETOOTH®WIRELESS
TECHNOLOGY PHONE OPERA-
TION (IF EQUIPPED)
1. button : Raises or lowers
speaker volume.
2. button : Mute the microphone
during a call.
3. button : Places and transfers
calls.
4. button : Ends calls or cancels
functions.
■
What is Bluetooth®Wireless
Technology?
Bluetooth®Wireless Technology is a wire-
less technology that allows multiple
devices to be connected in a short range,
low-powered devices like hands-free,
stereo headset, wireless remote control,
etc. For more information, visit the
Bluetooth®Wireless Technology website
at www.Bluetooth.com
■General Features
• This audio system supports Bluetooth®
Wireless Technology hands-free and
stereo-headset features.
- HANDS-FREE feature: Making or
receiving calls wirelessly.
- STEREO-HEADSET feature: Playing
music from cellular phones (that sup-
ports A2DP feature) wirelessly.
✽NOTICE
• The phone must be paired to the sys-
tem before using Bluetooth®Wireless
Technology features.
• Only one selected (connected) cellular
phone can be used with the system at
a time.
• Some phones are not fully compatible
with this system.
■Phone Setup
All Bluetooth®Wireless Technology-relat-
ed operations can be performed in
PHONE menu.
1) Push the button to enter
SETUP mode.
2) Select “PHONE” item by using
, button, then push
the button.
3) Select desired item by using
, button, then push
the button.
OK
TUNEFILE
OK
TUNEFILE
SETUP
MUTE
VOLUME
4
3
1
2
Page 220 of 403

Features of your vehicle
144 4
• Pairing a phone
Before using Bluetooth®Wireless
Technology features, the phone must be
paired (registered) with the audio sys-
tem. Up to 5 phones can be paired with
the system.
NOTE:
• The pairing procedure of the phone
varies according to each phone
model. Before attempting to pair
phone, please see your phone’s
User’s Guide for instructions.
• Once pairing with the phone is com-
pleted, there is no need to pair with
that phone again unless the phone
is deleted manually from the audio
system (refer “Deleting a Phone”
section) or the vehicle’s information
is removed from the phone.
1. Press button to enter SETUP
mode.
2. Select “Phone”, then “Pair” in PHONE
menu.
3. The audio displays “searching
----
passkey: 0000”4. Search the
Bluetooth®Wireless
Technology system on your phone.
Your phone should display your [vehi-
cle model name] on the
Bluetooth®
Wireless Technology device list. Then
attempt pairing on your phone.
NOTE:
If the phone is paired to two or more
vehicles of the same model, i.e. both
vehicles are HYUNDAI
AZERA/GRANDEUR, some phones
may not handle
Bluetooth®Wireless
Technology devices of that name cor-
rectly. In this case, you may need to
change the name displayed on your
phone from AZERA/ GRANDEUR to
AZERA1/GRANDEUR1 and
AZERA2/GRANDEUR2.
Refer to your phone’s User’s Guide, or
contact your cellular carrier or phone
manufacturer for instructions.• Connecting a phone
When the
Bluetooth®Wireless
Technology system is enabled, the
phone previously used is automatically
selected and re-connected. If you want to
select different phone previously paired,
the phone can be selected through
“Select Phone” menu.
Only a selected phone can be used with
the hands-free system at a time.
1. Press button to enter SETUP
mode.
2. Select “Phone”, then “Select” in
PHONE menu.
3. Select desired phone name from the
list shown.
• Deleting a Phone
The paired phone can be deleted.
- When the phone is deleted, all the infor-
mation associated with that phone is
also deleted (including phonebook).
- If you want to use the deleted phone
with the audio system again, pairing
procedure must be completed once
more.
1. Press button to enter SETUP
mode.
2. Select “Phone”, then “Delete” in
PHONE menu.
3. Select desired phone name from the
list shown.
SETUP
SETUP
SETUP
Page 221 of 403

4145
Features of your vehicle
• Changing Priority
If several phones are paired with the
audio system, the system attempts to
connect following order when the
Bluetooth®Wireless Technology system
is enabled:
1) “Priority” checked phone.
2) Previously connected phone
3) Gives up auto connection.
1. Press button to enter SETUP
mode.
2. Select “Phone”, then “Priority” in
PHONE menu.
3. Select desired phone name from the
list shown.
• Turning
Bluetooth®Wireless
Technology ON/OFF
Bluetooth®Wireless Technology Wireless
Technology system can be enabled (ON)
or disabled (OFF) by this menu.
- If
Bluetooth®Wireless Technology is
disabled, all the commands related to
Bluetooth®Wireless Technology system
prompts whether you wish to turn
Bluetooth®Wireless Technology ON or
not.
1. Press button to enter SETUP
mode.
2. Select “Phone”, then “BT Off ” in
PHONE menu.
■Receiving a Phone Call
When receiving a phone call, a ringtone
is audible from speakers and the audio
system changes into telephone mode.
When receiving a phone call, “Incoming”
message and incoming phone number (if
available) are displayed on the audio.
• To Answer a Call:
- Press button on the steering
wheel.
• To Reject a Call:
- Press button on the steering
wheel.
• To Adjust Ring Volume:
- Use VOLUME buttons on the steering
wheel.
• To Transfer a Call to the Phone (Private
Call):
- Press and hold button on the
steering wheel until the audio system
transfers a call to the phone.
■Talking on the Phone
When talking on the phone, “Active Calls”
message and the other party’s phone
number (if available) are displayed on the
audio.
• To Mute the Microphone
- Press button on the steering
wheel.
• To Finish a Call
- Press button on the steering
wheel.
■Making a Phone Call
A Call Back can be made by pressing
button on the steering wheel.
- This is the same function as using the
button solely on the cellular
phone.
NOTE:
Some phone models require pressing
button twice to make a call.
MUTE
SETUP
SETUP