2011 Hyundai Accent engine
[x] Cancel search: enginePage 157 of 232
3
WHAT TO DO IN AN EMERGENCY
5
!
!
SPARE TYRE
(If the air conditioning had been in use, it is normal for cold water to bedraining from it when you stop).
WARNING:
While the engine is running, keep hair, hands and clothing away from moving parts such as the fan anddrive belts to prevent injury. 6. If you cannot find the cause of the
overheating, wait until the enginetemperature has returned to normal. Then, if coolant has been lost, care- fully add engine coolant to the reser-voir (page 6-7) to bring the fluid level in the reservoir up to the halfway mark.
7. Proceed with caution, keeping alert for further signs of overheating. Ifoverheating happens again, call aHyundai dealer for assistance.
5. If the water pump drive belt is broken or coolant is leaking out, stop theengine immediately and call the near-est Hyundai dealer for assistance.
WARNING:
Do not remove the radiator cap when the engine is hot. This may result in coolant being blown out of the open-ing and cause serious burns.
! CAUTION:
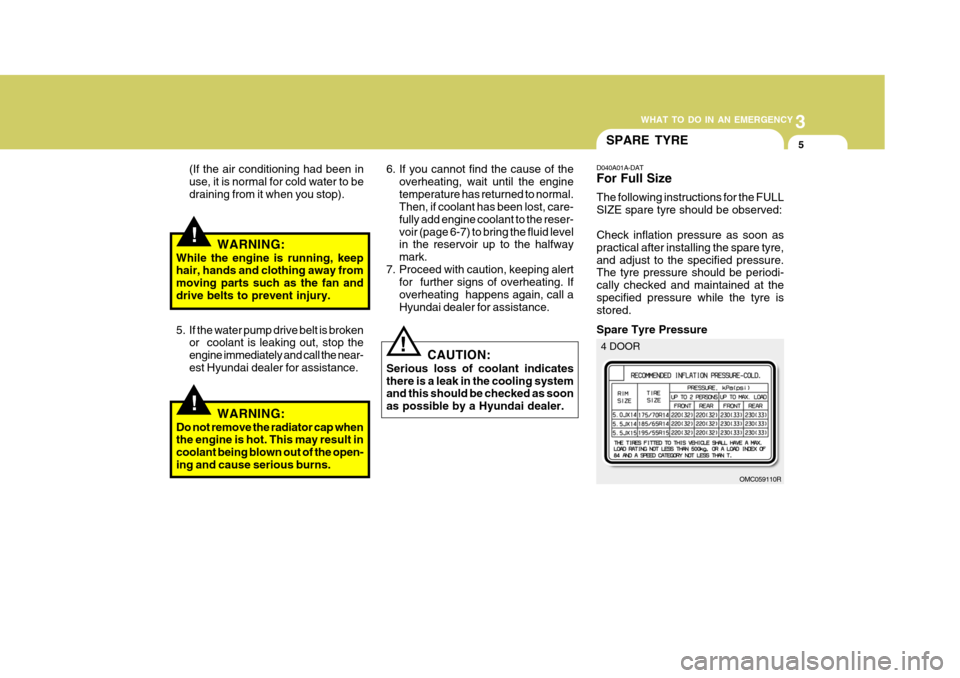
Serious loss of coolant indicates there is a leak in the cooling system and this should be checked as soon as possible by a Hyundai dealer. D040A01A-DAT For Full Size The following instructions for the FULL SIZE spare tyre should be observed: Check inflation pressure as soon as practical after installing the spare tyre,and adjust to the specified pressure. The tyre pressure should be periodi- cally checked and maintained at thespecified pressure while the tyre is stored. Spare Tyre Pressure
OMC059110R
4 DOOR
Page 158 of 232
3 WHAT TO DO IN AN EMERGENCY
6WHEEL AND TYRE CHANG- ING
D050A01MC-DAT In the event of a puncture and subse- quent tyre deflation occurring whilst the vehicle is in motion:
o Allow the vehicle speed to decrease,
without using the brakes if possible.
o Pull off the road or into the curb where it is safe to do so and stop the vehicle. Turn off the engine.
o Activate the hazard warning light, apply the hand brake and place thetransaxle in gear ("P" position forAutomatic Transaxle).
o Passengers should not remain in-
side the vehicle during wheel chang-ing.
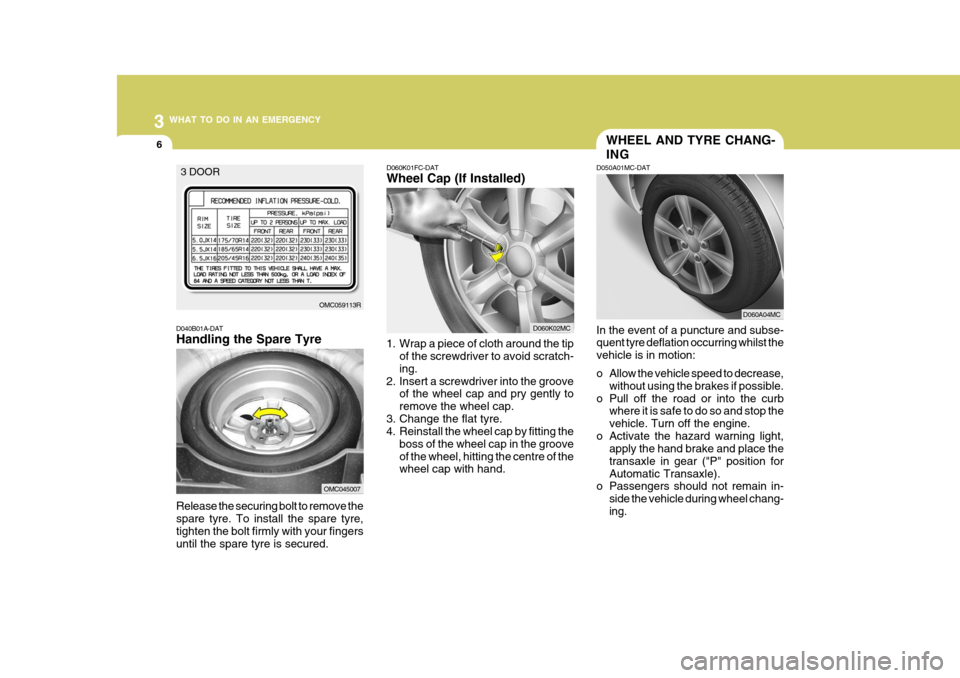
D040B01A-DAT Handling the Spare Tyre Release the securing bolt to remove the spare tyre. To install the spare tyre, tighten the bolt firmly with your fingers until the spare tyre is secured.
OMC059113R
3 DOOR
OMC045007
D060A04MC
D060K01FC-DAT Wheel Cap (If Installed)
1. Wrap a piece of cloth around the tip of the screwdriver to avoid scratch- ing.
2. Insert a screwdriver into the groove of the wheel cap and pry gently toremove the wheel cap.
3. Change the flat tyre.
4. Reinstall the wheel cap by fitting the
boss of the wheel cap in the groove of the wheel, hitting the centre of the wheel cap with hand.
D060K02MC
Page 161 of 232
3
WHAT TO DO IN AN EMERGENCY
9
8. Lower the vehicle to the ground by using the wheel brace and tighten the nuts fully by using the wheel brace. 10. Check and adjust the air pressure
ensuring that the valve cap is re-placed afterwards.
11. Return the jack, tool bag and spare wheel to the boot.
12. As soon as possible, check the wheel nut torque and adjust to the specification listed below:
Wheel nut tightening torque Steel wheel & aluminium alloy wheel: 900 ~ 1,100 kg.cm (65 ~ 80 lb.ft)
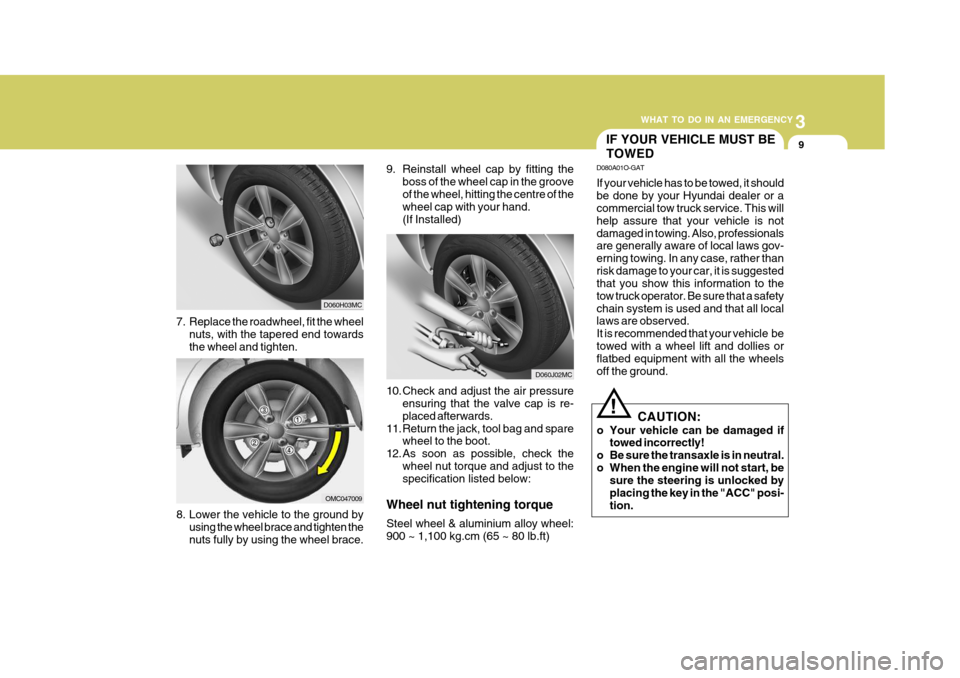
7. Replace the roadwheel, fit the wheel
nuts, with the tapered end towards the wheel and tighten.
D060H03MC
OMC047009
D060J02MC
IF YOUR VEHICLE MUST BE TOWED
D080A01O-GAT If your vehicle has to be towed, it should be done by your Hyundai dealer or a commercial tow truck service. This will help assure that your vehicle is notdamaged in towing. Also, professionals are generally aware of local laws gov- erning towing. In any case, rather thanrisk damage to your car, it is suggested that you show this information to the tow truck operator. Be sure that a safetychain system is used and that all local laws are observed. It is recommended that your vehicle betowed with a wheel lift and dollies or flatbed equipment with all the wheels off the ground.
! CAUTION:
o Your vehicle can be damaged if towed incorrectly!
o Be sure the transaxle is in neutral.
o When the engine will not start, be sure the steering is unlocked byplacing the key in the "ACC" posi-tion.
9. Reinstall wheel cap by fitting the
boss of the wheel cap in the grooveof the wheel, hitting the centre of the wheel cap with your hand. (If Installed)
Page 163 of 232
3
WHAT TO DO IN AN EMERGENCY
11
!
D080B03MC
o Automatic Transaxle:
Be sure to use a towing dolly under the front wheels.
CAUTION:
A vehicle with an automatic transaxle should never be towed from the rear with the front wheels on the ground.This can cause serious damage to the transaxle.
3) It is recommended that your vehicle be towed with all the wheels off the ground.
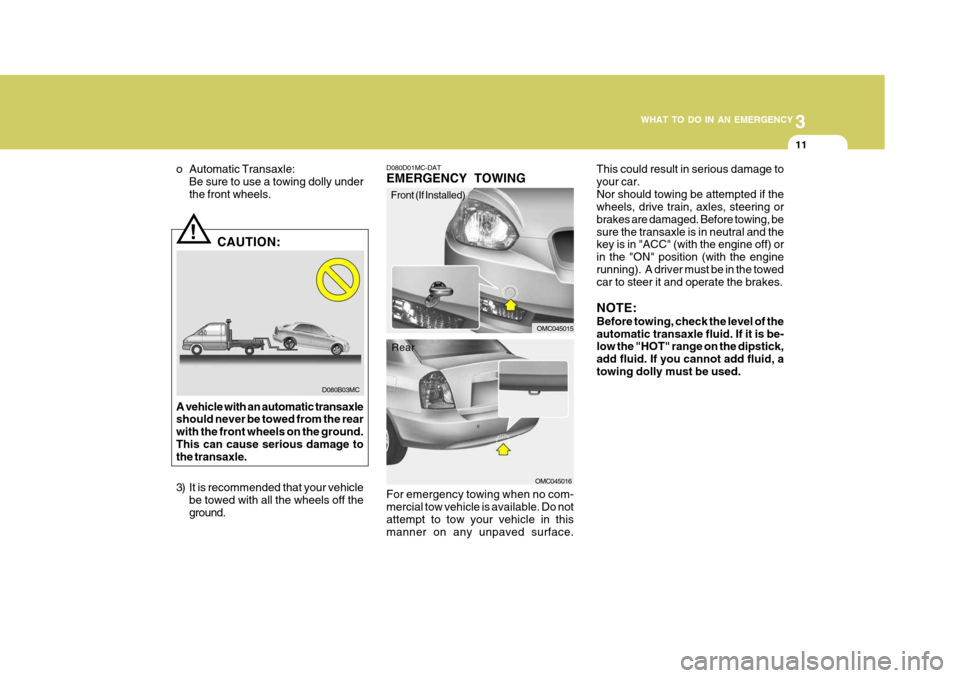
D080D01MC-DAT EMERGENCY TOWING For emergency towing when no com- mercial tow vehicle is available. Do not attempt to tow your vehicle in this manner on any unpaved surface.
OMC045016 This could result in serious damage to your car.Nor should towing be attempted if the wheels, drive train, axles, steering or brakes are damaged. Before towing, besure the transaxle is in neutral and the key is in "ACC" (with the engine off) or in the "ON" position (with the enginerunning). A driver must be in the towed car to steer it and operate the brakes. NOTE: Before towing, check the level of the automatic transaxle fluid. If it is be- low the "HOT" range on the dipstick, add fluid. If you cannot add fluid, atowing dolly must be used.
OMC045015
Front (If Installed)
Rear
Page 170 of 232
4
CORROSION PREVENTION AND APPEARANCE CARE
5
4
CORROSION PREVENTION AND APPEARANCE CARE
5
E030B01A-DAT Spot Cleaning Don't use petrol, strong solvents or corrosive cleaning agents. These can damage the finish of the car. To remove road tar, use turpentine on a clean, softcloth or commercially available bug and tar remover. Be gentle. To remove dead insects or tree sap,use warm water and mild soap or car- washing solution. Soak the spot and rub gently. If the paint has lost itsluster, use a commercial car-cleaning polish. E030C01A-AAT Polishing and Waxing Always wash and dry the car before polishing or waxing or using a combi-nation cleaner and wax. Use a good quality commercial product and follow the manufacturer's directions on thecontainer. Polish and wax the bright trim pieces as well as the paint.
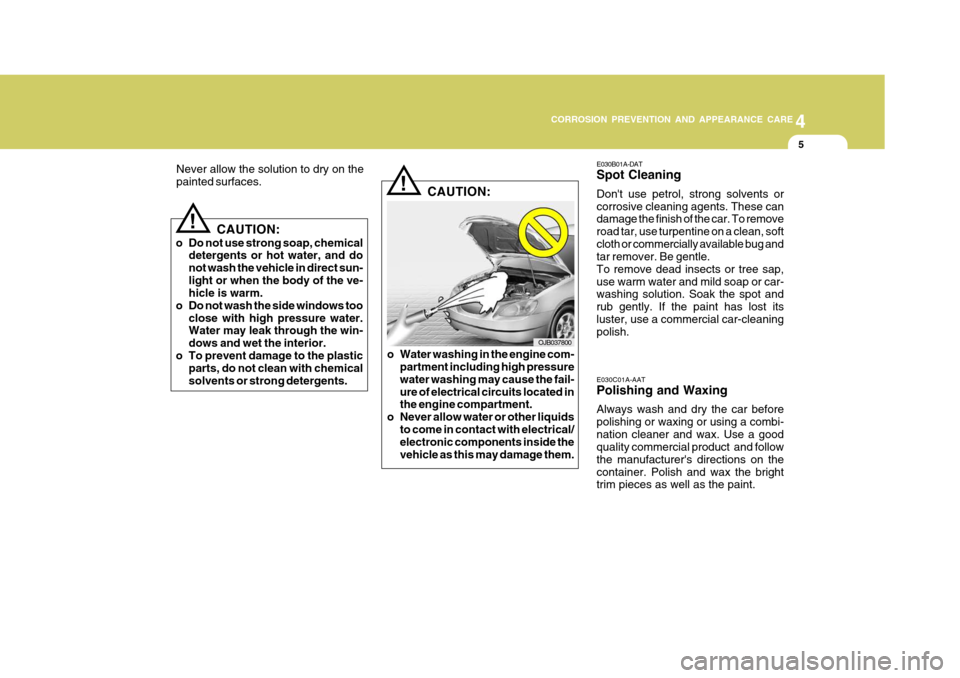
! CAUTION:
OJB037800
o Water washing in the engine com- partment including high pressure water washing may cause the fail-ure of electrical circuits located in the engine compartment.
o Never allow water or other liquids
to come in contact with electrical/electronic components inside the vehicle as this may damage them.
Never allow the solution to dry on thepainted surfaces.
!
CAUTION:
o Do not use strong soap, chemical detergents or hot water, and do not wash the vehicle in direct sun-light or when the body of the ve- hicle is warm.
o Do not wash the side windows too
close with high pressure water.Water may leak through the win- dows and wet the interior.
o To prevent damage to the plastic parts, do not clean with chemicalsolvents or strong detergents.
Page 174 of 232
5VEHICLE MAINTENANCE REQUIREMENTS
2MAINTENANCE INTERVALS
F010C01A-DAT
Specified Scheduled Procedures
These are the procedures such as
inspections, adjustments and replace- ments that are listed in the mainte- nance charts starting on page 5-4.These procedures must be performed at the intervals shown in the mainte- nance schedule to assure that yourwarranty remains in effect. Although it is strongly recommended that they be performed by the factory-trainedor distributor-trained technicians at your Hyundai dealer, these proce- dures may be performed at any quali-fied service facility. It is suggested that genuine Hyundai service parts be used for any required repairs orreplacements. Other parts of equiva- lent quality such as engine oil, engine coolant, manual or auto transaxle oil,brake fluid and so on which are not supplied by Hyundai Motor Company or its distributor may be used withoutaffecting your warranty coverage but you should always be sure these are equivalent to the quality of the originalHyundai parts. Your Service Passport provides further information about your warranty coverage.
F010A01A-DAT
Service Requirements
To ensure that you receive satisfying
operation from your Hyundai, certain maintenance procedures must be per- formed. Although careful design andengineering have reduced these to a minimum, those that are required are of the utmost importance. It is your responsibility to have these
maintenance procedures performedto comply with the terms of the war- ranties covering your new Hyundai. The Service Passport supplied withyour new vehicle provides further in- formation about these warranties. F010D01A-AAT
General Checks
These are the regular checks you should perform each time you drive your Hyundai or you fill the fuel tank. A list of these items will be found onpage 6-3.
F010B01A-AAT Maintenance Requirements The maintenance required for your Hyundai can be divided into three main areas:
o Specified scheduled procedures
o General checks
o Do-it-yourself maintenance F010E01A-AAT
Do-It-Yourself Maintenance
If you are mechanically inclined, own a
few tools that are required and want to take the time to do so, you can inspect and service a number of items. Formore information about doing it your- self, see Section 6.
Page 176 of 232
5VEHICLE MAINTENANCE REQUIREMENTS
4REGULAR SERVICING
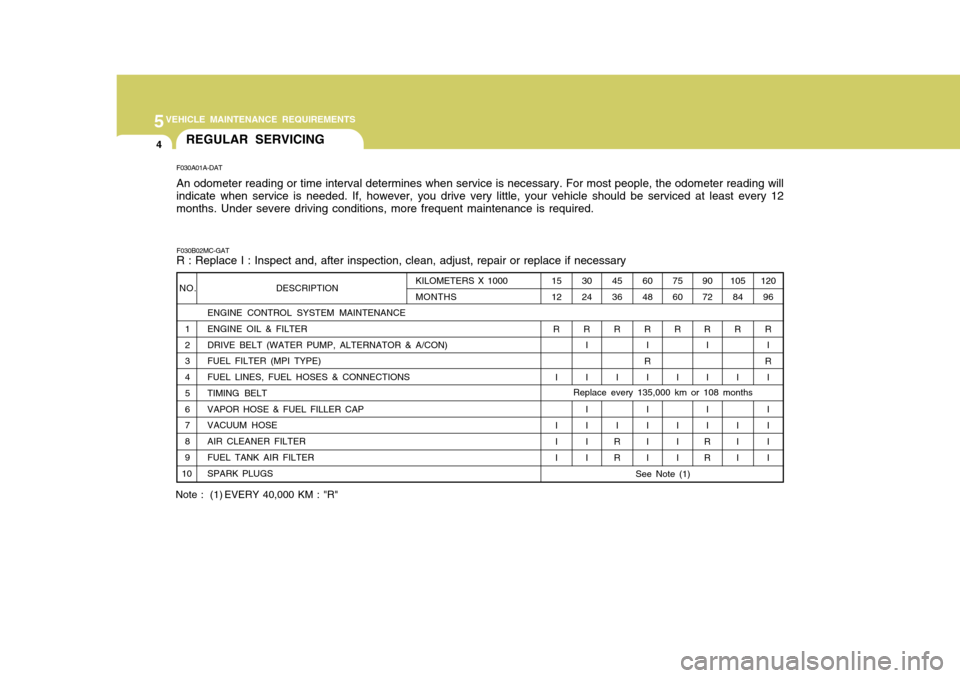
F030A01A-DAT An odometer reading or time interval determines when service is necessary. For most people, the odometer reading will indicate when service is needed. If, however, you drive very little, your vehicle should be serviced at least every 12 months. Under severe driving conditions, more frequent maintenance is required.
F030B02MC-GAT R : Replace I : Inspect and, after inspection, clean, adjust, repair or replace if necessary
ENGINE CONTROL SYSTEM MAINTENANCE
1 ENGINE OIL & FILTER
2 DRIVE BELT (WATER PUMP, ALTERNATOR & A/CON)
3 FUEL FILTER (MPI TYPE)
4 FUEL LINES, FUEL HOSES & CONNECTIONS
5 TIMING BELT
6 VAPOR HOSE & FUEL FILLER CAP
7 VACUUM HOSE
8 AIR CLEANER FILTER
9 FUEL TANK AIR FILTER
10 SPARK PLUGS
NO. DESCRIPTION105
84
R
I I I I 120
96
R I
R I I I I I
9072
R I II I
RR
7560
R
I I I I
6048
R I
R I I I I I
4536
R
I I
R R
3024
R I II I I I
1512
R
I I I I
KILOMETERS X 1000MONTHS
Note : (1) EVERY 40,000 KM : "R"
See Note (1)
Replace every 135,000 km or 108 months
Page 177 of 232
5
VEHICLE MAINTENANCE REQUIREMENTS
5
1 23456789
101112131415
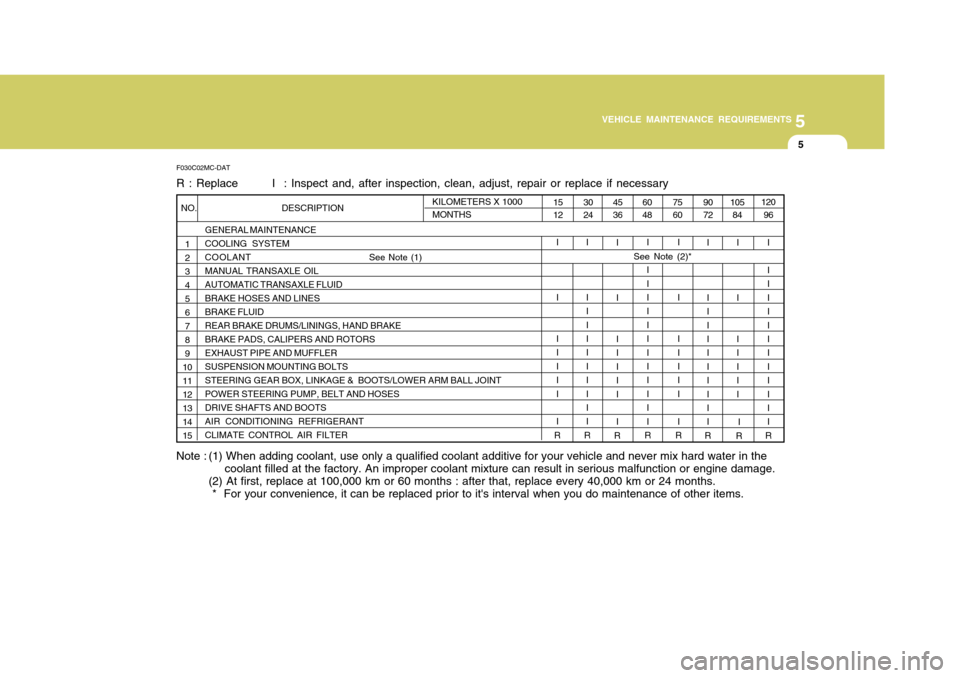
Note : (1) When adding coolant, use only a qualified coolant additive for your vehicle and never mix hard water in the coolant filled at the factory. An improper coolant mixture can result in serious malfunction or engine damage.
(2) At first, replace at 100,000 km or 60 months : after that, replace every 40,000 km or 24 months. * For your convenience, it can be replaced prior to it's interval when you do maintenance of other items.
F030C02MC-DAT R : Replace I : Inspect and, after inspection, clean, adjust, repair or replace if necessary
GENERAL MAINTENANCE COOLING SYSTEMCOOLANT
See Note (1)
MANUAL TRANSAXLE OILAUTOMATIC TRANSAXLE FLUIDBRAKE HOSES AND LINESBRAKE FLUIDREAR BRAKE DRUMS/LININGS, HAND BRAKEBRAKE PADS, CALIPERS AND ROTORSEXHAUST PIPE AND MUFFLERSUSPENSION MOUNTING BOLTSSTEERING GEAR BOX, LINKAGE & BOOTS/LOWER ARM BALL JOINTPOWER STEERING PUMP, BELT AND HOSESDRIVE SHAFTS AND BOOTSAIR CONDITIONING REFRIGERANTCLIMATE CONTROL AIR FILTER
120 96
I I IIII I IIIII I
R
105
84
I I I IIII
90 72
7560
6048
I I II I IIIII I
R
I I I I I II I
R
II I I IIII I IIII
R
45 36
3024
I I I IIII I
R
I I II I IIIII I
R
15 12
I I I IIII I
R
KILOMETERS X 1000 MONTHS
NO. DESCRIPTION
See Note (2)*
I
R