Page 77 of 232
1FEATURES OF YOUR HYUNDAI
66REAR WINDOW DEMISTER SWITCHHAZARD WARNING SYS- TEMINSTRUMENT PANEL LIGHT CONTROL (RHEOSTAT)
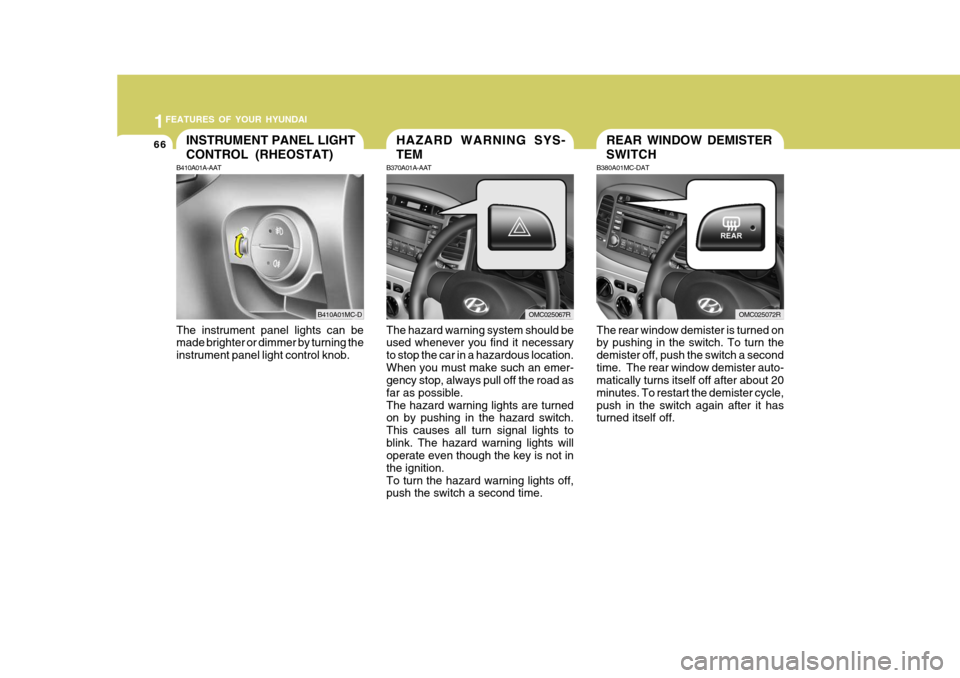
B370A01A-AAT The hazard warning system should be used whenever you find it necessary to stop the car in a hazardous location.When you must make such an emer- gency stop, always pull off the road as far as possible.The hazard warning lights are turned on by pushing in the hazard switch. This causes all turn signal lights toblink. The hazard warning lights will operate even though the key is not in the ignition.To turn the hazard warning lights off, push the switch a second time.
The instrument panel lights can bemade brighter or dimmer by turning the instrument panel light control knob.
B410A01A-AAT
B410A01MC-DOMC025067R
B380A01MC-DAT The rear window demister is turned on by pushing in the switch. To turn the demister off, push the switch a secondtime. The rear window demister auto- matically turns itself off after about 20 minutes. To restart the demister cycle,push in the switch again after it has turned itself off.OMC025072R
Page 114 of 232
1
FEATURES OF YOUR HYUNDAI
103
NOTE: Look at a tape before you insert it. If the tape is loose, tighten it byturning one of the hubs with a pencil or your finger. If the label is peeling off, do not putit in the drive mechanism. Do not leave tapes sitting where they are exposed to hot, warm, or highhumidity, such as on top of the dash- board or in the player. If a tape is excessively hot or cold, letit reach a moderate temperature be- fore putting it in the player. B860A03L
ANTENNA
B870D02MC-GAT MICRO ANTENNA
Your car uses the micro antenna to receive both AM and FM broadcast signals.This antenna is a removable type. OMC025111-1CAUTION:
o Before entering an automatic car wash, remove by turning the an-tenna counterclockwise to prevent damage to the micro antenna. To install the antenna, turn the an-tenna clockwise.
o Be sure to remove the micro an-
tenna before entering a garagewith a low height or installing a car cover.
!
Page 151 of 232
2 DRIVING YOUR HYUNDAI
24
8. When parking your car and trailer,especially on a hill, be sure to follow all the normal precautions. Turn your front wheel into the curb, set the hand brake firmly, and put thetransaxle in 1st or Reverse (manual) or Park (automatic). In addition, place wheel chocks at each of thetrailer's tyres.
9. If the trailer has electric brakes,
drive your vehicle with the trailerattached, and then apply the trailer brakes by hand. This test confirms the operation of the trailer brakesand also checks your electrical con- nection at the same time.
10. During your trip, check occasionally to be sure that the load is secure,and that the lights and any trailer brakes are still working.
11.Avoid jerky starts, sudden accel- eration or sudden stops.
12.Avoid sharp turns and rapid lane changes.
13.Avoid holding the brake pedal down
too long or too frequently. This couldcause the brakes to overheat, re- sulting in reduced braking efficiency.
!WARNING:
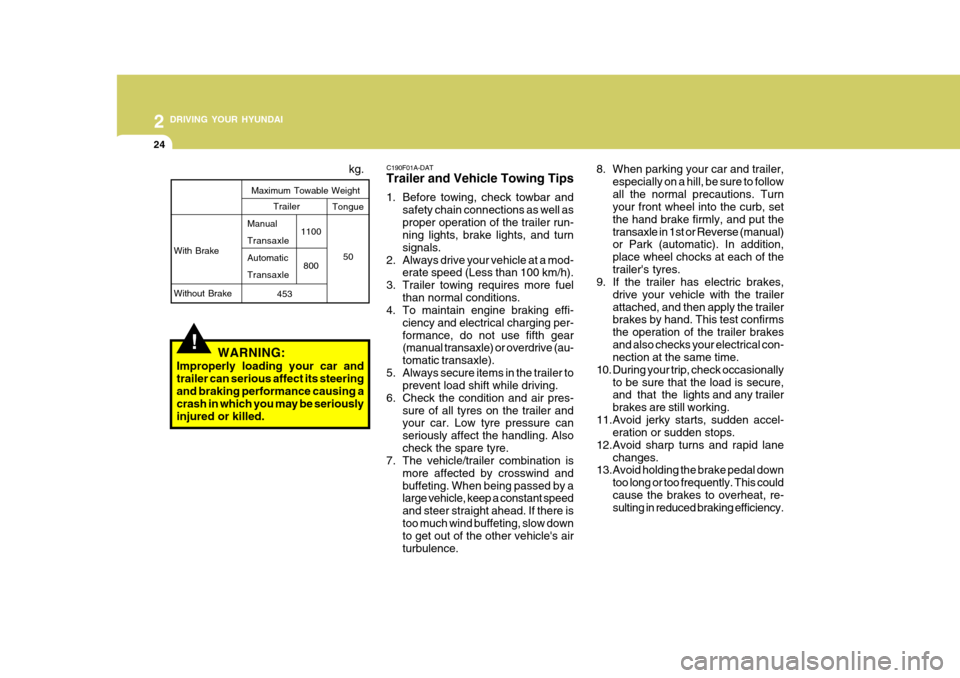
Improperly loading your car and trailer can serious affect its steeringand braking performance causing a crash in which you may be seriously injured or killed. kg.
With Brake Without Brake
Maximum Towable Weight
1100800
Trailer Tongue
50
453
Manual TransaxleAutomaticTransaxle C190F01A-DAT Trailer and Vehicle Towing Tips
1. Before towing, check towbar and
safety chain connections as well as proper operation of the trailer run- ning lights, brake lights, and turn signals.
2. Always drive your vehicle at a mod- erate speed (Less than 100 km/h).
3. Trailer towing requires more fuel than normal conditions.
4. To maintain engine braking effi-
ciency and electrical charging per-formance, do not use fifth gear (manual transaxle) or overdrive (au- tomatic transaxle).
5. Always secure items in the trailer to prevent load shift while driving.
6. Check the condition and air pres- sure of all tyres on the trailer and your car. Low tyre pressure can seriously affect the handling. Alsocheck the spare tyre.
7. The vehicle/trailer combination is
more affected by crosswind andbuffeting. When being passed by a large vehicle, keep a constant speed and steer straight ahead. If there istoo much wind buffeting, slow down to get out of the other vehicle's air turbulence.
Page 184 of 232
6
DO-IT-YOURSELF MAINTENANCE
3GENERAL CHECKS
G020A01A-AAT Engine Compartment The following should be checked regu- larly:
o Engine oil level and condition
o Transaxle fluid level and condition
o Brake fluid level
o Clutch fluid level
o Engine coolant level
o Windshield washer fluid level
o Accessory drive belt condition
o Engine coolant hose condition
o Fluid leaks (on or below compo- nents)
o Power steering fluid level
o Battery condition
o Air cleaner filter condition G020C01A-DAT Vehicle Interior The following should be checked each time when the vehicle is driven:
o Lights operation
o Windshield wiper operation
o Horn operation
o Demister, heating system operation
(and air conditioning, if installed)
o Steering operation and condition
o Mirror condition and operation
o Turn signal light operation
o Accelerator pedal operation
o Brake operation, including hand
brake
o Manual transaxle operation, includ- ing clutch operation
o Automatic transaxle operation, in- cluding "Park" mechanism opera-tion
o Seat control condition and opera- tion
o Seat belt condition and operation
o Sunvisor operation If you notice anything that does not operate correctly or appears to befunctioning incorrectly, inspect it care- fully and seek assistance from your Hyundai dealer if service is needed.
G020B01A-DAT Vehicle Exterior The following should be checked monthly:
o Overall appearance and condition
o Wheel condition and wheel nut torque
o Exhaust system condition
o Light condition and operation
o Windshield glass condition
o Wiper blade condition
o Paint condition and body corrosion
o Fluid leaks
o Door and bonnet lock condition
o Tyre pressure and condition (includ-
ing spare tyre)
Page 205 of 232
6 DO-IT-YOURSELF MAINTENANCE
24
Headlight
1. Allow the bulb to cool. Wear eye protection.
2. Open the engine bonnet and discon- nect the negative (-) post of the battery.
3. Always grasp the bulb by its plastic base, avoid touching the glass.
4. Disconnect the power cord from the
back of the headlight.
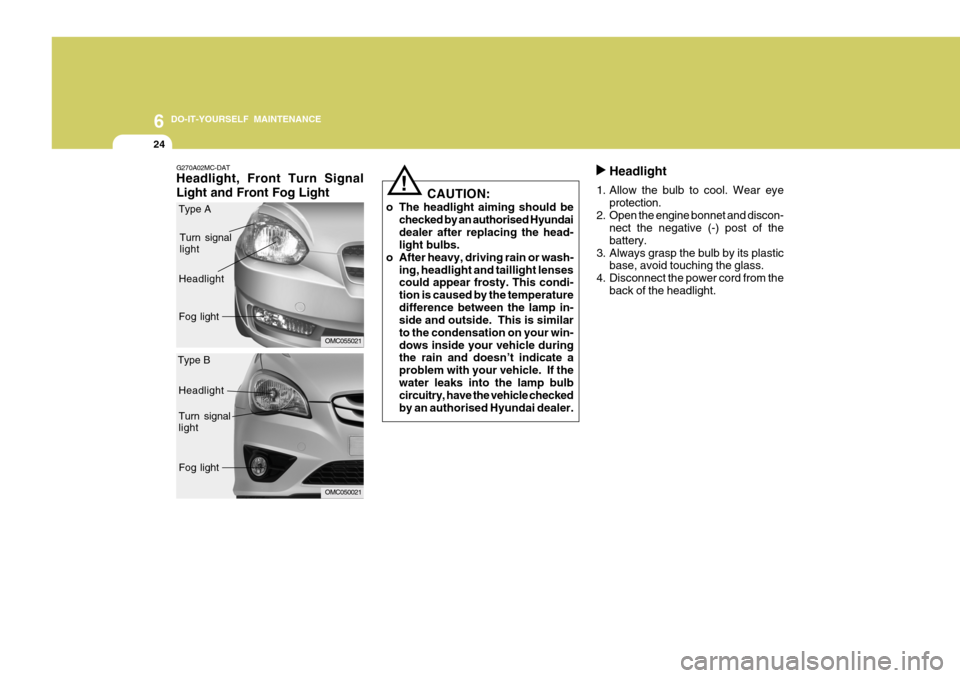
G270A02MC-DAT Headlight, Front Turn Signal Light and Front Fog Light CAUTION:
o The headlight aiming should be checked by an authorised Hyundai dealer after replacing the head- light bulbs.
o After heavy, driving rain or wash- ing, headlight and taillight lensescould appear frosty. This condi- tion is caused by the temperaturedifference between the lamp in- side and outside. This is similar to the condensation on your win-dows inside your vehicle during the rain and doesn’t indicate a problem with your vehicle. If thewater leaks into the lamp bulb circuitry, have the vehicle checked by an authorised Hyundai dealer.
!
OMC055021
Turn signal light
Headlight Fog light
OMC050021
Headlight Turn signal light
Fog light
Type A
Type B
Page 206 of 232
6
DO-IT-YOURSELF MAINTENANCE
25
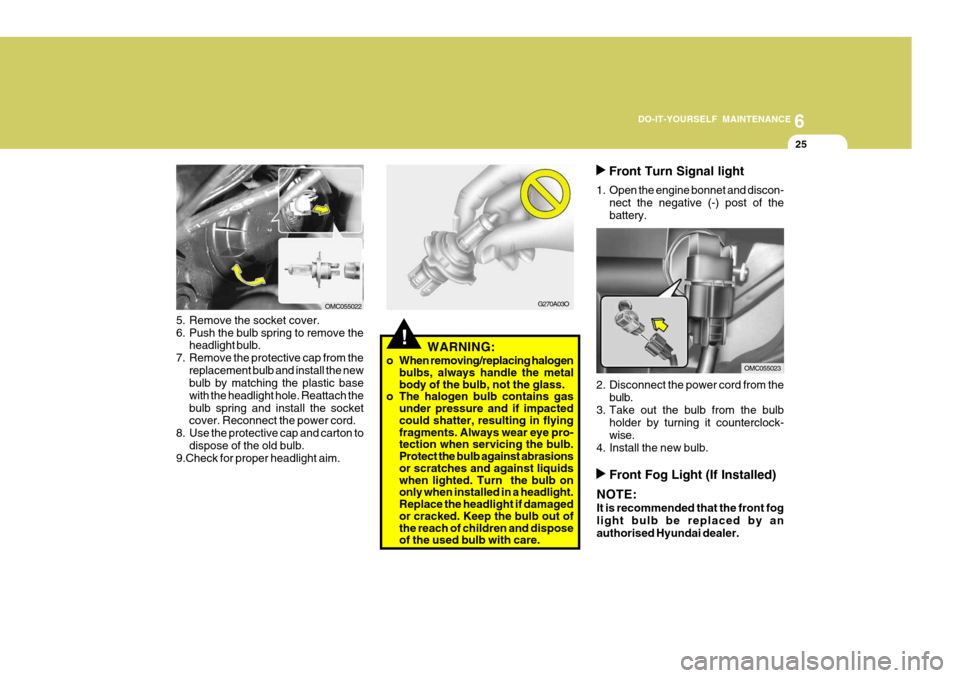
Front Turn Signal light
1. Open the engine bonnet and discon- nect the negative (-) post of the battery.
2. Disconnect the power cord from the bulb.
3. Take out the bulb from the bulb holder by turning it counterclock-wise.
4. Install the new bulb.
G270A03O
!WARNING:
o When removing/replacing halogen bulbs, always handle the metal body of the bulb, not the glass.
o The halogen bulb contains gas
under pressure and if impacted could shatter, resulting in flying fragments. Always wear eye pro- tection when servicing the bulb. Protect the bulb against abrasions or scratches and against liquids when lighted. Turn the bulb on only when installed in a headlight. Replace the headlight if damaged or cracked. Keep the bulb out of the reach of children and dispose of the used bulb with care.
5. Remove the socket cover.
6. Push the bulb spring to remove the
headlight bulb.
7. Remove the protective cap from the replacement bulb and install the new bulb by matching the plastic base with the headlight hole. Reattach thebulb spring and install the socket cover. Reconnect the power cord.
8. Use the protective cap and carton to dispose of the old bulb.
9.Check for proper headlight aim.
OMC055022
OMC055023
Front Fog Light (If Installed)
NOTE: It is recommended that the front fog light bulb be replaced by anauthorised Hyundai dealer.
Page 207 of 232
6 DO-IT-YOURSELF MAINTENANCE
26
3. Remove the nuts of the rear combi-
nation light with a spanner.
G270D01MC-DAT Rear Combination Light
1. Open the boot lid (4 Door) or tailgate (3 Door).
OMC055024
OMC055025
2. Remove the cover on the inside of
luggage trim.
4 Door
4 Door 5. To replace the rear combination light,
take it out from the bulb holder by turning it counterclockwise.
(1) Stop/Tail Light(2) Turn Signal Light (3) Back-up Light
(4) Rear Fog Light
6. Install the new bulb.
OMC055027OMC055026
4 Door
3 Door
4.
Detach the rear combination lamp by pulling it out (4 Door) or remove the mounting screws of the rear combi- nation lamp with a phillips screw-driver (3 Door).
OMC055026-1
Page 210 of 232
6
DO-IT-YOURSELF MAINTENANCE
29BULB WATTAGE
G280A01MC-DAT
OMC059020N
Socket Type P43t-38
BAU15s
W2.1X9.5d W2.1X9.5d
S8.5/8.5PG13
LED Type
W2.1X9.5d Part Name
Stop/Tail Light
High Mounted Rear Stop Light Luggage Compartment Light
Rear Turn Signal LightRear Fog Light Back-up Light
License Plate Light
Part Name
Headlight (High/Low) Front Turn Signal Light Front Position LightMap Light (If Installed) Interior Light Front Fog Light (If Installed)Side Repeater Light (If Installed) Side Repeater Light (If Installed)
No.
1 2 3 4 5 67 No.
89
10 11 1213 14
Wattage
55/60 215
10 10 27
0.4
5
Wattage 21/5165
21 21 16 5 Socket Type
BAY15d
W2.1X9.5d S8.5/8.5 BAU15s
BA15s
W2.1X9.5d
S8.5/8.5
4 Door 3 Door