Page 291 of 427
Make sure the parking brake is
f ully released bef ore driving away.
Driving with the parking brake
partially set can overheat or
damage the rear brakes.
Make sure the moonroof (if
equipped) and the windows are
closed.
Turn of f the lights.
Place any packages, valuables, etc.
in the cargo area in your vehicle or
the In-Bed Trunk, or take them
with you.
Lock the doors.
Check the indicator on the driver’s
door to verify that the security
system is set.
Never park over dry leaves, tall
grass, or other f lammable
materials. The hot three way
catalytic converter could cause
these materials to catch on fire.If the vehicle is f acing uphill, turn
the f ront wheels away f rom the
curb.
If the vehicle is f acing downhill,
turn the front wheels toward the
curb.
On vehicles with security system
Parking
Parking T ips
Driving
287
Main MenuTable of Contents
Page 292 of 427

Your vehicle is equipped with disc
brakes at all f our wheels. A power
assist helps reduce the ef f ort needed
on the brake pedal. The emergency
brake assist system increases the
stopping f orce when you depress the
brake pedal hard in an emergency
situation. The anti-lock brake system
(ABS) helps you retain steering
control when braking very hard.
Resting your f oot on the pedal keeps
the brakes applied lightly, builds up
heat, reduces their ef f ectiveness and
reduces brake pad lif e. In addition,
f uel economy can be reduced. It also
keeps your brake lights on all the
time, conf using drivers behind you.Constant application of the brakes
when going down a long hill builds
up heat and reduces their ef f ective-
ness. Use the engine to assist the
brakes by taking your f oot of f the
accelerator and downshif ting to a
lower gear.
Check the brakes after driving
through deep water. Apply the
brakes moderately to see if they f eel
normal. If not, apply them gently and
f requently until they do. Be extra
cautious and alert in your driving.
The hydraulic system that operates
the brakes has two separate circuits.
Each circuit works diagonally across
the vehicle (the lef t-f ront brake is
connected with the right-rear brake,
etc.). If one circuit should develop a
problem, you will still have braking
at two wheels.
If the brake pads need replacing, you
will hear a distinctive, metallic
screeching sound when you apply
the brake pedal. If you do not have
the brake pads replaced, they will
screech all the time. It is normal f or
the brakes to occasionally squeal or
squeak when you apply them.
Braking System Design
Brake Pad Wear Indicators
Braking System
288
Main MenuTable of Contents
Page 304 of 427

�´
Trailer lights and equipment must
comply with f ederal, state, province/
territory, and local regulations.
Check trailer light requirements f or
the areas where you plan to tow, and
use only equipment designed f or
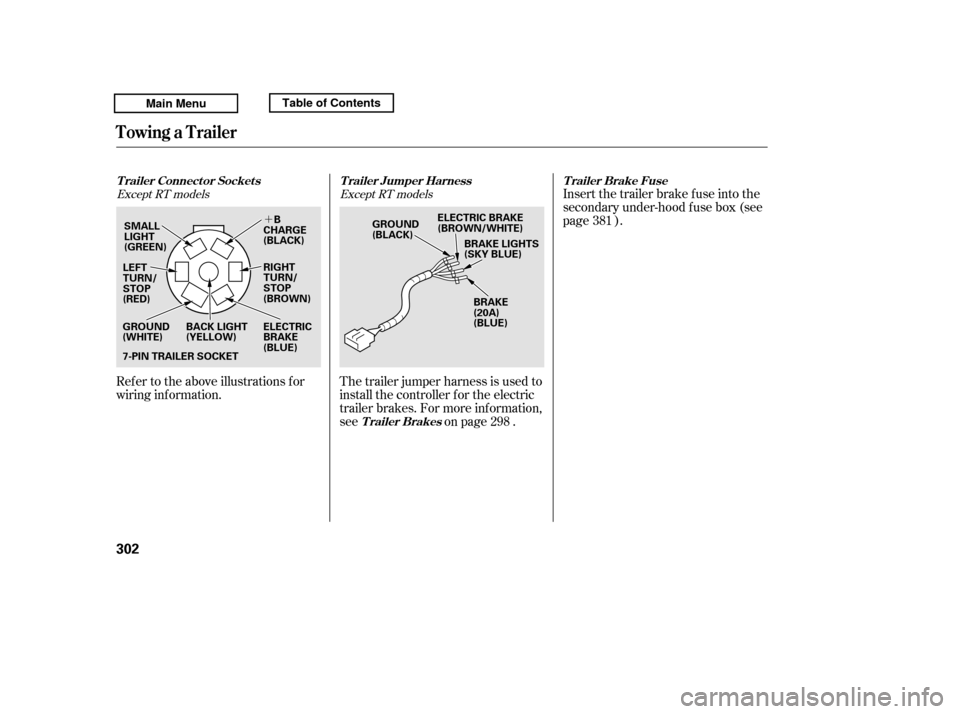
your vehicle.Ref er to the above illustration f or
wiring information.
We recommend that you have your
dealer install a Honda wiring harness
and converter. This harness has
been designed f or your vehicle.
Your vehicle is equipped with a
trailer lighting connector.
Your vehicle is equipped with a
connector to install an optional trailer
lighting connector that mates with
your vehicle. You can get this
optional connector f rom your dealer. Since lighting and wiring vary with
trailer type and brand, you should
also have a qualif ied mechanic install
a suitable connector between the
vehicle and the trailer.Except RT models
On RT models
Trailer Lights
Towing a Trailer
300
TAILLIGHTS
(GREEN/BLACK) ELECTRIC BRAKE
(BROWN/WHITE)
RIGHT TURN SIGNAL
AND BRAKE LIGHTS
(GREEN/RED) GROUND
(BLACK)
B CHARGE
(GREEN)
LEFT TURN SIGNAL
AND BRAKE LIGHTS
(GREEN/RED)
BACK-UP LIGHTS
(BLUE)
Main MenuTable of Contents
Page 306 of 427
�´
Ref er to the above illustrations f or
wiring information.The trailer jumper harness is used to
install the controller f or the electric
trailer brakes. For more inf ormation,
see on page .Insert the trailer brake f use into the
secondary under-hood f use box (see
page ).
298 381
Except RT models Except RT models
T railer Connect or Socket s T railer Jumper Harness
Trailer BrakesT railer Brake Fuse
Towing a Trailer
302
7-PIN TRAILER SOCKET
SMALL
LIGHT
(GREEN)
BACK LIGHT
(YELLOW)
GROUND
(WHITE) GROUND
(BLACK)
ELECTRIC BRAKE
(BROWN/WHITE)
LEFT
TURN/
STOP
(RED) BRAKE
(20A)
(BLUE)
B
CHARGE
(BLACK)
RIGHT
TURN/
STOP
(BROWN)
ELECTRIC
BRAKE
(BLUE) BRAKE LIGHTS
(SKY BLUE)
Main MenuTable of Contents
Page 307 of 427

The added weight, length, and
height of a trailer will af f ect your
vehicle’s handling and perf ormance,
so driving with a trailer requires
some special driving skills and
techniques.
The vehicle has been properly
serviced, and the tires, brakes,
suspension, cooling system, and
lights are in good operating
condition.
The trailer has been properly
serviced and is in good condition.
All weights and loads are within
limits.
Thehitch,safetychains,andany
other attachments are secure.
Allitemsonandinthetrailerare
properly secured and cannot shif t
while you drive.
When preparing to tow, and bef ore
driving away, be sure to check the
f ollowing:
Towing perf ormance can be
af f ected by high altitude, high
temperature, or when climbing
steep grades. Theref ore, premium
f uel (premium unleaded gasoline
with pump octane number of 91 or
higher) is recommended when
towing more than 3,500 lbs (1,590
kg).
The trailer tires and spare are in
good condition and inf lated as
recommended by the trailer
maker.
Your vehicle tires and spare are in
good condition and properly
inf lated.
The lights and brakes on your
vehicle and the trailer are working
properly.
Foryoursafetyandthesafetyof
others,taketimetopracticedriving
maneuvers bef ore heading f or the
open road, and f ollow the guidelines
on the f ollowing page.
CONT INUED
Driving Saf ely With a T railer
Pre-T ow Checklist
Towing a Trailer
Driving
303
Main MenuTable of Contents
Page 315 of 427

This section explains why it is
important to keep your vehicle well
maintained and how to f ollow basic
maintenance saf ety precautions.
This section also includes
instructions on how to read the
maintenance minder messages on
the inf ormation display or multi-
inf ormation display (depending on
models), and instructions f or simple
maintenance tasks you may want to
take care of yourself .U.S. Vehicles:
If you have the skills and tools to
perf orm more complex maintenance
tasks on your vehicle, you may want
to purchase the service manual. See
page f or inf ormation on how to
obtain a copy, or see your dealer. ......................
Maintenance Saf ety . 312
.................
Maintenance Minder . 313
..............................
Fluid Locations . 325
........................
Adding Engine Oil . 326
Changing the Engine Oil and
...........................................
Filter . 327
..............................
Engine Coolant . 329
....................
Windshield Washers . 330
....
Automatic Transmission Fluid . 331
.................
Rear Dif f erential Fluid . 333
.............
Transf er Assembly Fluid . 333
....................................
Brake Fluid . 334
....................
Power Steering Fluid . 335
....................................
Timing Belt . 336
.............................................
Lights . 336
................
Cleaning the Seat Belts . 344
.....................................
Floor Mats . 345
..................
Dust and Pollen Filter . 345
.................................
Wiper Blades . 346
...........................................
Wheels . 348
...............................................
Tires . 348
...................
Checking the Battery . 356
.............................
Vehicle Storage . 357
407
Maintenance
Maintenance, replacement, or
repair of emissions control
devices and systems may be done
by any automotive repair
establishment or individual using
parts that are ‘‘certif ied’’ to EPA
standards.
Maint enance
311
TM
Main Menu
Page 327 of 427

�µ�µ�µ �µ
�µ
�µ
�Ì
Youshouldcheckthefollowing
items at the specif ied intervals. If
you are unsure of how to perf orm
any check, turn to the appropriate
page listed.
Engine oil level Check every
time you fill the fuel tank. See
page .
Engine coolant level Check the
radiator reserve tank every time
you f ill the f uel tank. See page .
Automatic transmission Check
the f luid level monthly. See page . Brakes Check the f luid level
monthly. See page .
Tires Check the tire pressure
monthly. Examine the tread f or
wear and foreign objects. See page
.
Lights Check the operation of
the headlights, parking lights,
taillights, high-mount brake light,
and license plate lights monthly.
See page .
According to state and federal
regulations, f ailure to perf orm
maintenance on the items marked
with will not void your emissions
warranties. However, all
maintenance services should be
perf ormed in accordance with the
intervals indicated by the odometer/
trip meter display or the multi-
inf ormation display. 253
253
331 334
336
348
CONT INUED
Maintenance Minder
Owner’s Maintenance Checks
Maint enance
323
TM
Main MenuTable of Contents
Page 344 of 427
Remove the socket by turning it
one-quarter turn counterclockwise.
Remove the burned-out bulb by
pulling it straight out of the socket.
Drop open the tailgate.
Remove the two bolts, and remove
the rear light assembly f rom the
rear pillar.
Determine which of the three
bulbs is burned out: brake/
taillight, turn signal/hazard light,
or back-up light.
Install the new bulb into the hole
and turn it one-quarter turn
clockwise to lock it in place.
Push the electrical connector back
onto the bulb. Make sure it is on
all the way.
Turn on the lights to test the new bulb.
Reinstall the inner f ender. Make
sure it is installed under the edge
of the f ront bumper.
Reinstall the holding clip, and push
in its head, then install the bolts
and tighten them securely.
1. 2. 3. 4. 5.
5. 6.7. 8. 9.
Replacing Rear Bulbs
Lights
340
BULB
SOCKET
Main MenuTable of Contents
 and the")