Page 598 of 722
Maketurnsmoreslowlyandwider
than normal. The trailer tracks a
smaller arc than your vehicle, and it
canhitorrunoversomethingthe
vehicle misses. Allow more time and
distance f or braking. Do not brake or
turn suddenly as this could cause the
trailer to jackknif e or turn over.
When climbing hills, closely watch
your temperature gauge. If it nears
the red mark, turn the air
conditioning of f , reduce speed and, if
necessary, pull to the side of the
road to let the engine cool.Always drive slowly and have
someone guide you when backing up.
Grip the of the steering wheel,
then turn the wheel to the left to get
the trailer to move to the lef t, and
turn the wheel right to move the
trailer to the right.
Follow all normal precautions when
parking, including putting the
transmission in Park and f irmly
setting the parking brake. Also, place
wheel chocks at each of the trailer’s
tires.
If you must stop when f acing uphill,
use the f oot brake or parking brake.
Do not try to hold the vehicle in
placebypressingontheaccelerator,
as this can cause the automatic
transmission to overheat.
Your vehicle is not designed to be
towed behind a motor home. If your
vehicle needs to be towed in an
emergency, see page .
If the automatic transmission shif ts
f requently while going up a hill, shif t
to D3 or D4 depending on models. When driving down hills, reduce
your speed and shif t down to L. Do
not ‘‘ride’’ the brakes, and remember,
it will take longer to slow down and
stop when towing a trailer.
Crosswinds and air turbulence
caused by passing trucks can disrupt
your steering and cause the trailer to
sway. When being passed by a large
vehicle, keep a constant speed, and
steer straight ahead. Do not try to
make quick steering or braking
corrections.
683
bottom
Making T urns and Braking
Driving on Hills Backing Up
Parking
Handling Crosswinds and Buf f et ing
Towing Your Vehicle
Towing a Trailer, Towing Your Vehicle
Driving
595
10/07/17 10:54:10 31TK8600_600
2011 Odyssey
Page 600 of 722
This section explains why it is
important to keep your vehicle well
maintained and how to f ollow basic
maintenance saf ety precautions.
If you have the skills and tools to
perf orm more complex maintenance
tasks on your vehicle, you may want
to purchase the service manual. See
page f or inf ormation on how to
obtain a copy, or see your dealer.U.S. Vehicles:
This section also includes
instructions on how to read the
Maintenance Minder messages on
the inf ormation display or multi-
inf ormation display (depending on
models), and instructions f or simple
maintenance tasks you may want to
take care of yourself . ......................
Maintenance Saf ety .598
.................
Maintenance Minder . 599
..............................
Fluid Locations .613
........................
Adding Engine Oil .614
Changing the Engine Oil and ...........................................
Filter .616
..............................
Engine Coolant .618
....................
Windshield Washers .620
....
Automatic Transmission Fluid . 621
....................................
Brake Fluid .623
....................
Power Steering Fluid . 624
....................................
Timing Belt .624
.............................................
Lights .625
................
Cleaning the Seat Belts . 636
..................
Dust and Pollen Filter . 636
.....................................
Floor Mats .637
.................................
Wiper Blades .638
...........................................
Wheels .642
...............................................
Tires .642
...................
Checking the Battery . 649
.............................
Vehicle Storage .651
..................................
Interior Care .652
707
Maintenance
Maintenance, replacement, or
repair of emissions control
devices and systems may be done
by any automotive repair
establishment or individual using
parts that are ‘‘certif ied’’ to EPA
standards.
Maint enance
597
TM
10/07/17 10:54:18 31TK8600_602
2011 Odyssey
Page 601 of 722
To eliminate potential hazards, read
the instructions bef ore you begin,
and make sure you have the tools
and skills required.Do
not run the engine unless
instructed to do so.
Some of the most important saf ety
precautions are given here. However,
we cannot warn you of every
conceivable hazard that can arise in
perf orming maintenance. Only you
can decide whether or not you
should perf orm a given task.
Make sure your vehicle is parked
on level ground, the parking brake
is set, and the engine is of f .
To clean parts, use a commercially
available degreaser or parts
cleaner, not gasoline.
To reduce the possibility of f ire or
explosion, keep cigarettes, sparks,
and flames away from the battery
and all f uel-related parts.
Wear eye protection and
protective clothing when working
with the battery or compressed air.
All service items not detailed in this
section should be perf ormed by a
certif ied technician or other qualif ied
mechanic.
Let the
engine and exhaust system cool
down bef ore touching any parts. Be sure there is
adequate ventilation whenever you
operate the engine.Maintenance Saf etyImportant Saf ety Precautions Injury f rom moving parts.
Burns f rom hot parts. Carbon Monoxide poison f rom
engine exhaust.
Potential Vehicle Hazards598
Failure to properly follow
maintenance instructions and
precautions can cause you to
be seriously hurt or killed.
Always follow the procedures
and precautions in this owner’s
manual.
Improperly maintaining this
vehicle, or failing to correct a
problem before driving can
cause a crash in which you can
be seriously hurt or killed.
Always follow the inspection
and maintenance
recommendations and
schedules in this owner’s
manual.
10/07/17 10:54:28 31TK8600_603
2011 Odyssey
Page 614 of 722
�µ
�µ
�µ
�µ
�µ
�µ
�Ì
U.S. Vehicles:
Youshouldcheckthefollowing
items at the specif ied intervals. If
you are unsure of how to perf orm
any check, turn to the appropriate
page listed. Lights Check the operation of
the headlights, parking lights,
taillights, high-mount brake light,
and license plate lights monthly.
See page .
Engine coolant level Check the
radiator reserve tank every time
you f ill the f uel tank. See page . Engine oil level Check every
time you fill the fuel tank. See
page .
Automatic transmission Check
the f luid level monthly. See page .
Brakes Check the f luid level
monthly. See page .
Tires Check the tire pressure
monthly. Examine the tread f or
wear and foreign objects. See page .
According to state and federal
regulations, f ailure to perf orm
maintenance on the items marked
with will not void your emissions
warranties. However, all
maintenance services should be
perf ormed in accordance with the
intervals indicated by the odometer/
trip meter display or the multi-
inf ormation display.
545
621 623
643 625
545
CONT INUED
Owner’s Maintenance Checks
Maintenance Minder
Maint enance
611TM
10/07/17 10:56:05 31TK8600_616
2011 Odyssey
Page 615 of 722

�Î
�Î
�Ì �Ì
�µ
�µ
�Ì
�ÎMaintenance Minder612
:
TM
Maintenance Main Items
Replace engine oil
Replace engine oil and oil filter
Inspect front and rear brakes
Check parking brake adjustment
Inspect these items: Tie rod ends, steering gear box, and boots
Suspension components
Driveshaft boots
Brake hoses and lines (including ABS/VSA)
All fluid levels and condition of fluids
Exhaust system
Fuel lines and connections Maintenance Sub Items
Rotate tires
Replace air cleaner element If you drive in dusty conditions, replace
every 15,000 miles (24,000 km).
Replace dust and pollen filter If you drive primarily in urban areas that have high
concentrations of soot in the air from industry and
from diesel-powered vehicles, replace every 15,000
miles (24,000 km).
Inspect drive belt
Replace transmission fluid
Replace spark plugs
Replace timing belt and inspect water pump If you drive regularly in very high temperatures (over
110°F, 43°C), in very low temperatures (under 20°F,
29°C), replace every 60,000 miles/100,000 km.
Inspect valve clearance
Replace engine coolant
A
B
Symbol
Symbol
1
2
3
4
5
1
1
See information on maintenance and emissions warranty in the first column
on page .
Adjust the valves during services A, B, 1, 2, or 3 only if they are noisy. Inspect idle speed every 160,000 miles (256,000 km).
If the message ‘‘SERVICE DUE NOW’’ does not appear within 12 months
after the display was last reset, change the engine oil every year.
Independent of the Maintenance Minder information, replace the brake
fluid every 3 years.
NOTE: 1:
611
Maintenance Minder
10/07/17 10:56:13 31TK8600_617
2011 Odyssey
Page 616 of 722
Fluid Locations
Maint enance
613
ENGINE OIL DIPSTICK
(Orange loop)RADIATOR CAP
POWER STEERING FLUID
(Red cap)
WASHER FLUID
(Blue cap)
ENGINE COOLANT RESERVOIR
BRAKE FLUID
(Black cap)
AUTOMATIC
TRANSMISSION
FLUID DIPSTICK
(Yellow loop)
ENGINE OIL FILL CAP
10/07/17 10:56:17 31TK8600_618
2011 Odyssey
Page 626 of 722
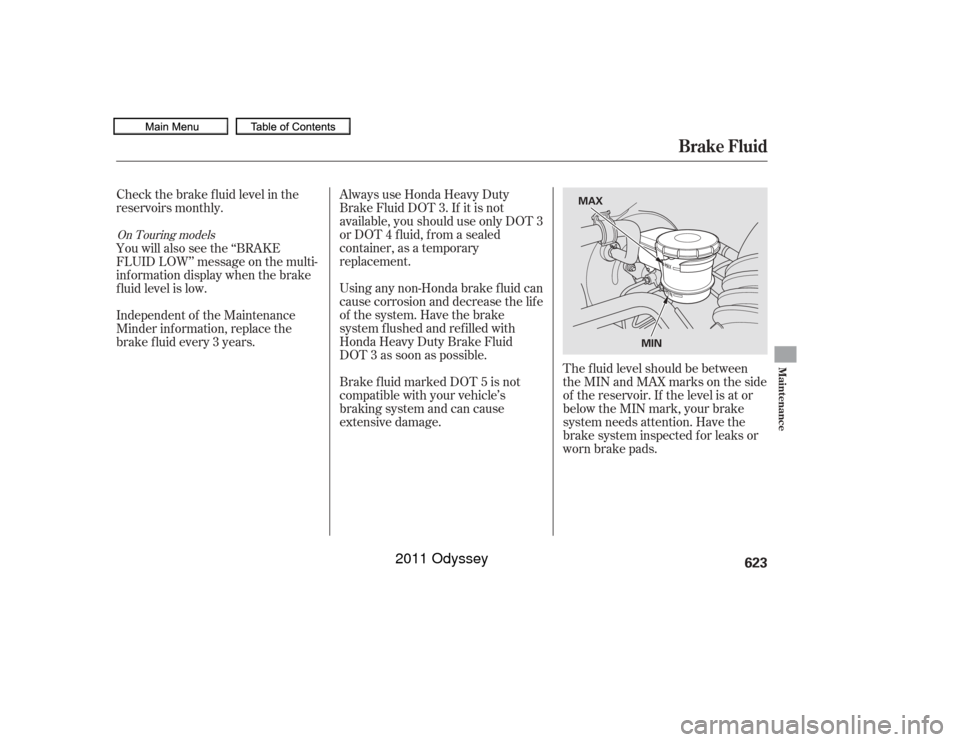
Check the brake f luid level in the
reservoirs monthly.Always use Honda Heavy Duty
Brake Fluid DOT 3. If it is not
available, you should use only DOT 3
or DOT 4 f luid, f rom a sealed
container, as a temporary
replacement.
Using any non-Honda brake f luid can
cause corrosion and decrease the lif e
of the system. Have the brake
system f lushed and ref illed with
Honda Heavy Duty Brake Fluid
DOT 3 as soon as possible.
Brake f luid marked DOT 5 is not
compatible with your vehicle’s
braking system and can cause
extensive damage. The f luid level should be between
theMINandMAXmarksontheside
of the reservoir. If the level is at or
below the MIN mark, your brake
system needs attention. Have the
brake system inspected f or leaks or
worn brake pads.
You will also see the ‘‘BRAKE
FLUID LOW’’ message on the multi-
inf ormation display when the brake
f luid level is low.
Independent of the Maintenance
Minder inf ormation, replace the
brake f luid every 3 years.On Touring models
Brake Fluid
Maint enance
623
MAX
MIN
10/07/17 10:57:32 31TK8600_628
2011 Odyssey
Page 637 of 722
Remove the socket f rom the light
assembly by turning it one-quarter
turn counterclockwise.
Pull the bulb straight out of its
socket. Push the new bulb straight
into the socket until it bottoms.
Place a cloth on the edge of the
lens segment to prevent scratches.
Remove each lens segment by
caref ully prying on its edge with a
small f lat-tip screwdriver.
Remove the screws with a Phillips-
head screwdriver, then remove
the light assembly f rom the
tailgate.
Insert the socket back into the
light assembly. Turn it clockwise
to lock it in place.
Turn on the lights to make sure
the new bulb is working.
Reinstall the cover.
1.
2. 3.
4.
5.
6.
7.
Lights
Replacing a High-mount Brake
Light Bulb
634
SCREWS
LENS SEGMENTS
SOCKETBULB
10/07/17 10:59:13 31TK8600_639
2011 Odyssey