Page 653 of 722

�µ
If there is a problem with the sensor,
you will see a ‘‘CHECK BATTERY
SENSOR’’ message on the multi-
inf ormation display. Have the vehicle
checked by your dealer.
Check the terminals f or corrosion (a
white or yellowish powder). To
remove it, cover the terminals with a
solution of baking soda and water. It
will bubble up and turn brown. When
this stops, wash it of f with plain
water. Dry off the battery with a
cloth or paper towel. Coat the
terminals with grease to help prevent
f uture corrosion.
If additional battery maintenance is
needed, see your dealer or a
qualif ied technician.
Battery posts,
terminals, and related accessories
contain lead and lead compounds. If you need to connect the battery to
a charger, disconnect both cables to
prevent damaging your vehicle’s
electrical system. Always disconnect
the negative ( ) cable first, and
reconnect it last.
If your vehicle’s battery is
disconnected, or goes dead, the time
setting will be reset to 1:00. To set
the time again, f ollow the setting
procedure (see page ).
The navigation system will also
disableitself.Thenexttimeyouturn
on the ignition switch, the system
will require you to enter a PIN
bef ore it can be used. Ref er to the
navigation system manual.315
On vehicles without navigation system
On vehicles with navigation system
On Touring models
Checking the BatteryWARNING:
Wash your hands af ter handling.650
The battery gives off explosive
hydrogen gas during normal
operation.
A spark or flame can cause the
battery to explode with enough
force to kill or seriously hurt you.
Wear protective clothing and a
face shield, or have a skilled
technician do the battery
maintenance.
10/07/17 11:01:27 31TK8600_655
2011 Odyssey
Page 654 of 722
, there are several things you
should do to prepare it f or storage.
Proper preparation helps prevent
deterioration and make")
If you need to park your vehicle f or
an extended period (more than 1
month), there are several things you
should do to prepare it f or storage.
Proper preparation helps prevent
deterioration and makes it easier to
get your vehicle back on the road. If
possible, store your vehicle indoors.Fill the f uel tank. Block the rear wheels.
If the vehicle is to be stored f or a
longer period, it should be
supported on jackstands so the
tires are of f the ground.
Leave one window open slightly (if
the vehicle is being stored
indoors).
Disconnect the battery.
Support the f ront and rear wiper
blade arms with a f olded towel or
ragsotheydonottouchthe
windshield.
To minimize sticking, apply a
silicone spray lubricant to all door
and tailgate seals. Also, apply a
vehiclebodywaxtothepainted
surfaces that mate with the door
and tailgate seals.Cover the vehicle with a
‘‘breathable’’ cover, one made
f rom a porous material such as
cotton. Non-porous materials, such
as plastic sheeting, trap moisture,
which can damage the paint.
If possible, periodically run the
engine until it reaches f ull
operating temperature (the
cooling f ans cycle twice).
Pref erably, do this once a month.
Wash and dry the exterior
completely.
Cleantheinterior.Makesurethe
carpeting, floor mats, etc., are
completely dry.
Leave the parking brake off. Put
the transmission in Park.
Vehicle Storage
Maint enance
651
10/07/17 11:01:37 31TK8600_656
2011 Odyssey
Page 666 of 722
 position. Turn on the
headlights, and check their
brightness. If the headlights are
very dim or do not come on at all,
the battery is discharged. Seeon page .
I")
Turn the ignition switch to the ON
(II) position. Turn on the
headlights, and check their
brightness. If the headlights are
very dim or do not come on at all,
the battery is discharged. Seeon page .
If you see a ‘‘CHECK BATTERY
SENSOR’’ message on the multi-
inf ormation display (or ‘‘CHECK
BATT SENSOR’’ message on the
inf ormation display on some
models) when you try to start the
engine, the battery is discharged.
If it will not start, see on page . Turn the ignition switch to the
START (III) position. If the
headlights do not dim, check the
condition of the f uses. If the f uses
areOK,thereisprobably
something wrong with the
electrical circuit for the ignition
switch or starter motor. You will
need a qualif ied technician to
determine the problem. See
on page .If the headlights dim noticeably or
go out when you try to start the
engine, either the battery is
discharged or the connections are
corroded. Check the condition of the
battery and terminal connections
(see page ). You can then try
jump starting the vehicle from a
booster battery (see page ).
665
665 665
649
683
If theEngineWon’tStart
Jump Starting
Jump
Starting Emergency T owing
Taking Care of the Unexpected
663
10/07/17 11:03:00 31TK8600_668
2011 Odyssey
Page 668 of 722

�´�´
CONT INUED
Although this seems like a simple
procedure, you should take several
precautions.
You cannot start your vehicle by
pushing or pulling it. The numbers in the illustration
show you the order to connect the
jumper cables.
Open the hood, and check the
physical condition of the battery.
In very cold weather, check the
condition of the electrolyte. If it
seems slushy or f rozen, do not try
jump starting until it thaws.
Remove the upper part of the air
intake duct (see page ).
Connect one jumper cable to the
positive ( ) terminal on your
vehicle’s battery. Connect the
other end to the positive ( )
terminal on the booster battery.
Turn of f all electrical accessories:
heater, A/C, climate control, audio
system, lights, etc. Put the
transmission in Park, and set the
parking brake.
1.
2.
3.
4.
626
To Jump Start Your Vehicle:
Jump Starting
Taking Care of the Unexpected
665
BOOSTER
BATTERY
A battery can explode if you do
not follow the correct procedure,
seriously injuring anyone
nearby.
Keep all sparks, open flames,
and smoking materials away
from the battery. If a battery sits in extreme cold, the
electrolyte inside can f reeze.
Attempting to jump start with a f rozen
battery can cause it to rupture.
10/07/17 11:03:15 31TK8600_670
2011 Odyssey
Page 669 of 722
�µ
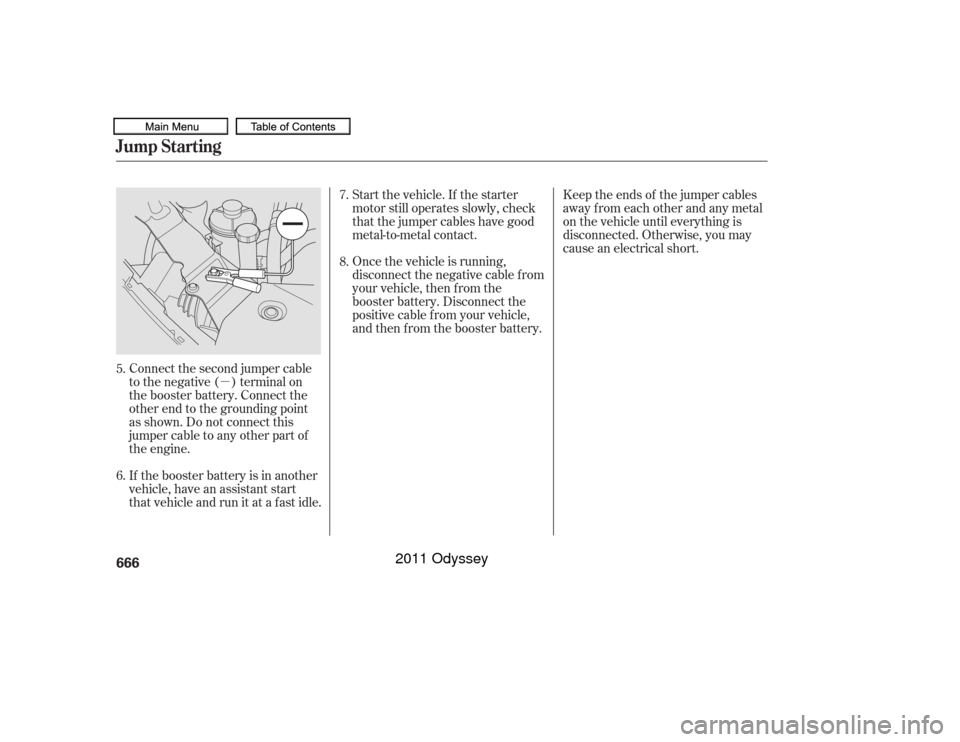
Connect the second jumper cable
to the negative ( ) terminal on
the booster battery. Connect the
other end to the grounding point
as shown. Do not connect this
jumper cable to any other part of
the engine.
If the booster battery is in another
vehicle, have an assistant start
that vehicle and run it at a fast idle. Start the vehicle. If the starter
motor still operates slowly, check
that the jumper cables have good
metal-to-metal contact.
Once the vehicle is running,
disconnect the negative cable f rom
your vehicle, then f rom the
booster battery. Disconnect the
positive cable f rom your vehicle,
and then from the booster battery.
Keep the ends of the jumper cables
away from each other and any metal
on the vehicle until everything is
disconnected. Otherwise, you may
cause an electrical short.
6. 7.
5. 8.
Jump Starting666
10/07/17 11:03:22 31TK8600_671
2011 Odyssey
Page 673 of 722
Immediately turn of f all electrical
accessories. Try not to use other
electrically operated controls such as
the power windows. Keep the engine
running; starting the engine will
discharge the battery rapidly.
Go to a service station or garage
where you can get technical
assistance.If you see a ‘‘REPLACE BATTERY’’
message on the multi-information
display (‘‘CHANGE BATT’’ message
on the inf ormation display on some
models), along with this indicator on,
you may need to replace the battery.
Have your vehicle’s battery checked
andreplacedbyyourdealer.
If the charging system
indicator comes on brightly
when the engine is running, the
battery is not being charged.
You will also see a ‘‘CHECK
CHARGE SYSTEM’’ message on the
inf ormation display.
You will also see a ‘‘CHECK
CHARGING SYSTEM’’ message on
the multi-information display.
Except Touring models
On Touring modelsCharging System Indicator670
10/07/17 11:03:50 31TK8600_675
2011 Odyssey
Page 674 of 722

If your vehicle’s battery has been
disconnected or gone dead, these
codes are erased. It can take several
days of driving under various
conditions to set the codes again.
To check if they are set, turn the
ignition switch to the ON (II)
position, without starting the engine.
The malf unction indicator lamp will
come on f or 20 seconds. If it then
goes of f , the readiness codes are set.
If it blinks f ive times, the readiness
codes are not set. If possible, do not
take your vehicle f or an emissions
test until the readiness codes are set.
Refer tofor
more information (see page ).
The indicator may also come on with
the ‘‘D’’ indicator.
If this indicator comes on
while driving, it means one
of the engine’s emissions control
systems may have a problem. Even
though you may f eel no dif f erence in
your vehicle’s perf ormance, it can
reduce your f uel economy and cause
increased emissions. Continued
operation may cause serious damage.
If you have recently ref ueled your
vehicle, the indicator coming on
could be due to a loose or missing
f uel f ill cap. Tighten the cap until it
clicks at least once. Tightening the
cap will not turn the indicator of f
immediately; it can take several days
of normal driving.
If the indicator comes on repeatedly,
even though it may turn of f as you
continue driving, have your vehicle
checked by your dealer as soon as
possible. You will also see a ‘‘CHECK
EMISSION SYSTEM’’ message on
the multi-information display.
Your vehicle has certain ‘‘readiness
codes’’ that are part of the on-board
diagnostics f or the emissions
systems. In some states, part of the
emissions testing is to make sure
these codes are set. If they are not
set, the test cannot be completed.
700
On Touring models
Malf unction Indicator L amp
Emissions T esting
Readiness Codes
Taking Care of the Unexpected
671
If you keep driving with the
malf unction indicator lamp on, you can
damage your vehicle’s emissions
controls and engine. Those repairs may
not be covered by your vehicle’s
warranties.
10/07/17 11:03:58 31TK8600_676
2011 Odyssey
Page 677 of 722
�µ
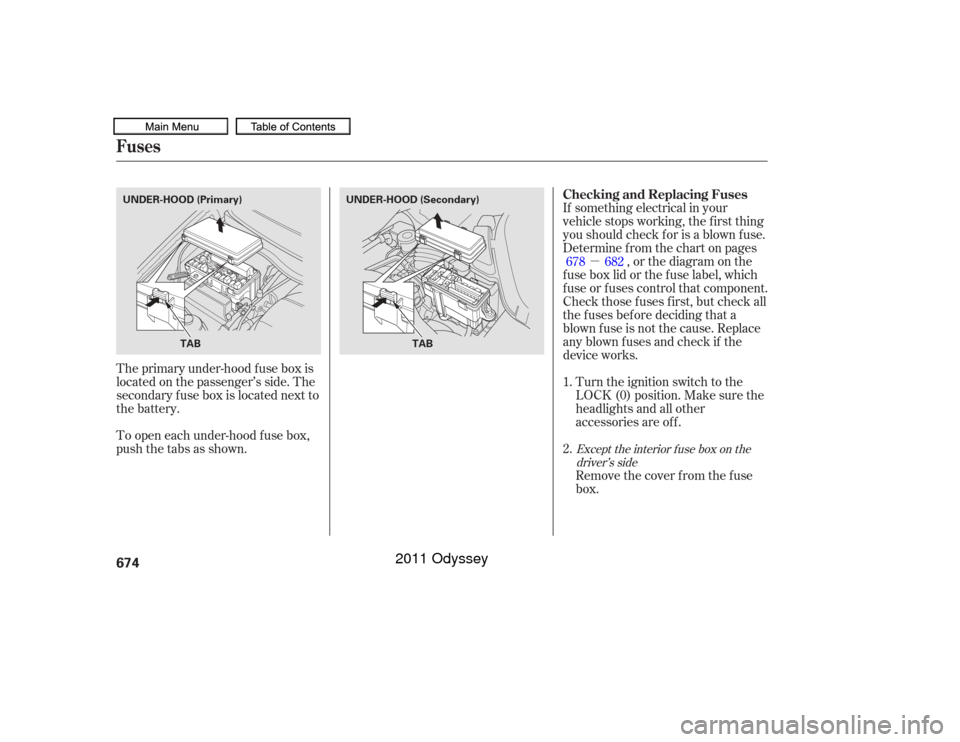
The primary under-hood f use box is
locatedonthepassenger’sside.The
secondary f use box is located next to
the battery.
To open each under-hood f use box,
pushthetabsasshown. If something electrical in your
vehicle stops working, the first thing
youshouldcheckforisablownfuse.
Determine f rom the chart on pages
, or the diagram on the
f use box lid or the f use label, which
f use or f uses control that component.
Check those f uses f irst, but check all
the f uses bef ore deciding that a
blown f use is not the cause. Replace
any blown fuses and check if the
device works.
Turn the ignition switch to the
LOCK (0) position. Make sure the
headlights and all other
accessories are of f .
Remove the cover f rom the f use
box.
1.
2. 678 682
Except the interior f use box on the
driver’s side
Fuses
Checking and Replacing Fuses
674
TAB
TAB
UNDER-HOOD (Primary)
UNDER-HOOD (Secondary)
10/07/17 11:04:22 31TK8600_679
2011 Odyssey