Page 614 of 722

�µ
�µ
�µ
�µ
�µ
�µ
�Ì
U.S. Vehicles:
Youshouldcheckthefollowing
items at the specif ied intervals. If
you are unsure of how to perf orm
any check, turn to the appropriate
page listed. Lights Check the operation of
the headlights, parking lights,
taillights, high-mount brake light,
and license plate lights monthly.
See page .
Engine coolant level Check the
radiator reserve tank every time
you f ill the f uel tank. See page . Engine oil level Check every
time you fill the fuel tank. See
page .
Automatic transmission Check
the f luid level monthly. See page .
Brakes Check the f luid level
monthly. See page .
Tires Check the tire pressure
monthly. Examine the tread f or
wear and foreign objects. See page .
According to state and federal
regulations, f ailure to perf orm
maintenance on the items marked
with will not void your emissions
warranties. However, all
maintenance services should be
perf ormed in accordance with the
intervals indicated by the odometer/
trip meter display or the multi-
inf ormation display.
545
621 623
643 625
545
CONT INUED
Owner’s Maintenance Checks
Maintenance Minder
Maint enance
611TM
10/07/17 10:56:05 31TK8600_616
2011 Odyssey
Page 628 of 722

CONT INUED
Theheadlightswereproperlyaimed
when your vehicle was new. If you
regularly carry heavy items in the
cargo area or pull a trailer,
readjustment may be required.
Adjustmentsshouldbedonebyyour
dealer or other qualif ied technician.Your vehicle has halogen headlight
bulbs. When replacing a bulb, handle
it by its base, and protect the glass
f rom contact with your skin or hard
objects. If you touch the glass, clean
it with denatured alcohol and a clean
cloth.
The low beam headlight bulbs are a
type of high voltage discharge tube.
High voltage can remain in the
circuit even with the light switch of f
and the key removed. Because of
this, you should not attempt to
examine or change a low beam
headlight bulb yourself . If a low
beam headlight bulb fails, take your
vehicle to a dealer to have it replaced.
On Touring Elite and Canadian Touring
models
Lights
Headlight A iming Replacing a Headlight Bulb
High Voltage Discharge Tube
Headlights
Maint enance
625
Halogen headlight bulbs get very hot
when lit. Oil, perspiration, or a scratch
on the glass can cause the bulb to
overheat and shatter.
10/07/17 10:57:48 31TK8600_630
2011 Odyssey
Page 629 of 722
Open the hood.
To change a bulb on the driver’s
side, remove the upper part of the
air intake duct.
Use a f lat-tip screwdriver to
remove the holding clip, then
remove the upper part.To change a bulb on the
passenger’s side, use a f lat-tip
screwdriver to remove the holding
clip f rom the engine coolant
reserve tank, and then remove the
engine coolant reserve tank out of
its stay.
Remove the power steering
reservoir f rom the stay bracket to
get enough working space.
1.
2.
LightsHigh Beam Headlights626
HOLDING CLIPS
STAY
COOLANT RESERVE TANK
HOLDING CLIP POWER STEERING RESERVOIR
STAY BRACKET
10/07/17 10:57:56 31TK8600_631
2011 Odyssey
Page 630 of 722
Insert the new bulb into the hole,
and turn it one-quarter turn
clockwise to lock it in place.
Push the electrical connector onto
the new bulb.
Turn on the headlights to test the
new bulb.
Remove the electrical connector
f rom the bulb by pushing on the
tab and pulling the connector
down.
Remove the bulb by turning it
about one-quarter turn
counterclockwise. Reinstall the air intake duct
securely.
Reinstall the engine coolant
reserve tank and power steering
reservoir. Open the hood.
Remove the electrical connector
f rom the bulb by pushing on the
tab and pulling the connector
down.
Remove the bulb by turning it
about one-quarter turn
counterclockwise.
4. 5.
6.
3. 7.
8.
2.
3. 1.
CONT INUED
Driver’s sidePassenger’s side
Lights
L ow Beam Headlight s
Maint enance
627
TAB
CONNECTOR BULB
BULBTAB
CONNECTOR
10/07/17 10:58:08 31TK8600_632
2011 Odyssey
Page 631 of 722
Insert the new bulb into the hole,
and turn it one-quarter turn
clockwise to lock it in place.
Push the electrical connector onto
the new bulb.
Turn on the headlights to test the
new bulb.Open the hood.
Remove the socket from the
headlight assembly by turning it
one-quarter turn counterclockwise.
Pull the bulb straight out of its
socket.Turn on the lights to make sure
the new bulb is working. Insert the socket back into the
headlight assembly. Turn it
clockwise to lock it in place. Push the new bulb straight into
the socket until it bottoms.
1.
4.
5.
6.
2.
3. 4.
5.
6.
Lights
Replacing the Front Side Marker/
Parking/Turn Signal Light Bulb
628
BULB
SOCKET
10/07/17 10:58:18 31TK8600_633
2011 Odyssey
Page 666 of 722
 position. Turn on the
headlights, and check their
brightness. If the headlights are
very dim or do not come on at all,
the battery is discharged. Seeon page .
I")
Turn the ignition switch to the ON
(II) position. Turn on the
headlights, and check their
brightness. If the headlights are
very dim or do not come on at all,
the battery is discharged. Seeon page .
If you see a ‘‘CHECK BATTERY
SENSOR’’ message on the multi-
inf ormation display (or ‘‘CHECK
BATT SENSOR’’ message on the
inf ormation display on some
models) when you try to start the
engine, the battery is discharged.
If it will not start, see on page . Turn the ignition switch to the
START (III) position. If the
headlights do not dim, check the
condition of the f uses. If the f uses
areOK,thereisprobably
something wrong with the
electrical circuit for the ignition
switch or starter motor. You will
need a qualif ied technician to
determine the problem. See
on page .If the headlights dim noticeably or
go out when you try to start the
engine, either the battery is
discharged or the connections are
corroded. Check the condition of the
battery and terminal connections
(see page ). You can then try
jump starting the vehicle from a
booster battery (see page ).
665
665 665
649
683
If theEngineWon’tStart
Jump Starting
Jump
Starting Emergency T owing
Taking Care of the Unexpected
663
10/07/17 11:03:00 31TK8600_668
2011 Odyssey
Page 677 of 722
�µ
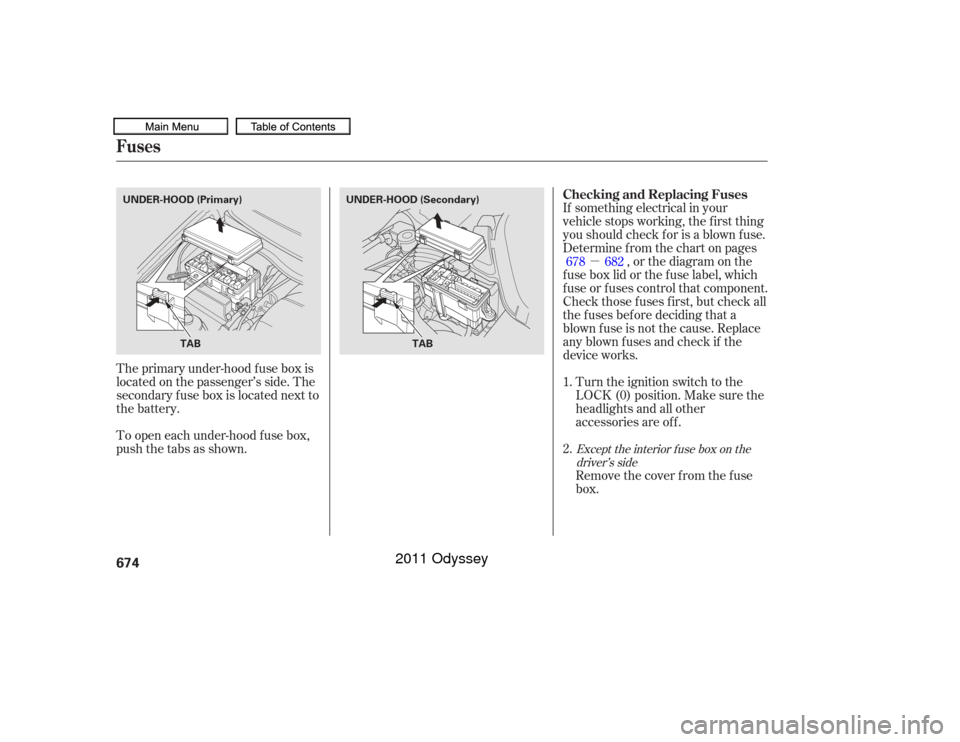
The primary under-hood f use box is
locatedonthepassenger’sside.The
secondary f use box is located next to
the battery.
To open each under-hood f use box,
pushthetabsasshown. If something electrical in your
vehicle stops working, the first thing
youshouldcheckforisablownfuse.
Determine f rom the chart on pages
, or the diagram on the
f use box lid or the f use label, which
f use or f uses control that component.
Check those f uses f irst, but check all
the f uses bef ore deciding that a
blown f use is not the cause. Replace
any blown fuses and check if the
device works.
Turn the ignition switch to the
LOCK (0) position. Make sure the
headlights and all other
accessories are of f .
Remove the cover f rom the f use
box.
1.
2. 678 682
Except the interior f use box on the
driver’s side
Fuses
Checking and Replacing Fuses
674
TAB
TAB
UNDER-HOOD (Primary)
UNDER-HOOD (Secondary)
10/07/17 11:04:22 31TK8600_679
2011 Odyssey
Page 681 of 722
�µ
�µ
�µ
�µ
�µ
�µ�µ
�µ
�µ
�µ
�µ
�µ
�µ
�µ
�µ
�µ
�µ
�µ
�µ
�µ
�Î
�Î
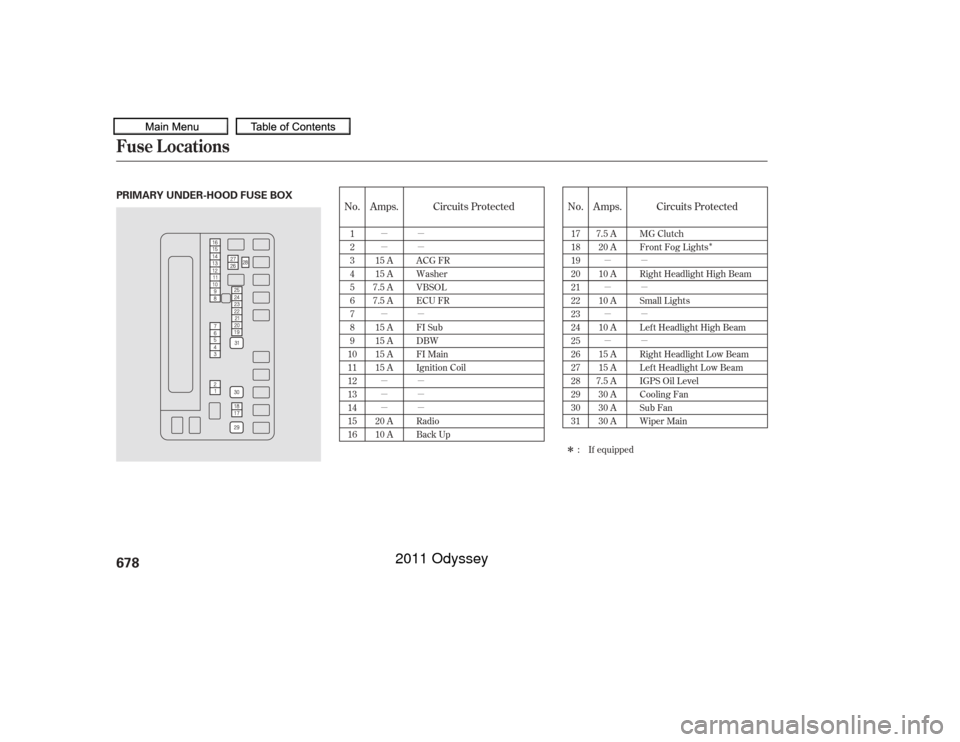
No. Amps. Circuits Protected No. Amps. Circuits Protected1
2
3
4
5
6
7
8
9
10
11
12
13
14
15
16 15 A
15 A
7.5 A
7.5 A
15 A
15 A
15 A
15 A
20 A
10 A ACG FR
Washer
VBSOL
ECU FR
FI Sub
DBW
FI Main
Ignition Coil
Radio
Back Up 17
18
19
20
21
22
23
24
25
26
27
28
29
30
31
7.5 A
20 A
10 A
10 A
10 A
15 A
15 A
7.5 A
30 A
30 A
30 A MG Clutch
Front Fog Lights
Right Headlight High Beam
Small Lights
Left Headlight High Beam
Right Headlight Low Beam
Left Headlight Low Beam
IGPS Oil Level
Cooling Fan
Sub Fan
Wiper Main
: If equipped
Fuse Locations678PRIMARY UNDER-HOOD FUSE BOX
10/07/17 11:04:46 31TK8600_683
2011 Odyssey