Page 194 of 356
On vehicles with navigation system
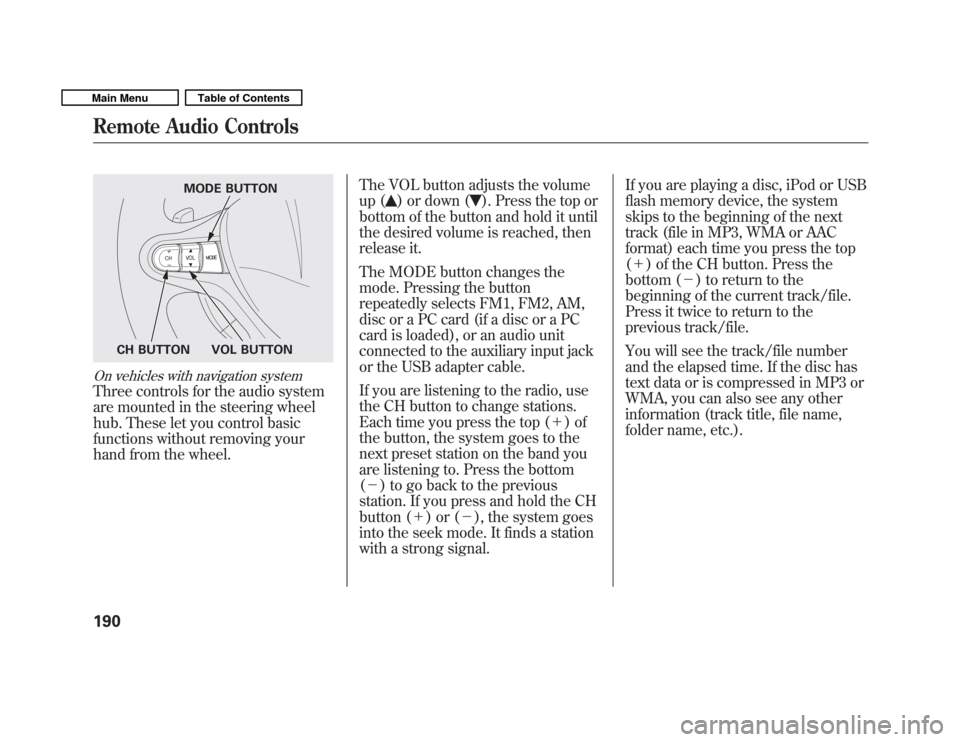
Three controls for the audio system
are mounted in the steering wheel
hub. These let you control basic
functions without removing your
hand from the wheel.The VOL button adjusts the volume
up (
) or down (). Press the top or
bottom of the button and hold it until
the desired volume is reached, then
release it.
The MODE button changes the
mode. Pressing the button
repeatedly selects FM1, FM2, AM,
disc or a PC card (if a disc or a PC
card is loaded), or an audio unit
connected to the auxiliary input jack
or the USB adapter cable.
If you are listening to the radio, use
the CH button to change stations.
Each time you press the top ( +)of
the button, the system goes to the
next preset station on the band you
are listening to. Press the bottom( � ) to go back to the previous
station. If you press and hold the CH
button ( +)or( �), the system goes
into the seek mode. It finds a station
with a strong signal. If you are playing a disc, iPod or USB
flash memory device, the system
skips to the beginning of the next
track (file in MP3, WMA or AAC
format) each time you press the top(
+ ) of the CH button. Press the
bottom ( �) to return to the
beginning of the current track/file.
Press it twice to return to the
previous track/file.
You will see the track/file number
and the elapsed time. If the disc has
text data or is compressed in MP3 or
WMA, you can also see any other
information (track title, file name,
folder name, etc.).
MODE BUTTON
VOL BUTTON
CH BUTTON
Remote Audio Controls
190
Main MenuTable of Contents
Page 195 of 356
In MP3 or WMA mode, you can use
the skip function to select folders.
Press and hold the top (+) of the CH
button until you hear a beep, to skip
forward to the first file of the next
folder. Press the bottom ( �) to skip
backward to the previous folder.
If you are playing a PC card, press
the top ( +) of the CH button to
advance to the next file. Press the
bottom ( �) to go back to the
previous file. Auxiliary Input Jack
Your vehicle has the auxiliary input
jack on the front panel. The system
will accept auxiliary input from
standard audio accessories.
When a compatible audio unit is
connected to the jack, press the CD/
AUX (On vehicles with navigation
system) or AUX (On vehicles without
navigation system) button to select it.
On vehicles with navigation system
On vehicles without navigation system
Remote Audio Controls, Auxiliary Input Jack
191
Features
Main MenuTable of Contents
Page 196 of 356
Your vehicle's audio system will
disable itself if it is disconnected
from electrical power for any reason.
To make it work again, you must
enter a specific digit code using the
preset buttons. Because there are
hundreds of number combinations
possible from specific digits, making
the system work without knowing
the exact code is nearly impossible.
You should have received a card that
lists your audio system's code and
serial numbers. It is best to store this
card in a safe place at home. In
addition, you should write the audio
system's serial number in this
owner's manual.
If you lose the card, you must obtain
the code number from a dealer. To
do this, you will need the system's
serial number.If your vehicle's battery is
disconnected or goes dead, the audio
system will disable itself. If this
happens, you will see
‘‘ENTER
CODE ’’in the frequency display the
next time you turn on the system.
Use the preset buttons to enter the
code. On vehicles with navigation
system, touch the Done icon to set
the code. The code is on the radio
code card included in your owner's
manual kit. When it is entered
correctly, the radio will start playing.
If you make a mistake entering the
code, do not start over; complete the
sequence, then enter the correct
code. You have 10 tries to enter the
correct code. If you are unsuccessful
in 10 attempts, you must then leave
the system on for 1 hour before
trying again.
Radio Theft Protection
192
Main MenuTable of Contents
Page 197 of 356
On vehicles without navigation system
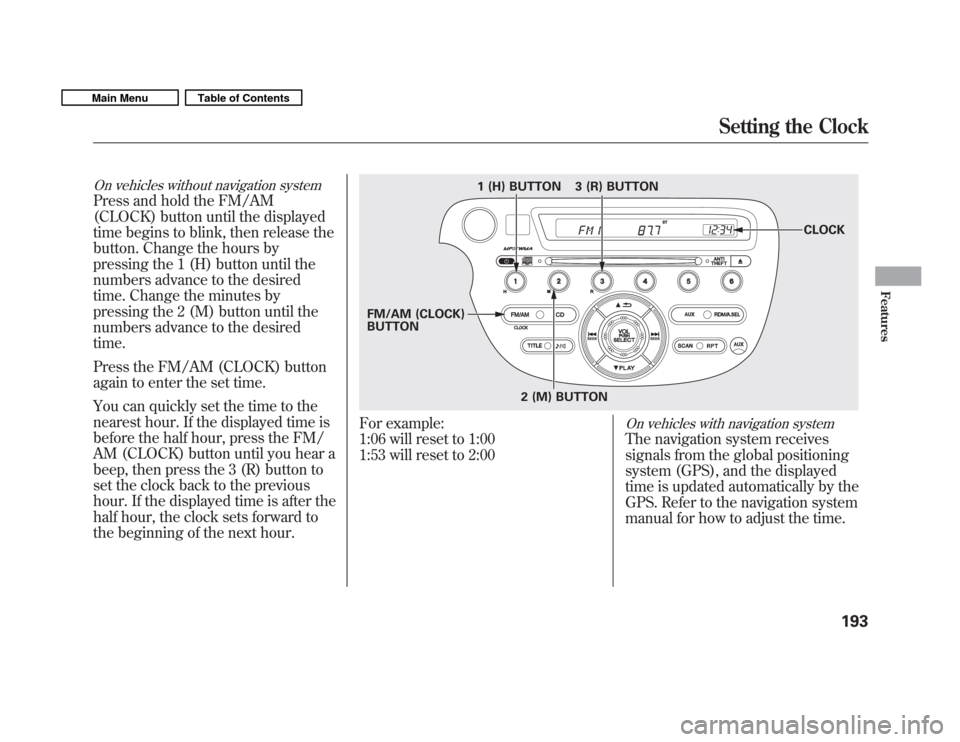
Press and hold the FM/AM
(CLOCK) button until the displayed
time begins to blink, then release the
button. Change the hours by
pressing the 1 (H) button until the
numbers advance to the desired
time. Change the minutes by
pressing the 2 (M) button until the
numbers advance to the desiredtime.
Press the FM/AM (CLOCK) button
again to enter the set time.
You can quickly set the time to the
nearest hour. If the displayed time is
before the half hour, press the FM/
AM (CLOCK) button until you hear a
beep, then press the 3 (R) button to
set the clock back to the previous
hour. If the displayed time is after the
half hour, the clock sets forward to
the beginning of the next hour.
For example:
1:06 will reset to 1:00
1:53 will reset to 2:00On vehicles with navigation system
The navigation system receives
signals from the global positioning
system (GPS), and the displayed
time is updated automatically by the
GPS. Refer to the navigation system
manual for how to adjust the time.
1 (H) BUTTON
FM/AM (CLOCK) BUTTON 3 (R) BUTTON
CLOCK
2 (M) BUTTON
Setting the Clock
193
Features
Main MenuTable of Contents
Page 286 of 356
WARNING:Battery posts,
terminals, and related accessories
contain lead and lead compounds.
Wash your hands after handling.
If you need to connect the battery to
a charger, disconnect both cables to
prevent damaging your vehicle's
electrical system. Always disconnect
the negative ( �) cable first, and
reconnect it last.
On vehicles without navigation system
If your vehicle's battery is
disconnected, or goes dead, the time
setting is lost. To reset the time, see
page 193.
If your vehicle's battery is
disconnected, or goes dead, the
audio system may disable itself. The
next time you turn on the radio, you
will see ‘‘ENTER CODE ’’in the
frequency display. Use the preset
buttons to enter the code (see page192).
The battery gives off explosive
hydrogen gas during normaloperation.
A spark or flame can cause the
battery to explode with enough
force to kill or seriously hurtyou.
Wear protective clothing and a
face shield, or have a skilled
technician do the batterymaintenance.
On vehicles with navigation system
The navigation system will also
disable itself. The next time you turn
on the ignition switch, the system
will require you to enter ‘‘ENTER
CODE ’’before it can be used. Refer
to the navigation system manual.
Checking the Battery
282
Main MenuTable of Contents
Page 314 of 356
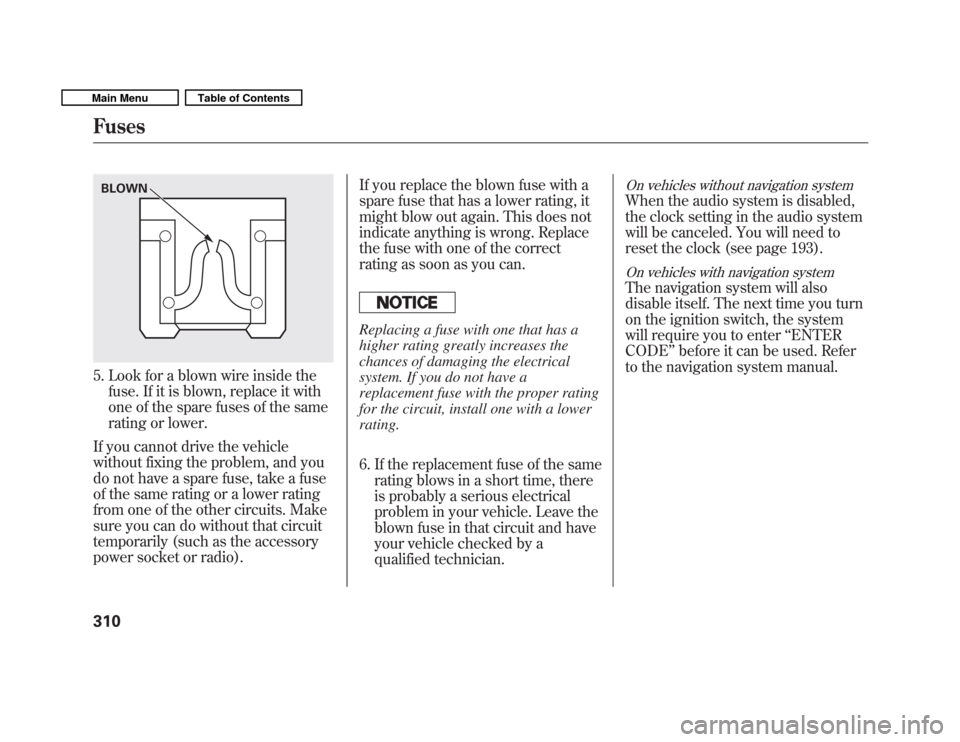
5. Look for a blown wire inside thefuse. If it is blown, replace it with
one of the spare fuses of the same
rating or lower.
If you cannot drive the vehicle
without fixing the problem, and you
do not have a spare fuse, take a fuse
of the same rating or a lower rating
from one of the other circuits. Make
sure you can do without that circuit
temporarily (such as the accessory
power socket or radio). If you replace the blown fuse with a
spare fuse that has a lower rating, it
might blow out again. This does not
indicate anything is wrong. Replace
the fuse with one of the correct
rating as soon as you can.
Replacing a fuse with one that has a
higher rating greatly increases the
chances of damaging the electrical
system. If you do not have a
replacement fuse with the proper rating
for the circuit, install one with a lowerrating.
6. If the replacement fuse of the same
rating blows in a short time, there
is probably a serious electrical
problem in your vehicle. Leave the
blown fuse in that circuit and have
your vehicle checked by a
qualified technician.
On vehicles without navigation system
When the audio system is disabled,
the clock setting in the audio system
will be canceled. You will need to
reset the clock (see page 193).
On vehicles with navigation system
The navigation system will also
disable itself. The next time you turn
on the ignition switch, the system
will require you to enter ‘‘ENTER
CODE ’’before it can be used. Refer
to the navigation system manual.
BLOWN
Fuses
310
Main MenuTable of Contents
Page 341 of 356
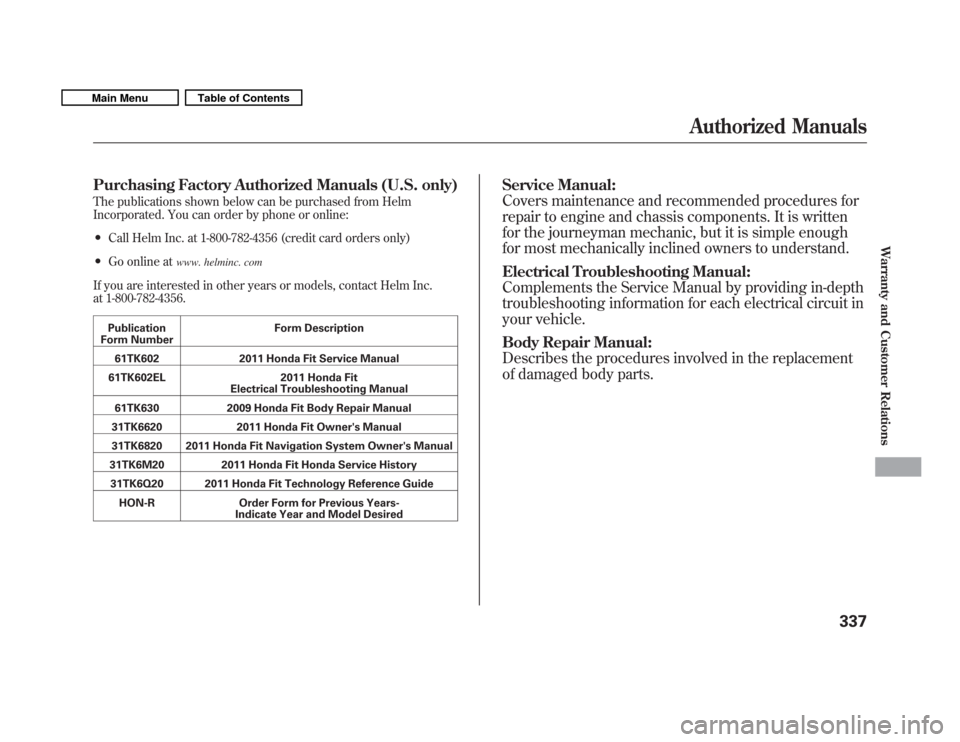
Purchasing Factory Authorized Manuals (U.S. only)
The publications shown below can be purchased from Helm
Incorporated. You can order by phone or online:� Call Helm Inc. at 1-800-782-4356 (credit card orders only)
� Go online at www. helminc. com
If you are interested in other years or models, contact Helm Inc.
at 1-800-782-4356.
Publication
Form Number Form Description
61TK602 2011 Honda Fit Service Manual
61TK602EL 2011 Honda Fit Electrical Troubleshooting Manual
61TK630 2009 Honda Fit Body Repair Manual
31TK6620 2011 Honda Fit Owner's Manual
31TK6820 2011 Honda Fit Navigation System Owner's Manual
31TK6M20 2011 Honda Fit Honda Service History
31TK6Q20 2011 Honda Fit Technology Reference Guide HON-R Order Form for Previous Years- Indicate Year and Model Desired Service Manual:
Covers maintenance and recommended procedures for
repair to engine and chassis components. It is written
for the journeyman mechanic, but it is simple enough
for most mechanically inclined owners to understand.
Electrical Troubleshooting Manual:
Complements the Service Manual by providing in-depth
troubleshooting information for each electrical circuit in
your vehicle.
Body Repair Manual:
Describes the procedures involved in the replacement
of damaged body parts.
Authorized Manuals
337
Warranty and Customer Relations
Main MenuTable of Contents