Page 101 of 445
If the power door lock system cannot
unlock the tailgate, unlock it
manually.Push the release lever to the lower
right as shown.
If you need to unlock the tailgate
manually, it means there is a
problem with the tailgate. Have the
vehicle checked by your dealer.
Placeaclothonthetopsideof the
cover to prevent scratches, then use
a small f lat-tip screwdriver to remove
the cover on the back of the tailgate.
Unlocking the T ailgate
Tailgate
96
RELEASE LEVER
Main MenuTable of Contents
Page 103 of 445
�µ
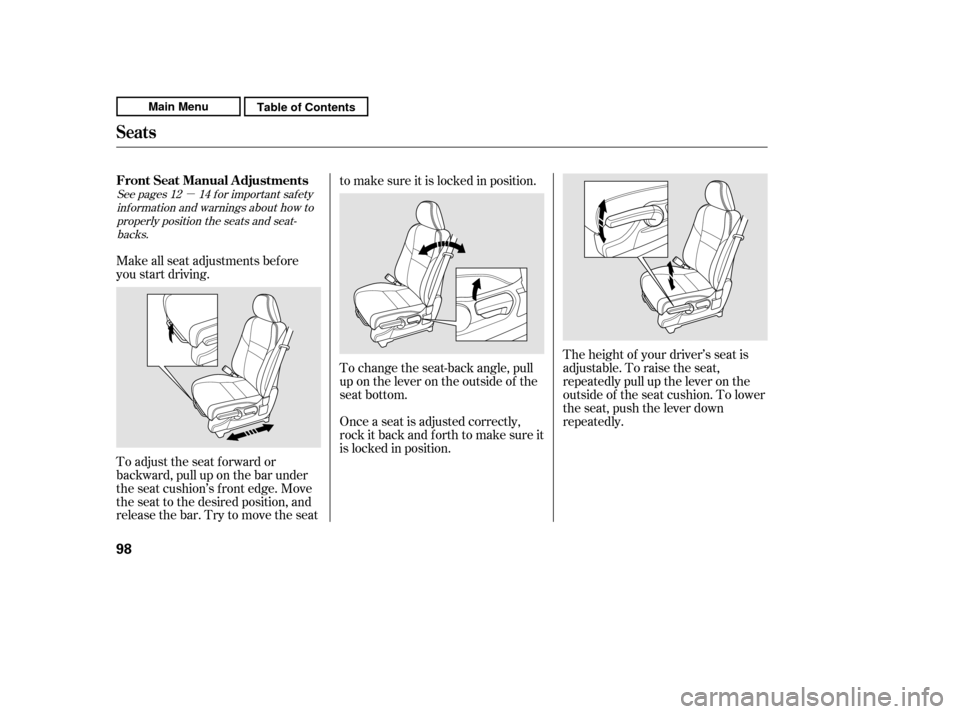
The height of your driver’s seat is
adjustable. To raise the seat,
repeatedly pull up the lever on the
outside of the seat cushion. To lower
the seat, push the lever down
repeatedly.
Make all seat adjustments bef ore
you start driving.
To adjust the seat f orward or
backward, pull up on the bar under
the seat cushion’s f ront edge. Move
the seat to the desired position, and
releasethebar.Trytomovetheseat to make sure it is locked in position.
Once a seat is adjusted correctly,
rock it back and f orth to make sure it
is locked in position.
To change the seat-back angle, pull
up on the lever on the outside of the
seat bottom.
See pages f or important saf ety
inf ormation and warnings about how toproperly position the seats and seat-
backs. 12 14
Seats
FrontSeatManualAdjustments
98
Main MenuTable of Contents
Page 104 of 445
Each front seat has an armrest on
thesideof theseat-back.Touseit,
pivotitdown.
To adjust the seats forward and
backward, pull up on the lever under
the seat cushion. Af ter moving the
seat, make sure it is locked into
position.
The angle of each rear seat-back can
be adjusted separately. To change
the seat-back angle of the rear seat-
back, pull up on the release lever on
the top of the seat-back. Move the
seat-back to the desired position, then release the lever. Make sure
the seat-back latches in the new
position.
Make sure all rear shoulder belts are
positioned in f ront of the rear seat-
backs af ter you adjust the rear seats.
When using the center seating
position, adjust the lef t and right side
of the rear seats to the same position.
CONT INUED
Armrests
Rear Seat Adjustments
Seats
Inst rument s and Cont rols
99
FRONT
Main MenuTable of Contents
Page 107 of 445

Make sure the removed head
restraints are securely stored.
Make sure the head restraint locks
in position when you reinstall it.
When reinstalling a head restraint,
put the legs back in place. Then
adjust it to the appropriate height
while pressing the release button.
When a passenger is seated in the
rear center seating position, make
sure the center head restraint is
properly adjusted.
To pivot the outer head restraint
down f or better visibility, press the
tilt button on the side of the head
restraint. It f olds down f orward. To
raise the head restraint, pivot it up
by hand. Make sure the head
restraint locks in position.
To remove a f ront or rear center
head restraint, pull it up as f ar as it
will go. Push the release button, then
pull the restraint out of the seat-back.
Seats
Removing t he Head Rest raint
102
RELEASE BUTTON
Rear Outer Position
LEGSSEAT-BACK
CUSHION
TILT BUTTON Rear Center Position
CUSHION
Failure to reinstall the head
restraints can result in severe
injury during a crash.
Always replace the head
restraints before driving.
Main MenuTable of Contents
Page 109 of 445

You can recline the seat-backs on the
f ront seats so they are level with the
rear seat cushions, making a large
cushioned area. To do this:Adjust the rear seats as f ar back
as possible.
Remove the f ront head restraints
(see page ), and store them
securely.
Only the passenger’s side can be
level as f ollows. Adjust the f ront seats f orward as
f ar as possible. Pull up the seat-
back angle adjustment lever and
pivot the seat-back backward until
it is level with the rear seat
cushion.
The seat-back of the power
adjustable driver’s seat cannot be
level. Do not push the seat-back
down f orcibly.
Adjust the rear seat-back to the
desired position.
Reverse this procedure to return the
f ront and rear seats to the upright
position. Make sure you install the
head restraints and securely lock the
seats before driving.
When you return the seat-back to its
upright position, hold the seat-back
to keep it f rom going up too quickly.
1. 2.
4.
3.
102
EX-L and Canadian EX models
EX-L and Canadian EX models
Reclining the Front Seats
Seats
104
SLIDE BAR SEAT-BACK ANGLE
ADJUSTMENT LEVER
Main MenuTable of Contents
Page 113 of 445
Pull out the f astening strap f rom
the slit on the seat-back. Then
attach the anchor on the fastening
strap to the hook on the center
pillar.Pull down on the anchor to engage
the upper part of the anchor
securely on the hook, and make
sure the seat is secure.
Unlock the seat f rom the f loor by
pulling the lock release strap
located at the rear of the seat
cushion, under the seat back, then
lift the rear of the seat.
You cannot fold up the rear seat if
it is not latched securely in the
rearmost position.
3.
4.5.
Seats
108
LOCK RELEASE STRAP ANCHOR
HOOK
FASTENING
STRAP ANCHOR
FASTENING STRAP
HOOK
Main MenuTable of Contents
Page 125 of 445
Open the lower glove box by pulling
the bottom of the handle. Close it
with a f irm push. Lock or unlock the
glove box with the master key.
Sitting on or getting under the table,
or putting heavy objects on the table,
may damage or deform it.
Do not put any items on the table
while driving. They may f all down or
f ly around when you go around
corners or brake hard.
To use the center table, pull up the
outside edge of the table until it
latches. To store it, pull the lever and
lower the table.On LX and U.S. EX models
Lower Glove Box
Center Table
Interior Convenience Items
120
To lock
Main MenuTable of Contents
Page 131 of 445
Af ter all doors and the tailgate are
closed tightly, the light fades out in
about 30 seconds.
The ceiling light (with the switch in
the center position) comes on when
you remove the key f rom the ignition
switch. If you do not open a door and
the tailgate, the light f ades out in
about 30 seconds.
If you leave any door or the tailgate
open without the key in the ignition
switch, the ceiling light goes of f af ter
3 minutes.
The ceiling light has a three-position
switch: ON, Door Activated, and
OFF. In the Door Activated (center)
position, the light comes on when
you:
Unlock the doors and the tailgate
with the key or remote transmitter.
Open any door. Turn on the spotlight by pushing the
lens. Push the lens again to turn it
of f . You can use the spotlights at all
times.
All models
Interior Lights
Spotlights
Ceiling L ight
126
Push
Push
ON
OFF DOOR ACTIVATED LX model
Main MenuTable of Contents


 comes on when
you remove the key f rom the")