Page 87 of 445

Youshouldhavereceivedakey
number tag with your keys. You will
need this key number if you ever
have to get a lost key replaced. Use
only Honda-approved key blanks.
These keys contain electronic
circuits that are activated by the
immobilizer system. They will not
work to start the engine if the
circuits are damaged.Protect the keys f rom direct
sunlight, high temperature, and
high humidity.
Donotdropthekeysorsetheavy
objects on them.
Keep the keys away f rom liquids.
If they get wet, dry them
immediately with a sof t cloth.
Push the lever up to lock the
steering wheel in position.
Make sure you have securely
locked the steering wheel in place
by trying to move it up, down, in,
and out.
The master key fits all the locks on
your vehicle. The valet key works
only in the ignition and the driver’s
door lock. You can keep the glove
boxlockedwhenyouleaveyour
vehicle and the valet key at a parking
f acility.
The valet key does not contain a
battery. Do not try to take it apart.
3. 4. Keys and Locks
Steering Wheel A djustment, K eys and L ocks
82
LEVER
KEY
NUMBERTAG
MASTER KEY
WITH REMOTE
TRANSMITTER VALET
KEY
(Gray)
Main MenuTable of Contents
Page 97 of 445

�µ
�µ �µ
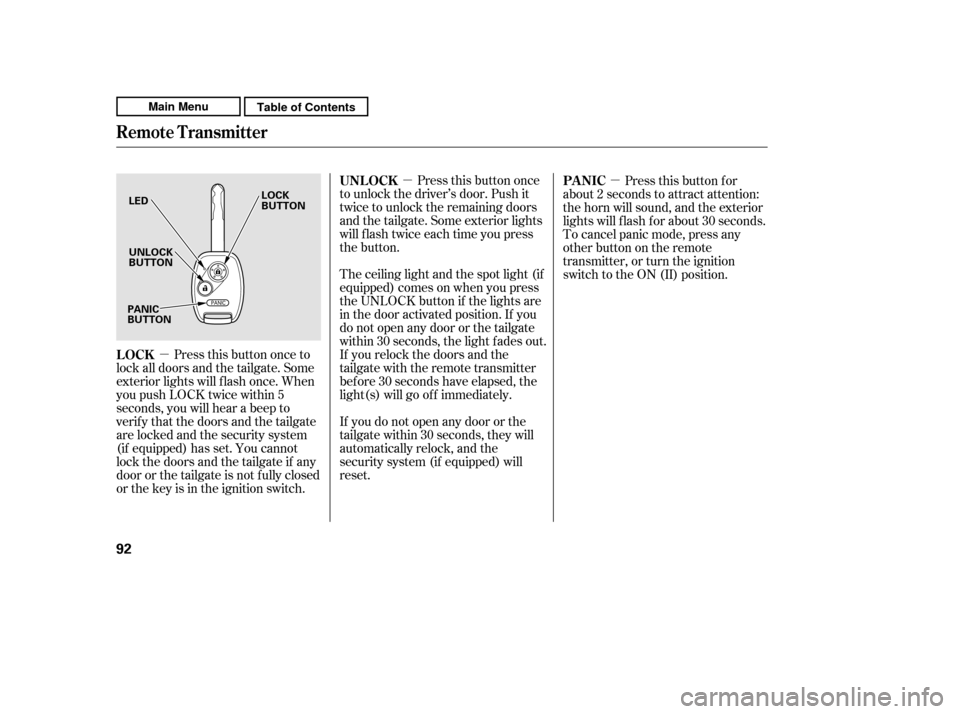
Press this button once
to unlock the driver’s door. Push it
twice to unlock the remaining doors
and the tailgate. Some exterior lights
will f lash twice each time you press
the button.
Press this button once to
lock all doors and the tailgate. Some
exterior lights will f lash once. When
you push LOCK twice within 5
seconds, you will hear a beep to
verify that the doors and the tailgate
arelockedandthesecuritysystem
(if equipped) has set. You cannot
lockthedoorsandthetailgateif any
door or the tailgate is not f ully closed
or the key is in the ignition switch. The ceiling light and the spot light (if
equipped) comes on when you press
the UNLOCK button if the lights are
in the door activated position. If you
do not open any door or the tailgate
within 30 seconds, the light f ades out.
If you relock the doors and the
tailgate with the remote transmitter
bef ore 30 seconds have elapsed, the
light(s) will go of f immediately.
If you do not open any door or the
tailgate within 30 seconds, they will
automatically relock, and the
security system (if equipped) will
reset. Pressthisbuttonfor
about 2 seconds to attract attention:
the horn will sound, and the exterior
lights will f lash f or about 30 seconds.
To cancel panic mode, press any
other button on the remote
transmitter, or turn the ignition
switch to the ON (II) position.
UNL OCK
LOCK PA NIC
Remote Transmitter
92
LED UNLOCK
BUTTON
LOCK
BUTTON
PANIC
BUTTON
Main MenuTable of Contents
Page 107 of 445

Make sure the removed head
restraints are securely stored.
Make sure the head restraint locks
in position when you reinstall it.
When reinstalling a head restraint,
put the legs back in place. Then
adjust it to the appropriate height
while pressing the release button.
When a passenger is seated in the
rear center seating position, make
sure the center head restraint is
properly adjusted.
To pivot the outer head restraint
down f or better visibility, press the
tilt button on the side of the head
restraint. It f olds down f orward. To
raise the head restraint, pivot it up
by hand. Make sure the head
restraint locks in position.
To remove a f ront or rear center
head restraint, pull it up as f ar as it
will go. Push the release button, then
pull the restraint out of the seat-back.
Seats
Removing t he Head Rest raint
102
RELEASE BUTTON
Rear Outer Position
LEGSSEAT-BACK
CUSHION
TILT BUTTON Rear Center Position
CUSHION
Failure to reinstall the head
restraints can result in severe
injury during a crash.
Always replace the head
restraints before driving.
Main MenuTable of Contents
Page 108 of 445

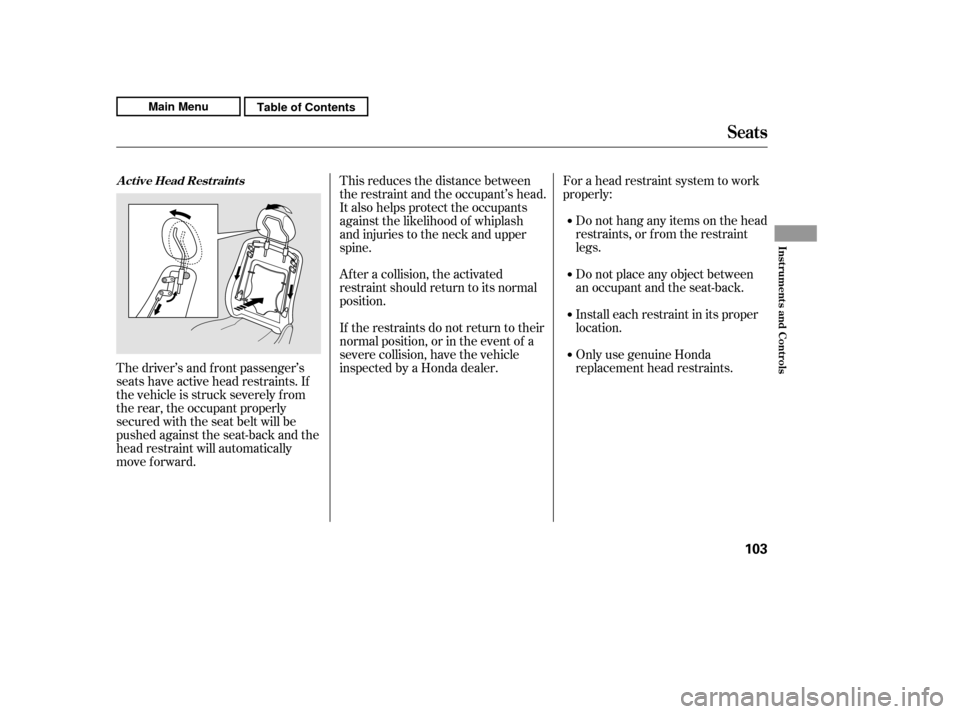
The driver’s and f ront passenger’s
seats have active head restraints. If
the vehicle is struck severely f rom
the rear, the occupant properly
secured with the seat belt will be
pushed against the seat-back and the
head restraint will automatically
move f orward.For a head restraint system to work
properly:
Do not hang any items on the head
restraints, or f rom the restraint
legs.
Do not place any object between
an occupant and the seat-back.
Install each restraint in its proper
location.
Only use genuine Honda
replacement head restraints.
If the restraints do not return to their
normal position, or in the event of a
severe collision, have the vehicle
inspected by a Honda dealer.
Af ter a collision, the activated
restraint should return to its normal
position.
This reduces the distance between
the restraint and the occupant’s head.
It also helps protect the occupants
against the likelihood of whiplash
and injuries to the neck and upper
spine.
A ct ive Head Rest raint s
Seats
Inst rument s and Cont rols
103
Main MenuTable of Contents
Page 109 of 445

You can recline the seat-backs on the
f ront seats so they are level with the
rear seat cushions, making a large
cushioned area. To do this:Adjust the rear seats as f ar back
as possible.
Remove the f ront head restraints
(see page ), and store them
securely.
Only the passenger’s side can be
level as f ollows. Adjust the f ront seats f orward as
f ar as possible. Pull up the seat-
back angle adjustment lever and
pivot the seat-back backward until
it is level with the rear seat
cushion.
The seat-back of the power
adjustable driver’s seat cannot be
level. Do not push the seat-back
down f orcibly.
Adjust the rear seat-back to the
desired position.
Reverse this procedure to return the
f ront and rear seats to the upright
position. Make sure you install the
head restraints and securely lock the
seats before driving.
When you return the seat-back to its
upright position, hold the seat-back
to keep it f rom going up too quickly.
1. 2.
4.
3.
102
EX-L and Canadian EX models
EX-L and Canadian EX models
Reclining the Front Seats
Seats
104
SLIDE BAR SEAT-BACK ANGLE
ADJUSTMENT LEVER
Main MenuTable of Contents
Page 111 of 445

Reverse this procedure to return the
seat-back to the upright position.
Make sure the seat is secured and
the seat belt is in f ront of the seat-
back bef ore driving.
In the rear center seating position,
be sure the detachable anchor is
latched securely (see page ).Make sure that the f olded down rear
seat does not interf ere with the f ront
passenger’s seat-back. This will
cause the f ront passenger’s weight
sensors and the f ront passenger’s
seat belt reminder indicator to work
improperly (see page ). Also
check the passenger airbag of f
indicator to assure proper operation
of the passenger’s f ront airbag (see
page ).
Do not put any heavy items on the
seat-back when it is folded down. Fold the seat-back forward.
Pull up the release lever on the top
of the seat-back.
Lower the rear center head
restraint to its lowest position.
Push the button located next to
each rear outer head restraint to
pivot the head restraint down.
2. 3. 4. 109
19
33
Seats
106
RELEASE LEVER
Main MenuTable of Contents
Page 112 of 445
When any seat-back is f olded down,
do not use the dual deck cargo shelf
(if equipped).
Make sure all items in the cargo area
are secured. Loose items can f ly
f orward and cause injury if you have
to brake hard (See
on page ).The lef t and right rear seats can be
f olded up separately to make room
for cargo.
To f old the rear seat f orward:
Remove any items from the seat
beforeyoufolduptheseatcushion.
Pull up the bar under the seat
cushion and slide the rear seat
backward. The rear seat will not
foldforwardunlessitisasfar
back as it will go. Lower the center seat-back bef ore
f olding the passenger’s side seat
forward.
Follow steps 1 through 4 on pages
and f or f olding down the
seat-back.
1. 2.
304 105 106
CONT INUED
Carrying CargoFolding the Rear Seat Forward
Seats
Inst rument s and Cont rols
107
SLIDE BARS
Main MenuTable of Contents
Page 113 of 445
Pull out the f astening strap f rom
the slit on the seat-back. Then
attach the anchor on the fastening
strap to the hook on the center
pillar.Pull down on the anchor to engage
the upper part of the anchor
securely on the hook, and make
sure the seat is secure.
Unlock the seat f rom the f loor by
pulling the lock release strap
located at the rear of the seat
cushion, under the seat back, then
lift the rear of the seat.
You cannot fold up the rear seat if
it is not latched securely in the
rearmost position.
3.
4.5.
Seats
108
LOCK RELEASE STRAP ANCHOR
HOOK
FASTENING
STRAP ANCHOR
FASTENING STRAP
HOOK
Main MenuTable of Contents