Page 79 of 388

�´�µ
The buttons under the lef t side vent
control the brightness of the
instrument panel. Push the or
button to adjust the brightness.
Separate adjustments can be made
when the headlights are on and of f . There are six brightness levels.
When you push either button, the
inf ormation display indicates the
current level. You will hear a tone
when you reach the maximum or
minimum brightness. The display
returns to the odometer 5 seconds
af ter you stop adjusting the
brightness.To reduce glare at night, the
instrument panel illumination dims
when you turn the light switch to the
or position.
The center of each meter (upper and
lower) illuminates with reduced
brightness when you unlock and
open the driver’s door, and then goes
back to the selected brightness when
you turn the ignition switch to the
ON (II) position.
If you insert the key but do not turn
the ignition switch to the ON (II)
position, the illumination turns of f in
about 10 seconds.
Instrument Panel Brightness
Inst rument s and Cont rols
75
INSTRUMENT PANEL BRIGHTNESS
CONTROL BUTTONS
BRIGHTNESS LEVEL
Main Menu
Page 80 of 388

Make sure the rear window is clear
and you have good visibility bef ore
starting to drive.
The def ogger and antenna wires on
the inside of the rear window can be
accidentally damaged. When
cleaning the glass, always wipe side-
to-side.
The rear window def ogger will clear
fog, frost, and thin ice from the
window. Push the def ogger button to
turn it on and off. The indicator in
the button comes on to show the
def ogger is on. If you do not turn it
of f , the def ogger will shut itself of f
af ter about 15 minutes. It also shuts
of f when you turn of f the ignition
switch. You have to turn the
def ogger on again when you restart
the vehicle.
Pushthebuttontoturnonthe
hazard warning lights (f our-way
flashers). This causes all four
outside turn signals and both turn
indicators in the instrument panel to
f lash. Use the hazard warning lights
if you need to park in a dangerous
area near heavy traffic, or if your
vehicle is disabled.
Pushing this button also turns the
mirror heaters on or of f . For more
inf ormation, see page .
104
OnAllEX-L,CanadianSE,andSi
models
Hazard Warning Button, Rear Window Def ogger
Rear Window Def ogger
Hazard Warning Button
76
EX-L,
Canadian
SE, and Si
Main Menu
Page 94 of 388

�µ�µ
�µ
�µ
Press this button once to
lock all doors. Some exterior lights
will f lash once. When you push
LOCK twice within 5 seconds, you
will hear a horn to verif y that the
doors are locked. You cannot lock
the doors if any door is not f ully
closed or the key is in the ignition
switch. If you unlock the doors with the
remote transmitter, but do not open
any of the doors within 30 seconds,
the doors automatically relock. On
U.S. LX, LX-S, EX, EX-L, and Si
models, the security system will also
set.
If you push the LOCK button twice
within 5 seconds, you will hear a
horn to verify that the security
system has set.
Press this button once
to unlock the driver’s door. Push it
twice to unlock the other doors.
Some exterior lights will f lash twice
each time you press the button. This
button does not work when the key
is in the ignition switch.
The ceiling light (if the ceiling light
switch is in the door activated
position) will come on when you
press the UNLOCK button. If you do
not open any door, the light stays on
f or about 30 seconds, then f ades out.
If you relock the doors with the
remote transmitter before 30
seconds have elapsed, the light goes
of f immediately. Press this
button f or about 1 second to open
the trunk. You cannot open the trunk
if the key is in the ignition switch. Pressthisbuttonfor
about 1 second to attract attention;
thehornwillsoundandtheexterior
lights will f lash f or about 30 seconds.
To cancel panic mode, press any
other button on the remote
transmitter, or turn the ignition
switch to the ON (II) position.
On U.S. LX, LX-S, EX, EX-L, and Si
models
On EX-L, Si, U.S. EX, and Canadian SEmodels
LOCK UNL OCK
T RUNK REL EA SE
PA NIC
Remote Transmitter
90
LOCK
BUTTON
TRUNK
RELEASE
BUTTON
PANIC BUTTON
PANIC BUTTON UNLOCK
BUTTON
LOCK
BUTTON UNLOCK BUTTON
U.S.LX,LX-S,and
Canadian DX-G models
EX-L, Si, U.S. EX, and Canadian SE
models
Main Menu
Page 107 of 388

The moonroof has a key-of f delay.
You can open and close the
moonroof f or up to 10 minutes af ter
you turn of f the ignition switch. The
key-of f delay cancels as soon as you
open either f ront door. You must
then turn the ignition switch to the
ON (II) position f or the moonroof to
operate.If the moonroof runs into any
obstacle while it is closing
automatically, it will reverse
direction, and then stop. To close the
moonroof , remove the obstacle, then
use the moonroof switch again.
Auto reverse stops sensing when the
moonroof is almost closed. You
should always check that all
passengers and objects are away
f rom the moonroof bef ore closing it.
Keeptheinsideandoutsidemirrors
clean and adjusted f or best visibility.
Be sure to adjust the mirrors bef ore
you start driving.
The inside mirror has day and night
positions. The night position reduces
glare f rom headlights behind you.
Flip the tab on the bottom edge of
the mirror to select the day or night
position.
Auto Reverse Mirrors
Moonroof , Mirrors
Inst rument s and Cont rols
103
TAB
If you try to open the moonroof in
below-f reezing temperatures, or when
it is covered with snow or ice, you can
damage the moonroof panel or motor.
Main Menu
Page 110 of 388
After all doors are closed tightly, the
light(s) dims slightly, then f ades out
in about 30 seconds.
If you do not open any door af ter you
unlock the driver’s door or remove
the key from the ignition switch, the
light(s) f ades out in about 30
seconds.
If you leave any door open without
the key in the ignition switch, the
ceiling light(s) will go of f af ter 3
minutes.The f ront ceiling light has a two-
position switch; Door Activated and
OFF.
The f ront ceiling light has two
spotlights. Push the spotlight lenses
to turn them on and off.Push on the spotlight lenses to turn
the light on and of f .
On models with moonroof
On models with moonroof OnU.S.LXandLX-Smodels
Interior Lights
Spotlights
106
OFF
SWITCHES
DOOR
ACTIVATED
Main Menu
Page 111 of 388
�Î�Î
�Î
The courtesy light between the
spotlights comes on when you turn
the parking lights on. To adjust its
brightness, push the instrument
panel brightness control buttons
under the driver’s side vent with the
ignition switch in the ON (II)
position.
On Canadian Si model
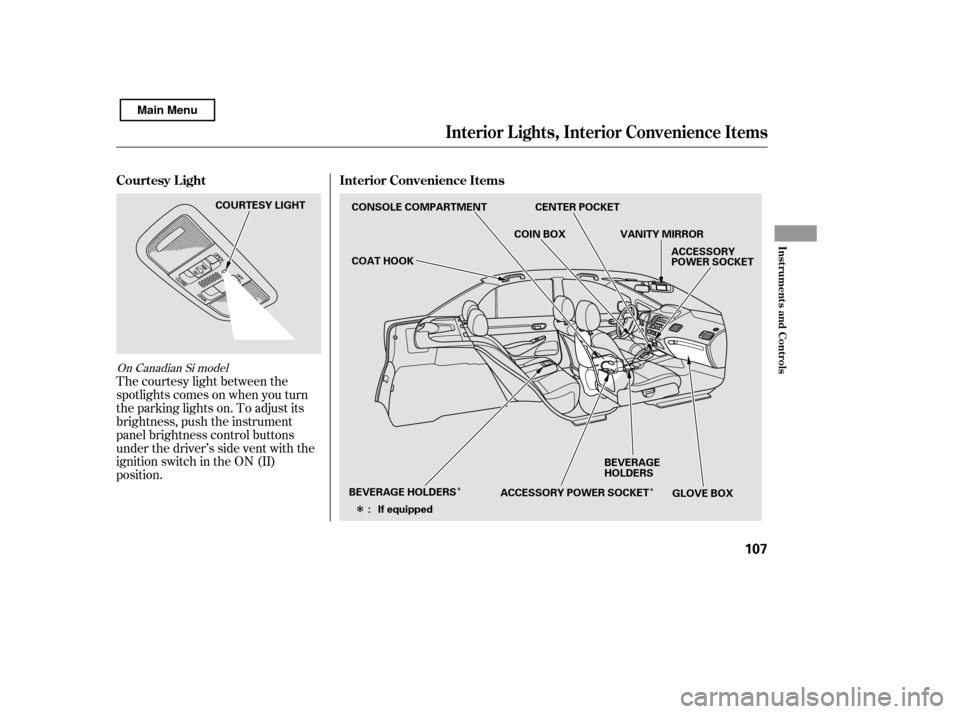
Interior Convenience Items
Courtesy L ight
Interior L ights, Interior Convenience Items
Inst rument s and Cont rols
107
CONSOLE COMPARTMENT
COAT HOOK
GLOVE BOX
ACCESSORY
POWER SOCKET
BEVERAGE
HOLDERS
BEVERAGE HOLDERS ACCESSORY POWER SOCKETVANITY MIRROR
COIN BOX
If equipped
: CENTER POCKET
COURTESY LIGHT
Main Menu
Page 123 of 388

�µ�µ
�µ
These two
modes adjust the strength of the
sound coming f rom each speaker.
BALANCE adjusts the side-to-side
strength, while FADER adjusts the
front-to-back strength. You can use the instrument panel
brightness control buttons to adjust
the illumination of the audio system
(see page ). The audio system
illuminates when the parking lights
are on, even if the radio is of f .
The SVC
mode controls the volume based on
vehicle speed. The f aster you go, the
louder the audio volume becomes.
As you slow down, the audio volume
decreases.
The SVC has f our modes: SVC OFF,
SVC LOW, SVC MID, and SVC
HIGH. Turn the SOUND (TUNE)
knob to adjust the setting to your
liking.
If you f eel the sound is too loud,
choose low. If you f eel the sound is
too quiet, choose high.
Use the TREBLE/
BASS modes to adjust the tone to
your liking.
75
Balance/Fader A udio System L ighting
Speed-sensitive volume
compensation (SVC)
Treble/Bass
Audio System (Models without navigation system)
Features
119
Main Menu
Page 165 of 388
. The audio system
illuminates when the parking lights
are on, even if the radio")
You can use the instrument panel
brightness control buttons to adjust
the illumination of the audio system
(see page ). The audio system
illuminates when the parking lights
are on, even if the radio is of f .
You can select the background
screen to display the sound level.
There are three screen modes: level
(the sound level is shown with the
vertical bars), spectrum analysis (the
sound level appears as ripples of
water), and off. Each time you touch
the background icon, the display
changes.
If you f eel the sound is too loud,
choose low. If you f eel the sound is
too quiet, choose Hi.
You can also select the icon with the
joystick. Move it up and down to
move the highlighting and scroll
through lists. Select the icon, then
move the joystick to lef t or right to
change the setting.
The system will return to the audio
display about 5 seconds af ter you
stop adjusting a mode. 75
A udio System L ighting
Screen Mode
Audio System (Models with navigation system)
Features
161
Main Menu
 dims slightly, then f ades out
in about 30 seconds.
If you do not open any door af ter you
unlock the driver’s door or remove
the key from the ign")