Page 76 of 369
�Î�Î
�Î
�Î �Î
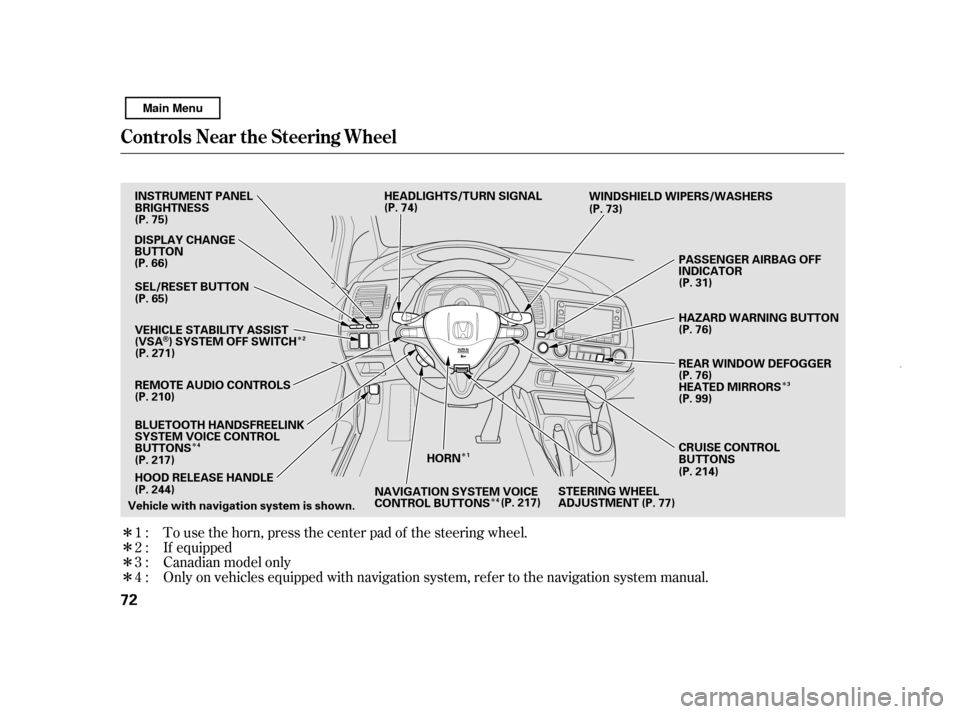
�Π���ΠOnly on vehicles equipped with navigation system, ref er to the navigati on system manual.
To use the horn, press the center pad of the steering wheel.
1:2:3:4: If equipped
Canadian model only
Controls Near the Steering Wheel
72 HORN
Vehicle with navigation system is shown. CRUISE CONTROL
BUTTONS
WINDSHIELD WIPERS/WASHERS
(P. 75) (P. 74)
(P. 73)
(P. 76)
HEATED MIRRORS
(P. 214)
NAVIGATION SYSTEM VOICE
CONTROL BUTTONS (P. 217) (P. 76)
DISPLAY CHANGE
BUTTON
(P. 66)
(P. 99)
HEADLIGHTS/TURN SIGNAL
STEERING WHEEL
ADJUSTMENT
(P. 217)
HOOD RELEASE HANDLE
(P. 244)
INSTRUMENT PANEL
BRIGHTNESS
SEL/RESET BUTTON
PASSENGER AIRBAG OFF
INDICATOR
HAZARD WARNING BUTTON
REAR WINDOW DEFOGGER
BLUETOOTH HANDSFREELINK
SYSTEM VOICE CONTROL
BUTTONS
VEHICLE STABILITY ASSIST
(VSA
) SYSTEM OFF SWITCH
(P. 65)
(P. 271)
(P. 77)
REMOTE AUDIO CONTROLS
(P. 210)
(P. 31)
1 3
4
4 2
Main Menu
Page 79 of 369

�´�µ
The buttons under the lef t side vent
control the brightness of the
instrument panel. Push the or
button to adjust the brightness.
With the headlight switch of f or in
the position, the high beam
headlights come on with reduced
brightness when you turn the
ignition switch to the ON (II)
position and release the parking
brake. They remain on until you turn
the ignition switch of f , even if you
set the parking brake.
The headlights revert to normal
operation when you turn them on
with the switch.
There are six brightness levels.
When you push either button, the
inf ormation display indicates the
current level. You will hear a tone
when you reach the maximum or
minimum brightness. The display
returns to the odometer 5 seconds af ter you stop adjusting the
brightness.
To reduce glare at night, the
instrument panel illumination dims
when you turn the light switch to the
or position.
The center of each meter (upper and
lower) illuminates with reduced
brightness when you unlock and
open the driver’s door, and then goes
back to the selected brightness when
you turn the ignition switch to the
ON (II) position.
If you insert the key but do not turn
the ignition switch to the ON (II)
position, the illumination turns of f in
about 10 seconds.
Daytime Running L ights Instrument Panel Brightness
Headlights, Instrument Panel Brightness
Inst rument s and Cont rols
75
INSTRUMENT PANEL BRIGHTNESS
CONTROL BUTTONS
Main Menu
Page 109 of 369

Only on models equipped withNavigation SystemYou can manually select various
f unctions of the climate control
system when it is in f ull automatic
mode. All other f eatures remain
automatically controlled.
Making any manual selection causes
thewordAUTOinthedisplaytogo
out.
Turn this dial to increase or decrease
the fan speed and airflow.
Turning this dial clockwise increases
the temperature of the airflow.
The system automatically selects the
proper mix of conditioned and/or
heated air that will, as quickly as
possible, raise or lower the interior
temperature to your pref erence.
When you set the temperature to its
lower limit ( ) or its upper limit
( ), the system runs at f ull
cooling or heating only. It does not
regulate the interior temperature.
In cold weather, the fan will not
come on automatically until the
heater starts to develop warm air.
In ‘‘AUTO’’ mode, the air conditioner
may not work if the humidity inside
the vehicle is low. To activate the air
conditioner, press A/C button.
The climate control system f or your
vehicle can also be operated using
the voice control system. See the
navigation system manual f or
complete details.
The automatic climate control
system adjusts the f an speed and
airflow levels to maintain the interior
temperature you select.
Press the AUTO button.
Set the desired temperature by
turning the temperature control
dial. You will see AUTO in the
system’s display.
Voice Control System
Semi-automatic Operation
Fan Control Dial
T emperature Control Dial
Using A utomatic Climate Control
Climat e Cont rol
Features
105
Main Menu
Page 117 of 369

�µ�µ
�µ
�µ
�µ
CONT INUED
If you do nothing, the system will
then scan f or the next strong station
andplayitfor10seconds.Whenit
plays a station you want to listen to,
press the SCAN button again.
Use the TUNE knob to
tune the radio to a desired f requency.
Turn the knob right to tune to a
higher f requency, or lef t to tune to a
lower f requency.
Each side of the buttons
(1 through 6) can store one
f requency on AM, and two
f requencies on FM.
Repeat steps 1 through 3 to store a
total of six stations on AM and
twelve stations on FM.
Pick a preset number (1 6), and
hold it until you hear a beep.
Usethetune,seek,orscan
function to tune the radio to a
desired station.
Select the desired band, AM or
FM. FM1 and FM2 let you store
six stations each.
You can use any of f ive methods to
find radio stations on the selected
band: the
preset buttons, and .
The ignition switch must be in the
ACCESSORY (I) or the ON (II)
position. Turn the system on by
pushingthePWR/VOLknoborthe
AM/FM button. Adjust the volume
by turning the same knob.
The band and f requency that the
radio was last tuned to is displayed.
To change bands, press the AM/FM
button. On the FM band, ST will be
displayed if the station is
broadcasting in stereo. Stereo
reproduction in AM is not available.
The scan f unction samples
all stations with strong signals on the
selected band. To activate it, press
the SCAN button, then release it.
You will see SCAN in the display.
When it f inds a strong signal, it will
stop and play that station for about
10 seconds. The seek f unction
searches up and down f rom the
current f requency to f ind a station
with a strong signal. To activate it,
press the or side of the
SEEK button, then release it. 1.
2. 3. 4.
To Select a Station TUNE
Preset
To Play the AM/FM Radio
TUNE,SEEK,SCAN, AUTO SELECT SCAN
SEEK
Playing t he A M/FM Radio (Models wit hout navigat ion syst em)
Features
113
Main Menu
Page 118 of 369
�µ
To turn of f auto select,pressthe
A. SEL (auto select) button. This
restores the presets you originally
set.
Press the A. SEL button. ‘‘A.SEL’’
f lashes in the display, and the system
goes into scan mode f or several
seconds. It stores the f requencies of
six AM, and twelve FM stations in
the preset buttons. You will see a ‘‘0’’ displayed af ter
pressing a preset button if auto
select cannot f ind a strong station f or
that preset button.
If you do not like the stations auto
select has stored, you can store
other f requencies on the preset
buttons as previously described.
For inf ormation on AM/FM radio
f requencies and reception, see page
.
If you are
traveling and can no longer receive
your preset stations, you can use the
auto select feature to find stations in
the local area.
204
Playing t he A M/FM Radio (Models wit hout navigat ion syst em)
AUTO SELECT 114
Main Menu
Page 119 of 369
. The audio system
illuminates when the parking lights
are on, even if")
�µ�µ
�µ You can use the instrument panel
brightness control buttons to adjust
the illumination of the audio system
(see page ). The audio system
illuminates when the parking lights
are on, even if the radio is of f .
These two
modes adjust the strength of the
sound coming f rom each speaker.
BALANCE adjusts the side-to-side
strength, while FADER adjusts the
front-to-back strength.
The SVC
mode controls the volume based on
vehicle speed. The f aster you go, the
louder the audio volume becomes.
As you slow down, the audio volume
decreases.
The SVC has f our modes: SVC OFF,
SVC LOW, SVC MID, and SVC
HIGH. Turn the SOUND (TUNE)
knob to adjust the setting to your
liking.
If you f eel the sound is too loud,
choose low. If you f eel the sound is
too quiet, choose high.
Press the SOUND (TUNE) knob
repeatedly to display the BASS,
TREBLE, FADER, BALANCE, and
SVC (speed-sensitive volume
compensation) settings.
Eachmodeisshowninthedisplayas
it changes. Turn the SOUND
(TUNE) knob to adjust the setting to
your liking. When the level reaches
the center, you will see ‘‘ ’’ in
the display. The system will
automatically return the display to
the selected audio mode about 5
seconds af ter you stop adjusting a
mode.
Use the TREBLE/
BASS modes to adjust the tone to
your liking. 75
A udio System L ighting
Balance/Fader
Speed-sensitive volume
compensation (SVC)
Treble/Bass
A djusting the Sound (Models wit hout navigation system)
Features
115
Main Menu
Page 120 of 369
Your audio system is capable of
receiving XM
Radio anywhere in
the United States, except Hawaii and
Alaska.
XM is a registered trademark of
Sirius XM Radio
,Inc.
XM Radio receives signals f rom two
satellites to produce clear, high-
quality digital reception. It of f ers
many channels in several categories.
Along with a large selection of
dif f erent types of music, XM Radio
allows you to view channel and
category selections in the display.
Playing the XMRadio (Models without navigation system)
Opt ional on U.S. models
116 POWER/VOLUME KNOB
CD BUTTON
AUX BUTTON
SCAN BUTTON DISPLAY BUTTON
TUNE KNOB
PRESET BUTTONS
Main Menu
Page 121 of 369

�µ�µ
�µ
You may experience periods when
XM Radio does not transmit the
artist’s name and song title
inf ormation. If this happens, there is
nothing wrong with your system.
Turn the TUNE knob to
change channel selections. Turn the
knob right f or higher numbered
channels and lef t f or lower
numbered channels. In the category
mode, you can only select channels
within that category.
Press either side of the CATEGORY
button ( or ) to select
another category.
In channel mode, you can select all
of the available channels. In category
mode, such as Jazz, Rock, Classical,
etc., you can select all of the
channels within that category.
To listen to XM Radio, turn the
ignition switch to the ACCESSORY
(I) or the ON (II) position. Push the
power/volume knob to turn on the
audio system, and press the ‘‘AUX’’
button. Adjust the volume by turning
the knob. The last channel you
listened to will show in the display. To switch between
channel mode and category mode,
press and hold the DISP button until
themodechanges.
Each time you press and release the
DISP button, the display changes in
the f ollowing sequence: Channel
name, channel number, category,
artist name, and music title.
CONT INUED
Operating the XM Radio
TUNE
SEEK /SK IP (CA T EGORY)
MODE
Playing the XMRadio (Models without navigation system)
Features
117
Main Menu