Page 7 of 400
�Î
�Î�Î
�Î�Î
�Î
�Î
�Î �Î
If equipped
:
Your Vehicle at a Glance
Your Vehicle at a Glance
3
(P.9, 23)
DRIVER’S FRONT AIRBAG
MIRROR CONTROLS MOONROOF SWITCH
A/T model without navigation system is shown. (P.106)
HAZARD WARNING BUTTON
AUDIO SYSTEM
HEATING/COOLING
CONTROLS
(P.118)(P.123)
POWER DOOR LOCK
MASTER SWITCH
(P.108)
(P.83)
AUTOMATIC TRANSMISSION
(P.274)
MANUAL TRANSMISSION
(P.271)
FUEL FILL DOOR/
TRUNK RELEASE
HANDLE
(P.144, 153, 196, 207)
USB ADAPTER CABLE
(P.57, 58)
INSTRUMENT PANEL INDICATORS
GAUGES
(P.67)
POWER WINDOW
SWITCHES
(P.104)
HOOD RELEASE
HANDLE
(P.254)
(P.253, 93) SEAT HEATER
SWITCHES
(P.103) ACCESSORY POWER
SOCKETSCLOCK
PASSENGER’S
FRONT AIRBAG
(P.9, 23)
(P.77)
(P.112) (P.222)
Main Menu
Page 46 of 400

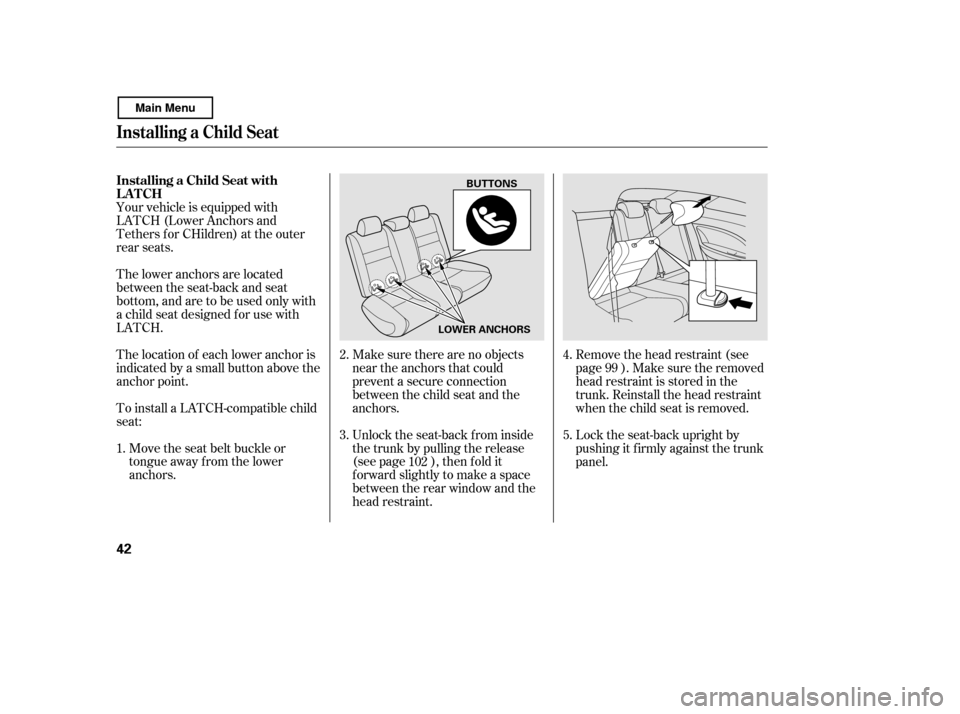
Your vehicle is equipped with
LATCH (Lower Anchors and
Tethers for CHildren) at the outer
rear seats.
The location of each lower anchor is
indicated by a small button above the
anchor point.
The lower anchors are located
between the seat-back and seat
bottom, and are to be used only with
a child seat designed f or use with
LATCH.
To install a LATCH-compatible child
seat:
Move the seat belt buckle or
tongue away f rom the lower
anchors. Make sure there are no objects
near the anchors that could
prevent a secure connection
between the child seat and the
anchors.
Unlock the seat-back from inside
the trunk by pulling the release
(see page ), then f old it
f orward slightly to make a space
between the rear window and the
head restraint.Remove the head restraint (see
page ). Make sure the removed
head restraint is stored in the
trunk. Reinstall the head restraint
when the child seat is removed.
Lock the seat-back upright by
pushing it f irmly against the trunk
panel.
1. 2. 3.
4.5.
99
102
Installing a Child Seat with
LATCH
Installing a Child Seat
42
LOWER ANCHORS
BUTTONS
Main Menu
Page 50 of 400
A child seat with a tether can be
installed in any seating position in
the back seat, using one of the
anchorage points shown above.
Since a tether can provide additional
security to the lap/shoulder belt
installation, we recommend using a
tether whenever one is required or
available.Unlock the seat-back from inside
the trunk by pulling the release
(see page ), then f old it
f orward slightly to make a space
between the rear window and the
head restraint.
Remove the head restraint (see
page ). Make sure the removed
head restraint is stored in the
trunk. Reinstall the head restraint
when the child seat is removed.Lock the seat-back upright by
pushing it f irmly against the trunk
panel.
Af ter properly securing the child
seat (see page ), route the
tether strap over the seat-back.
1. 2. 3.
102
99 4.
44
Installing a Child Seat with a
Tether
Using an Out er A nchor
Installing a Child Seat
46
TETHER ANCHORAGE P
OINTS
COVER
ANCHOR
Main Menu
Page 60 of 400
�Î
�Î
�Î
�Î
�Î�Î �Î�Î
�Î
�Î
If equipped
:
Control L ocations
56
HEATING/COOLING
CONTROLS
(P.118)
A/T model without navigation system is shown. INSTRUMENT PANEL INDICATORS
MOONROOF SWITCH
HAZARD WARNING BUTTON (P.77) (P.106)
(P.57, 58)
GAUGES
(P.67)
MIRROR CONTROLS
(P.108)
POWER DOOR LOCK
MASTER SWITCH
(P.83)
POWER WINDOW
SWITCHES
(P.104)
(P.144, 153, 196, 207)
SEAT HEATER SWITCHES
(P.103) USB ADAPTER CABLE ACCESSORY POWER
SOCKETS
AUDIO SYSTEM
CLOCK
(P.222)
(P.123)
(P.112)
FUEL FILL DOOR/
TRUNK RELEASE HANDLE
(P.253, 93)
HOOD RELEASE
HANDLE
(P.254)
Main Menu
Page 69 of 400

If this indicator comes on when you
turn the ignition switch to the ON
(II) position and release the parking
brake, it means there is a problem
withtheDRL.Theremayalsobea
problem with the high beam
headlights. Have your vehicle
checked by your dealer.
This indicator comes on with the
high beam headlights. For more
inf ormation, see page .
This indicator also comes on with
reduced brightness when the
daytime running lights (DRL) are on
(see page ).This indicator comes on if either
door is not closed tightly.
This indicator comes on when the
washer f luid level is low. Add washer
f luid when you see this indicator
(see page ).
This indicator comes on if the trunk
lid is not closed tightly.
This indicator reminds you that the
exterior lights are on. It comes on
when the light switch is in either the
or position. If you turn the
ignition switch to the ACCESSORY
(I) or LOCK (0) position without
turning of f the light switch, this
indicator will stay on. A reminder
chime will also sound when you open
the driver’s door.
This indicator comes on when you
turn on the f og lights. For more
inf ormation, see page .
307
75 74
75
Canadian models only
If equipped
High Beam IndicatorDoor-open Indicator
T runk-open Indicator L ights On Indicator
Washer Level Indicator
Daytime Running L ights
Indicator
Fog L ight Indicator
Instrument Panel Indicators
Inst rument s and Cont rols
65
Main Menu
Page 83 of 400
�Î
�Î
The master key fits all the locks on
your vehicle. The valet key works
only in the ignition and the driver’s
door lock . You can keep the trunk
and trunk release handle locked
when you leave your vehicle and the
valet key at a parking f acility.
On DX model (except Canadian
DX-G), the passenger’s door can
also be locked or unlocked with
the key.
Youshouldhavereceivedakey
number tag with your keys. You will
need this key number if you ever
have to get a lost key replaced. Use
only Honda-approved key blanks.
CONT INUED
Keys and Locks
Inst rument s and Cont rols
79
KEY NUMBER TAG
KEY NUMBERTAG VALET KEY
(Gray)
DX model (except Canadian DX-G)
MASTER KEY WITH
REMOTE TRANSMITTER
VALET KEY
(Gray) VALET KEY
(Gray)
MASTER KEY WITH
REMOTE TRANSMITTER
MASTER KEYS (Black) KEY NUMBERTAG
U.S. LX and Canadian DX-G models
All EX, EX-L and Si models, and
Canadian SE model
Main Menu
Page 93 of 400

�µ
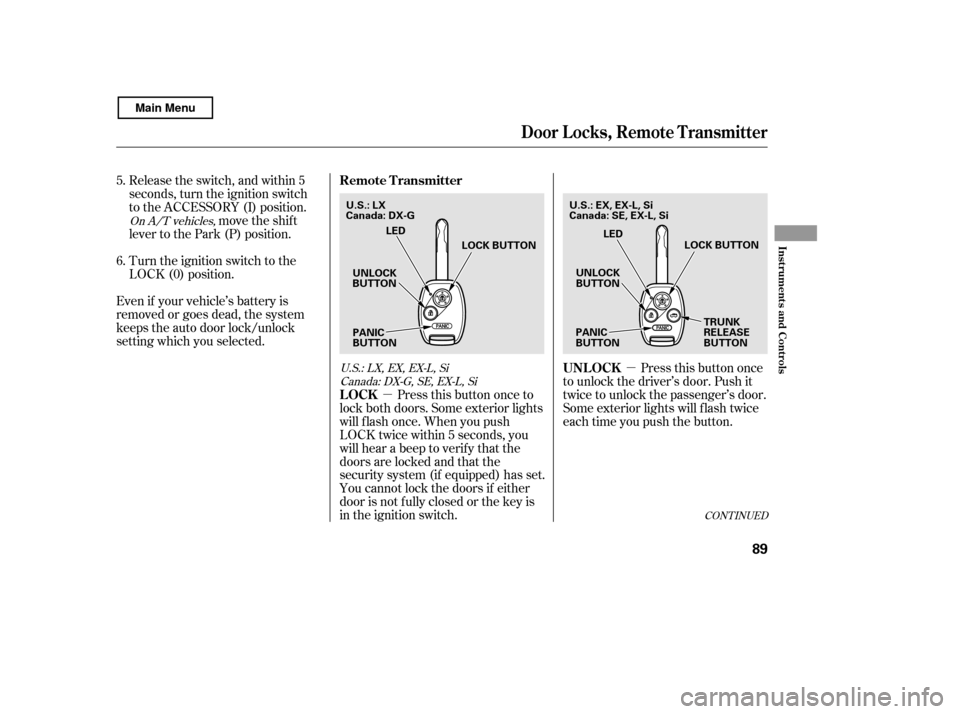
�µ Pressthisbuttononce
to unlock the driver’s door. Push it
twice to unlock the passenger’s door.
Some exterior lights will f lash twice
each time you push the button.
Release the switch, and within 5
seconds, turn the ignition switch
to the ACCESSORY (I) position.
move the shif t
lever to the Park (P) position.
Turn the ignition switch to the
LOCK (0) position.
Even if your vehicle’s battery is
removed or goes dead, the system
keeps the auto door lock/unlock
setting which you selected.
Press this button once to
lock both doors. Some exterior lights
will f lash once. When you push
LOCK twice within 5 seconds, you
will hear a beep to verify that the
doors are locked and that the
security system (if equipped) has set.
You cannot lock the doors if either
door is not f ully closed or the key is
in the ignition switch.
5. 6.
On A/T vehicles,
U.S.:LX,EX,EX-L,SiCanada: DX-G, SE, EX-L, Si
CONT INUED
UNL OCK
LOCK
Remote Transmitter
Door Locks, Remote Transmitter
Inst rument s and Cont rols
89
UNLOCK
BUTTON
LED
UNLOCK
BUTTON LED
LOCK BUTTON LOCK BUTTON
PANIC
BUTTON PANIC
BUTTONTRUNK
RELEASE
BUTTON
Canada: DX-G
U.S.: LX
U.S.: EX, EX-L, Si
Canada: SE, EX-L, Si
Main Menu
Page 95 of 400
If it takes several pushes on the
button to lock or unlock the doors,
replace the battery as soon as
possible.
Battery type: CR1616Inside the transmitter, separate
the inner cover f rom the keypad
by releasing the two tabs on the
cover.
To replace the battery:
Remove the screw at the base of
the transmitter with a small
Phillips-head screwdriver. Separate the transmitter by prying
its middle seam with your
f ingernail.
Be caref ul when removing
this screw as the head of the screw
can strip out.
1.
2.3.
CONT INUED
Replacing the Transmitter
Battery
Remote Transmitter
Inst rument s and Cont rols
91
NOTE:
SCREW
Model with trunk release is shown. BATTERY
TAB
Main Menu