Page 318 of 400
To change the driver’s side bulb,
start the engine, turn the steering
wheel all the way to the right, and
turn of f the engine. To change the
passenger’s side bulb, turn the
steering wheel to the lef t. Remove the electrical connectorf rom the bulb by pushing on the
tab to unlock it, then slide the
connector of f the bulb.Remove the bulb f rom the
headlight assembly by turning it
one-quarter turn counterclockwise.
Insert the new bulb into the hole,
and turn it one-quarter turn
clockwise to lock it in place.
Push the electrical connector back
onto the bulb. Make sure it is on
all the way.
Turn on the headlights to test the
new bulb.
Use a Phillips-head screwdriver to
remove the screw from the inner
f ender, and pull the inner f ender
cover back. Reinstall the inner f ender cover.
Then reinstall the screw and
tighten it securely.
2.
1.
3.4. 5.6.7. 8.
Lights
L ow Beam Headlight
314
SCREW
BULB
ELECTRICAL CONNECTOR
Main Menu
Page 319 of 400
Remove the bulb f rom the socket
by pushing the bulb in and turning
it counterclockwise until it unlocks.
Install the new bulb in the socket.
Turn it clockwise to lock it in place.
Insert the socket back into the
headlight assembly. Turn it
clockwise to lock it in place.
Turn on the lights to make sure
the new bulb is working.
Remove the socket from the
headlight assembly by turning it
one-quarter turn counterclockwise.
To change the driver’s side bulb,
start the engine, turn the steering
wheel all the way to the right, and
turn of f the engine. To change the
passenger’s side bulb, turn the
steering wheel to the lef t.
Use a Phillips-head screwdriver to
remove the screw from the inner
f ender, and pull the inner f ender
cover back.
Reinstall the inner f ender cover.
Then reinstall the screw and
tighten it securely.
4. 5. 6. 7. 8.
3.
2.
1.
Lights
Replacing the Front Side Marker/
Parking/Turn Signal Light Bulb
Maint enance
315
Main Menu
Page 332 of 400

To help increase tire lif e and
distribute wear more evenly, rotate
the tires according to the
maintenance messages displayed on
the information display.
Move the tires to the positions
shown in the illustration each time
they are rotated. If you purchase
directional tires, rotate only f ront-to-
back.Themileageyoucanexpectfrom
yourvehicletiresisthesameas
comparable mid-and rear-engine
sports cars, and it will vary greatly
with your driving habits.
If you drive moderately, the f ront
tires could last more than 10,000
miles (16,000 km). However, the
mileage will be substantially less if
you tend to drive your vehicle at the
upper limits of its capabilities.
You should caref ully inspect your
vehicle’s tires f or wear, damage, and
proper inf lation every 7,500 miles
(12,000 km).
As a trade-of f , they will wear more
rapidly than tires used on ordinary
passenger vehicles. Because of the
vehicle’s weight distribution, and the
fact that the front wheels are the
driving wheels, you can expect them
to wear more rapidly than the rear
tires.
The tires that came on your vehicle
were designed and constructed to
provide superior grip during
acceleration, braking, and cornering.
When the tires are rotated, make
sure the air pressures are checked.
Si model only
Tires
Tire Rotation
Tire Wear
328
FrontFront
(For Directional
Tires and Wheels)
(For Non-directional
Tires and Wheels)
Main Menu
Page 339 of 400
, there are several things you
should do to prepare it f or storage.
Proper preparation helps prevent
deterioration and mak")
If you need to park your vehicle f or
an extended period (more than 1
month), there are several things you
should do to prepare it f or storage.
Proper preparation helps prevent
deterioration and makes it easier to
get your vehicle back on the road. If
possible, store your vehicle indoors.Fill the f uel tank. Block the rear wheels.
If the vehicle is to be stored f or a
longer period, it should be
supported on jackstands so the
tires are of f the ground.
Cover the vehicle with a
‘‘breathable’’ cover, one made
f rom a porous material such as
cotton. Non-porous materials, such
as plastic sheeting, trap moisture,
which can damage the paint.
Leave one window open slightly (if
the vehicle is being stored
indoors). If possible, periodically run the
engine until it reaches f ull
operating temperature (the
cooling f ans cycle on and of f
twice). Pref erably, do this once a
month.
To minimize sticking, apply a
silicone spray lubricant to all door
and trunk seals. Also, apply a
vehiclebodywaxtothepainted
surfaces that mate with the door
and trunk seals.
Support the f ront wiper blade
arms with a f olded towel or rag so
they do not touch the windshield.
Disconnect the battery.
Wash and dry the exterior
completely.
Cleantheinterior.Makesurethe
carpeting, floor mats, etc., are
completely dry.
Leave the parking brake off. Put
the transmission in reverse
(manual) or Park (automatic).
Vehicle Storage
Maint enance
335
Main Menu
Page 341 of 400

This section covers the more
common problems that motorists
experience with their vehicles. It
gives you inf ormation about how to
safely evaluate the problem and what
to do to correct it. If the problem has
stranded you on the side of the road,
you may be able to get going again.
If not, you will also f ind instructions
on getting your vehicle towed.......................
Compact Spare Tire . 338
....................
Changing a Flat Tire . 339
.............
If the Engine Won’t Start . 343
................................
Jump Starting . 345
..............
If the Engine Overheats . 347
.........
Low Oil Pressure Indicator . 349
..........
Charging System Indicator . 349
.......
Malf unction Indicator Lamp . 350
...............
Brake System Indicator . 351
..............................................
Fuses . 352
..............................
Fuse Locations . 356
......................
Emergency Towing . 358
Taking Care of the Unexpected
T aking Care of t he Unexpect ed
337
Main Menu
Page 347 of 400

position:You hear nothing, or almost
nothing. The engine")
Diagnosing why the engine won’t
start f alls into two areas, depending
on what you hear when you turn the
ignition switch to the START (III)
position:You hear nothing, or almost
nothing. The engine’s starter
motor does not operate at all, or
operates very slowly.
You can hear the starter motor
operating normally, or the starter
motor sounds like it is spinning
f aster than normal, but the engine
does not start up and run.
Store the wheel cover or center
cap in the trunk. Make sure it does
not get scratched or damaged.
Lower the trunk f loor, then close
the trunk lid.
Your vehicle’s original tire has a
tire pressure monitoring system
sensor. To replace a tire, ref er to
(see
page ).
Place the flat tire face down in the
spare tire well.
Remove the spacer cone f rom the
wing bolt, turn it over, and put it
back on the bolt.
Securetheflattirebyscrewing
the wing bolt back into its hole.
Store the jack and tools in the tool
kit case. Place the tool kit case in
the center of the flat tire. 20. 21. 22.
16.17. 18. 19.
286
On all U.S. models
Changing a Flat T ire, If the Engine Won’t Start
If the Engine Won’t Start
Changing a T ire with T PMS
T aking Care of t he Unexpect ed
343
For normal tire
WING BOLT
For
compact
spare tire
SPACER CONE
Loose items can fly around the
interiorinacrashandcould
seriously injure the occupants.
Store the wheel, jack, and tools
securely before driving.
Main Menu
Page 348 of 400

Are you using the proper starting
procedure? Ref er toon page .
Are you using a properly coded
key? An improperly coded key will
cause the immobilizer system
indicator in the instrument panel
to blink rapidly (see page ).
Turn the ignition switch to the
START (III) position. If the
headlights do not dim, check the
condition of the f uses. If the f uses
areOK,thereisprobably
something wrong with the
electrical circuit for the ignition
switch or starter motor. You will
need a qualif ied technician to
determine the problem. See
on page .
If the headlights dim noticeably or
go out when you try to start the
engine, either the battery is
discharged or the connections are
corroded. Check the condition of
the battery and terminal connec-
tions (see page ). You can
then try jump starting the vehicle
f rom a booster battery (see page ).
In this case, the starter motor’s
speed sounds normal, or even f aster than normal, when you turn the
ignition switch to the START (III)
position, but the engine does not run.
Do you have f uel? Check the f uel
gauge; the low f uel indicator may
not be working.
There may be an electrical
problem, such as no power to the
f uel pump. Check all the f uses
(see page ).
If youfindnothingwrong,youwill
need a qualif ied technician to f ind
the problem. See on page .
When you turn the ignition switch to
the START (III) position, you do not
hear the normal noise of the engine
trying to start. You may hear a
clicking sound, a series of clicks, or
nothing at all.
Check these things:
Check the transmission interlock.
If you have a manual transmission,
the clutch pedal must be pushed
all the way to the f loor or the
starter will not operate. With an
automatic transmission, it must be
in Park or neutral.
Turn the ignition switch to the ON
(II) position. Turn on the
headlights, and check their
brightness. If the headlights are
very dim or do not come on at all,
the battery is discharged. See on page .345 358
333
345 270
352 358 80
If theEngineWon’tStart
Starting the
Engine
Emergency T owing
T he Starter Operates Normally Emergency
Towing
Nothing Happens or the Starter
Motor Operates Very Slowly
Jump Starting
344
Main Menu
Page 350 of 400
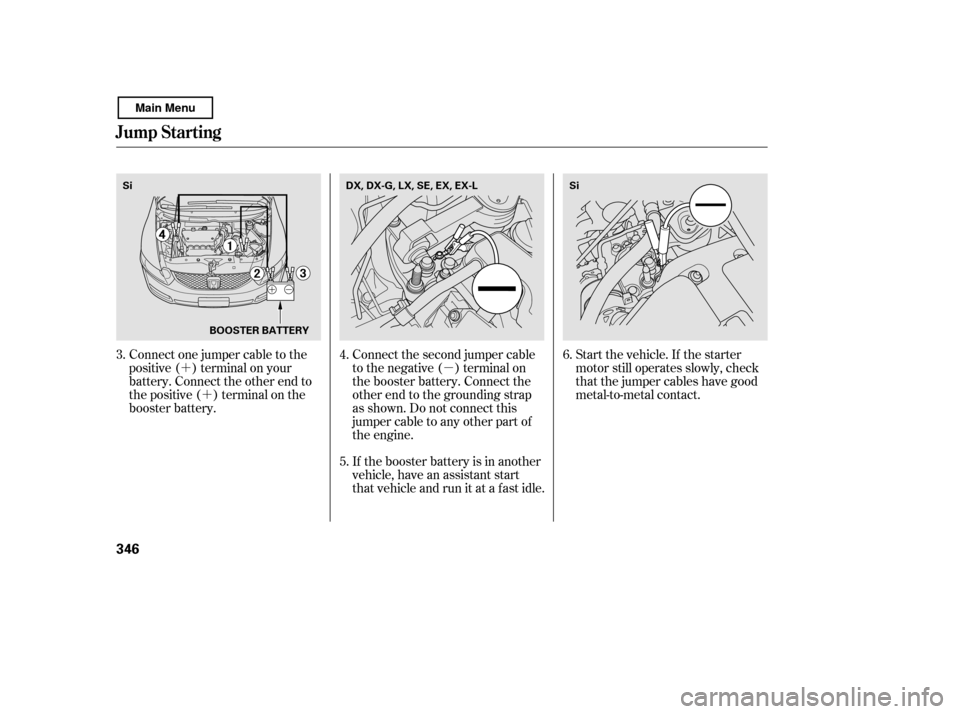
�µ
�´
�´ Start the vehicle. If the starter
motor still operates slowly, check
that the jumper cables have good
metal-to-metal contact.
Connect the second jumper cable
to the negative ( ) terminal on
the booster battery. Connect the
other end to the grounding strap
as shown. Do not connect this
jumper cable to any other part of
the engine.
If the booster battery is in another
vehicle, have an assistant start
that vehicle and run it at a fast idle.
Connect one jumper cable to the
positive ( ) terminal on your
battery. Connect the other end to
the positive ( ) terminal on the
booster battery.
6.
4. 5.
3.
Jump Starting
346
Si
Si
BOOSTER BATTERY DX, DX-G, LX, SE, EX, EX-L
Main Menu