Page 283 of 400

Your vehicle is equipped with f ront
disc brakes. The brakes on the rear
wheels may be disc or drum,
depending on the model. A power
assist helps reduce the ef f ort needed
on the brake pedal. The anti-lock
brake system (ABS) helps you retain
steering control when braking very
hard.The hydraulic system that operates
the brakes has two separate circuits.
Each circuit works diagonally across
the vehicle (the lef t-f ront brake is
connected with the right-rear brake,
etc.). If one circuit should develop a
problem, you will still have braking
at two wheels.
If the brake pads need replacing, you
will hear a distinctive, metallic
screeching sound when you apply
the brake pedal. If you do not have
the brake pads replaced, they will
screech all the time. It is normal f or
the brakes to occasionally squeal or
squeak when you apply them.
Check the brakes after driving
through deep water. Apply the
brakes moderately to see if they f eel
normal. If not, apply them gently and
f requently until they do. Be extra
cautious in your driving.
Constant application of the brakes
when going down a long hill builds
up heat and reduces their ef f ective-
ness. Use the engine to assist the
brakes by taking your f oot of f the
accelerator and downshif ting to a
lower gear.
On vehicles with vehicle stability
assist (VSA) system, the emergency
brake assist system increases the
stopping f orce when you depress the
brake pedal hard in an emergency
situation.
Resting your f oot on the pedal keeps
the brakes applied lightly, builds up
heat, reduces their ef f ectiveness and
reduces brake pad lif e. In addition,
f uel economy can be reduced. It also
keeps your brake lights on all the
time, conf using drivers behind you.
Braking System
Braking System Design
Brake Pad Wear Indicators
Driving
279
Main Menu
Page 293 of 400

This section explains why it is
important to keep your vehicle well
maintained and how to f ollow basic
maintenance saf ety precautions.
This section also includes
instructions on how to read the
Maintenance Minder messages on
the information display, and
instructions f or simple maintenance
tasks you may want to take care of
yourself .
If you have the skills and tools to
perf orm more complex maintenance
tasks on your vehicle, you may want
to purchase the service manual. See
page f or inf ormation on how to
obtain a copy, or see your dealer.U.S. Vehicles:
......................
Maintenance Saf ety . 290
.................
Maintenance Minder . 291
..............................
Fluid Locations . 298
........................
Adding Engine Oil . 300
.......
Recommended Engine Oil . 300
..............................
Synthetic Oil . 301
................
Engine Oil Additives . 301
Changing the Engine Oil and
...........................................
Filter . 302
..............................
Engine Coolant . 304
....................
Windshield Washers . 307
....
Automatic Transmission Fluid . 308
........
Manual Transmission Fluid . 309
................
Brake and Clutch Fluid . 310
....................
Power Steering Fluid . 311
.............................................
Lights . 312
................
Cleaning the Seat Belts . 319
.....................................
Floor Mats . 320
..................
Dust and Pollen Filter . 321
.................................
Wiper Blades . 321
...............................................
Tires . 323
...................
Checking the Battery . 333
.............................
Vehicle Storage . 335
..................................
Interior Care . 336
383
Maintenance
Maintenance, replacement, or
repair of emissions control
devices and systems may be done
by any automotive repair
establishment or individual using
parts that are ‘‘certif ied’’ to EPA
standards.
Maint enance
289
TM
Main Menu
Page 300 of 400

�Ì�µ�µ �µ
�µ
�µ
�µ
However, service at a dealer is not
mandatory to keep your warranties
in effect. Maintenance may be done
by any qualif ied service f acility or
person who is skilled in this type of
automotive service. Make sure to
have the service f acility or person
reset the display as previously
described. Keep all receipts as proof
of completion, and have the person
who does the work f ill out your
Honda Service History or Canadian
Maintenance Log. Check your
warranty booklet f or more
inf ormation.
We recommend using Honda parts
and fluids whenever you have
maintenance done. These are
manuf actured to the same high
quality standards as the original
components, so you can be conf ident
of their perf ormance and durability. U.S. Vehicles:
According to state and federal
regulations, f ailure to perf orm
maintenance on the items marked
with will not void your emissions
warranties. However, all
maintenance services should be
perf ormed in accordance with the
intervals indicated by the
inf ormation display.
Youshouldcheckthefollowing
items at the specif ied intervals. If
you are unsure of how to perf orm
any check, turn to the appropriate
page listed.
Engine oil level Check every
time you fill the fuel tank. See
page .
Engine coolant level Check the
radiator reserve tank every time
you f ill the f uel tank. See page . Automatic transmission Check
the f luid level monthly. See page
.
Brakes Check the f luid level
monthly. See page .
Tires Check the tire pressure
monthly. Examine the tread f or
wear and foreign objects. See page .
Lights Check the operation of
the headlights, parking lights,
taillights, high-mount brake light,
and license plate lights monthly.
See page .
255 257308
310
323
312
Maintenance Minder
Owner’s Maintenance Checks
296
TM
Main Menu
Page 302 of 400
�Î�Î
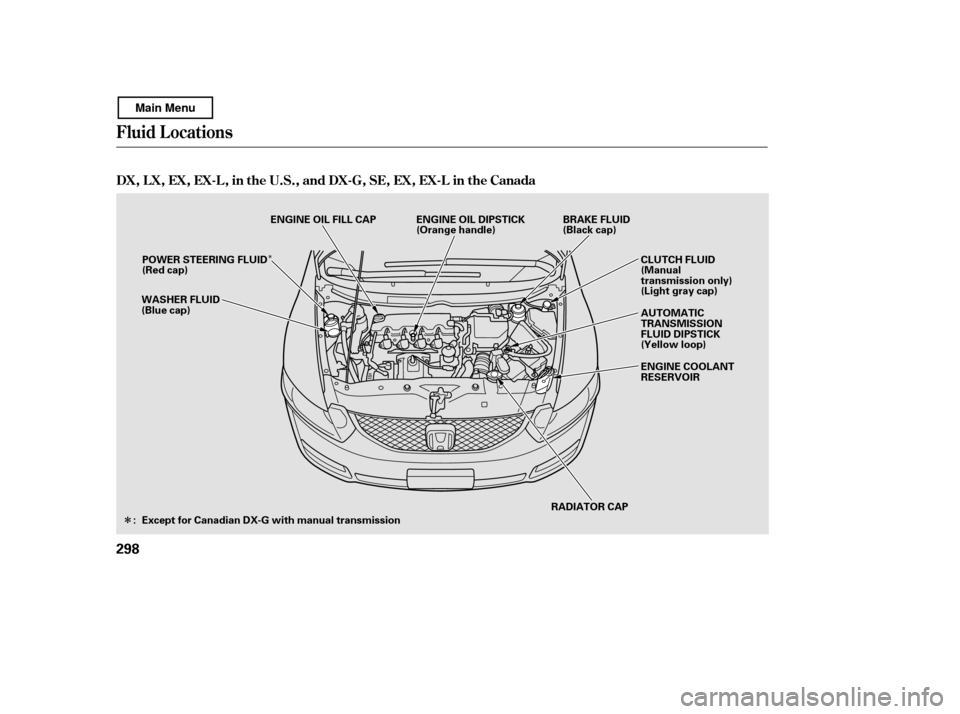
Fluid Locations
DX, LX, EX, EX-L, in the U.S., and DX-G, SE, EX, EX-L in the Canada
298
RADIATOR CAP
WASHER FLUID
(Blue cap)
ENGINE OIL DIPSTICK
(Orange handle)
BRAKE FLUID
(Black cap)
ENGINE OIL FILL CAP
CLUTCH FLUID
(Manual
transmission only)
(Light gray cap)
ENGINE COOLANT
RESERVOIR
AUTOMATIC
TRANSMISSION
FLUID DIPSTICK
(Yellow loop)
: Except for Canadian DX-G with manual transmission POWER STEERING FLUID
(Red cap)
Main Menu
Page 303 of 400
Fluid Locations
Si model
Maint enance
299
ENGINE COOLANT
RESERVOIR
CLUTCH FLUID
(Light gray cap)
WASHER FLUID
(Blue cap)
RADIATOR CAP
ENGINE OIL DIPSTICK
(Orange handle)
ENGINE OIL FILL CAP BRAKE FLUID
(Black cap)
Main Menu
Page 316 of 400
Your vehicle has halogen headlight
bulbs. When replacing a bulb, handle
it by its base, and protect the glass
f rom contact with your skin or hard
objects. If you touch the glass, clean
it with denatured alcohol and a clean
cloth.Open the hood.
To change a bulb on the driver’s
side, remove the coolant tube f rom
the two clips, then remove the
reserve tank f rom its holder by
pulling it straight up.
Theheadlightswereproperlyaimed
when your vehicle was new. If you
regularly carry heavy items in the
trunk, readjustment may be required.
Adjustmentsshouldbedonebyyour
dealer or another qualif ied
technician.
1.
Lights
Headlight A iming Replacing a Headlight BulbHigh Beam Headlight
312
CLIP COOLANT TUBE
Halogen headlight bulbs get very hot
when lit. Oil, perspiration, or a scratch
on the glass can cause the bulb to
overheat and shatter.
Main Menu
Page 317 of 400
Push the electrical connector back
onto the bulb. Make sure it is on
all the way.
Turn on the headlights to test the
new bulb.
Insert the new bulb into the hole,
and turn it one-quarter turn
clockwise to lock it in place.
Remove the bulb by turning it
about one-quarter turn
counterclockwise.
Remove the electrical connector
f rom the bulb by pushing on the
tab to unlock it, then slide the
connector of f the bulb.
(Driver’s side)
Put the tube back in the clips and
install the reserve tank back in
place, making sure its bottom tab
is in the holder.
2. 3. 4. 5.6. 7.
CONT INUED
Lights
Maint enance
313
TAB
BULB
CONNECTOR
HOLDER
Main Menu
Page 318 of 400
To change the driver’s side bulb,
start the engine, turn the steering
wheel all the way to the right, and
turn of f the engine. To change the
passenger’s side bulb, turn the
steering wheel to the lef t. Remove the electrical connectorf rom the bulb by pushing on the
tab to unlock it, then slide the
connector of f the bulb.Remove the bulb f rom the
headlight assembly by turning it
one-quarter turn counterclockwise.
Insert the new bulb into the hole,
and turn it one-quarter turn
clockwise to lock it in place.
Push the electrical connector back
onto the bulb. Make sure it is on
all the way.
Turn on the headlights to test the
new bulb.
Use a Phillips-head screwdriver to
remove the screw from the inner
f ender, and pull the inner f ender
cover back. Reinstall the inner f ender cover.
Then reinstall the screw and
tighten it securely.
2.
1.
3.4. 5.6.7. 8.
Lights
L ow Beam Headlight
314
SCREW
BULB
ELECTRICAL CONNECTOR
Main Menu

WASHER FLUID
(Blue cap)
RADIATOR CAP
ENGINE OIL DIPSTICK
(Orange handle)
ENGINE OIL FILL CAP BRAKE FLU")


