Page 103 of 400

When a passenger is seated in the
rear center seating position, the
center head restraint should be
adjusted up or down, to match the
passenger’s height.To remove a f ront or rear center
head restraint f or cleaning or repair,
pull it up as f ar as it will go. Push the
release button, then pull the restraint
out of the seat-back.
To remove a rear outer head
restraint, do as f ollows.
Unlock the seat-back from inside
the trunk by pulling the release
(see page ), then f old it
f orward slightly to make a space between the rear window and the
head restraint.
Pull the restraint up as f ar as it will
go, push the release button, then
pull the restraint out of the seat-
back.
Push the seat-back firmly against
the trunk panel to lock it upright.
1. 2. 3.
102
CONT INUED
Removing t he Head Rest raint
Seats
Inst rument s and Cont rols
99
Rear Center Position LEG
SEAT-BACK Rear Outer Position
SEAT-BACK RELEASE BUTTON
RELEASE BUTTON
Failure to reinstall the head
restraints can result in severe
injury during a crash.
Always replace the head
restraints before driving.
Main Menu
Page 105 of 400
CONT INUED
Remove any items from the seat
beforeyoufolddowntheseat-back.
When storing cargo, you can move
therearcentershoulderbeltoutof
the way by removing the belt f rom
the guide.
The left and right halves can be
f olded separately.
The back of the rear seat folds down
to give you direct access to the trunk.
The seat-back can be released f rom
inside the trunk.
For a head restraint system to work
properly:
Do not hang any items on the head
restraints, or f rom the restraint
legs.
Do not place any object between
an occupant and the seat-back.
Install each restraint in its proper
location.
Only use genuine Honda
replacement head restraints.On all models except DX, CanadianDX-G and U.S. LX
Seats
Folding Rear Seat
Inst rument s and Cont rols
101
GUIDE
Main Menu
Page 106 of 400

Make sure all rear shoulder belts are
positioned in f ront of the rear seat-
back, and the center shoulder belt is
re-positioned in the guide whenever
the seat-back is in its upright position.
Be sure there are no twists in any
shoulder belt.
Do not put any heavy items on the
seat-back when it is folded down.
Make sure all items in the trunk, or
items extending through the opening
into the back seat, are secured.
Looseitemscanflyforwardand
cause injury if you have to brake
hard. See on page.
Never drive with the seat-back
f olded down and the trunk lid open.
See on
page .
Make sure that the folded seat-back
does not press against the f ront
passenger’s seat, as this could cause
the weight sensors to work
improperly.
If the rear head restraints get caught
on the f ront seat backs and you
cannot fold down the rear seat-back
f ully, you can remove the head
restraints (see page ).
Make sure the removed head
restraints are securely stored.
To lock the seat-back upright, push it
f irmly against the trunk panel. Make
sure it is latched in place by pulling
on the top of the seat.
To release the seat-back, pull the
release under the trunk panel. Push
the seat-back down, then let go of
the release.
For 60/40 split rear f old-down seat
models, a release is located on each
side of the trunk.
For f ull rear f old-down seat models,
the release is located on the driver’s
side of the trunk. 99
26352
Seats
Carrying Cargo
Carbon Monoxide Hazard
102
RELEASE
Main Menu
Page 227 of 400

Once the security system is set,
opening either door without using
the key or the remote transmitter,
the hood, or the trunk will cause the
alarm to activate. It will also activate
if the audio unit is removed f rom the
dashboard or the wiring is cut.
The security system helps to protect
your vehicle and valuables f rom thef t.
The horn sounds and a combination
of headlights, parking lights, side
marker lights, and taillights f lashes if
someone attempts to break into your
vehicleorremovetheradio.This
alarm continues f or 2 minutes, then
the system resets. To reset an
activated system before the 2
minutes have elapsed, unlock the
driver’s door with the key or the
remote transmitter.
The security system automatically
sets 15 seconds after you lock the
doors, hood, and trunk. For the
system to activate, you must lock the
doors f rom the outside with the key,
lock tab, door lock switch, or remote
transmitter. The security system
indicator on the instrument panel
starts blinking immediately to show
you the system is setting itself . The security system will not set if
the hood, trunk, or either door is not
f ully closed. If the system will not set,
turn the ignition switch to the ON
(II) position, and check the
indicators on the instrument panel.
Close either door or the trunk
indicated on the display. Check the
hood visually since it is not part of
the display, and shut it if necessary.
With the system set, you can still
open the trunk with the master key
(U.S. LX model) or the remote
transmitter (U.S. EX, EX-L and Si
models) without triggering the alarm. The alarm will sound if the trunk
lock is f orced, or the trunk is opened
with the trunk release handle or the
emergency trunk opener.
Use the remote transmitter
to quickly check that the hood, the
trunk, and both doors are closed.
Push the lock button twice within 5
seconds. There should be an audible
conf irmation beep.
Do not attempt to alter this system
or add other devices to it.
If equipped
Security System
Features
223
NOTE:
SECURITY SYSTEM INDICATOR
Main Menu
Page 267 of 400
�Î
�Î
�Î
�Î
�Î
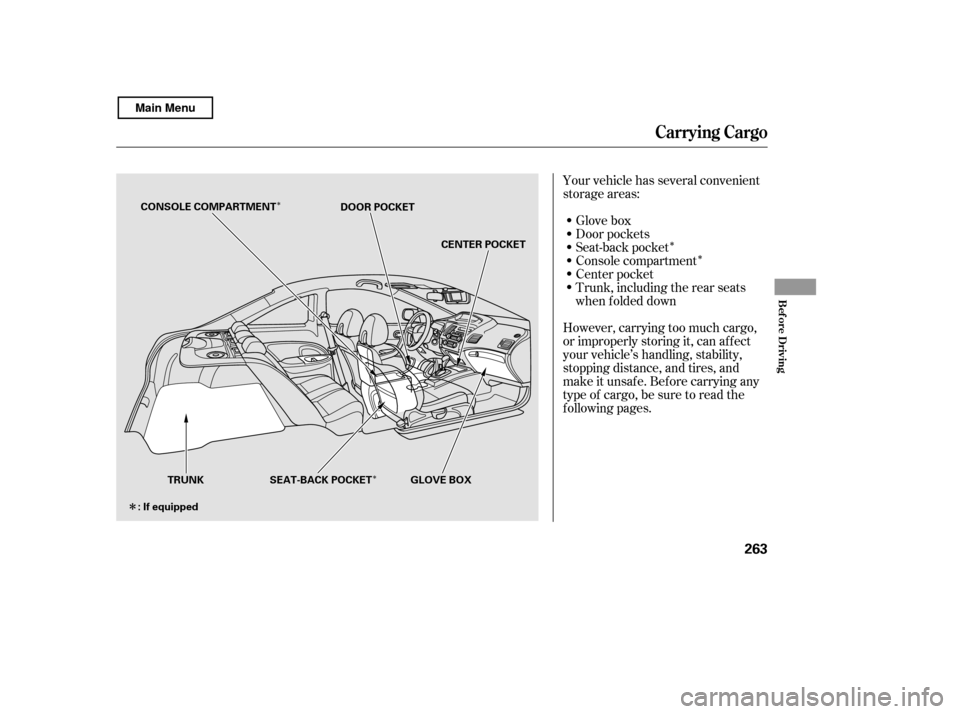
Your vehicle has several convenient
storage areas: Glove box
Console compartment
Center pocket
Door pockets
Trunk, including the rear seats
when f olded down
Seat-back pocket
However, carrying too much cargo,
or improperly storing it, can af f ect
your vehicle’s handling, stability,
stopping distance, and tires, and
make it unsaf e. Bef ore carrying any
type of cargo, be sure to read the
f ollowing pages.
Carrying Cargo
Bef ore Driving
263
TRUNK GLOVE BOX
CONSOLE COMPARTMENT
DOOR POCKET
SEAT-BACK POCKET
: If equipped CENTER POCKET
Main Menu
Page 270 of 400

Store or secure all items that could
be thrown around and hurt
someone during a crash.
Do not put any items on top of the
rear shelf . They can block your
view and be thrown around the
vehicle during a crash.The cargo net can be used to help
hold down items stored in the trunk.
Be sure items placed on the f loor
behind the f ront seats cannot roll
under the seats and interf ere with
the driver’s ability to operate the
pedals, the operation of the seats,
or the operation of the sensors
under the seats. If you carry large items that
prevent you f rom closing the trunk
lid, exhaust gas can enter the
passenger area. To avoid the
possibility of
, f ollow the instructions
on page .
If youfolddownthebackseat,tie
down items that could be thrown
about the vehicle during a crash or
sudden stop.
Distribute cargo evenly on the
f loor of the trunk, placing the
heaviest items on the bottom and
as f ar f orward as possible.
Keep the glove box closed while
driving. If it is open, a passenger
could injure their knees during a
crash or sudden stop.
Keep all cargo below the bottom
of the windows. If it is higher, it
could interf ere with the proper
operation of the side curtain
airbags. 52
Optional
Carrying Cargo
Carrying Items in the Passenger
Compartment Cargo Net
carbon monoxide
poisoning
Carrying Cargo in the Trunk
266
Main Menu
Page 273 of 400
Fasten your seat belt. Check that
your passengers have f astened
their seat belts (see page ).
Make sure the doors are securely
closed and locked.
Check the steering wheel
adjustment (see page ).
Check the adjustment of the
inside and outside mirrors (see
page ).
Check that any items you may be
carrying are stored properly or
f astened down securely.
Check the seat adjustment (see
page ).
Make sure all windows, mirrors,
and outside lights are clean and
unobstructed. Remove f rost, snow,
or ice.
Youshoulddothefollowingchecks
and adjustments bef ore you drive
your vehicle.
Check that the hood is f ully closed.
Check that the trunk is f ully
closed. When you start the engine, check
the gauges and indicators in the
instrument panel (see page ).
Visually check the tires. If a tire
looks low, use a gauge to check its
pressure.
1. 2.
14
3. 4. 5. 6. 7. 8. 9.
11.
10.
95
108 78 57
Preparing to Drive
Driving
269
Main Menu
Page 282 of 400

If your vehicle has an automatic
transmission, set the parking brake
bef ore you put the transmission in
Park. This keeps the vehicle f rom
moving and putting pressure on the
parking mechanism in the
transmission.Make sure the parking brake is
f ully released bef ore driving away.
Driving with the parking brake
partially set can overheat or
damage the rear brakes.
Make sure the moonroof (if
equipped) and the windows are
closed.
Lock the doors.
Place any packages, valuables, etc.,
in the trunk or take them with you.
Turn of f the lights.
Always use the parking brake when
you park your vehicle. Make sure
the parking brake is set f irmly, or
your vehicle may roll if it is parked
on an incline.
Check the indicator on the
instrument panel to verif y that the
security system is set.
Never park over dry leaves, tall
grass, or other f lammable
materials. The hot three way
catalytic converter could cause
these materials to catch on fire.If the vehicle is f acing uphill, turn
the f ront wheels away f rom the
curb. If your vehicle has a manual
transmission, put it in f irst gear.
If the vehicle is f acing downhill,
turn the front wheels toward the
curb. If your vehicle has a manual
transmission, put it in reverse gear.
On vehicles with security system
Parking T ips
Parking
278
Never install a sunshade between the
upper and lower meters on the
instrument panel. If you do, you could
cause heat damage to the upper meter
on a very hot day.
Main Menu

.
Make sure the doors are securely
closed and locked.
Check the steering wheel
adjustment (see page ).
Che")