Page 281 of 400

Do this if pushing on the brake pedal
and pressing the release button does
not let you shif t the transmission out
of Park:Set the parking brake.
Remove the key from the ignition
switch.
Insert the key in the shift lock
release slot.If you need to use the shif t lock
release, it means your vehicle is
developing a problem. Have it
checked by your dealer.Remove the key from the shift
lock release slot, then install the
cover. Make sure the notch on the
cover is on the rear.
Insert the key into the ignition
switch, press the brake pedal, and
restart the engine.
Push down on the key while you
pressthereleasebuttononthe
f ront of the shif t lever and move
the shift lever out of Park to
neutral.
Put a cloth on the edge of the shif t
lock release slot cover to prevent
scratches. Using a small f lat-tip screwdriver or metal f ingernail f ile,
caref ully pry on the edge of the
cover to remove it.
1. 2. 3. 4. 5.6.
Automatic Transmission
Shif t L ock Release
Driving
277
COVER
SHIFT LOCK RELEASE SLOTRELEASE BUTTON
Main Menu
Page 282 of 400

If your vehicle has an automatic
transmission, set the parking brake
bef ore you put the transmission in
Park. This keeps the vehicle f rom
moving and putting pressure on the
parking mechanism in the
transmission.Make sure the parking brake is
f ully released bef ore driving away.
Driving with the parking brake
partially set can overheat or
damage the rear brakes.
Make sure the moonroof (if
equipped) and the windows are
closed.
Lock the doors.
Place any packages, valuables, etc.,
in the trunk or take them with you.
Turn of f the lights.
Always use the parking brake when
you park your vehicle. Make sure
the parking brake is set f irmly, or
your vehicle may roll if it is parked
on an incline.
Check the indicator on the
instrument panel to verif y that the
security system is set.
Never park over dry leaves, tall
grass, or other f lammable
materials. The hot three way
catalytic converter could cause
these materials to catch on fire.If the vehicle is f acing uphill, turn
the f ront wheels away f rom the
curb. If your vehicle has a manual
transmission, put it in f irst gear.
If the vehicle is f acing downhill,
turn the front wheels toward the
curb. If your vehicle has a manual
transmission, put it in reverse gear.
On vehicles with security system
Parking T ips
Parking
278
Never install a sunshade between the
upper and lower meters on the
instrument panel. If you do, you could
cause heat damage to the upper meter
on a very hot day.
Main Menu
Page 293 of 400

This section explains why it is
important to keep your vehicle well
maintained and how to f ollow basic
maintenance saf ety precautions.
This section also includes
instructions on how to read the
Maintenance Minder messages on
the information display, and
instructions f or simple maintenance
tasks you may want to take care of
yourself .
If you have the skills and tools to
perf orm more complex maintenance
tasks on your vehicle, you may want
to purchase the service manual. See
page f or inf ormation on how to
obtain a copy, or see your dealer.U.S. Vehicles:
......................
Maintenance Saf ety . 290
.................
Maintenance Minder . 291
..............................
Fluid Locations . 298
........................
Adding Engine Oil . 300
.......
Recommended Engine Oil . 300
..............................
Synthetic Oil . 301
................
Engine Oil Additives . 301
Changing the Engine Oil and
...........................................
Filter . 302
..............................
Engine Coolant . 304
....................
Windshield Washers . 307
....
Automatic Transmission Fluid . 308
........
Manual Transmission Fluid . 309
................
Brake and Clutch Fluid . 310
....................
Power Steering Fluid . 311
.............................................
Lights . 312
................
Cleaning the Seat Belts . 319
.....................................
Floor Mats . 320
..................
Dust and Pollen Filter . 321
.................................
Wiper Blades . 321
...............................................
Tires . 323
...................
Checking the Battery . 333
.............................
Vehicle Storage . 335
..................................
Interior Care . 336
383
Maintenance
Maintenance, replacement, or
repair of emissions control
devices and systems may be done
by any automotive repair
establishment or individual using
parts that are ‘‘certif ied’’ to EPA
standards.
Maint enance
289
TM
Main Menu
Page 300 of 400

�Ì�µ�µ �µ
�µ
�µ
�µ
However, service at a dealer is not
mandatory to keep your warranties
in effect. Maintenance may be done
by any qualif ied service f acility or
person who is skilled in this type of
automotive service. Make sure to
have the service f acility or person
reset the display as previously
described. Keep all receipts as proof
of completion, and have the person
who does the work f ill out your
Honda Service History or Canadian
Maintenance Log. Check your
warranty booklet f or more
inf ormation.
We recommend using Honda parts
and fluids whenever you have
maintenance done. These are
manuf actured to the same high
quality standards as the original
components, so you can be conf ident
of their perf ormance and durability. U.S. Vehicles:
According to state and federal
regulations, f ailure to perf orm
maintenance on the items marked
with will not void your emissions
warranties. However, all
maintenance services should be
perf ormed in accordance with the
intervals indicated by the
inf ormation display.
Youshouldcheckthefollowing
items at the specif ied intervals. If
you are unsure of how to perf orm
any check, turn to the appropriate
page listed.
Engine oil level Check every
time you fill the fuel tank. See
page .
Engine coolant level Check the
radiator reserve tank every time
you f ill the f uel tank. See page . Automatic transmission Check
the f luid level monthly. See page
.
Brakes Check the f luid level
monthly. See page .
Tires Check the tire pressure
monthly. Examine the tread f or
wear and foreign objects. See page .
Lights Check the operation of
the headlights, parking lights,
taillights, high-mount brake light,
and license plate lights monthly.
See page .
255 257308
310
323
312
Maintenance Minder
Owner’s Maintenance Checks
296
TM
Main Menu
Page 302 of 400
�Î�Î
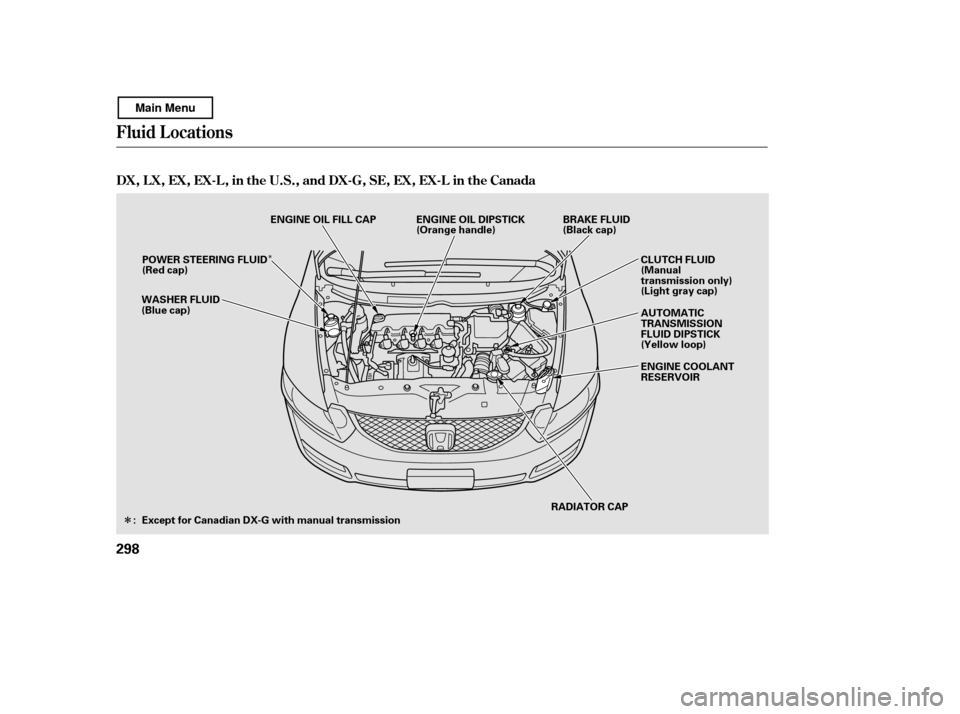
Fluid Locations
DX, LX, EX, EX-L, in the U.S., and DX-G, SE, EX, EX-L in the Canada
298
RADIATOR CAP
WASHER FLUID
(Blue cap)
ENGINE OIL DIPSTICK
(Orange handle)
BRAKE FLUID
(Black cap)
ENGINE OIL FILL CAP
CLUTCH FLUID
(Manual
transmission only)
(Light gray cap)
ENGINE COOLANT
RESERVOIR
AUTOMATIC
TRANSMISSION
FLUID DIPSTICK
(Yellow loop)
: Except for Canadian DX-G with manual transmission POWER STEERING FLUID
(Red cap)
Main Menu
Page 312 of 400

If the level is below the lower
mark, add f luid into the dipstick
hole to bring it to the level
between the upper and lower
marks.
Pour the f luid slowly and caref ully
so you do not spill any. Clean up
any spill immediately; it could
damage components in the engine
compartment.
Check the f luid level with the engine
at normal operating temperature. Park the vehicle on level ground.
Start the engine, let it run until the
radiator f an comes on, then shut
of f the engine. For accurate
results, wait about 60 seconds (but
no longer than 90 seconds) bef ore
doing step 2. Remove the dipstick, and check
the f luid level. It should be
between the upper and lower
marks.
Insert the dipstick all the way into
the transmission securely as
shown in the illustration.
Remove the dipstick (yellow loop)
f rom the transmission, and wipe it
with a clean cloth.
Always use Honda ATF DW-1
(automatic transmission f luid).
Insert the dipstick all the way back
into the transmission securely as
shown in the illustration.
3. 4.
1.
2.5. 6.
Automatic Transmission Fluid
308
LOWER
MARK
UPPER
MARK
DIPSTICK
Main Menu
Page 313 of 400

Check the f luid level with the
transmission at normal operating
temperature and the vehicle sitting
on level ground. Remove the
transmission f iller bolt, and caref ully
f eel inside the bolt hole with your
f inger. The f luid level should be up
to the edge of the bolt hole. If it is
not, add Honda Manual
Transmission Fluid (MTF) until it
starts to run out of the hole. Reinstall
the f iller bolt, and tighten it securely.
The transmission should be drained
and ref illed with new f luid according
to the Maintenance Minder (see
page ).
If you are not sure how to add f luid,
contact your dealer.
If Honda MTF is not available, you
may use an SAE 10W-30 or 10W-40
viscosity motor oil with the API
Certif ication Seal that says ‘‘FOR
GASOLINE ENGINES’’ as a
temporary replacement. However,
motor oil does not contain the proper
additives, and continued use can
cause stif f er shif ting. Replace as
soon as it is convenient.
291
CONT INUED
Manual Transmission Fluid
A ut omat ic T ransmission Fluid, Manual T ransmission Fluid
Maint enance
309
FILLER BOLT
Correct Level Correct Level
Si FILLER BOLT
DX, DX-G, LX, SE, EX, EX-LTM
Use only Honda ATF DW-1 (automatic
transmission f luid). Do not mix with
other transmission f luids.
Using transmission f luid other than
Honda ATF DW-1 may cause
deterioration in transmission operation
and durability, and could result in
damage to the transmission.
Damage resulting f rom the use of
transmission f luid other than Honda
ATF DW-1 is not covered by the Honda
new vehicle warranty.
Main Menu
Page 329 of 400

The following charts show the
recommended cold tire pressures f or
most normal driving conditions.We strongly recommend that you do
not drive faster than the posted
speed limits and conditions allow. If
you ever drive in a sanctioned
competitive event at sustained high
speeds (over 118 mph or 190 km/h),
be sure to adjust the cold tire
pressuresasshownbelow.If youdo
not, excessive heat can build up and
cause sudden tire f ailure.
For additional inf ormation about
your tires, see page .
For convenience, the recommended
tire sizes and cold tire pressures are
on a label on the driver’s doorjamb.
Thecompactsparetirepressureis:
Front/Rear:
367
Tire Size
Tire Size Cold Tire Pressure
Front/Rear
Tire Size Cold Tire Pressure Front/Rear
Tire Size Cold Tire Pressure Front/Rear
Tire Size Cold Tire Pressure Front/Rear Cold Tire Pressure
Front/Rear
CONT INUED
Si
DX and Canadian DX-G with automatic
transmission
Canadian DX-G with manual transmission Optional Summer T ire f or U.S. Si
LX, SE, EX, EX-L
Si model only
Si model only
Tires
Recommended T ire Pressures High Speed Driving
T ire Size·Cold T ire Pressure f or High
Speed DrivingMaint enance
325
215/45ZR17 91W
P195/65R15 89H
P195/65R15 89S
P205/55R16 89H P215/45R17 87V
32 psi (220 kPa , 2.2 kgf/cm
)
32 psi (220 kPa ,
2.2 kgf/cm
)
32 psi (220 kPa , 2.2 kgf/cm
) 32 psi (220 kPa ,
2.2 kgf/cm
)
32 psi (220 kPa , 2.2 kgf/cm
)
35 psi (240 kPa , 2.4 kgf/cm)
P215/45R17 87V
60 psi (420 kPa , 4.2 kgf/cm
)
Main Menu