Page 466 of 594
Black plate (42,1)GMC Sierra Owner Manual - 2011
10-42 Vehicle Care
Headlamp Aiming
The vehicle has a visual optical
headlamp aiming system. The aim
of the headlamps has been preset
at the factory and should need no
further adjustment.
However, if the vehicle is damaged
in a crash, the aim of the headlamps
may be affected and adjustment
may be necessary.
If oncoming vehicles flash their high
beams at you, this may mean the
vertical aim of the headlamps needs
to be adjusted.
It is recommended that the vehicle
be taken to the dealer for service if
the headlamps need to be adjusted.
It is possible, however, to re-aim the
headlamps as described.The vehicle should:.Be placed so the headlamps
are 7.6 m (25 ft) from a
light‐colored wall.
.Have all four tires on a level
surface which is level all the
way to the wall.
.Be placed so it is perpendicular
to the wall.
.Not have any snow, ice, or mud
on it.
.Be fully assembled and all other
work stopped while headlamp
aiming is being performed.
.Be loaded with a full tank of
fuel and one person or 75 kg
(160 lbs) sitting on the
driver seat.
.Have the tires properly inflated.
.Have the spare tire in its proper
location in the vehicle.Headlamp aiming is done with the
vehicle's low-beam headlamps.
The high-beam headlamps will be
correctly aimed if the low-beam
headlamps are aimed properly.
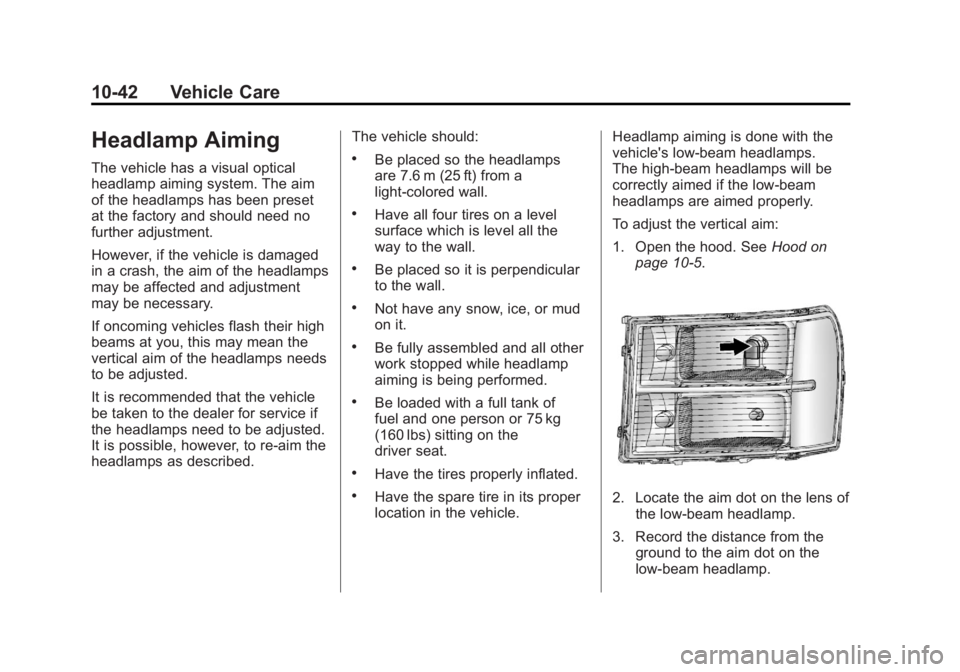
To adjust the vertical aim:
1. Open the hood. See
Hood on
page 10‑5.2. Locate the aim dot on the lens of the low‐beam headlamp.
3. Record the distance from the ground to the aim dot on the
low‐beam headlamp.
Page 467 of 594
Black plate (43,1)GMC Sierra Owner Manual - 2011
Vehicle Care 10-43
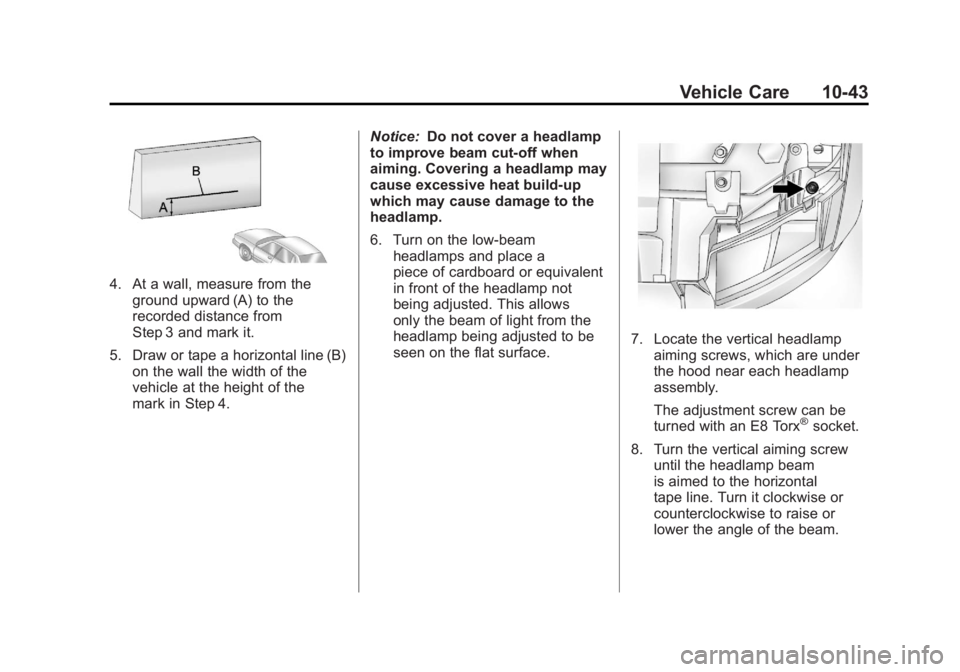
4. At a wall, measure from theground upward (A) to the
recorded distance from
Step 3 and mark it.
5. Draw or tape a horizontal line (B) on the wall the width of the
vehicle at the height of the
mark in Step 4. Notice:
Do not cover a headlamp
to improve beam cut-off when
aiming. Covering a headlamp may
cause excessive heat build-up
which may cause damage to the
headlamp.
6. Turn on the low-beam
headlamps and place a
piece of cardboard or equivalent
in front of the headlamp not
being adjusted. This allows
only the beam of light from the
headlamp being adjusted to be
seen on the flat surface.
7. Locate the vertical headlampaiming screws, which are under
the hood near each headlamp
assembly.
The adjustment screw can be
turned with an E8 Torx
®socket.
8. Turn the vertical aiming screw until the headlamp beam
is aimed to the horizontal
tape line. Turn it clockwise or
counterclockwise to raise or
lower the angle of the beam.
Page 469 of 594
Black plate (45,1)GMC Sierra Owner Manual - 2011
Vehicle Care 10-45
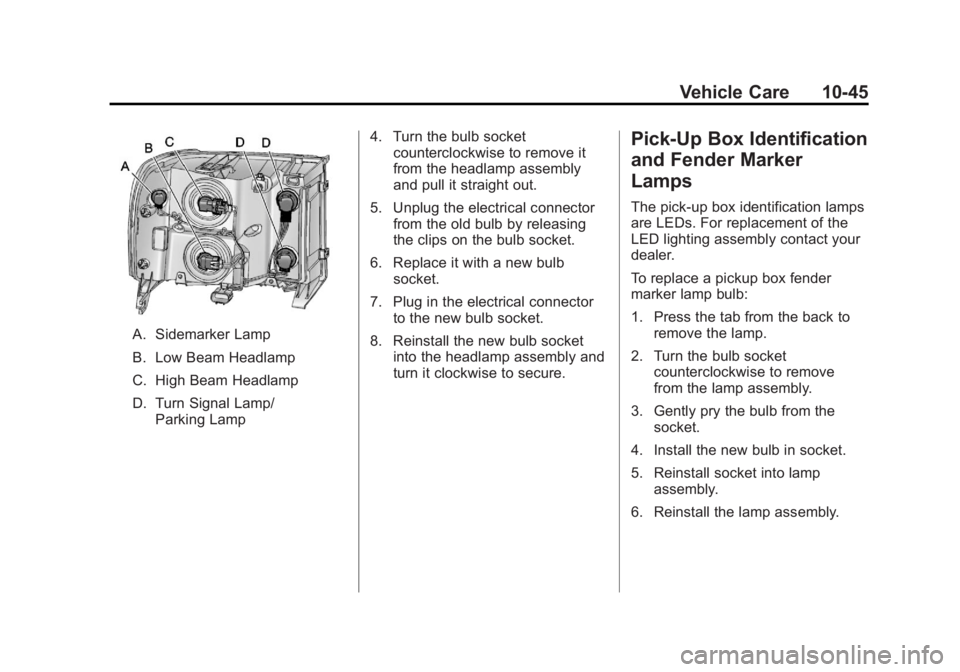
A. Sidemarker Lamp
B. Low Beam Headlamp
C. High Beam Headlamp
D. Turn Signal Lamp/Parking Lamp 4. Turn the bulb socket
counterclockwise to remove it
from the headlamp assembly
and pull it straight out.
5. Unplug the electrical connector from the old bulb by releasing
the clips on the bulb socket.
6. Replace it with a new bulb socket.
7. Plug in the electrical connector to the new bulb socket.
8. Reinstall the new bulb socket into the headlamp assembly and
turn it clockwise to secure.
Pick-Up Box Identification
and Fender Marker
Lamps
The pick-up box identification lamps
are LEDs. For replacement of the
LED lighting assembly contact your
dealer.
To replace a pickup box fender
marker lamp bulb:
1. Press the tab from the back to
remove the lamp.
2. Turn the bulb socket counterclockwise to remove
from the lamp assembly.
3. Gently pry the bulb from the socket.
4. Install the new bulb in socket.
5. Reinstall socket into lamp assembly.
6. Reinstall the lamp assembly.
Page 472 of 594
Black plate (48,1)GMC Sierra Owner Manual - 2011
10-48 Vehicle Care
License Plate Lamp
To replace one of these bulbs:
1. Reach under the rear bumper forthe bulb socket.
2. Turn the bulb socketcounterclockwise and pull
the bulb socket out of the
lamp assembly.
3. Pull the old bulb straight out from the bulb socket.
4. Install the new bulb.
5. Reverse Steps 1 and 2 to reinstall the bulb socket.
Replacement Bulbs
Exterior Lamp Bulb Number
Back-up Lamp 921
Back-up Lamp* 1156
Cargo Lamp
and Center
High-Mounted
Stoplamp
(CHMSL) 912
Fender Marker W5WLL
High-Beam
Headlamp 9005
Low-Beam
Headlamp H11Exterior Lamp Bulb
Number
License
Plate Lamp 168
Stoplamp/Taillamp/
Turn Signal Lamp 3047K
Sidemarker Lamp 194
Stoplamp/Turn
Signal Lamp/
Taillamp* 1157
* Chassis Cab Models
For replacement bulbs not listed
here, contact your dealer.
Page 475 of 594
Black plate (51,1)GMC Sierra Owner Manual - 2011
Vehicle Care 10-51
FusesUsage
1 Right Trailer
Stop/Turn Lamp
2 Electronic
Suspension
Control, Automatic
Level Control
Exhaust Fuses
Usage
3 Left Trailer
Stop/Turn Lamp
4 Engine Controls
5 Engine Control
Module, Throttle
Control Fuses
Usage
6 Trailer Brake
Controller
7 Front Washer
8 Oxygen Sensor
9 Antilock Brakes
System 2
10 Trailer Back-up
Lamps
11 Driver Side
Low-Beam
Headlamp
12 Engine Control
Module (Battery)
13 Fuel Injectors,
Ignition Coils
(Right Side)
14 Transmission
Control Module
(Battery)
15 Vehicle Back-up
Lamps
Page 476 of 594
Black plate (52,1)GMC Sierra Owner Manual - 2011
10-52 Vehicle Care
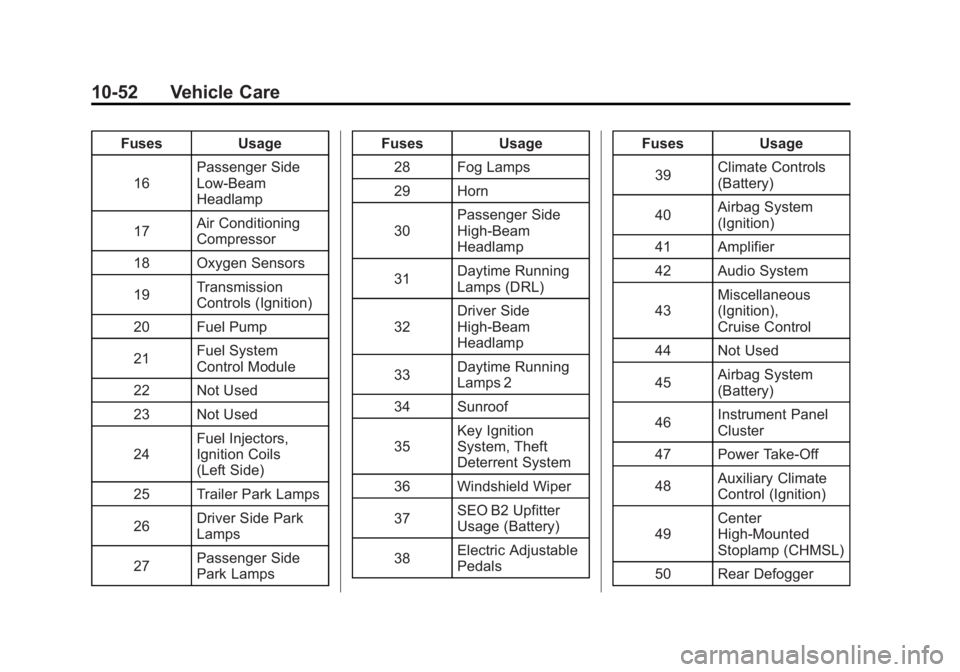
FusesUsage
16 Passenger Side
Low-Beam
Headlamp
17 Air Conditioning
Compressor
18 Oxygen Sensors
19 Transmission
Controls (Ignition)
20 Fuel Pump
21 Fuel System
Control Module
22 Not Used
23 Not Used
24 Fuel Injectors,
Ignition Coils
(Left Side)
25 Trailer Park Lamps
26 Driver Side Park
Lamps
27 Passenger Side
Park Lamps Fuses
Usage
28 Fog Lamps
29 Horn
30 Passenger Side
High-Beam
Headlamp
31 Daytime Running
Lamps (DRL)
32 Driver Side
High-Beam
Headlamp
33 Daytime Running
Lamps 2
34 Sunroof
35 Key Ignition
System, Theft
Deterrent System
36 Windshield Wiper
37 SEO B2 Upfitter
Usage (Battery)
38 Electric Adjustable
Pedals Fuses
Usage
39 Climate Controls
(Battery)
40 Airbag System
(Ignition)
41 Amplifier
42 Audio System
43 Miscellaneous
(Ignition),
Cruise Control
44 Not Used
45 Airbag System
(Battery)
46 Instrument Panel
Cluster
47 Power Take-Off
48 Auxiliary Climate
Control (Ignition)
49 Center
High-Mounted
Stoplamp (CHMSL)
50 Rear Defogger
Page 477 of 594
Black plate (53,1)GMC Sierra Owner Manual - 2011
Vehicle Care 10-53
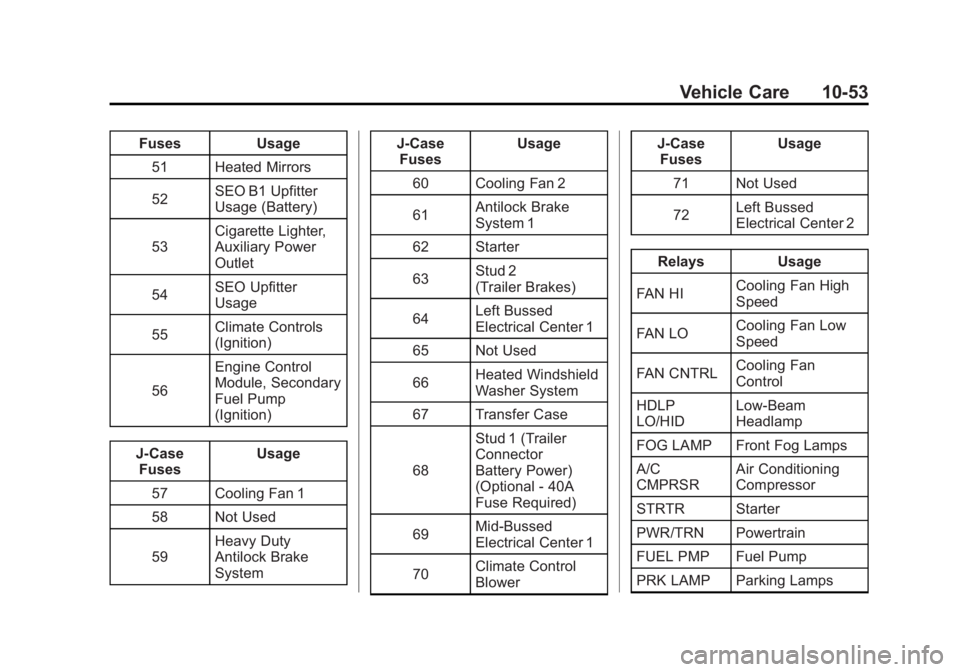
FusesUsage
51 Heated Mirrors
52 SEO B1 Upfitter
Usage (Battery)
53 Cigarette Lighter,
Auxiliary Power
Outlet
54 SEO Upfitter
Usage
55 Climate Controls
(Ignition)
56 Engine Control
Module, Secondary
Fuel Pump
(Ignition)
J-Case Fuses Usage
57 Cooling Fan 1
58 Not Used
59 Heavy Duty
Antilock Brake
System J-Case
Fuses Usage
60 Cooling Fan 2
61 Antilock Brake
System 1
62 Starter
63 Stud 2
(Trailer Brakes)
64 Left Bussed
Electrical Center 1
65 Not Used
66 Heated Windshield
Washer System
67 Transfer Case
68 Stud 1 (Trailer
Connector
Battery Power)
(Optional - 40A
Fuse Required)
69 Mid-Bussed
Electrical Center 1
70 Climate Control
Blower J-Case
Fuses Usage
71 Not Used
72 Left Bussed
Electrical Center 2
Relays Usage
FAN HI Cooling Fan High
Speed
FAN LO Cooling Fan Low
Speed
FAN CNTRL Cooling Fan
Control
HDLP
LO/HID Low-Beam
Headlamp
FOG LAMP Front Fog Lamps
A/C
CMPRSR Air Conditioning
Compressor
STRTR Starter
PWR/TRN Powertrain
FUEL PMP Fuel Pump
PRK LAMP Parking Lamps
Page 586 of 594
Black plate (6,1)GMC Sierra Owner Manual - 2011
i-6 INDEX
Fuel (cont.)Management, Active . . . . . . . . . . 9-44
Recommended . . . . . . . . . . . . . . . 9-84
Requirements, California . . . . . 9-85
System Messages . . . . . . . . . . . . 5-46
Fuel Economy Driving . . . . . . . . . . . . . . . . . . . . . . . . 1-35
Full-Size Spare Tire . . . . . . . . . . 10-97
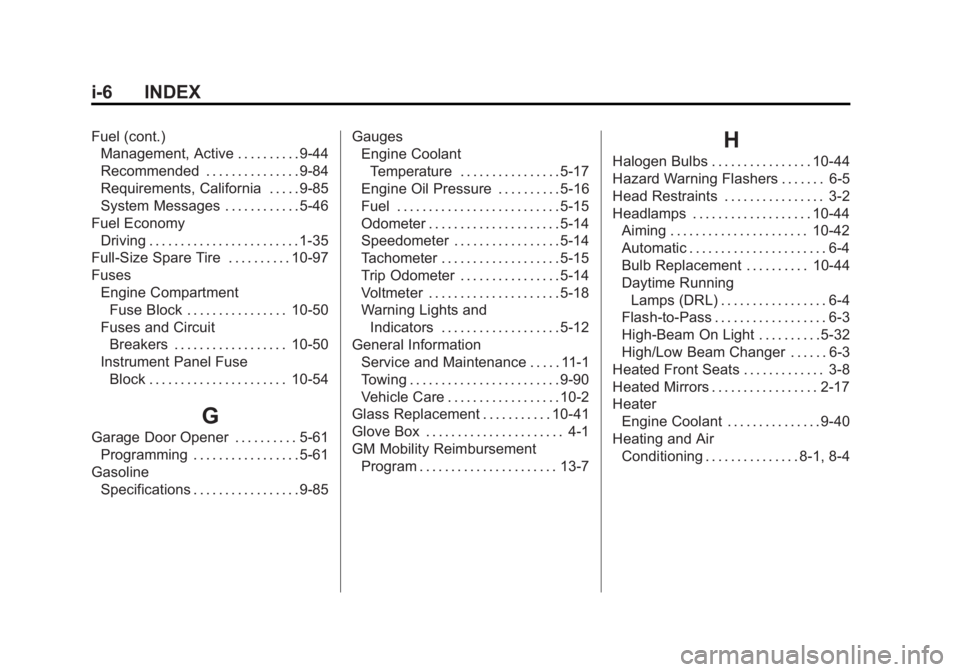
Fuses Engine CompartmentFuse Block . . . . . . . . . . . . . . . . 10-50
Fuses and Circuit Breakers . . . . . . . . . . . . . . . . . . 10-50
Instrument Panel Fuse
Block . . . . . . . . . . . . . . . . . . . . . . 10-54
G
Garage Door Opener . . . . . . . . . . 5-61Programming . . . . . . . . . . . . . . . . . 5-61
Gasoline
Specifications . . . . . . . . . . . . . . . . . 9-85 Gauges
Engine Coolant
Temperature . . . . . . . . . . . . . . . . 5-17
Engine Oil Pressure . . . . . . . . . . 5-16
Fuel . . . . . . . . . . . . . . . . . . . . . . . . . . 5-15
Odometer . . . . . . . . . . . . . . . . . . . . . 5-14
Speedometer . . . . . . . . . . . . . . . . . 5-14
Tachometer . . . . . . . . . . . . . . . . . . . 5-15
Trip Odometer . . . . . . . . . . . . . . . . 5-14
Voltmeter . . . . . . . . . . . . . . . . . . . . . 5-18
Warning Lights and Indicators . . . . . . . . . . . . . . . . . . . 5-12
General Information Service and Maintenance . . . . . 11-1
Towing . . . . . . . . . . . . . . . . . . . . . . . . 9-90
Vehicle Care . . . . . . . . . . . . . . . . . . 10-2
Glass Replacement . . . . . . . . . . . 10-41
Glove Box . . . . . . . . . . . . . . . . . . . . . . 4-1
GM Mobility Reimbursement Program . . . . . . . . . . . . . . . . . . . . . . 13-7
H
Halogen Bulbs . . . . . . . . . . . . . . . . 10-44
Hazard Warning Flashers . . . . . . . 6-5
Head Restraints . . . . . . . . . . . . . . . . 3-2
Headlamps . . . . . . . . . . . . . . . . . . . 10-44Aiming . . . . . . . . . . . . . . . . . . . . . . 10-42
Automatic . . . . . . . . . . . . . . . . . . . . . . 6-4
Bulb Replacement . . . . . . . . . . 10-44
Daytime RunningLamps (DRL) . . . . . . . . . . . . . . . . . 6-4
Flash-to-Pass . . . . . . . . . . . . . . . . . . 6-3
High-Beam On Light . . . . . . . . . . 5-32
High/Low Beam Changer . . . . . . 6-3
Heated Front Seats . . . . . . . . . . . . . 3-8
Heated Mirrors . . . . . . . . . . . . . . . . . 2-17
Heater Engine Coolant . . . . . . . . . . . . . . . 9-40
Heating and Air Conditioning . . . . . . . . . . . . . . . 8-1, 8-4