2011 FORD SUPER DUTY rear view mirror
[x] Cancel search: rear view mirrorPage 78 of 441
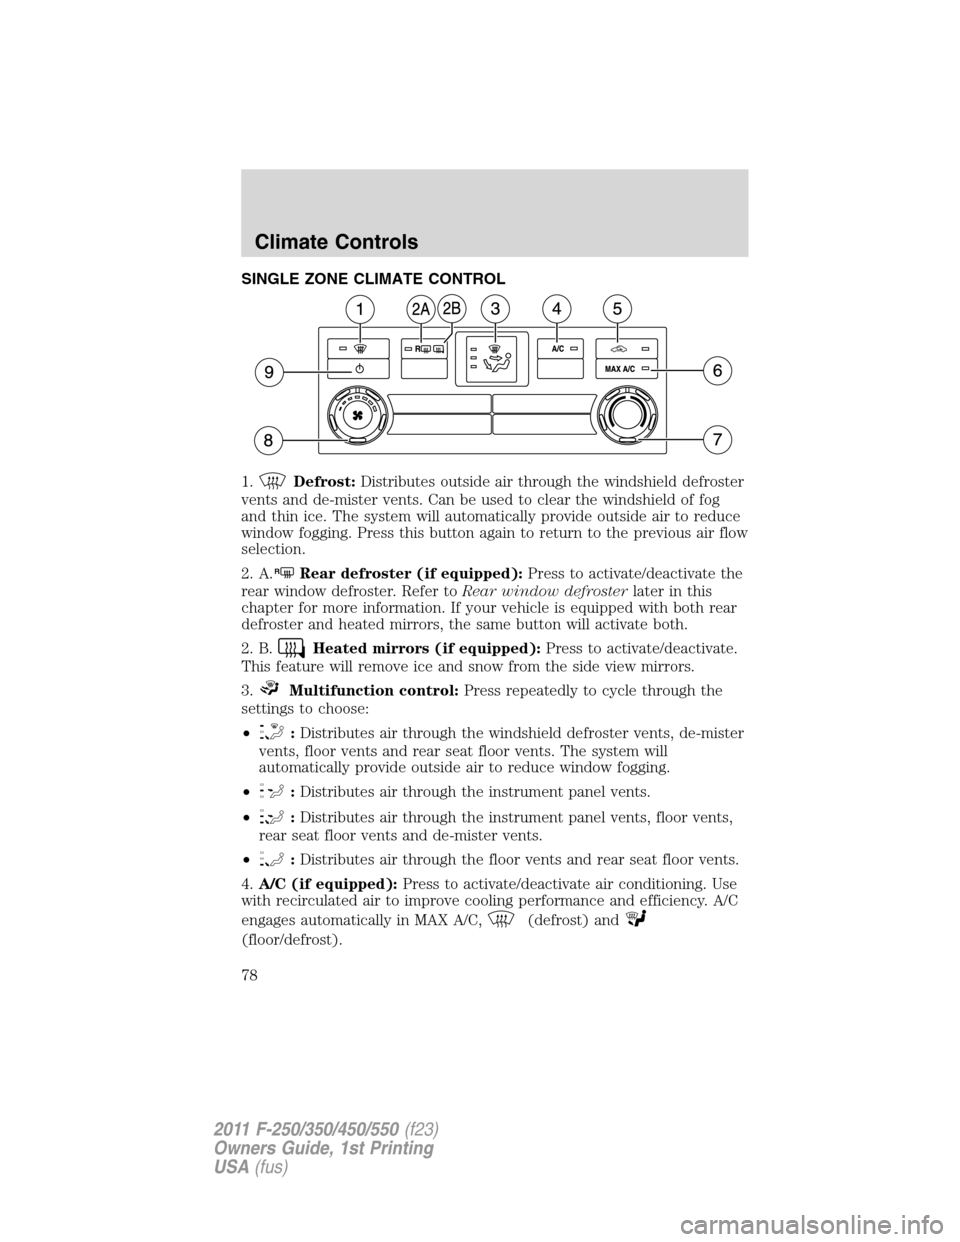
SINGLE ZONE CLIMATE CONTROL
1.
Defrost:Distributes outside air through the windshield defroster
vents and de-mister vents. Can be used to clear the windshield of fog
and thin ice. The system will automatically provide outside air to reduce
window fogging. Press this button again to return to the previous air flow
selection.
2. A.
RRear defroster (if equipped):Press to activate/deactivate the
rear window defroster. Refer toRear window defrosterlater in this
chapter for more information. If your vehicle is equipped with both rear
defroster and heated mirrors, the same button will activate both.
2. B.
Heated mirrors (if equipped):Press to activate/deactivate.
This feature will remove ice and snow from the side view mirrors.
3.
Multifunction control:Press repeatedly to cycle through the
settings to choose:
•
:Distributes air through the windshield defroster vents, de-mister
vents, floor vents and rear seat floor vents. The system will
automatically provide outside air to reduce window fogging.
•
:Distributes air through the instrument panel vents.
•
:Distributes air through the instrument panel vents, floor vents,
rear seat floor vents and de-mister vents.
•
:Distributes air through the floor vents and rear seat floor vents.
4.A/C (if equipped):Press to activate/deactivate air conditioning. Use
with recirculated air to improve cooling performance and efficiency. A/C
engages automatically in MAX A/C,
(defrost) and
(floor/defrost).
Climate Controls
78
2011 F-250/350/450/550(f23)
Owners Guide, 1st Printing
USA(fus)
Page 81 of 441
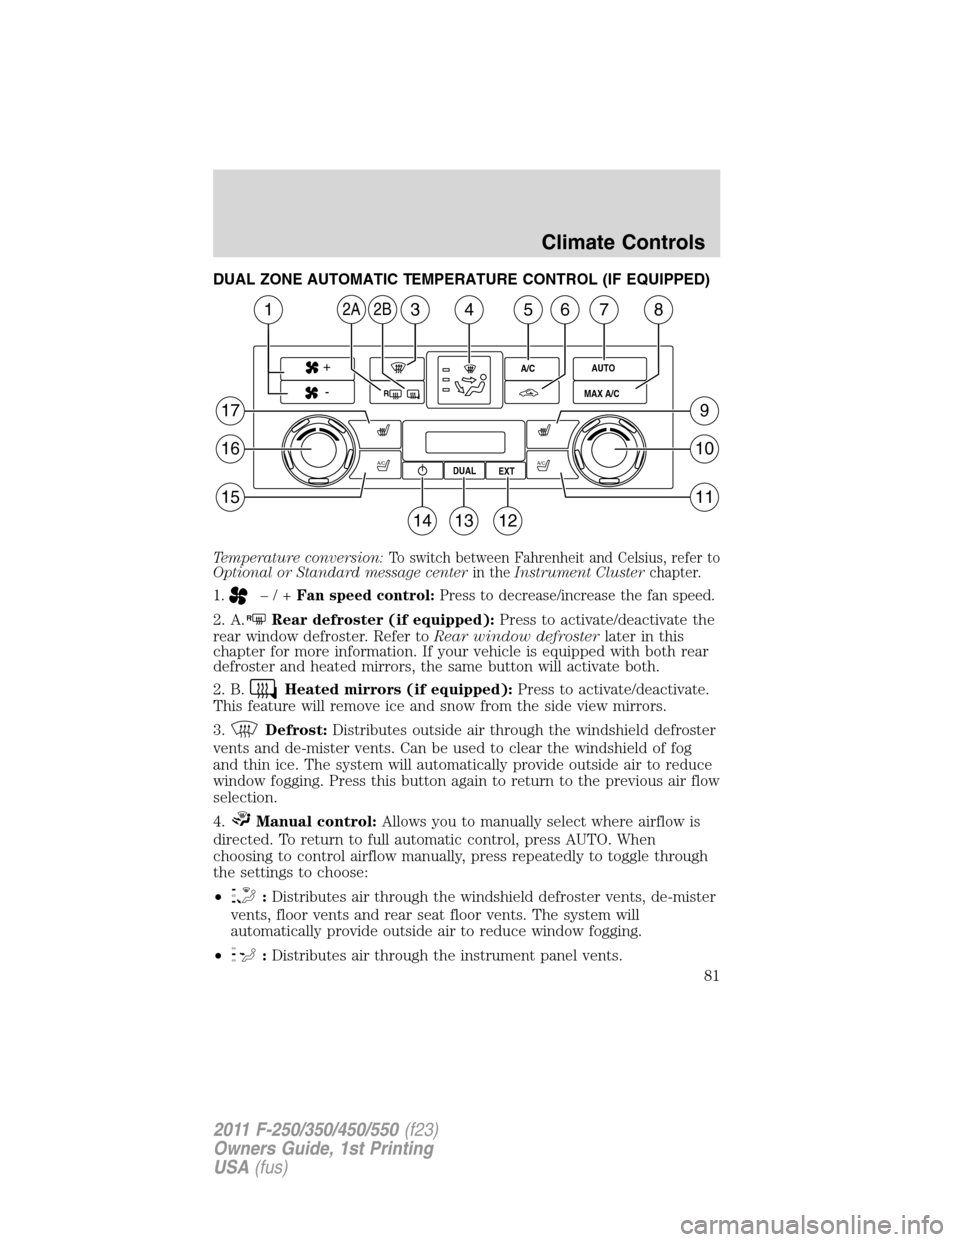
DUAL ZONE AUTOMATIC TEMPERATURE CONTROL (IF EQUIPPED)
Temperature conversion:To switch between Fahrenheit and Celsius, refer to
Optional or Standard message centerin theInstrument Clusterchapter.
1.–/+Fan speed control:Press to decrease/increase the fan speed.
2. A.RRear defroster (if equipped):Press to activate/deactivate the
rear window defroster. Refer toRear window defrosterlater in this
chapter for more information. If your vehicle is equipped with both rear
defroster and heated mirrors, the same button will activate both.
2. B.
Heated mirrors (if equipped):Press to activate/deactivate.
This feature will remove ice and snow from the side view mirrors.
3.
Defrost:Distributes outside air through the windshield defroster
vents and de-mister vents. Can be used to clear the windshield of fog
and thin ice. The system will automatically provide outside air to reduce
window fogging. Press this button again to return to the previous air flow
selection.
4.
Manual control:Allows you to manually select where airflow is
directed. To return to full automatic control, press AUTO. When
choosing to control airflow manually, press repeatedly to toggle through
the settings to choose:
•
:Distributes air through the windshield defroster vents, de-mister
vents, floor vents and rear seat floor vents. The system will
automatically provide outside air to reduce window fogging.
•
:Distributes air through the instrument panel vents.
A/CA/C
R
+
-A/CAUTO
DUAL
EXTMAX A/C
168
17
16
15
9
10
11
43572B2A
141312
Climate Controls
81
2011 F-250/350/450/550(f23)
Owners Guide, 1st Printing
USA(fus)
Page 104 of 441

INTERIOR MIRROR
The interior rear view mirror has two pivot points on the support arm
which lets you adjust the mirror up or down and from side to side.
WARNING:Do not adjust the mirror while the vehicle is in
motion.
Automatic dimming interior rear view mirror (if equipped)
Your vehicle may be equipped with an interior rear view mirror which
has an auto-dimming function. The electronic day/night mirror will
change from the normal (high reflective) state to the non-glare
(darkened) state when bright lights (glare) reach the mirror. When the
mirror detects bright light from behind the vehicle, it will automatically
adjust (darken) to minimize glare.
The mirror will automatically return to the normal state whenever the
vehicle is placed in R (Reverse) to ensure a bright clear view when
backing up.
Do not block the sensors on the front and back of the interior rear
view mirror since this may impair proper mirror performance.
Do not clean the housing or glass of any mirror with harsh
abrasives, fuel or other petroleum-based cleaning products.
Note:If equipped with a rearview camera system, a video image will be
displayed in the mirror or the navigation system (if equipped) when the
vehicle is put in R (Reverse). As you shift into any other gear from R
(Reverse), the image will remain for a few seconds and then turn off.
Refer toRearview camera systemin theDrivingchapter.
EXTERIOR MIRRORS
Power side view mirrors (if equipped)
To adjust your mirrors:
1. Rotate the control clockwise to
adjust the right mirror and rotate
the control counterclockwise to
adjust the left mirror.
2. Move the control in the direction
you wish to tilt the mirror.
Driver Controls
104
2011 F-250/350/450/550(f23)
Owners Guide, 1st Printing
USA(fus)
Page 107 of 441
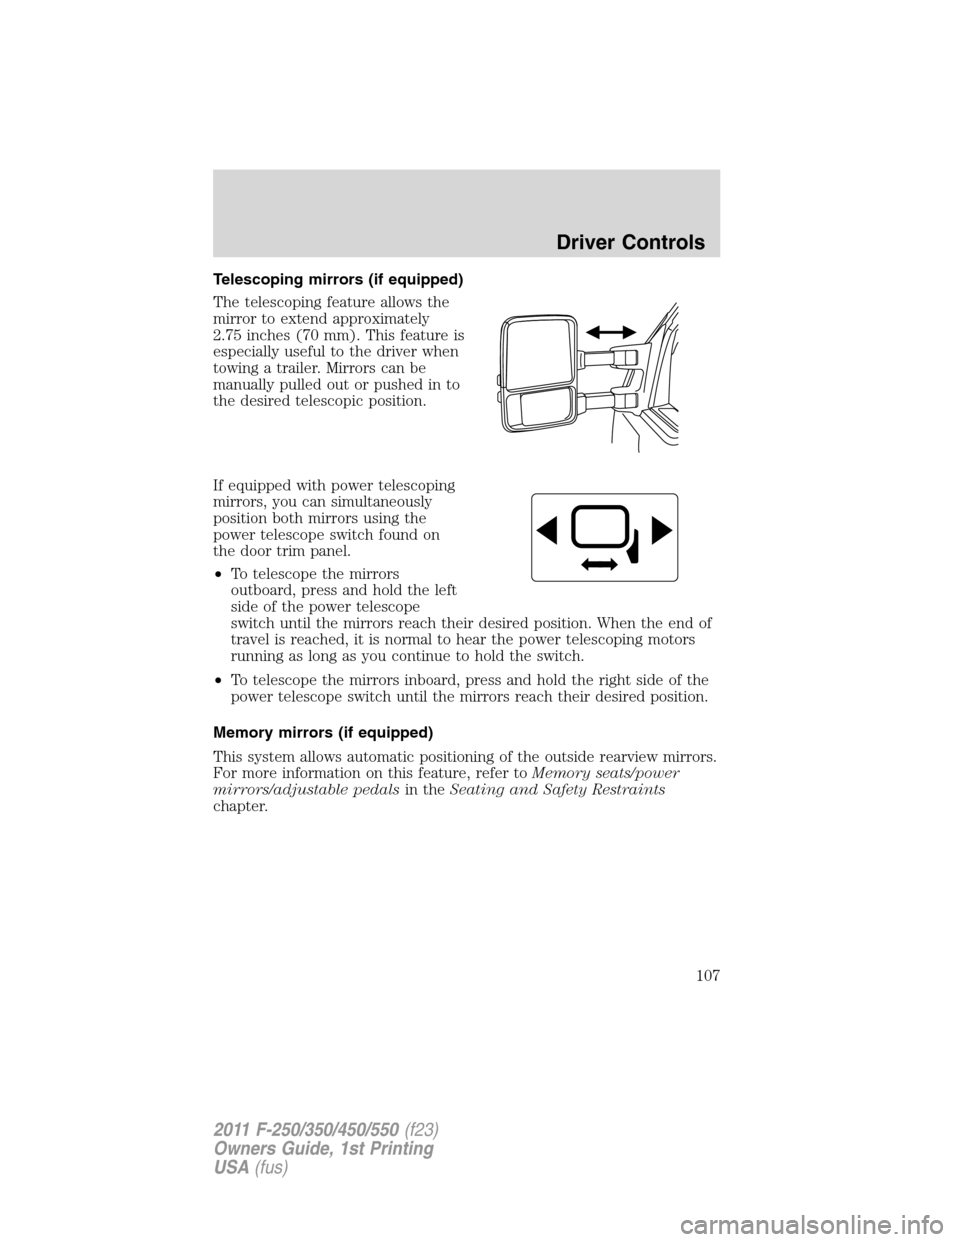
Telescoping mirrors (if equipped)
The telescoping feature allows the
mirror to extend approximately
2.75 inches (70 mm). This feature is
especially useful to the driver when
towing a trailer. Mirrors can be
manually pulled out or pushed in to
the desired telescopic position.
If equipped with power telescoping
mirrors, you can simultaneously
position both mirrors using the
power telescope switch found on
the door trim panel.
•To telescope the mirrors
outboard, press and hold the left
side of the power telescope
switch until the mirrors reach their desired position. When the end of
travel is reached, it is normal to hear the power telescoping motors
running as long as you continue to hold the switch.
•To telescope the mirrors inboard, press and hold the right side of the
power telescope switch until the mirrors reach their desired position.
Memory mirrors (if equipped)
This system allows automatic positioning of the outside rearview mirrors.
For more information on this feature, refer toMemory seats/power
mirrors/adjustable pedalsin theSeating and Safety Restraints
chapter.
Driver Controls
107
2011 F-250/350/450/550(f23)
Owners Guide, 1st Printing
USA(fus)
Page 256 of 441
Servicing after towing
If you tow a trailer for long distances, your vehicle will require more
frequent service intervals. Refer toSpecial operating conditionsin the
Scheduled Maintenance Guidechapter.
Trailer towing safety tips
General
•Ensure that the trailer, safety chains and 7–pin electrical connectors
are securely fastened.
•Make sure the truck receiver, draw bar, and coupler are properly
connected and adjusted.
•Check rear view and side mirrors for proper visibility especially when
towing trailer wider than the truck.
•When turning make wide turns to allow trailer tires to properly clear
any obstacles.
•When towing, operate the vehicle at lower speeds than you would
when not towing a trailer. The likelihood of trailer sway is greater at
higher speeds.
•Be prepared for trailer sway due to buffeting when larger vehicles
pass in either direction.
•If you will be towing a trailer frequently in hot weather, hilly
conditions, at GCWR, or any combination of these factors, consider
refilling your rear axle with synthetic gear lubricant if not already so
equipped. Refer toMaintenance product specifications and
capacitiesin theMaintenance and Specificationschapter for the
proper axle lubricant. Remember that regardless of the rear axle
lubricant used, do not tow a trailer for the first 500 miles (800 km) of
a new vehicle, and that the first 500 miles (800 km) of towing be done
at no faster than 70 mph (113 km/h) with no full-throttle starts.
Loading
•Trailer loads should be evenly distributed front to back and left to
right.
•Never exceed truck, trailer, receiver, ball, tongue, tire or coupler
loading recommendations.
•Keep the center-of-gravity low for best handling.
Tires, Wheels and Loading
256
2011 F-250/350/450/550(f23)
Owners Guide, 1st Printing
USA(fus)
Page 291 of 441
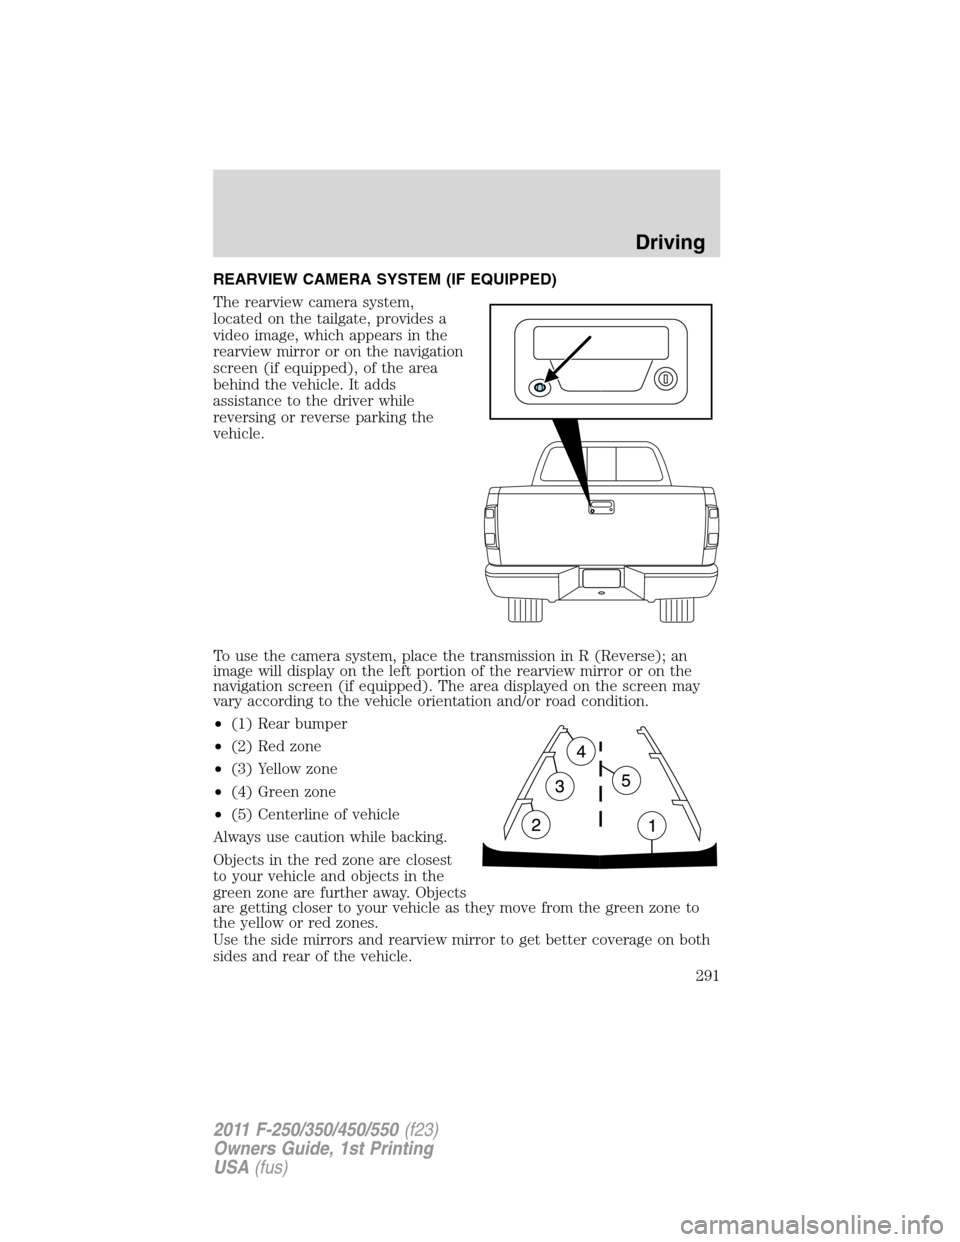
REARVIEW CAMERA SYSTEM (IF EQUIPPED)
The rearview camera system,
located on the tailgate, provides a
video image, which appears in the
rearview mirror or on the navigation
screen (if equipped), of the area
behind the vehicle. It adds
assistance to the driver while
reversing or reverse parking the
vehicle.
To use the camera system, place the transmission in R (Reverse); an
image will display on the left portion of the rearview mirror or on the
navigation screen (if equipped). The area displayed on the screen may
vary according to the vehicle orientation and/or road condition.
•(1) Rear bumper
•(2) Red zone
•(3) Yellow zone
•(4) Green zone
•(5) Centerline of vehicle
Always use caution while backing.
Objects in the red zone are closest
to your vehicle and objects in the
green zone are further away. Objects
are getting closer to your vehicle as they move from the green zone to
the yellow or red zones.
Use the side mirrors and rearview mirror to get better coverage on both
sides and rear of the vehicle.
Driving
291
2011 F-250/350/450/550(f23)
Owners Guide, 1st Printing
USA(fus)
Page 292 of 441
Image delay if displayed through the rearview mirror:
When shifting out of R (Reverse) and into any other gear, the image in
the rearview mirror will remain on for a few seconds before it shuts off
to assist in parking or trailer hookup.
Image delay if displayed through the navigation screen:
After shifting out of R (Reverse) and into any gear other than P (Park),
the image in the navigation screen will remain until the vehicle speed
reaches 5 mph (8 km/h), only if the rear camera delay feature is on, or
until any navigation radio button is pressed.
Note:The default setting for the rear camera delay is off. Press the
“Settings” button found on the navigation screen (if equipped) to set the
rear camera delay feature to on or off.
When towing, the camera system will only see what is being towed
behind the vehicle; this might not provide adequate coverage as it
usually provides in normal operation and some objects might not be
seen.
The camera lens for the camera is located on the tailgate. Keep the lens
clean so the video image remains clear and undistorted. Clean the lens
with a soft, lint-free cloth and non-abrasive cleaner.
Note:If the camera system image is not clear or seems distorted, it may
be covered with water droplets, snow, mud or any other substance. If
this occurs, clean the camera lens before using the camera system.
WARNING:The camera system is a reverse aid supplement
device that still requires the driver to use it in conjunction with
the rear view mirror and the side mirrors for maximum coverage.
WARNING:Objects that are close to either corner of the
bumper or under the bumper, might not be seen on the screen
due to the limited coverage of the camera system.
WARNING:Back up as slow as possible since higher speeds
might limit your reaction time to stop the vehicle.
WARNING:Do not use the camera system with the tailgate
open.
If the back end of the vehicle is hit or damaged, then check with your
authorized dealer to have your rearview camera system checked for
proper coverage and operation.
Driving
292
2011 F-250/350/450/550(f23)
Owners Guide, 1st Printing
USA(fus)
Page 436 of 441

in rear seat ......................195, 202
LATCH .....................................202
Child safety seats - booster
seats ...........................................207
Cleaning your vehicle
engine compartment ..............354
instrument panel ............356–357
interior .....................................357
plastic parts ............................355
safety belts ..............................357
washing ....................................352
waxing .....................................353
wheels ......................................353
wiper blades ............................355
Climate control (see Air
conditioning or Heating) ......78, 81
Clock adjust
AM/FM/CD .................................64
Compass, electronic
set zone adjustment .................27
Console ........................................99
overhead ....................................99
Controls
power seat ...............................156
steering column ......................111
Coolant
checking and adding ..............370
refill capacities ................374, 400
Cruise control
(see Speed control) ..................109
Customer Assistance ................311
Ford accessories for your
vehicle .....................................360
Ford Extended Service
Plan ..................................411, 414
Getting assistance outside
the U.S. and Canada ..............349
Getting roadside assistance ...311Getting the service you
need .........................................345
Ordering additional owner’s
literature .................................351
Utilizing the
Mediation/Arbitration
Program ...................................349
D
Daytime running lamps
(see Lamps) ................................88
Defrost
rear window and rearview
mirrors .......................................81
windshield .................................81
Dipstick
automatic transmission
fluid ..........................................391
engine oil .................................366
Driving under special
conditions ..................288, 301, 304
sand .........................................303
snow and ice ...........................305
through water .................303, 307
E
Electronic message center ...22, 40
Emergencies, roadside
jump-starting ..........................340
Emergency Flashers .................312
Emission control system ..........387
Engine ........................................404
cleaning ...................................354
coolant .....................................370
diesel ...........................................6
fail-safe cooling .......................374
idle speed control ...................368
Index
436
2011 F-250/350/450/550(f23)
Owners Guide, 1st Printing
USA(fus)