Page 33 of 302

Satellite radio electronic serial number (ESN):This 12–digit
Satellite Serial Number is needed to activate, modify or track your
satellite radio account. You will need this number when communicating
with SIRIUS. While in satellite radio mode, you can view this number on
the radio display by pressing the AUX and preset 1 controls
simultaneously.
Radio Display Condition Action Required
ACQUIRING Radio requires more
than two seconds to
produce audio for the
selected channel.No action required. This
message should disappear
shortly.
SAT FAULT Internal module or
system failure present.If this message does not
clear within a short period
of time, or with an ignition
key cycle, your receiver
may have a fault. See your
authorized dealer for
service.
INVALID CHNL Channel no longer
available.This previously available
channel is no longer
available. Tune to another
channel. If the channel was
one of your presets, you
may choose another
channel for that preset
button.
UNSUBSCRIBED Subscription not
available for this
channel.Contact SIRIUSat
1–888–539–7474 to
subscribe to the channel or
tune to another channel.
NO TEXT Artist information not
available.Artist information not
available at this time on
this channel. The system is
working properly.
Entertainment Systems
33
2011 Ranger(ran)
Owners Guide, 1st Printing
USA(fus)
Page 34 of 302
Radio Display Condition Action Required
NO TEXT Song title information
not available.Song title information not
available at this time on
this channel. The system is
working properly.
NO TEXT Category information
not available.Category information not
available at this time on
this channel. The system is
working properly.
NO SIGNAL Loss of signal from the
SIRIUSsatellite or
SIRIUStower to the
vehicle antenna.You are in a location that is
blocking the SIRIUSsignal
(i.e., tunnel, under an
overpass, dense foliage,
etc). The system is
working properly. When
you move into an open
area, the signal should
return.
UPDATING Update of channel
programming in
progress.No action required. The
process may take up to
three minutes.
CALL SIRIUS
1–888–539–7474Satellite service has
been deactivated by
SIRIUSsatellite radio.Call SIRIUSat
1–888–539–7474 to
re-activate or resolve
subscription issues.
Entertainment Systems
34
2011 Ranger(ran)
Owners Guide, 1st Printing
USA(fus)
Page 35 of 302

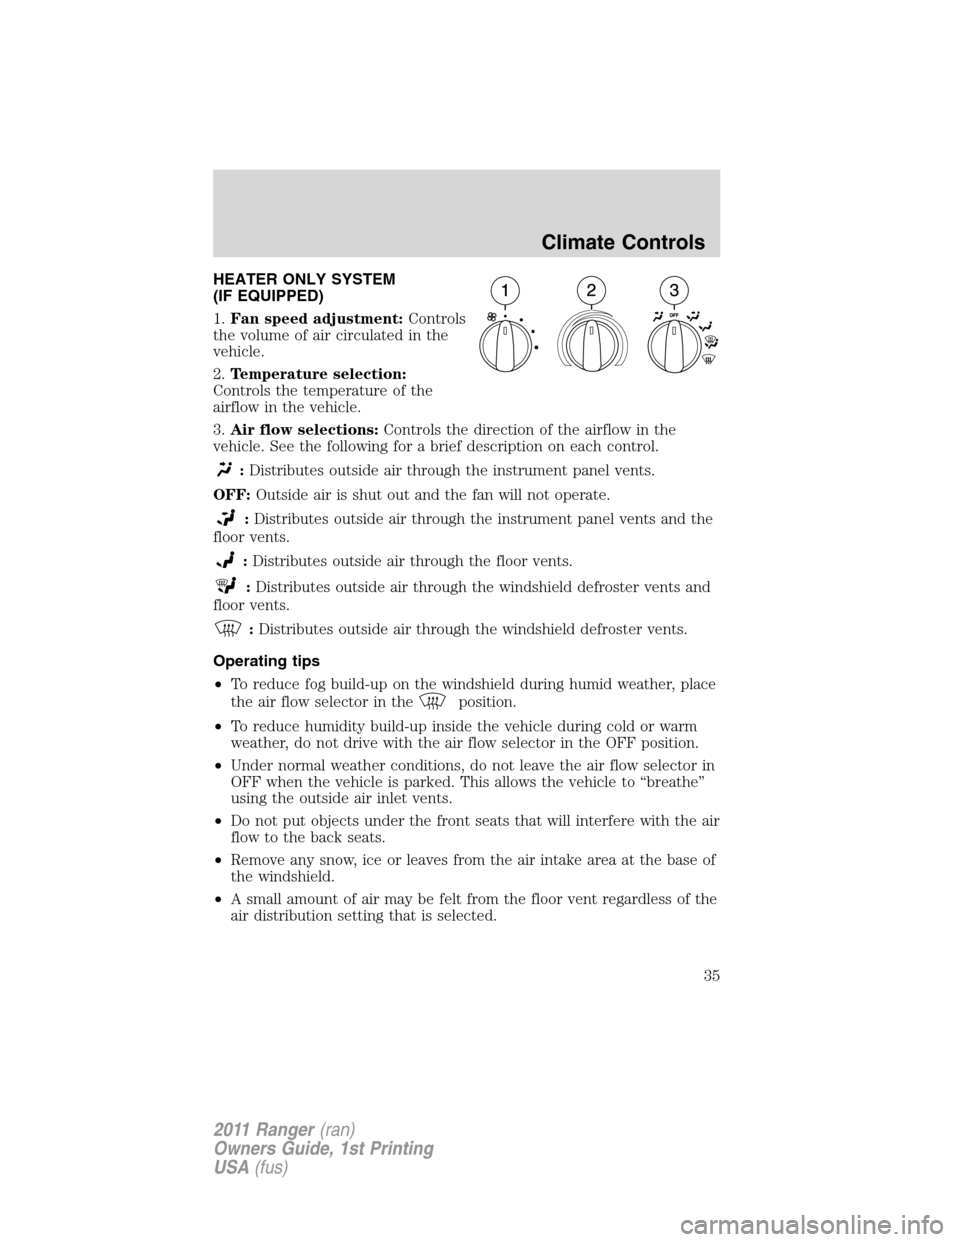
HEATER ONLY SYSTEM
(IF EQUIPPED)
1.Fan speed adjustment:Controls
the volume of air circulated in the
vehicle.
2.Temperature selection:
Controls the temperature of the
airflow in the vehicle.
3.Air flow selections:Controls the direction of the airflow in the
vehicle. See the following for a brief description on each control.
:Distributes outside air through the instrument panel vents.
OFF:Outside air is shut out and the fan will not operate.
:Distributes outside air through the instrument panel vents and the
floor vents.
:Distributes outside air through the floor vents.
:Distributes outside air through the windshield defroster vents and
floor vents.
:Distributes outside air through the windshield defroster vents.
Operating tips
•To reduce fog build-up on the windshield during humid weather, place
the air flow selector in the
position.
•To reduce humidity build-up inside the vehicle during cold or warm
weather, do not drive with the air flow selector in the OFF position.
•Under normal weather conditions, do not leave the air flow selector in
OFF when the vehicle is parked. This allows the vehicle to “breathe”
using the outside air inlet vents.
•Do not put objects under the front seats that will interfere with the air
flow to the back seats.
•Remove any snow, ice or leaves from the air intake area at the base of
the windshield.
•A small amount of air may be felt from the floor vent regardless of the
air distribution setting that is selected.
Climate Controls
35
2011 Ranger(ran)
Owners Guide, 1st Printing
USA(fus)
Page 36 of 302

To aid in side window defogging/demisting in cold weather:
1. Select
.
2. Adjust the temperature control to maintain comfort.
3. Set the fan speed to the highest setting.
4. Direct the outer instrument panel vents towards the side windows.
To increase airflow to the outer instrument panel vents, close the vents
located in the middle of the instrument panel.
MANUAL HEATING AND AIR CONDITIONING SYSTEM
(IF EQUIPPED)
1.Fan speed adjustment:Controls
the volume of air circulated in the
vehicle.
2.Temperature selection:
Controls the temperature of the
airflow in the vehicle.
3.Air flow selections:Controls the direction of the airflow in the
vehicle. See the following for a brief description on each control.
MAX A/C:Uses recirculated air to cool the vehicle. Air flows from the
instrument panel vents only. Temperature of airflow not adjustable.
A/C:Uses outside air to cool the vehicle. Air flows from the instrument
panel vents only.
:Distributes outside air through the instrument panel vents.
OFF:Outside air is shut out and the fan will not operate.
:Distributes outside air through the instrument panel vents and the
floor vents.
:Distributes outside air through the floor vents.
:Distributes outside air through the windshield defroster vents and
floor vents.
:Distributes outside air through the windshield defroster vents.
Climate Controls
36
2011 Ranger(ran)
Owners Guide, 1st Printing
USA(fus)
Page 37 of 302

Operating tips
•To reduce fog build-up on the windshield during humid weather, place
the air flow selector in the
position.
•To reduce humidity build-up inside the vehicle: do not drive with the
air flow selector in the OFF position.
•Under normal weather conditions, do not leave the air flow selector in
MAX A/C or OFF when the vehicle is parked. This allows the vehicle
to “breathe” using the outside air inlet vents.
•Do not put objects under the front seats that will interfere with the
airflow to the back seats.
•Remove any snow, ice or leaves from the air intake area at the base of
the windshield.
•A small amount of air may be felt from the floor vent regardless of the
air distribution setting that is selected.
During extreme high ambient temperatures when idling stationary for
extended periods of time in gear, it is recommended to run the A/C in
the MAX A/C position, reduce blower fan speed from the highest setting
and put the vehicle’s transmission into the P (Park) gear position
(automatic transmission only) to continue to receive cool air from your
A/C system.
To aid in side window defogging/demisting in cold weather:
1. Select
.
2. Adjust the temperature control to maintain comfort.
3. Set the highest fan speed.
4. Direct the outer instrument panel vents towards the side windows.
To increase airflow to the outer instrument panel vents, close the vents
located in the middle of the instrument panel.
Climate Controls
37
2011 Ranger(ran)
Owners Guide, 1st Printing
USA(fus)
Page 38 of 302
HEADLAMP CONTROL
Turns the lamps off.
Turns on the parking lamps,
instrument panel lamps, license
plate lamps and tail lamps.
Turns the low beam headlamps
on.
Fog lamp control (if equipped)
The fog lamps can be turned on
when the headlamp control is in
the
orposition and the
high beams are not turned on.
Pull the headlamp control towards
you to turn fog lamps on.
High beams
Push the lever toward the
instrument panel to activate. Pull
the lever toward you to deactivate.
Lights
38
2011 Ranger(ran)
Owners Guide, 1st Printing
USA(fus)
Page 39 of 302

Flash-to-pass
Pull toward you slightly to activate
and release to deactivate.
Daytime running lamps (DRL) (if equipped)
The daytime running light system turns the headlamps on with a
reduced light output.
To activate:
•the ignition must be in the on position and
•the headlamp system is in the off position or parking lamp position.
WARNING:Always remember to turn on your headlamps at
dusk or during inclement weather. The daytime running light
(DRL) system does not activate your tail lamps and generally may not
provide adequate lighting during these conditions. Failure to activate
your headlamps under these conditions may result in a collision.
PANEL DIMMER CONTROL
Use to adjust the brightness of the
instrument panel and all applicable
switches in the vehicle during
headlamp and parking lamp
operation.
Move the control up or down to
adjust the intensity of the panel
lighting.
Move the control to the full upright
position, past detent, to turn on the
interior lamps.
Lights
39
2011 Ranger(ran)
Owners Guide, 1st Printing
USA(fus)
Page 40 of 302

Note:If the battery is disconnected, discharged, or a new battery is
installed, the dimmer switch requires re-calibration. Rotate the dimmer
switch from the full dim position to the full dome/on position to reset.
This will ensure that your displays are visible under all lighting
conditions.
AIMING THE HEADLAMPS
The headlamps on your vehicle are properly aimed before leaving the
assembly plant. If your vehicle is involved in an accident or if you have
problems fixing the alignment of your headlamps, have them checked by
a qualified service technician.
Headlamp aim adjustment
The headlamps are designed to be mechanically aimed, but can also be
aimed visually by doing the following:
1. Park your vehicle on a level surface about 25 feet (7.6 meters) away
from a vertical plain surface (3). Check your headlamp alignment at
night or in a dark area so that you can see the headlamp beam pattern.
•(1) 8 feet (2.4 meters)
•(2) Center height of lamp to
ground
•(3) 25 feet (7.6 meters)
•(4) Horizontal reference line
•(5) Center of headlamps
•(6) Center line of the vehicle
2. The center of the headlamp is
marked either on the lens (a circle
or cross marker) or on the bulb shield, internal to the lamp (mark or
feature). Measure the height from the center of your headlamp to the
ground (2) and mark an 8 foot (2.4 meter) long horizontal line on the
wall or screen (1) at this height (masking tape works well).
Lights
40
2011 Ranger(ran)
Owners Guide, 1st Printing
USA(fus)