Page 1572 of 2057
5. CAUTION: Make sure that theinstallation marks are aligned.
E113883
Vehicles with mechanical timing belt tensioner
6. NOTE: Make sure that new components are
installed.
1. Torque: 25
Nm
3. NOTE: The timing belt tensioner setting is
dependant on the engine temperature.
Torque: 25
Nm
E68489
3
1
2
-20 C 20 C 50 C
G1166799en2008.50 Kuga8/2011
303-01- 39
Engine— 2.5L Duratec (147kW/200PS) - VI5303-01-
39
REMOVAL AND INSTALLATION
TO MODEL INDEX
BACK TO CHAPTER INDEX
FORD KUGA 2011.0MY WORKSHOP REPAIR MANUAL
Page 1573 of 2057
Vehicles with automatic timing belt tensioner
7. NOTE:Make sure that new components are
installed.
1. Torque: 25
Nm
3. Special Tool(s): 303-1054 Torque: 25
Nm
E113801
12
3
303-1054
8. WARNING: Take extra care when handling the compressed spring.
Remove the Special Tool(s): 303-1054
E113802
303-1054
All vehicles
9.Torque: 120Nm
E68746
10.Remove the Special Tool(s): 303-1178
E66324
303-1178
11 .Remove the Special Tool(s): 303-1182
E66328
303-1182
G1166799en2008.50 Kuga8/2011
303-01- 40
Engine— 2.5L Duratec (147kW/200PS) - VI5303-01-
40
REMOVAL AND INSTALLATION
TO MODEL INDEX
BACK TO CHAPTER INDEX
FORD KUGA 2011.0MY WORKSHOP REPAIR MANUAL
Page 1581 of 2057
Oil Pump(21 714 0)
Special Tool(s)211-014
Remover, Steering Wheel
13019
Removal
NOTE:Removal steps in this procedure may
contain installation details.
1. Refer to: Timing Belt (303-01 Engine - 2.5L
Duratec (147kW/200PS) - VI5, Removal and
Installation).
2. Special Tool(s): 211-014
E64877
211-014
3.Torque: 6Nm
E64878
4.Refer to: Crankshaft Front Seal (303-01 Engine
- 2.5L Duratec (147kW/200PS) - VI5, Removal
and Installation).
Installation
1. To install, reverse the removal procedure.
G543327en2008.50 Kuga8/2011
303-01- 48
Engine— 2.5L Duratec (147kW/200PS) - VI5303-01-
48
REMOVAL AND INSTALLATION
TO MODEL INDEX
BACK TO CHAPTER INDEX
FORD KUGA 2011.0MY WORKSHOP REPAIR MANUAL
Page 1617 of 2057
Engine(21 134 8)
Disassembly
Special Tool(s) / General Equipment211-014
Remover, Steering Wheel
13019
303-1054
Locking Tool, Timing Belt
Tensioner
3031054
Punch
Two Leg Puller
1.
E68416
2.
E122374
x4
3. General Equipment: Two Leg Puller
E122375
Vehicles with mechanical timing belt tensioner
4.
E68488
1
3
2
G543498en2008.50 Kuga8/2011
303-01- 84
Engine— 2.5L Duratec (147kW/200PS) - VI5303-01-
84
DISASSEMBLY
TO MODEL INDEX
BACK TO CHAPTER INDEX
FORD KUGA 2011.0MY WORKSHOP REPAIR MANUAL
Page 1618 of 2057
Vehicles with automatic timing belt tensioner
5. WARNING: Take extra care whenhandling the compressed spring.
6. WARNING: Take extra care whenhandling the compressed spring.
All vehicles
7.
G543498en2008.50 Kuga8/2011
303-01- 85
Engine— 2.5L Duratec (147kW/200PS) - VI5303-01-
85
DISASSEMBLY
TO MODEL INDEX
BACK TO CHAPTER INDEX
FORD KUGA 2011.0MY WORKSHOP REPAIR MANUAL
Install the Special Tool(s): 303-1054
1
2
E113799
303-1054
Special Tool(s): 303-1054
E113800
1
2
3
303-1054
E68408
1
2
8.
E68490
1
2
Page 1627 of 2057

Engine(21 134 8)
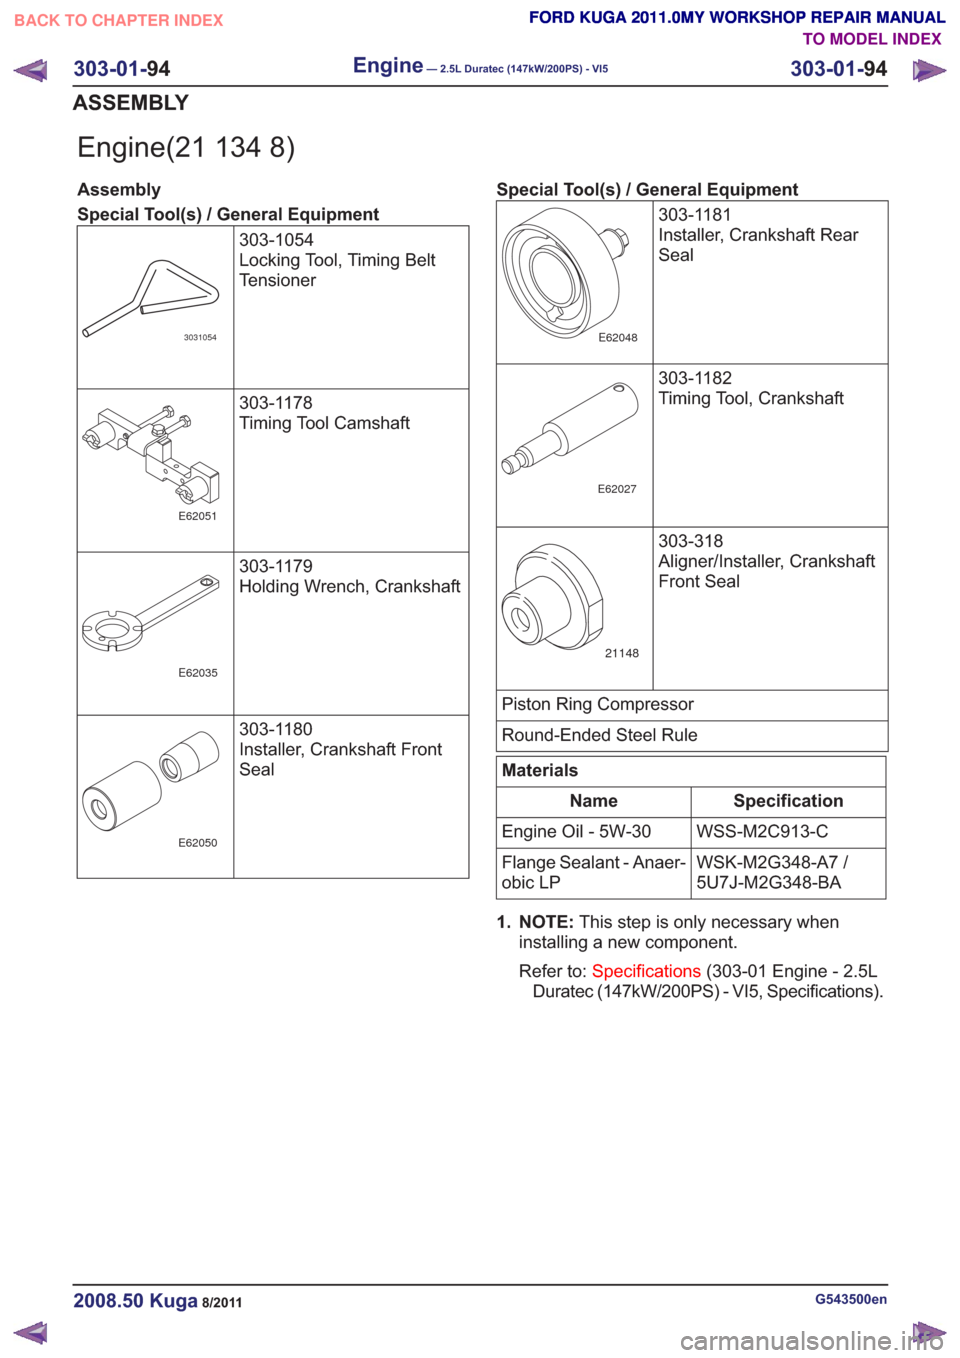
Assembly
Special Tool(s) / General Equipment303-1054
Locking Tool, Timing Belt
Tensioner
3031054
303-1178
Timing Tool Camshaft
E62051
303-1179
Holding Wrench, Crankshaft
E62035
303-1180
Installer, Crankshaft Front
Seal
E62050
Special Tool(s) / General Equipment303-1181
Installer, Crankshaft Rear
Seal
E62048
303-1182
Timing Tool, Crankshaft
E62027
303-318
Aligner/Installer, Crankshaft
Front Seal
21148
Piston Ring Compressor
Round-Ended Steel Rule
Materials
Specification
Name
WSS-M2C913-C
Engine Oil - 5W-30
WSK-M2G348-A7 /
5U7J-M2G348-BA
Flange Sealant - Anaer-
obic LP
1. NOTE: This step is only necessary when
installing a new component.
Refer to: Specifications (303-01 Engine - 2.5L
Duratec (147kW/200PS) - VI5, Specifications).
G543500en2008.50 Kuga8/2011
303-01- 94
Engine— 2.5L Duratec (147kW/200PS) - VI5303-01-
94
ASSEMBLY
TO MODEL INDEX
BACK TO CHAPTER INDEX
FORD KUGA 2011.0MY WORKSHOP REPAIR MANUAL FORD KUGA 2011.0MY WORKSHOP REPAIR MANUAL
FORD KUGA 2011.0MY WORKSHOP REPAIR MANUAL
FORD KUGA 2011.0MY WORKSHOP REPAIR MANUAL
FORD KUGA 2011.0MY WORKSHOP REPAIR MANUAL
FORD KUGA 2011.0MY WORKSHOP REPAIR MANUAL
Page 1641 of 2057
Vehicles with mechanical timing belt tensioner
39. N O T E :Make sure that new components are
installed.
1. Torque: 25
Nm
3. Torque: 25Nm
E68489
3
1
2
-20 C 20 C 50 C
Vehicles with automatic timing belt tensioner
40. N O T E : Make sure that new components are
installed.
1. Torque: 25
Nm
3. Special Tool(s): 303-1054 Torque: 25
Nm
E113801
12
3
303-1054
41. WARNING: Take extra care when handling the compressed spring.
Remove the Special Tool(s): 303-1054
E113802
303-1054
G543500en2008.50 Kuga8/2011
303-01- 108
Engine— 2.5L Duratec (147kW/200PS) - VI5303-01-
108
ASSEMBLY
TO MODEL INDEX
BACK TO CHAPTER INDEX
FORD KUGA 2011.0MY WORKSHOP REPAIR MANUAL
Page 1681 of 2057

Coolant Pump — 2.5L Duratec (147kW/200PS) - VI5(24 404 0)
General EquipmentTrolley Jack
Removal
NOTE: Removal steps in this procedure may
contain installation details.
1. Drain the cooling system.
Refer to: Cooling System Draining and Vacuum
Filling (303-03 Engine Cooling, General
Procedures).
2. Remove the timing belt.
Refer to: Timing Belt (303-01 Engine - 2.5L
Duratec (147kW/200PS) - VI5, Removal and
Installation).
3. CAUTION: Use a wooden block to protect the oil pan when supporting the
engine.
Position the trolley jack with the wooden block
under the oil pan. Raise the trolley jack until the
front of the engine is free from load and the
coolant pump bolts can be accessed.
General Equipment: Trolley Jack
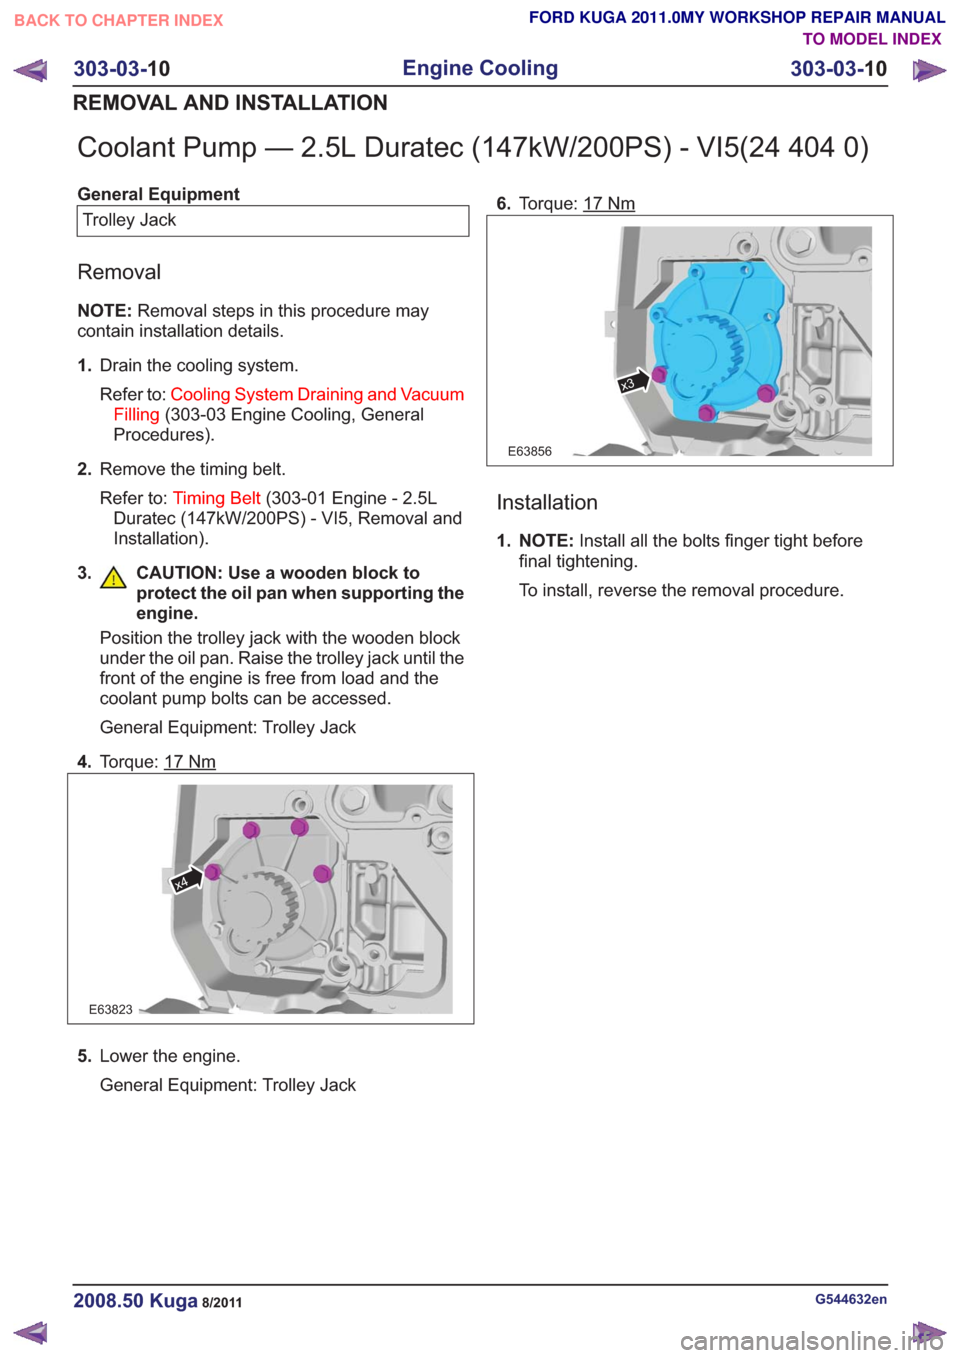
4. Torque: 17
Nm
E63823
x4
5.Lower the engine.
General Equipment: Trolley Jack 6.
Torque: 17
Nm
x3
E63856
Installation
1. NOTE: Install all the bolts finger tight before
final tightening.
To install, reverse the removal procedure.
G544632en2008.50 Kuga8/2011
303-03- 10
Engine Cooling
303-03- 10
REMOVAL AND INSTALLATION
TO MODEL INDEX
BACK TO CHAPTER INDEX
FORD KUGA 2011.0MY WORKSHOP REPAIR MANUAL