2011 FORD F150 air condition
[x] Cancel search: air conditionPage 202 of 461
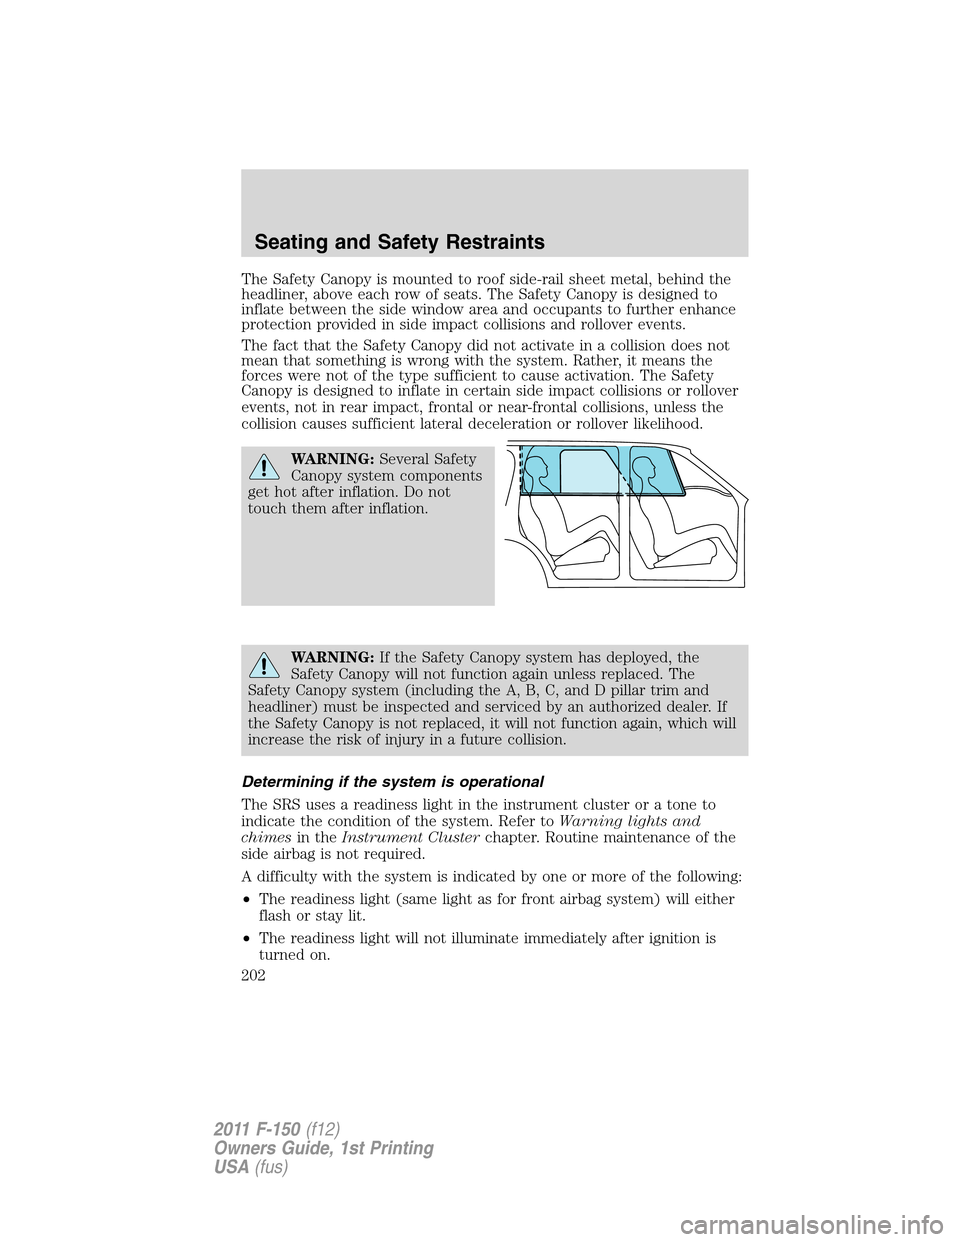
The Safety Canopy is mounted to roof side-rail sheet metal, behind the
headliner, above each row of seats. The Safety Canopy is designed to
inflate between the side window area and occupants to further enhance
protection provided in side impact collisions and rollover events.
The fact that the Safety Canopy did not activate in a collision does not
mean that something is wrong with the system. Rather, it means the
forces were not of the type sufficient to cause activation. The Safety
Canopy is designed to inflate in certain side impact collisions or rollover
events, not in rear impact, frontal or near-frontal collisions, unless the
collision causes sufficient lateral deceleration or rollover likelihood.
WARNING:Several Safety
Canopy system components
get hot after inflation. Do not
touch them after inflation.
WARNING:If the Safety Canopy system has deployed, the
Safety Canopy will not function again unless replaced. The
Safety Canopy system (including the A, B, C, and D pillar trim and
headliner) must be inspected and serviced by an authorized dealer. If
the Safety Canopy is not replaced, it will not function again, which will
increase the risk of injury in a future collision.
Determining if the system is operational
The SRS uses a readiness light in the instrument cluster or a tone to
indicate the condition of the system. Refer toWarning lights and
chimesin theInstrument Clusterchapter. Routine maintenance of the
side airbag is not required.
A difficulty with the system is indicated by one or more of the following:
•The readiness light (same light as for front airbag system) will either
flash or stay lit.
•The readiness light will not illuminate immediately after ignition is
turned on.
Seating and Safety Restraints
202
2011 F-150(f12)
Owners Guide, 1st Printing
USA(fus)
Page 233 of 461
TIRE CARE
Inspecting your tires and wheel valve stems
Periodically inspect the tire treads for uneven or excessive wear and
remove objects such as stones, nails or glass that may be wedged in the
tread grooves. Check the tire and valve stems for holes, cracks, or cuts
that may permit air leakage and repair or replace the tire and replace
the valve stem. Inspect the tire sidewalls for cracking, cuts, bruises and
other signs of damage or excessive wear. If internal damage to the tire is
suspected, have the tire demounted and inspected in case it needs to be
repaired or replaced. For your safety, tires that are damaged or show
signs of excessive wear should not be used because they are more likely
to blow out or fail.
Improper or inadequate vehicle maintenance can cause tires to wear
abnormally. Inspect all your tires, including the spare, frequently, and
replace them if one or more of the following conditions exist:
Tire wear
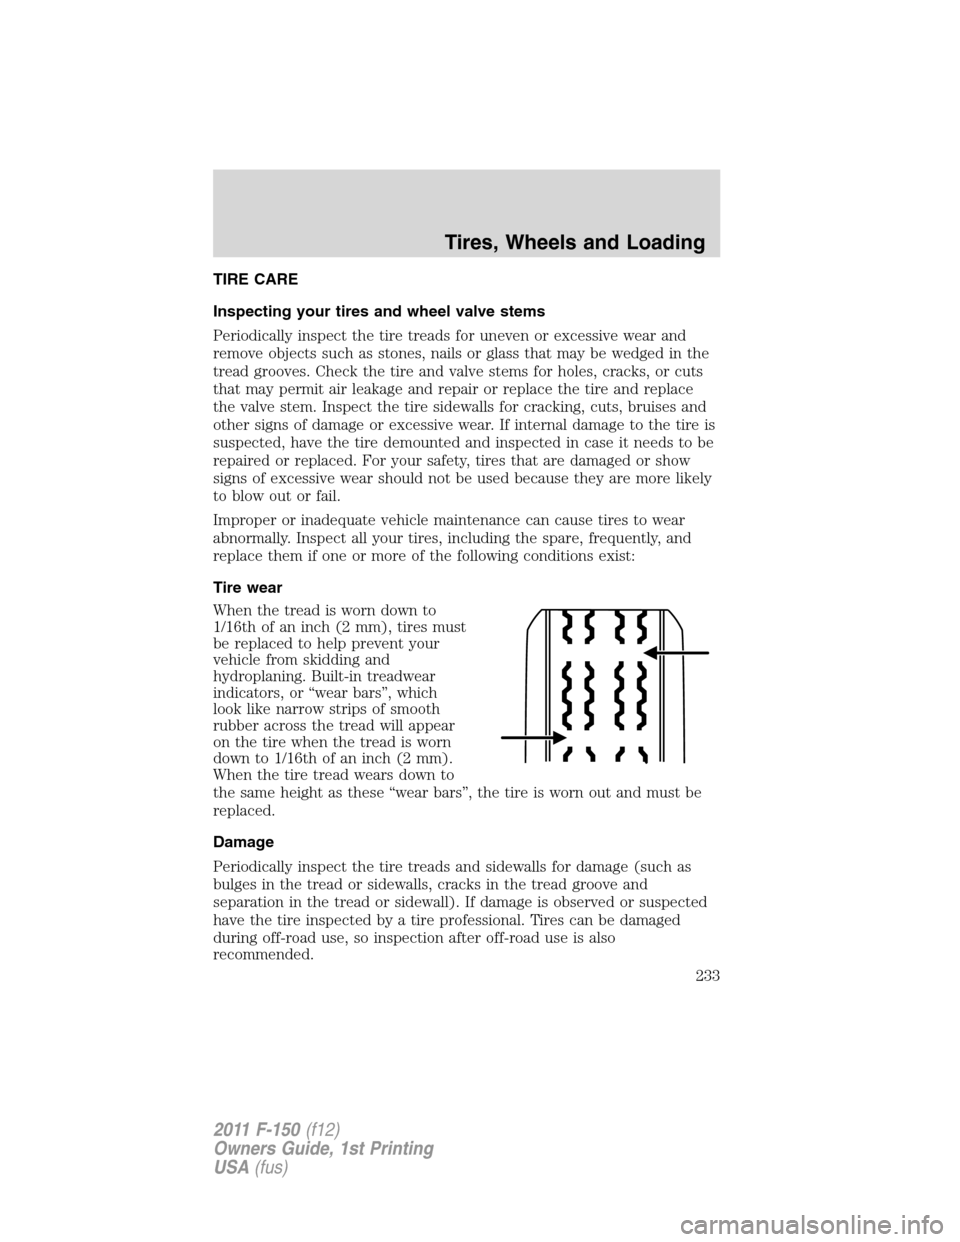
When the tread is worn down to
1/16th of an inch (2 mm), tires must
be replaced to help prevent your
vehicle from skidding and
hydroplaning. Built-in treadwear
indicators, or “wear bars”, which
look like narrow strips of smooth
rubber across the tread will appear
on the tire when the tread is worn
down to 1/16th of an inch (2 mm).
When the tire tread wears down to
the same height as these “wear bars”, the tire is worn out and must be
replaced.
Damage
Periodically inspect the tire treads and sidewalls for damage (such as
bulges in the tread or sidewalls, cracks in the tread groove and
separation in the tread or sidewall). If damage is observed or suspected
have the tire inspected by a tire professional. Tires can be damaged
during off-road use, so inspection after off-road use is also
recommended.
Tires, Wheels and Loading
233
2011 F-150(f12)
Owners Guide, 1st Printing
USA(fus)
Page 245 of 461
following two conditions: (1) This device may not cause harmful
interference, and (2) This device must accept any interference received,
including interference that may cause undesired operation.
WARNING:The tire pressure monitoring system is NOT a
substitute for manually checking tire pressure. The tire pressure
should be checked periodically (at least monthly) using a tire gauge,
seeInflating your tiresin this chapter. Failure to properly maintain
your tire pressure could increase the risk of tire failure, loss of control,
vehicle rollover and personal injury.
Changing tires with a TPMS
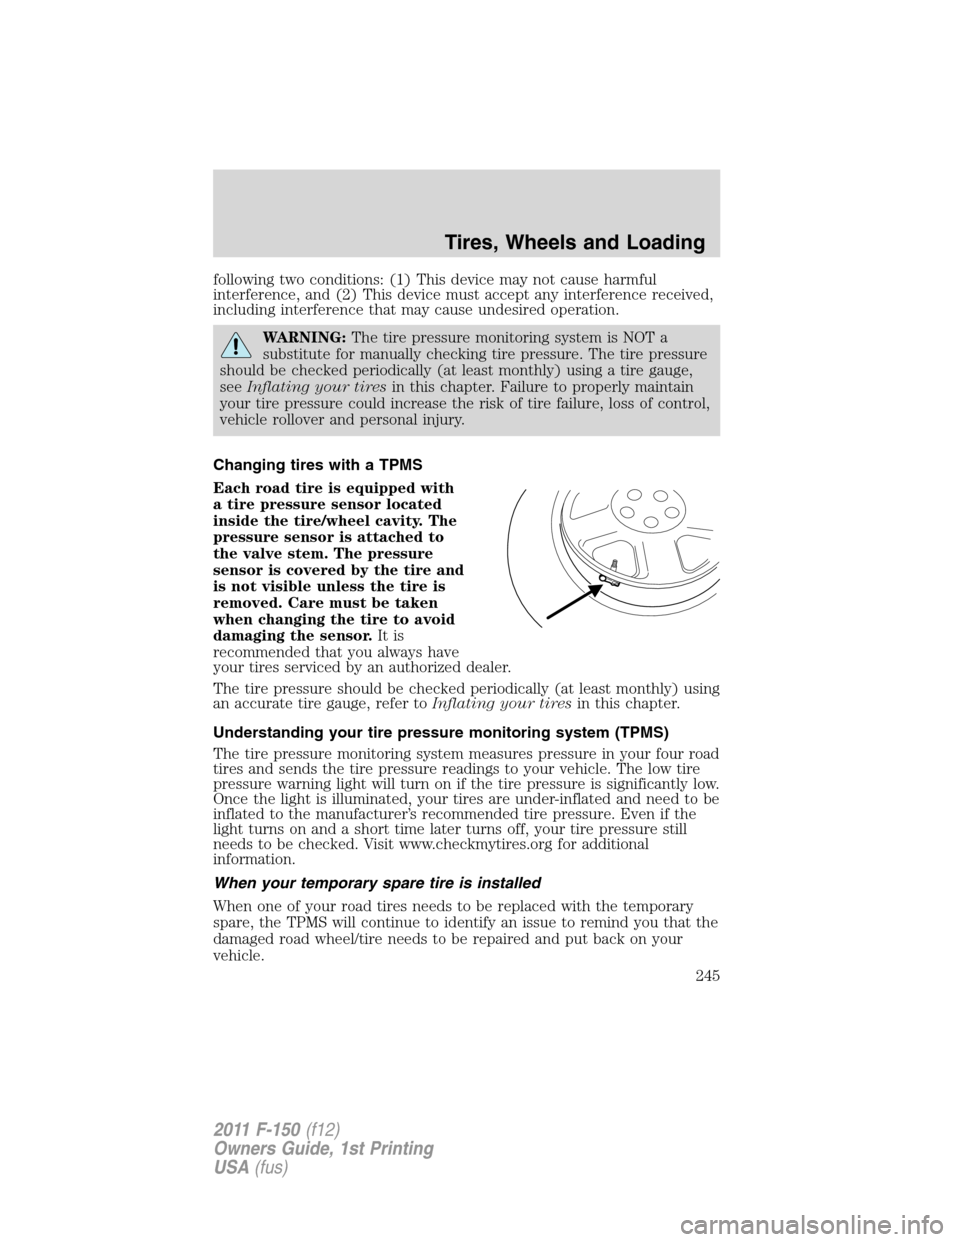
Each road tire is equipped with
a tire pressure sensor located
inside the tire/wheel cavity. The
pressure sensor is attached to
the valve stem. The pressure
sensor is covered by the tire and
is not visible unless the tire is
removed. Care must be taken
when changing the tire to avoid
damaging the sensor.It is
recommended that you always have
your tires serviced by an authorized dealer.
The tire pressure should be checked periodically (at least monthly) using
an accurate tire gauge, refer toInflating your tiresin this chapter.
Understanding your tire pressure monitoring system (TPMS)
The tire pressure monitoring system measures pressure in your four road
tires and sends the tire pressure readings to your vehicle. The low tire
pressure warning light will turn on if the tire pressure is significantly low.
Once the light is illuminated, your tires are under-inflated and need to be
inflated to the manufacturer’s recommended tire pressure. Even if the
light turns on and a short time later turns off, your tire pressure still
needs to be checked. Visit www.checkmytires.org for additional
information.
When your temporary spare tire is installed
When one of your road tires needs to be replaced with the temporary
spare, the TPMS will continue to identify an issue to remind you that the
damaged road wheel/tire needs to be repaired and put back on your
vehicle.
Tires, Wheels and Loading
245
2011 F-150(f12)
Owners Guide, 1st Printing
USA(fus)
Page 247 of 461
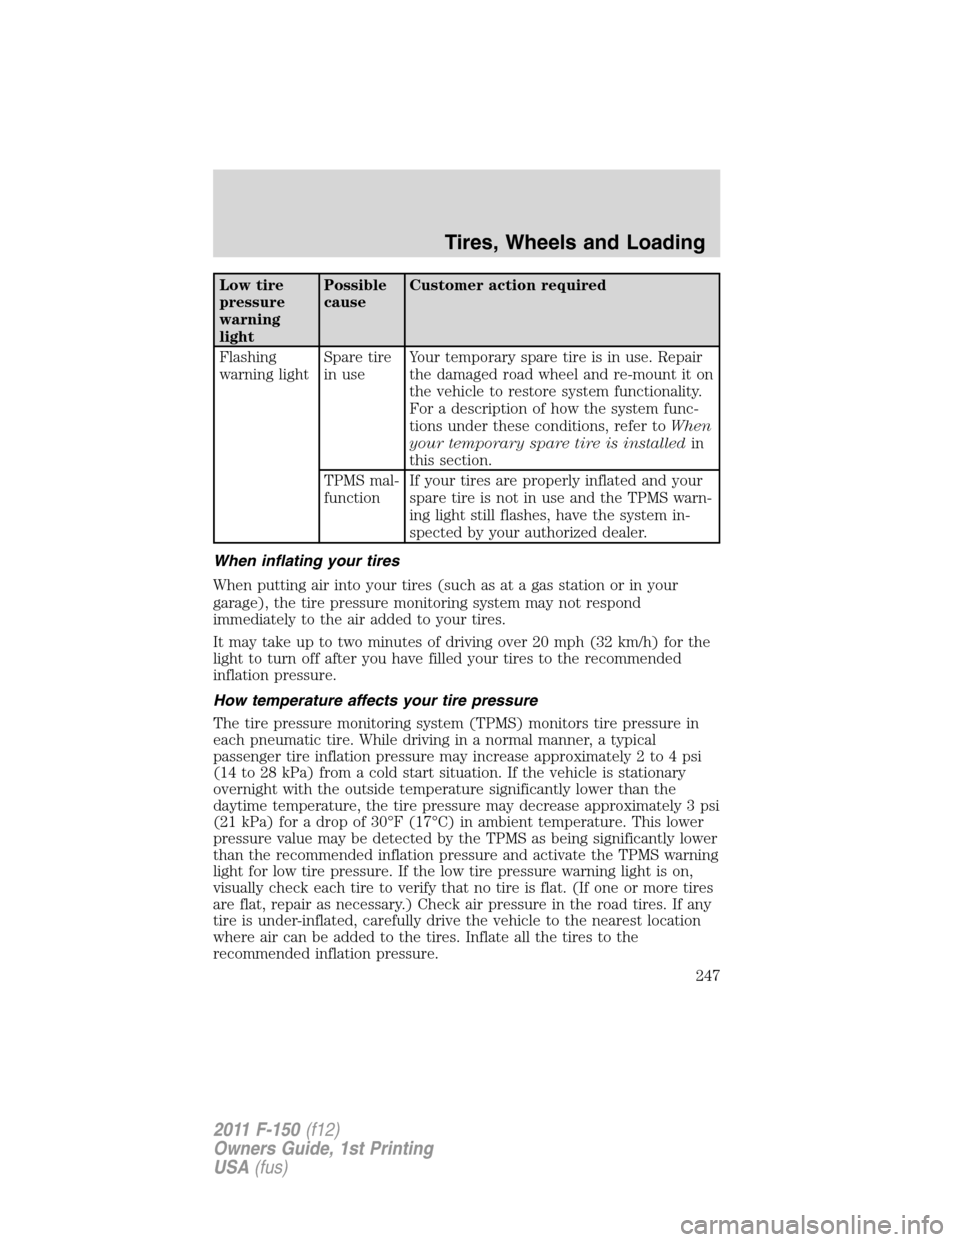
Low tire
pressure
warning
lightPossible
causeCustomer action required
Flashing
warning lightSpare tire
in useYour temporary spare tire is in use. Repair
the damaged road wheel and re-mount it on
the vehicle to restore system functionality.
For a description of how the system func-
tions under these conditions, refer toWhen
your temporary spare tire is installedin
this section.
TPMS mal-
functionIf your tires are properly inflated and your
spare tire is not in use and the TPMS warn-
ing light still flashes, have the system in-
spected by your authorized dealer.
When inflating your tires
When putting air into your tires (such as at a gas station or in your
garage), the tire pressure monitoring system may not respond
immediately to the air added to your tires.
It may take up to two minutes of driving over 20 mph (32 km/h) for the
light to turn off after you have filled your tires to the recommended
inflation pressure.
How temperature affects your tire pressure
The tire pressure monitoring system (TPMS) monitors tire pressure in
each pneumatic tire. While driving in a normal manner, a typical
passenger tire inflation pressure may increase approximately 2 to 4 psi
(14 to 28 kPa) from a cold start situation. If the vehicle is stationary
overnight with the outside temperature significantly lower than the
daytime temperature, the tire pressure may decrease approximately 3 psi
(21 kPa) for a drop of 30°F (17°C) in ambient temperature. This lower
pressure value may be detected by the TPMS as being significantly lower
than the recommended inflation pressure and activate the TPMS warning
light for low tire pressure. If the low tire pressure warning light is on,
visually check each tire to verify that no tire is flat. (If one or more tires
are flat, repair as necessary.) Check air pressure in the road tires. If any
tire is under-inflated, carefully drive the vehicle to the nearest location
where air can be added to the tires. Inflate all the tires to the
recommended inflation pressure.
Tires, Wheels and Loading
247
2011 F-150(f12)
Owners Guide, 1st Printing
USA(fus)
Page 267 of 461
1. Make sure the trailer brakes are in good working condition,
functioning normally and properly adjusted. See your trailer dealer if
necessary.
2. Hook up the trailer and make the electrical connections according to
the trailer manufacturer’s instructions.
3. When a trailer with electric brakes is plugged in, theTRAILER
CONNECTEDmessage displays in the instrument cluster message
center.
4. Use the GAIN adjustment (+/-) buttons to increase or decrease the
GAIN setting to the desired starting point. A GAIN setting of 6.0 is a
good starting point for heavier loads.
5. In a traffic-free environment, tow the trailer on a dry, level surface at
a speed of 20–25 mph (30–40 km/h) and squeeze the manual control
lever completely.
6. If the trailer wheels lock up (indicated by squealing tires), reduce the
GAIN setting; if the trailer wheels turn freely, increase the GAIN setting.
Repeat Steps 5 and 6 until the GAIN setting is at a point just below
trailer wheel lock-up. If towing a heavier trailer, trailer wheel lock-up
may not be attainable even with the maximum GAIN setting of 10.
Explanation of instrument cluster warning messages:
The TBC interacts with the instrument cluster message center to display
the following messages:
TRAILER BRAKE MODULE FAULT:This message is displayed and
accompanied by a single chime, in response to faults sensed by the TBC.
In the event this message is seen, please contact your authorized dealer
as soon as possible for diagnosis and repair. The TBC may still function,
but performance may be degraded.
WIRING FAULT ON TRAILER:This message is displayed when a
Short circuit on the electric brake output wirehas occurred. If the
WIRING FAULT ON TRAILERmessage is displayed and accompanied
by a single chime, with no trailer connected, the problem is with the
vehicle wiring from the TBC to the 7–pin connector at the bumper. If the
message is only displayed with a trailer connected, the problem is related
to the trailer wiring; consult your trailer dealer for assistance. This can
be a short to ground (i.e., chaffed wire) or a short to voltage (i.e., pulled
pin on trailer emergency break-away battery) or trailer brakes drawing
too much current.
Note:Your TBC can be diagnosed by your authorized dealer to
determine exactly which trailer fault has occurred; however, if the fault
is with the trailer this diagnosis isnotcovered under your Ford
warranty.
Tires, Wheels and Loading
267
2011 F-150(f12)
Owners Guide, 1st Printing
USA(fus)
Page 273 of 461
WARNING:Do not park, idle, or drive your vehicle in dry grass
or other dry ground cover. The emission system heats up the
engine compartment and exhaust system, which can start a fire.
WARNING:Do not start your vehicle in a closed garage or in
other enclosed areas. Exhaust fumes can be toxic. Always open
the garage door before you start the engine. SeeGuarding against
exhaust fumesin this chapter for more instructions.
WARNING:If you smell exhaust fumes inside your vehicle, have
your dealer inspect your vehicle immediately. Do not drive if you
smell exhaust fumes.
Important safety precautions
A computer system controls the engine’s idle revolutions per minute
(RPM). When the engine starts, the idle RPM runs higher than normal in
order to warm the engine. If the engine idle speed does not slow down
automatically, have the vehicle checked. If the vehicle is operated in a
heavy snow storm or blowing snow conditions, the engine air induction
may become partially clogged with snow and/or ice. If this occurs the
engine may experience a significant reduction in power output. At the
earliest opportunity, clear all snow and/or ice away from the air induction
inlet. Do not allow the vehicle to idle for more than 10 minutes at the
higher engine RPM.
Before starting the vehicle:
1. Make sure all vehicle occupants have buckled their safety belts. For
more information on safety belts and their proper usage, refer to the
Seating and Safety Restraintschapter.
2. Make sure the headlamps and vehicle accessories are off.
Driving
273
2011 F-150(f12)
Owners Guide, 1st Printing
USA(fus)
Page 275 of 461
Starting the engine
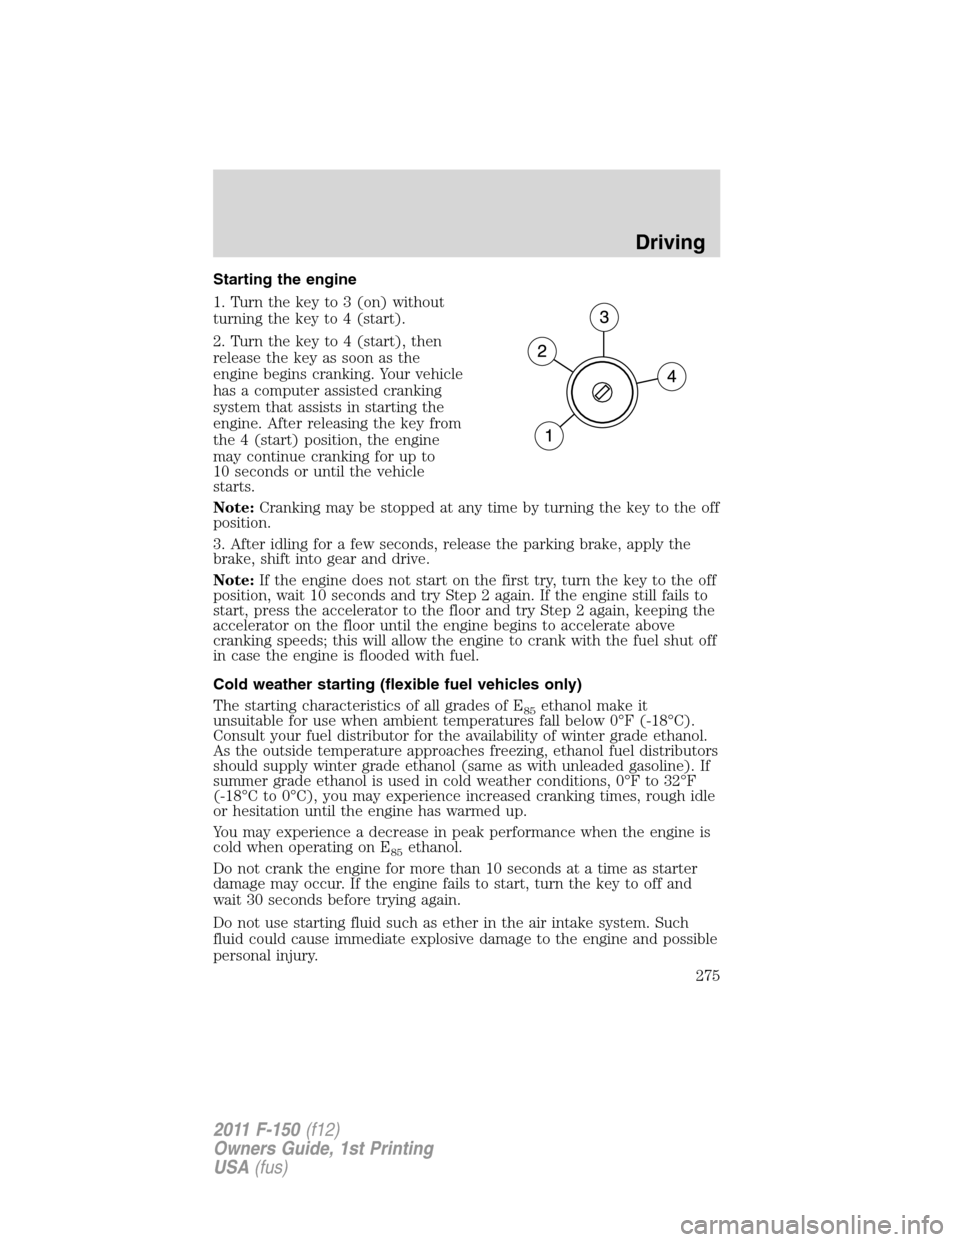
1. Turn the key to 3 (on) without
turning the key to 4 (start).
2. Turn the key to 4 (start), then
release the key as soon as the
engine begins cranking. Your vehicle
has a computer assisted cranking
system that assists in starting the
engine. After releasing the key from
the 4 (start) position, the engine
may continue cranking for up to
10 seconds or until the vehicle
starts.
Note:Cranking may be stopped at any time by turning the key to the off
position.
3. After idling for a few seconds, release the parking brake, apply the
brake, shift into gear and drive.
Note:If the engine does not start on the first try, turn the key to the off
position, wait 10 seconds and try Step 2 again. If the engine still fails to
start, press the accelerator to the floor and try Step 2 again, keeping the
accelerator on the floor until the engine begins to accelerate above
cranking speeds; this will allow the engine to crank with the fuel shut off
in case the engine is flooded with fuel.
Cold weather starting (flexible fuel vehicles only)
The starting characteristics of all grades of E
85ethanol make it
unsuitable for use when ambient temperatures fall below 0°F (-18°C).
Consult your fuel distributor for the availability of winter grade ethanol.
As the outside temperature approaches freezing, ethanol fuel distributors
should supply winter grade ethanol (same as with unleaded gasoline). If
summer grade ethanol is used in cold weather conditions, 0°F to 32°F
(-18°C to 0°C), you may experience increased cranking times, rough idle
or hesitation until the engine has warmed up.
You may experience a decrease in peak performance when the engine is
cold when operating on E
85ethanol.
Do not crank the engine for more than 10 seconds at a time as starter
damage may occur. If the engine fails to start, turn the key to off and
wait 30 seconds before trying again.
Do not use starting fluid such as ether in the air intake system. Such
fluid could cause immediate explosive damage to the engine and possible
personal injury.
Driving
275
2011 F-150(f12)
Owners Guide, 1st Printing
USA(fus)
Page 276 of 461

If you should experience cold weather starting problems on E85ethanol,
and neither an alternative brand of E
85ethanol nor an engine block
heater is available, the addition of unleaded gasoline to your tank will
improve cold starting performance. Your vehicle is designed to operate
on E
85ethanol alone, unleaded gasoline alone, or any mixture of the two.
SeeChoosing the right fuelin theMaintenance and Specifications
chapter for more information on ethanol.
If the engine fails to start using the preceding instructions
(flexible fuel vehicles only)
1. Press and hold down the accelerator 1/3 to 1/2 way to floor, then
crank the engine.
2. When the engine starts, release the key, then gradually release the
accelerator pedal as the engine speeds up. If the engine still fails to start,
repeat Step 1.
Guarding against exhaust fumes
Carbon monoxide is present in exhaust fumes. Take precautions to avoid
its dangerous effects.
WARNING:If you smell exhaust fumes inside your vehicle, have
your dealer inspect your vehicle immediately. Do not drive if you
smell exhaust fumes.
Important ventilating information
If the engine is idling while the vehicle is stopped for a long period of
time, open the windows at least 1 inch (2.5 cm) or adjust the heating or
air conditioning to bring in fresh air.
ENGINE BLOCK HEATER (IF EQUIPPED)
An engine block heater warms the engine coolant which aids in starting
and allows the heater/defroster system to respond quickly. If your vehicle
is equipped with this system, your equipment includes a heater element
which is installed in your engine block and a wire harness which allows
the user to connect the system to a grounded 120 volt A/C electrical
source. The block heater system is most effective when outdoor
temperatures reach below 0°F (-18°C).
For flexible fuel vehicles, if operating with E
85ethanol, an engine block
heater must be used if ambient temperature is below 0°F (-18°C).
SeeCold weather startingearlier in this chapter for more information
on starting with ethanol.
Driving
276
2011 F-150(f12)
Owners Guide, 1st Printing
USA(fus)