2011 FORD F150 instrument panel
[x] Cancel search: instrument panelPage 77 of 461

•:Distributes air through the windshield defroster vents, de-mister
vents, floor vents and rear seat floor vents. The system will
automatically provide outside air to reduce window fogging.
To return to full automatic control, press AUTO on the main bezel.
Fan Speed:Press to decrease/increase the fan speed.
Dual:Press to activate/deactivate separate driver and passenger
temperature controls.
Max A/C:Distributes recirculated air through the instrument panel
vents to cool the vehicle. This re-cooling of the interior air is more
economical and efficient. Recirculated air may also help reduce
undesirable odors from entering the vehicle. Press MAX A/C again for
normal operation.
VOICE COMMANDS IN CLIMATE MODE
Please refer to theVoice commands in climate modesection of the
Navigation supplementfor more information on using voice commands
with the climate control system.
Operating tips
•To reduce fog build-up on the windshield during humid weather,
select
(defrost). Temperature and/or fan speed can also be
increased to improve clearing.
•To reduce humidity build-up inside the vehicle: do not drive with the
system off or with
(recirculated air) engaged.
•Do not put objects under the front seats that will interfere with the
airflow to the back seats.
•Remove any snow, ice or leaves from the air intake area at the base of
the windshield.
•To improve the A/C cool down, drive with the windows slightly open
for not more than 2-3 minutes after start up to “air out” the vehicle.
•For maximum cooling performance when using Max A/C or
(recirculated air), all windows and doors should remain closed.
•A small amount of air may be felt from the floor vent regardless of the
air distribution setting that is selected.
If you are driving during extreme high ambient temperatures and idling
for extended periods of time in gear, it is recommended to run the A/C
in the MAX A/C mode, adjust the blower fan speed to the lowest setting
and put the vehicle’s transmission in P (Park) to continue to receive cool
air from your A/C system.
Climate Controls
77
2011 F-150(f12)
Owners Guide, 1st Printing
USA(fus)
Page 78 of 461

For maximum cooling performance (MAX A/C):
1. Press MAX A/C. The system will default to single zone operation and
set the temperature to 60°F (16°C). The blower will automatically go to
maximum.
2. A/C,
(recirculated air) and(panel) will be selected.
3. Fan speed can be adjusted as desired.
To aid in side window defogging/demisting in cold weather:
1. Select
.
2. Select A/C.
3. Adjust the temperature control to maintain comfort.
4. Set the fan speed to the highest setting.
5. Direct the outer instrument panel vents towards the side windows.
To increase airflow to the outer instrument panel vents, close the vents
located in the middle of the instrument panel.
REAR WINDOW DEFROSTER (IF EQUIPPED)
R
The rear defroster control is located on the climate control panel and
works to defrost your rear window from fog and thin ice. If equipped, it
also operates the heated mirror to remove snow and thin ice from the
side mirrors.
Ensure that the ignition on. Press to turn the defroster on/off. The
indicator light will illuminate when activated. For vehicles with a sliding
rear window– the defroster will be disabled when the window is opened.
Do not use razor blades or other sharp objects to clean the inside
of the rear window or to remove decals from the inside of the
rear window. This may cause damage to the heated grid lines and
will not be covered by your warranty.
REMOTE START CLIMATE OPERATION (IF EQUIPPED)
The climate control system will condition the cabin temperature during
remote start based on the outside temperature. Engine idle may increase
to help with adjusting the cabin temperature.
Note:No climate control adjustments will be recognized during remote
start operation. Once the ignition is cycled to the on position, the climate
control system will return to the previous settings (last ignition-on cycle)
and adjustments can be made normally. If the previous setting was off,
the climate control system will turn off.
Climate Controls
78
2011 F-150(f12)
Owners Guide, 1st Printing
USA(fus)
Page 82 of 461

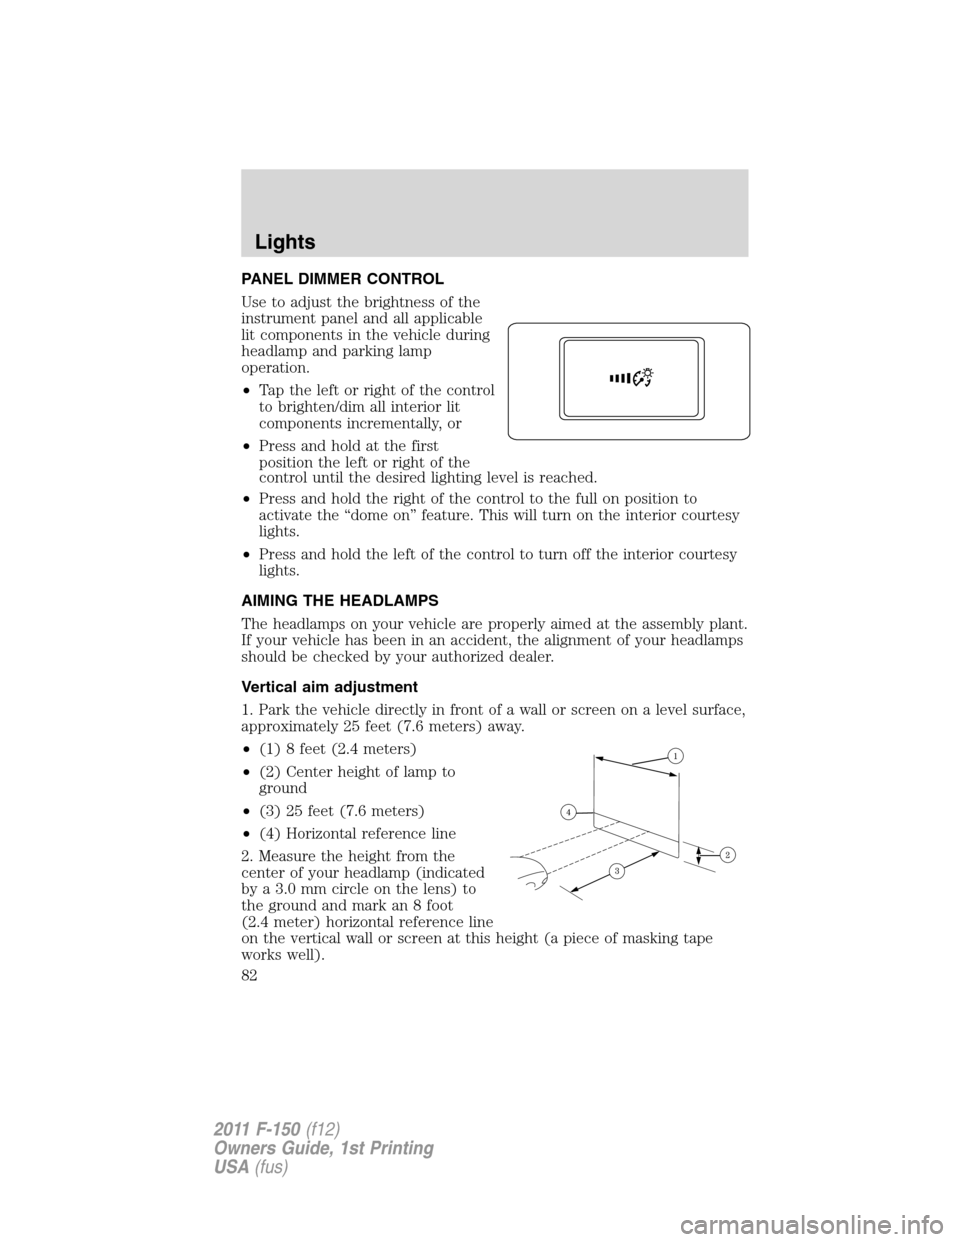
PANEL DIMMER CONTROL
Use to adjust the brightness of the
instrument panel and all applicable
lit components in the vehicle during
headlamp and parking lamp
operation.
•Tap the left or right of the control
to brighten/dim all interior lit
components incrementally, or
•Press and hold at the first
position the left or right of the
control until the desired lighting level is reached.
•Press and hold the right of the control to the full on position to
activate the “dome on” feature. This will turn on the interior courtesy
lights.
•Press and hold the left of the control to turn off the interior courtesy
lights.
AIMING THE HEADLAMPS
The headlamps on your vehicle are properly aimed at the assembly plant.
If your vehicle has been in an accident, the alignment of your headlamps
should be checked by your authorized dealer.
Vertical aim adjustment
1. Park the vehicle directly in front of a wall or screen on a level surface,
approximately 25 feet (7.6 meters) away.
•(1) 8 feet (2.4 meters)
•(2) Center height of lamp to
ground
•(3) 25 feet (7.6 meters)
•(4) Horizontal reference line
2. Measure the height from the
center of your headlamp (indicated
by a 3.0 mm circle on the lens) to
the ground and mark an 8 foot
(2.4 meter) horizontal reference line
on the vertical wall or screen at this height (a piece of masking tape
works well).
Lights
82
2011 F-150(f12)
Owners Guide, 1st Printing
USA(fus)
Page 84 of 461

•Push the lever up/down to the first stop position and hold. The turn
signals will flash for as long as the lever is held in this position.
INTERIOR LAMPS
Front row map lamps (if equipped)
To turn on the map lamps, press the
outer edge of the clear lens. The
front row map lamp lights when:
•any door is opened.
•the instrument panel dimmer
button is pressed until the
courtesy lamp comes on.
•the remote entry controls are
pressed and the ignition is off.
Rear dome lamp (if equipped)
•ON or
D: The dome light will
stay on.
•DOOR or middle position: The
dome light will only come on if a
door is opened.
•OFF or
: The lamp will not
come on at all.
The rear dome lamp can be turned on or off by sliding the control.
Rear dome/courtesy lamps (if equipped)
The dome lamp lights when:
•any door is opened.
•the instrument panel dimmer
button is pressed until the
courtesy lamp comes on.
•any of the remote entry controls
are pressed and the ignition is
off.
The reading portion, the two outer lights, can only be turned on and off
at the lamp.
Lights
84
2011 F-150(f12)
Owners Guide, 1st Printing
USA(fus)
Page 87 of 461

Function Number of
bulbsTrade number
Rear
stop/turn/sidemarker/tail
lamp (styleside)4 3057K
High-mount brakelamp 1 912
Cargo lamp 2 912
License plate lamp 2 194
Exterior mounted mirror
turn signal indicator
(if equipped)2 See your dealer
Puddle lamp
(if equipped)2 See your dealer
All replacement bulbs are clear in color except where noted.
To replace all instrument panel lights - see your authorized dealer
Replacing exterior bulbs
Check the operation of all the bulbs frequently.
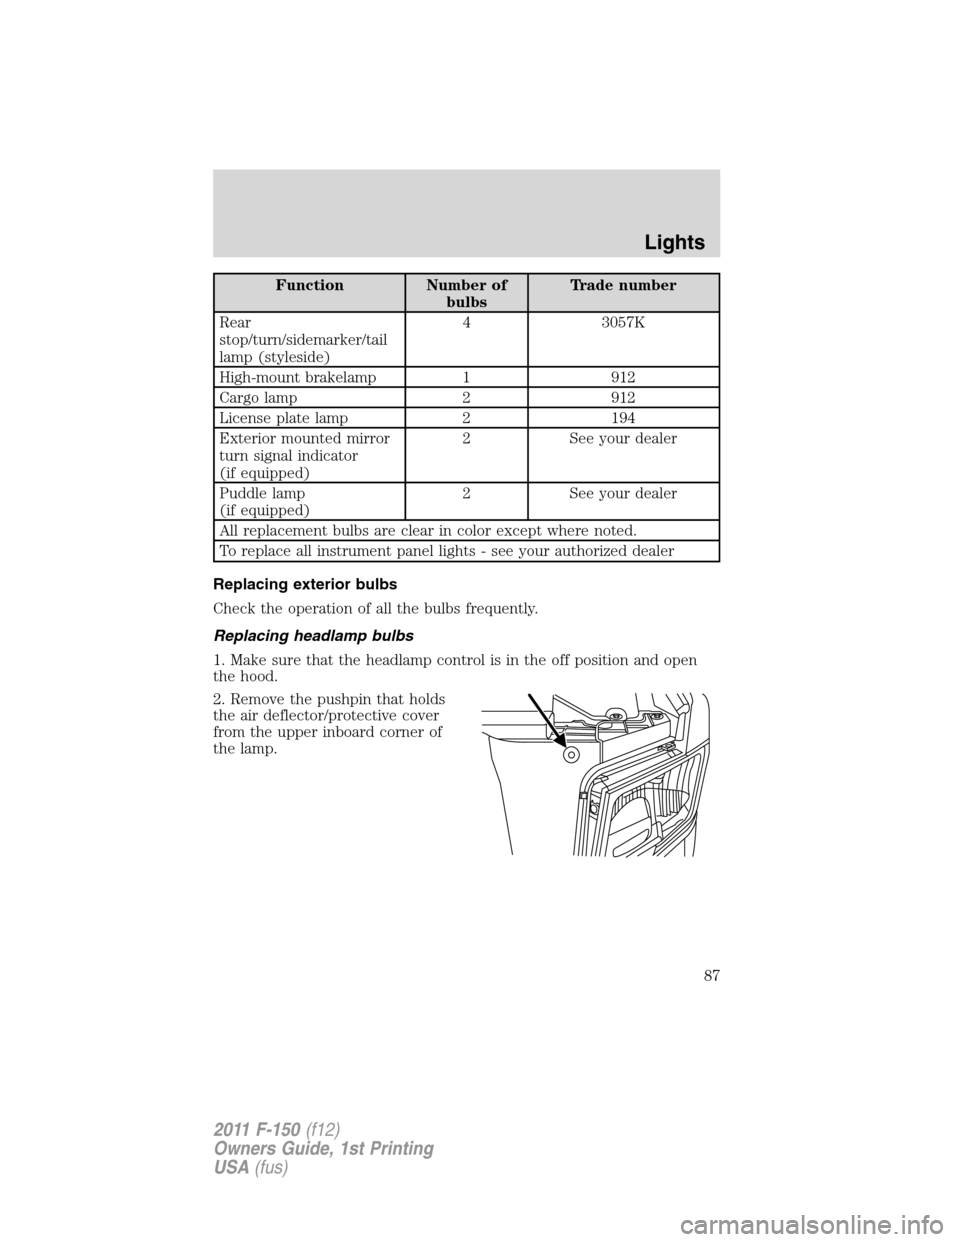
Replacing headlamp bulbs
1. Make sure that the headlamp control is in the off position and open
the hood.
2. Remove the pushpin that holds
the air deflector/protective cover
from the upper inboard corner of
the lamp.
Lights
87
2011 F-150(f12)
Owners Guide, 1st Printing
USA(fus)
Page 98 of 461

2. To calibrate, press and hold the 7
and 9 radio preset buttons together
for approximately 10 seconds until
CAL appears. Release the buttons.
3. Slowly drive the vehicle in a
circle (less than 3 mph [5 km/h])
until the CAL display changes to the
direction value (N, S, E, W, etc.). It
may take up to five circles to
complete calibration.
4. The compass is now calibrated.
AUXILIARY POWER POINT (12V DC)
Power outlets are designed for accessory plugs only. Do not insert
any other object in the power outlet as this will damage the
outlet and blow the fuse. Do not hang any type of accessory or
accessory bracket from the plug. Improper use of the power
outlet can cause damage not covered by your warranty.
Auxiliary power points can be found in the following locations:
•On the instrument panel
•Inside the center console storage area (if equipped)
•On the rear of the center console (if equipped) accessible from the
rear seat
Always keep the power point caps closed when not being used.
Do not use the power point for operating the cigarette lighter element (if
equipped).
Note:Do not plug optional electrical accessories into the cigarette
lighter socket (if equipped). Improper use of the lighter can cause
damage not covered by your warranty, and can result in fire or serious
injury.
To prevent the fuse from being blown, do not use the power point(s)
over the vehicle capacity of 12V DC/180W. If the power point or cigar
lighter socket is not working, a fuse may have blown. Refer toFuses and
relaysin theRoadside Emergencieschapter for information on
checking and replacing fuses.
Driver Controls
98
2011 F-150(f12)
Owners Guide, 1st Printing
USA(fus)
Page 100 of 461

The power point can switch to a fault mode when it is overloaded,
overheated, or shorted. For overloading and shorting conditions, unplug
your device and turn the ignition key off then on. For an overheating
condition, let the system cool off, then turn the ignition key off then on.
The 110V AC power point can provide power whenever the vehicle
ignition is in the on position and the power point green indicator light
located in the top left corner is turned on. Refer to the indicator light
code below for the power point status.
Indicator light codes
Green light is on — Power point is ready to supply power
Green light is off — Power point power supply is off. Ignition is not in
the on position
Green light is blinking — Power point is in fault mode
Note:The 110V AC power point will turn off after 13 minutes if the
ignition is in the on position without the engine running. Keep the
engine running or cycle the ignition before the 13 minute time-out to
keep the inverter on.
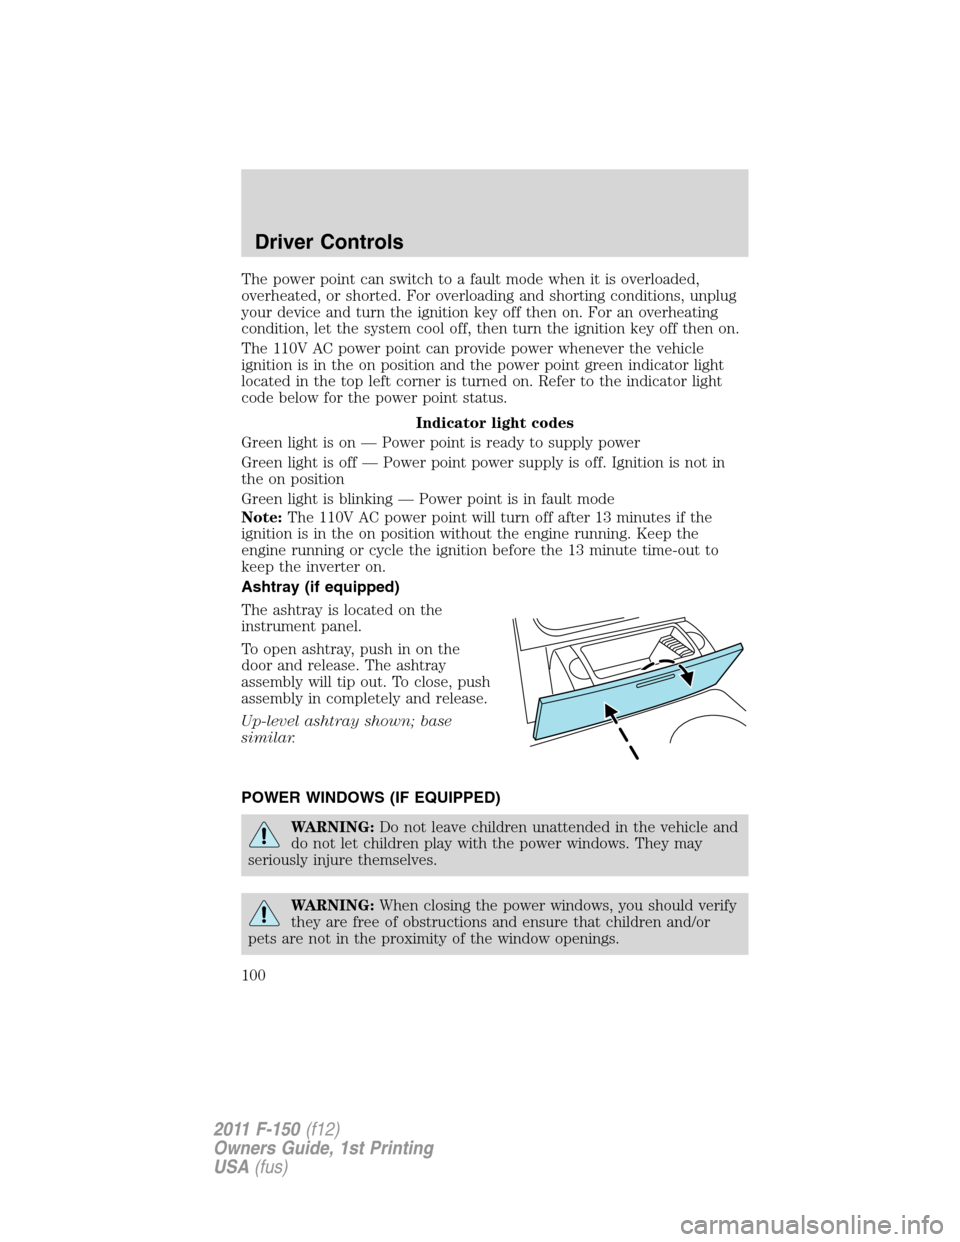
Ashtray (if equipped)
The ashtray is located on the
instrument panel.
To open ashtray, push in on the
door and release. The ashtray
assembly will tip out. To close, push
assembly in completely and release.
Up-level ashtray shown; base
similar.
POWER WINDOWS (IF EQUIPPED)
WARNING:Do not leave children unattended in the vehicle and
do not let children play with the power windows. They may
seriously injure themselves.
WARNING:When closing the power windows, you should verify
they are free of obstructions and ensure that children and/or
pets are not in the proximity of the window openings.
Driver Controls
100
2011 F-150(f12)
Owners Guide, 1st Printing
USA(fus)
Page 143 of 461

•the vehicle has then come to a stop and the ignition is turned to the
off ) or accessory position; and
•the driver door is opened within 10 minutes of the ignition being
transitioned to the off or accessory position.
Note:The doors will not autounlock if the vehicle has been
electronically locked before the driver door is opened.
Deactivating/activating autounlock feature
There are three methods to enable/disable this feature:
•Through your authorized dealer,
•by using a power door unlock/lock sequence,
•using a keypad procedure (if equipped)
•or by using the instrument cluster message center (if equipped). Refer
toOptional message centerin theDriver controlschapter.
Note:The autounlock feature can be activated/deactivated
independently of the autolock feature.
Power door lock switch autounlock enable/disable procedure
Before starting, ensure the ignition is in the off position and all vehicle
doors are closed. You must complete Steps 1–5 within 30 seconds or the
procedure will have to be repeated. If the procedure needs to be
repeated, wait a minimum of 30 seconds before beginning again.
1. Place the key in the ignition and
turn the ignition to the on position.
2. Press the power door unlock
control on the door panel three
times.
3. Turn the ignition from the on
position to the off position.
4. Press the power door unlock control on the door panel three times.
5. Turn the ignition back to the on position. The horn will chirp one time
to confirm programming mode has been entered and is active.
6. To enable/disable the autounlock feature, press the lock control, then
press the unlock control. The horn will chirp once if autounlock was
deactivated or twice (one short and one long chirp) if autounlock was
activated.
7. Turn the ignition to the off position. The horn will chirp once to
confirm the procedure is complete.
Locks and Security
143
2011 F-150(f12)
Owners Guide, 1st Printing
USA(fus)