Page 49 of 461

7.CLK (Clock):Press CLK to
toggle between displaying the radio
frequency and the clock setting.
Setting the clock:Press and hold
CLK until the hours begin to flash. Press
//SEEKto
manually increase/decrease the hours.
Press CLK again to set the minutes using
//SEEKto
manually increase/decrease the minutes. Allow 10 seconds to pass to
confirm that the time has been set.
AM/FM in-dash CD/MP3 satellite compatible sound system
WARNING:Driving while distracted can result in loss of vehicle
control, accident and injury. Ford strongly recommends that
drivers use extreme caution when using any device or feature that may
take their focus off the road. Your primary responsibility is the safe
operation of the vehicle. We recommend against the use of any
handheld device while driving, encourage the use of voice-operated
systems when possible and that you become aware of applicable state
and local laws that may affect use of electronic devices while driving.
OKTUNE LOAD
VOLCD
AUX AM/FM
SIRIUS TEXT
SCANCAT/FOLDCLOCK #
SOUNDMENU
SEEK
1
23
45
6
78
90
Entertainment Systems
49
2011 F-150(f12)
Owners Guide, 1st Printing
USA(fus)
Page 50 of 461

Accessory delay:Your vehicle is equipped with accessory delay. With
this feature, the radio and other electrical accessories may be used for
up to ten minutes after the ignition is turned off or until either front
door is opened.
Battery management:When the engine is off, your audio system may
turn off if the battery is at a low state of charge or if the ignition has
been in the accessory position or in the on position for approximately
45 minutes. The display will temporarily show SYS OFF TO SAVE BATT
and the audio system will be turned off. The audio system will return to
normal operation once the vehicle has been started and battery state of
charge allowed to recover. The battery state of charge recovery can be
accelerated by turning off any unnecessary electrical loads while driving.
Note:Your vehicle is equipped with
a unique audio system. If your
display shows six small circles in the
display, your audio system is a CD6
system (six disc changer). If not,
your system is a single CD system.
Setting the clock
To set the time, press CLOCK. The display will read SET TIME. Use the
memory preset numbers (0–9) to enter in the desired time–hours and
minutes and press OK. The clock will then begin from that time.
AM/FM Radio
/ VOL (Power/Volume):Press
to turn the radio on/off. Turn the
knob to increase/decrease volume.
If the volume is set above a certain
level and the ignition is turned off,
the volume will come back on at a
nominal listening level when the ignition switch is turned back on.
AM/FM:Press repeatedly to select AM/FM1/FM2 frequency band.
TUNE:Turn the knob to go
up/down the frequency band in
individual increments.
DIRECT:Press DIRECT and then manually enter the desired radio
station (i.e. 93.9) using the memory preset numbers (0–9).
Entertainment Systems
50
2011 F-150(f12)
Owners Guide, 1st Printing
USA(fus)
Page 80 of 461

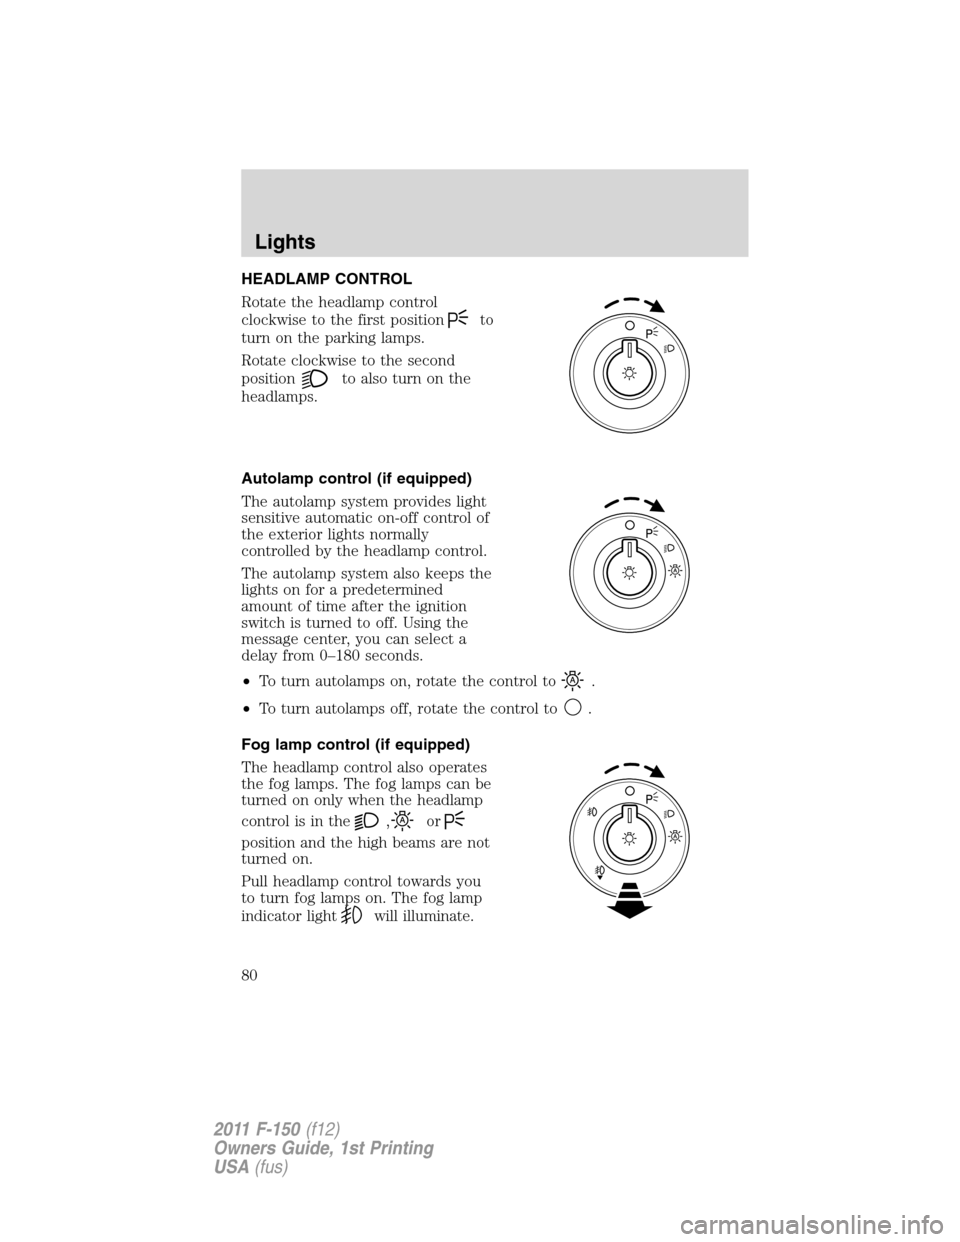
HEADLAMP CONTROL
Rotate the headlamp control
clockwise to the first position
to
turn on the parking lamps.
Rotate clockwise to the second
position
to also turn on the
headlamps.
Autolamp control (if equipped)
The autolamp system provides light
sensitive automatic on-off control of
the exterior lights normally
controlled by the headlamp control.
The autolamp system also keeps the
lights on for a predetermined
amount of time after the ignition
switch is turned to off. Using the
message center, you can select a
delay from 0–180 seconds.
•To turn autolamps on, rotate the control to
.
•To turn autolamps off, rotate the control to
.
Fog lamp control (if equipped)
The headlamp control also operates
the fog lamps. The fog lamps can be
turned on only when the headlamp
controlisinthe
,or
position and the high beams are not
turned on.
Pull headlamp control towards you
to turn fog lamps on. The fog lamp
indicator light
will illuminate.
Lights
80
2011 F-150(f12)
Owners Guide, 1st Printing
USA(fus)
Page 83 of 461

3. Turn on the low beam headlamps to illuminate the wall or screen and
open the hood. Cover one of the headlamps so no light hits the wall.
4. On the wall or screen you will
observe a light pattern with a
distinct horizontal edge towards the
right. If this edge is not at the
horizontal reference line, the beam will need to be adjusted so the edge
is at the same height as the horizontal reference line.
5. Locate the vertical adjuster on
each headlamp, then use a #2
Philips screwdriver to turn the
adjuster either counterclockwise (to
adjust up) or clockwise (to adjust
down) aligning the upper edge of
the light pattern up to the
horizontal line.
6. HORIZONTAL AIM IS NOT
REQUIRED FOR THIS VEHICLE
AND IS NON-ADJUSTABLE.
7. Repeat Steps 3–5 for the other headlamp.
8. Close the hood and turn off the lamps.
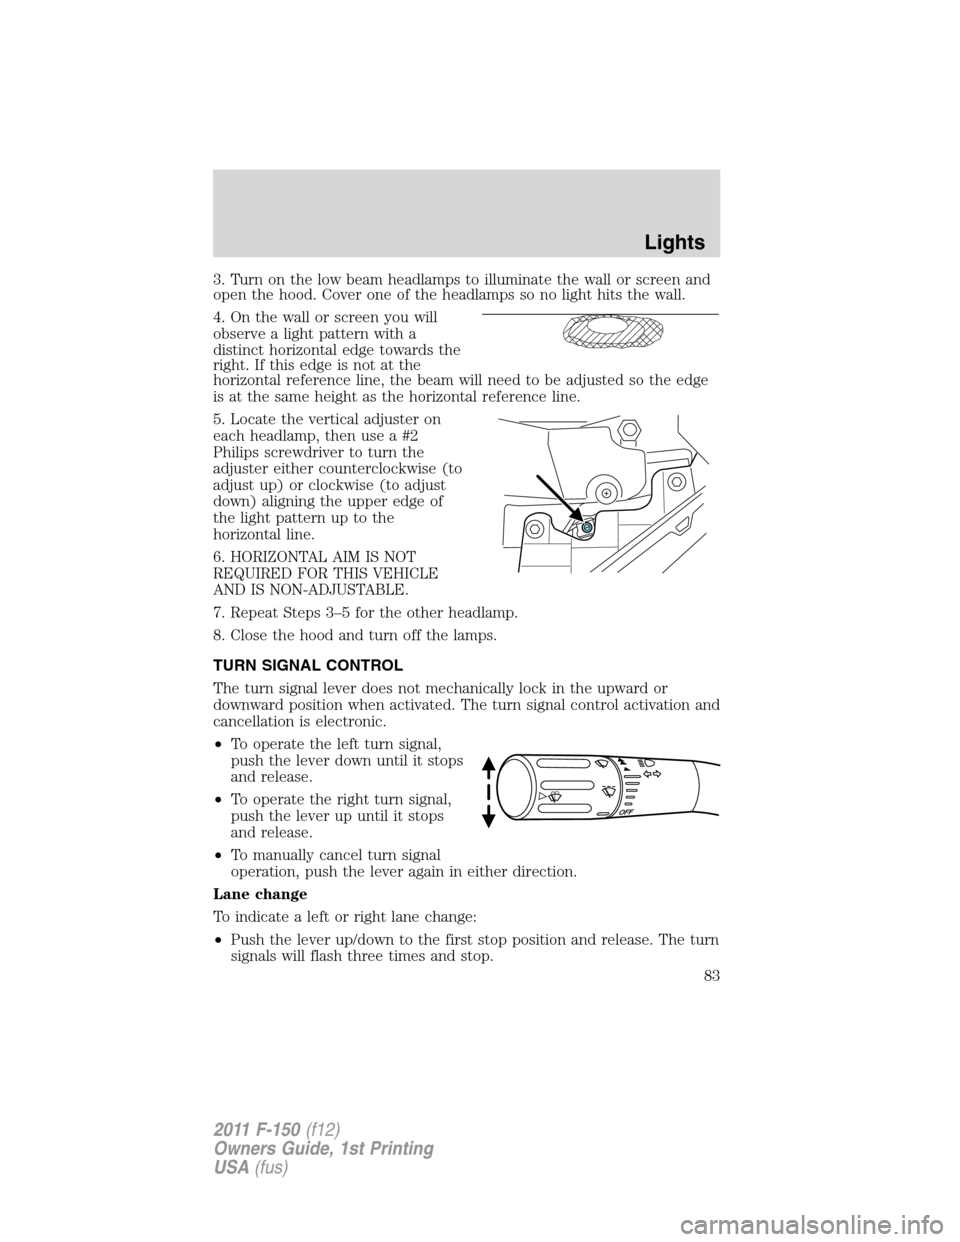
TURN SIGNAL CONTROL
The turn signal lever does not mechanically lock in the upward or
downward position when activated. The turn signal control activation and
cancellation is electronic.
•To operate the left turn signal,
push the lever down until it stops
and release.
•To operate the right turn signal,
push the lever up until it stops
and release.
•To manually cancel turn signal
operation, push the lever again in either direction.
Lane change
To indicate a left or right lane change:
•Push the lever up/down to the first stop position and release. The turn
signals will flash three times and stop.
Lights
83
2011 F-150(f12)
Owners Guide, 1st Printing
USA(fus)
Page 88 of 461
3. Loosen the three retaining bolts
(two at top of lamp, one at lower
inboard corner).
4. Once the three retaining bolts have been removed, slide the headlamp
assembly forward, disconnecting the two snap attachments at the fender.
5. Disconnect the electrical connector from the bulb by pulling rearward.
6. Remove the bulb and socket by
turning it counterclockwise, then
pull it straight out.
WARNING:Handle a halogen headlamp bulb carefully and keep
out of children’s reach. Grasp the bulb only by its plastic base
and do not touch the glass. The oil from your hand could cause the
bulb to break the next time the headlamps are operated.
Install the new bulb in reverse order.
Lights
88
2011 F-150(f12)
Owners Guide, 1st Printing
USA(fus)
Page 89 of 461
Replacing front parking lamp/turn signal/sidemarker bulbs
1. Make sure that the headlamp control is in the off position and open
the hood.
2. Remove the pushpin that holds
the air deflector/protective cover
from the upper inboard corner of
the lamp.
3. Loosen the three retaining bolts
(two at top of lamp, one at lower
inboard corner).
4. Once the three retaining bolts
have been removed, slide the
headlamp assembly forward,
disconnecting the two snap attachments at the fender.
5. Remove the bulb and socket by
turning it counterclockwise, then
pull it straight out.
6. Pull the bulb straight out of the
socket.
Install the new bulb(s) in reverse order.
Replacing tail/brake/turn signal/backup lamp bulbs
1. Make sure the headlamp control
is in the off position.
2. Open the tailgate to expose the
lamp assembly and remove the two
bolts from the tail lamp assembly.
Lights
89
2011 F-150(f12)
Owners Guide, 1st Printing
USA(fus)
Page 90 of 461

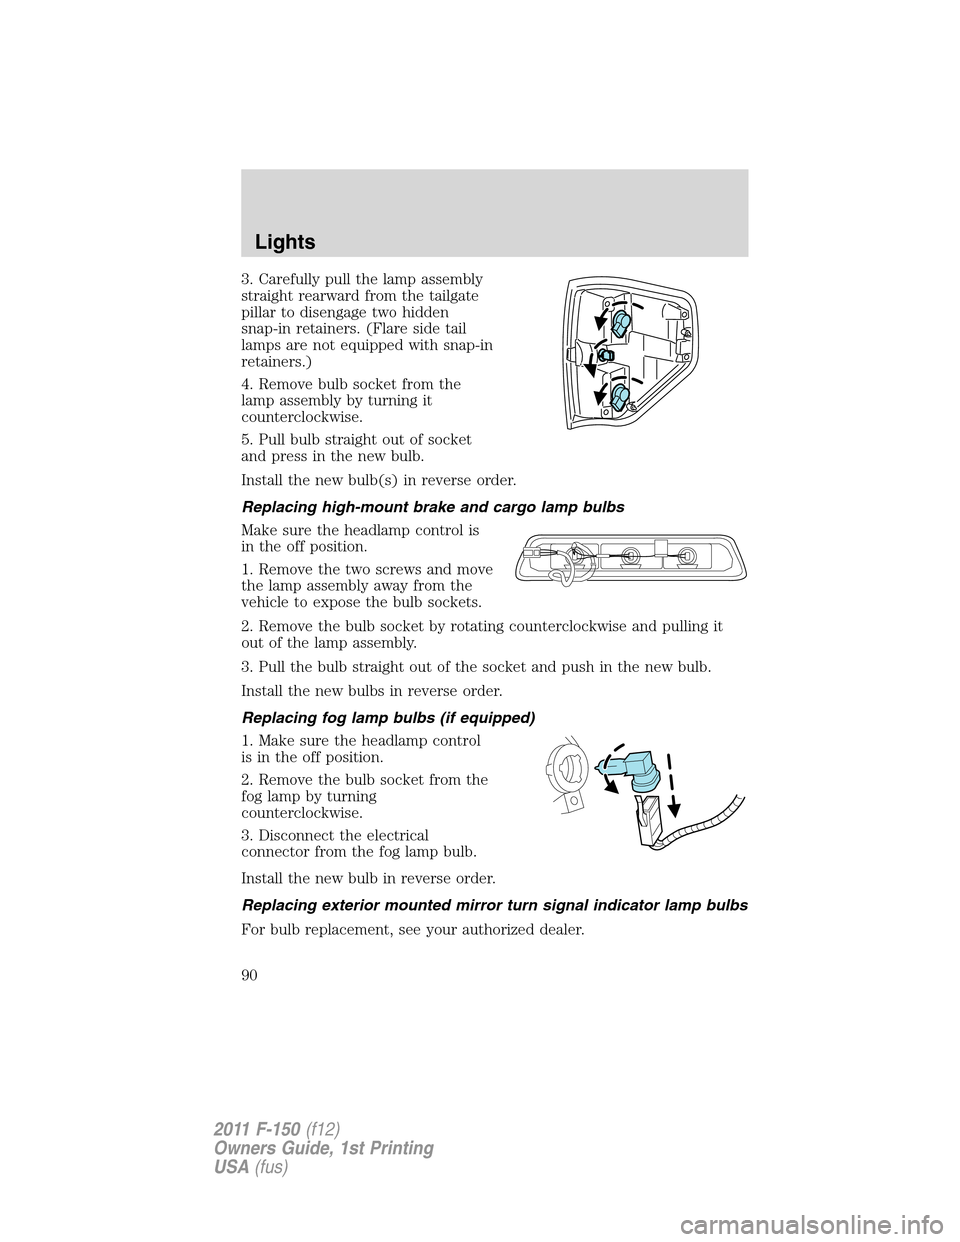
3. Carefully pull the lamp assembly
straight rearward from the tailgate
pillar to disengage two hidden
snap-in retainers. (Flare side tail
lamps are not equipped with snap-in
retainers.)
4. Remove bulb socket from the
lamp assembly by turning it
counterclockwise.
5. Pull bulb straight out of socket
and press in the new bulb.
Install the new bulb(s) in reverse order.
Replacing high-mount brake and cargo lamp bulbs
Make sure the headlamp control is
in the off position.
1. Remove the two screws and move
the lamp assembly away from the
vehicle to expose the bulb sockets.
2. Remove the bulb socket by rotating counterclockwise and pulling it
out of the lamp assembly.
3. Pull the bulb straight out of the socket and push in the new bulb.
Install the new bulbs in reverse order.
Replacing fog lamp bulbs (if equipped)
1. Make sure the headlamp control
is in the off position.
2. Remove the bulb socket from the
fog lamp by turning
counterclockwise.
3. Disconnect the electrical
connector from the fog lamp bulb.
Install the new bulb in reverse order.
Replacing exterior mounted mirror turn signal indicator lamp bulbs
For bulb replacement, see your authorized dealer.
Lights
90
2011 F-150(f12)
Owners Guide, 1st Printing
USA(fus)
Page 91 of 461
Replacing license plate lamp bulbs
The license plate bulbs are located
behind the rear bumper. To change
the license plate lamp bulbs:
1. Reach behind the rear bumper to
locate the bulb.
2. Twist the bulb socket
counterclockwise and carefully pull
to remove it from the lamp
assembly.
3. Pull out the old bulb from the
socket and push in the new bulb.
4. Install the bulb socket in lamp assembly by turning it clockwise.
Lights
91
2011 F-150(f12)
Owners Guide, 1st Printing
USA(fus)