2011 FORD EXPLORER fuel
[x] Cancel search: fuelPage 40 of 449

Configurable fuel history
Shown with vertical bar tachometer
enabled
•This display shows a bar chart of
your fuel history, configurable to
5, 10 or 30 minutes. To configure
the fuel history, press the right
arrow button when in this screen.
When the fuel level becomes low (50 miles [80 km] to empty), the level
indicator will change to amber. When the fuel level becomes critically low
(0 miles [0 km] to empty), the level indicator will change to red.
If you calculate your average fuel economy by dividing miles traveled by
gallons of fuel used (liters of fuel used by 100 kilometers traveled), your
figure may be different than displayed for the following reasons:
•Your vehicle was not perfectly level during fill-up.
•Differences in the automatic shut-off points on the fuel pumps at
service stations.
•Variations in top-off procedure from one fill-up to another.
•Rounding of the displayed values to the nearest 0.1 gallon (liter).
To determine your average highway fuel economy, do the following:
1. Drive the vehicle at least 5 miles (8 km) with the speed control
system engaged to display a stabilized average.
2. Record the highway fuel economy for future reference.
It is important to reset fuel economy after setting the speed control to
get accurate highway fuel economy readings.
For more information refer toEssentials of good fuel economyin the
Maintenance and Specificationschapter.
F6
4
RPM
1000+
2
0
01234.5mi
XX Min Fuel History
EM3
Instrument Cluster
39
2011 Explorer(exp)
Owners Guide, 1st Printing
USA(fus)
Page 41 of 449
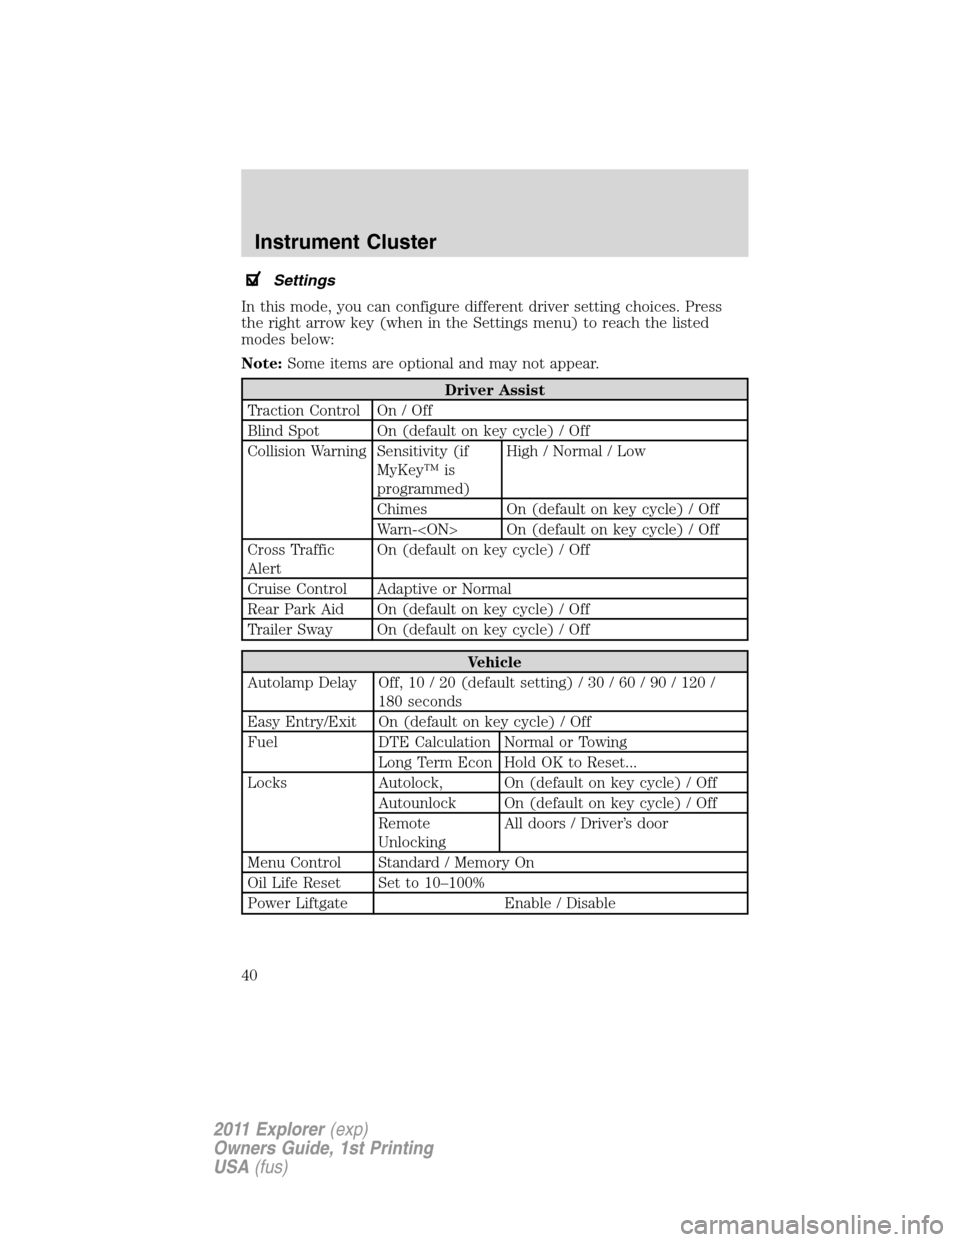
Settings
In this mode, you can configure different driver setting choices. Press
the right arrow key (when in the Settings menu) to reach the listed
modes below:
Note:Some items are optional and may not appear.
Driver Assist
Traction Control On / Off
Blind Spot On (default on key cycle) / Off
Collision Warning Sensitivity (if
MyKey™ is
programmed)High / Normal / Low
Chimes On (default on key cycle) / Off
Warn-
Cross Traffic
AlertOn (default on key cycle) / Off
Cruise Control Adaptive or Normal
Rear Park Aid On (default on key cycle) / Off
Trailer Sway On (default on key cycle) / Off
Vehicle
Autolamp Delay Off, 10 / 20 (default setting) / 30 / 60 / 90 / 120 /
180 seconds
Easy Entry/Exit On (default on key cycle) / Off
Fuel DTE Calculation Normal or Towing
Long Term Econ Hold OK to Reset...
Locks Autolock, On (default on key cycle) / Off
Autounlock On (default on key cycle) / Off
Remote
UnlockingAll doors / Driver’s door
Menu Control Standard / Memory On
Oil Life Reset Set to 10–100%
Power Liftgate Enable / Disable
Instrument Cluster
40
2011 Explorer(exp)
Owners Guide, 1st Printing
USA(fus)
Page 42 of 449
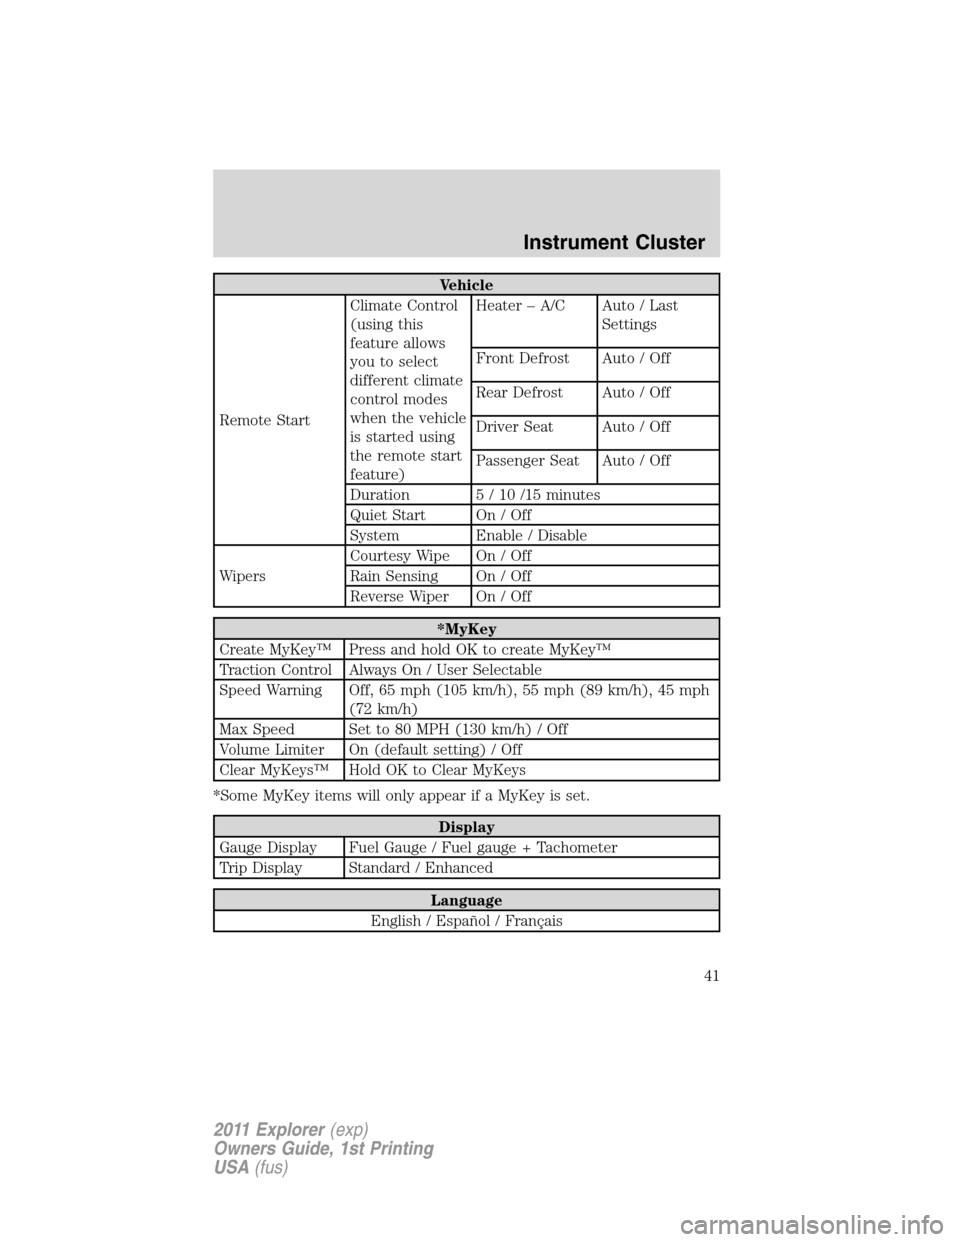
Vehicle
Remote StartClimate Control
(using this
feature allows
you to select
different climate
control modes
when the vehicle
is started using
the remote start
feature)Heater – A/C Auto / Last
Settings
Front Defrost Auto / Off
Rear Defrost Auto / Off
Driver Seat Auto / Off
Passenger Seat Auto / Off
Duration 5 / 10 /15 minutes
Quiet Start On / Off
System Enable / Disable
WipersCourtesy Wipe On / Off
Rain Sensing On / Off
Reverse Wiper On / Off
*MyKey
Create MyKey™ Press and hold OK to create MyKey™
Traction Control Always On / User Selectable
Speed Warning Off, 65 mph (105 km/h), 55 mph (89 km/h), 45 mph
(72 km/h)
Max Speed Set to 80 MPH (130 km/h) / Off
Volume Limiter On (default setting) / Off
Clear MyKeys™ Hold OK to Clear MyKeys
*Some MyKey items will only appear if a MyKey is set.
Display
Gauge Display Fuel Gauge / Fuel gauge + Tachometer
Trip Display Standard / Enhanced
Language
English / Español / Français
Instrument Cluster
41
2011 Explorer(exp)
Owners Guide, 1st Printing
USA(fus)
Page 43 of 449
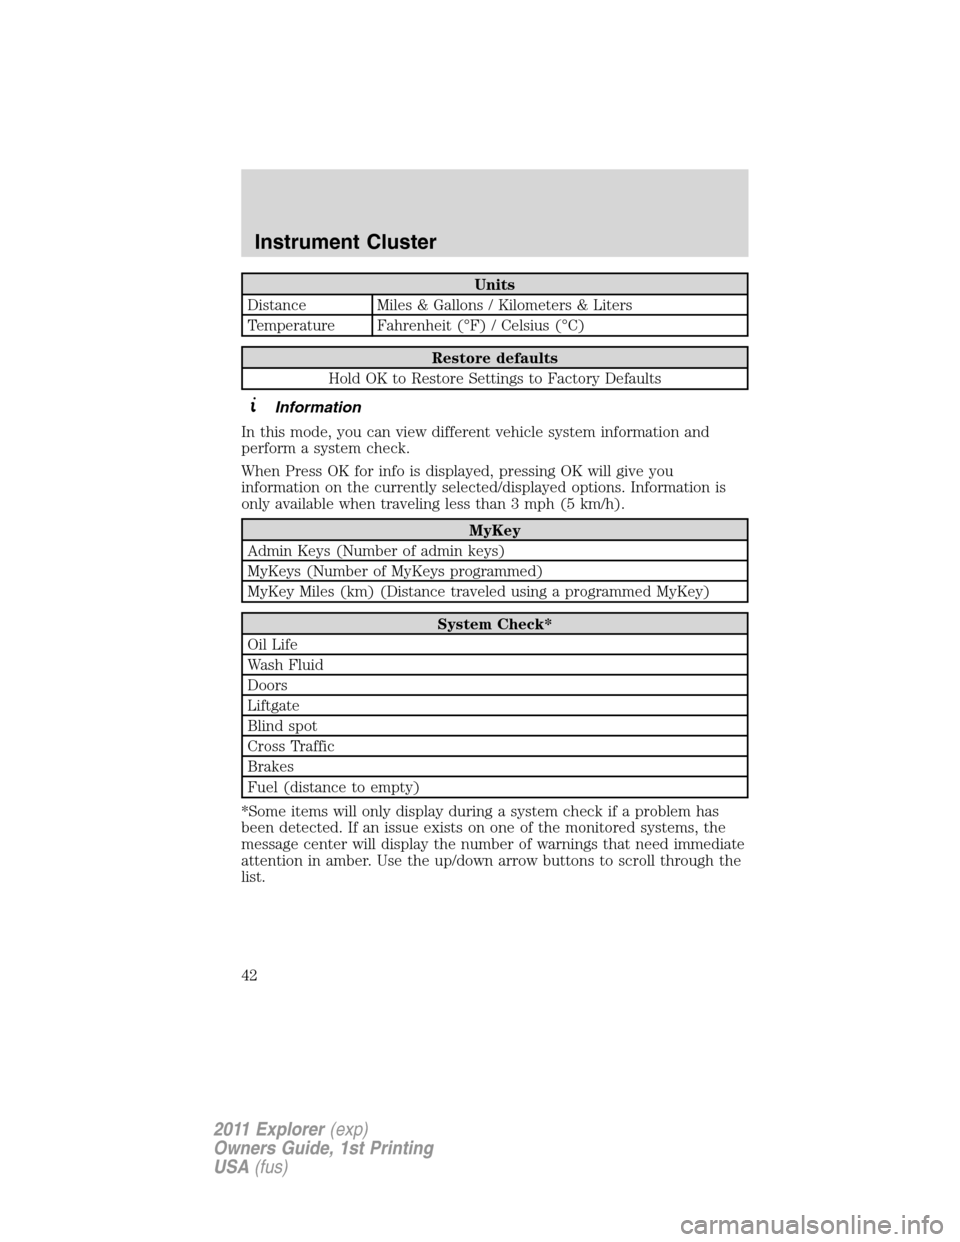
Units
Distance Miles & Gallons / Kilometers & Liters
Temperature Fahrenheit (°F) / Celsius (°C)
Restore defaults
Hold OK to Restore Settings to Factory Defaults
Information
In this mode, you can view different vehicle system information and
perform a system check.
When Press OK for info is displayed, pressing OK will give you
information on the currently selected/displayed options. Information is
only available when traveling less than 3 mph (5 km/h).
MyKey
Admin Keys (Number of admin keys)
MyKeys (Number of MyKeys programmed)
MyKey Miles (km) (Distance traveled using a programmed MyKey)
System Check*
Oil Life
Wash Fluid
Doors
Liftgate
Blind spot
Cross Traffic
Brakes
Fuel (distance to empty)
*Some items will only display during a system check if a problem has
been detected. If an issue exists on one of the monitored systems, the
message center will display the number of warnings that need immediate
attention in amber. Use the up/down arrow buttons to scroll through the
list.
Instrument Cluster
42
2011 Explorer(exp)
Owners Guide, 1st Printing
USA(fus)
Page 44 of 449
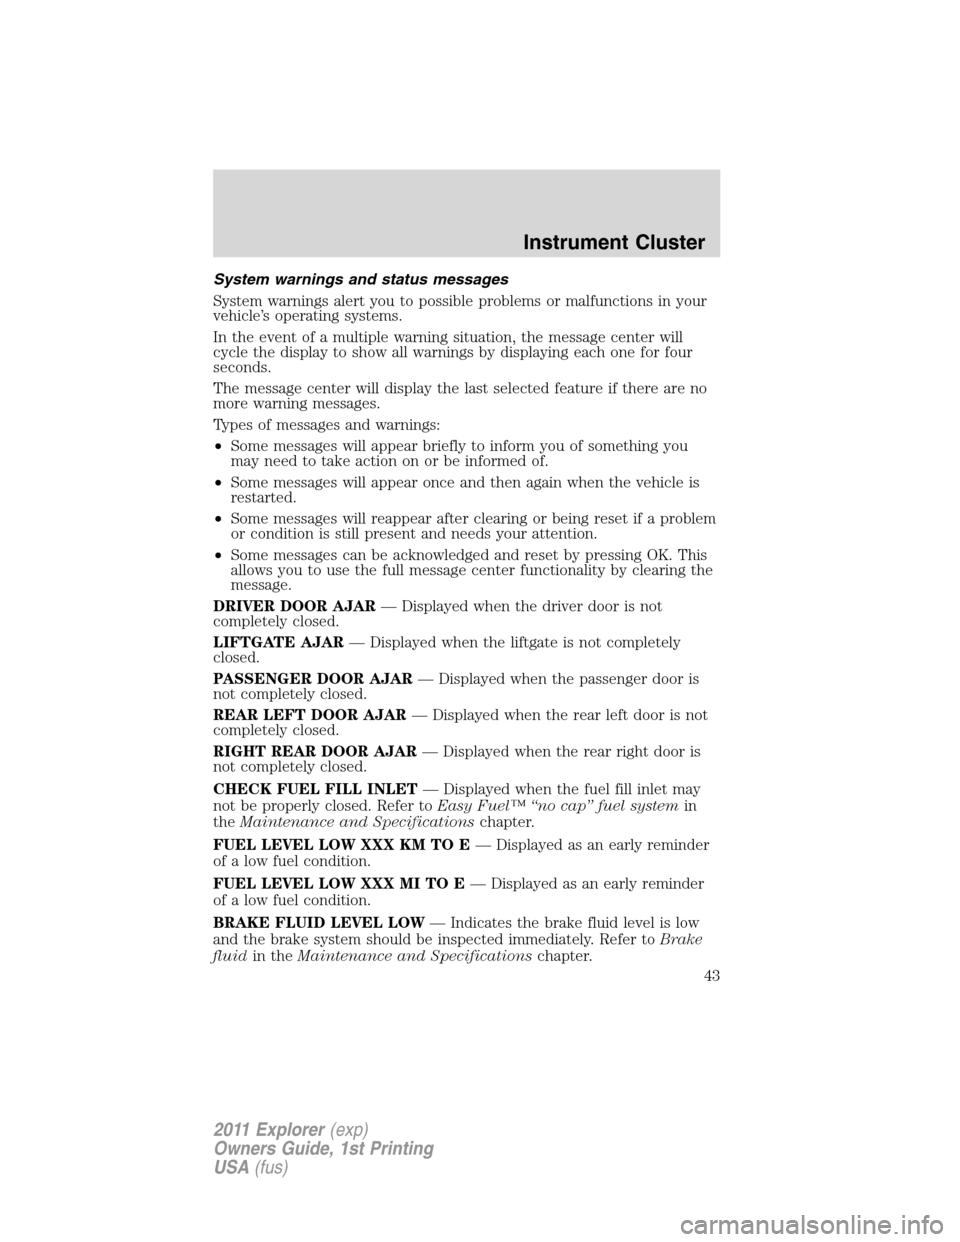
System warnings and status messages
System warnings alert you to possible problems or malfunctions in your
vehicle’s operating systems.
In the event of a multiple warning situation, the message center will
cycle the display to show all warnings by displaying each one for four
seconds.
The message center will display the last selected feature if there are no
more warning messages.
Types of messages and warnings:
•Some messages will appear briefly to inform you of something you
may need to take action on or be informed of.
•Some messages will appear once and then again when the vehicle is
restarted.
•Some messages will reappear after clearing or being reset if a problem
or condition is still present and needs your attention.
•Some messages can be acknowledged and reset by pressing OK. This
allows you to use the full message center functionality by clearing the
message.
DRIVER DOOR AJAR— Displayed when the driver door is not
completely closed.
LIFTGATE AJAR— Displayed when the liftgate is not completely
closed.
PASSENGER DOOR AJAR— Displayed when the passenger door is
not completely closed.
REAR LEFT DOOR AJAR— Displayed when the rear left door is not
completely closed.
RIGHT REAR DOOR AJAR— Displayed when the rear right door is
not completely closed.
CHECK FUEL FILL INLET— Displayed when the fuel fill inlet may
not be properly closed. Refer toEasy Fuel™ “no cap” fuel systemin
theMaintenance and Specificationschapter.
FUEL LEVEL LOW XXX KM TO E— Displayed as an early reminder
of a low fuel condition.
FUEL LEVEL LOW XXX MI TO E— Displayed as an early reminder
of a low fuel condition.
BRAKE FLUID LEVEL LOW— Indicates the brake fluid level is low
and the brake system should be inspected immediately. Refer toBrake
fluidin theMaintenance and Specificationschapter.
Instrument Cluster
43
2011 Explorer(exp)
Owners Guide, 1st Printing
USA(fus)
Page 101 of 449

INTERIOR MIRROR
The interior rear view mirror has two pivot points on the support arm
which lets you adjust the mirror up or down and from side to side.
WARNING:Do not adjust the mirror while the vehicle is in
motion.
Automatic dimming interior rear view mirror (if equipped)
The interior rear view mirror has an auto-dimming function. The
electronic day/night mirror will change from the normal (high reflective)
state to the non-glare (darkened) state when bright lights (glare) reach
the mirror. When the mirror detects bright light from behind the vehicle,
it will automatically adjust (darken) to minimize glare.
The mirror will automatically return to the normal state whenever the
vehicle is placed in R (Reverse) to ensure a bright clear view when
backing up.
Do not block the sensors on the front and back of the interior rear
view mirror since this may impair proper mirror performance.
Note:A rear center passenger and/or raised rear center headrest (if
equipped) may also block the light from reaching the sensor.
Do not clean the housing or glass of any mirror with harsh
abrasives, fuel or other petroleum-based cleaning products.
Driver Controls
100
2011 Explorer(exp)
Owners Guide, 1st Printing
USA(fus)
Page 102 of 449
EXTERIOR MIRRORS
Power side view mirrors
WARNING:Do not adjust the mirror while the vehicle is in
motion.
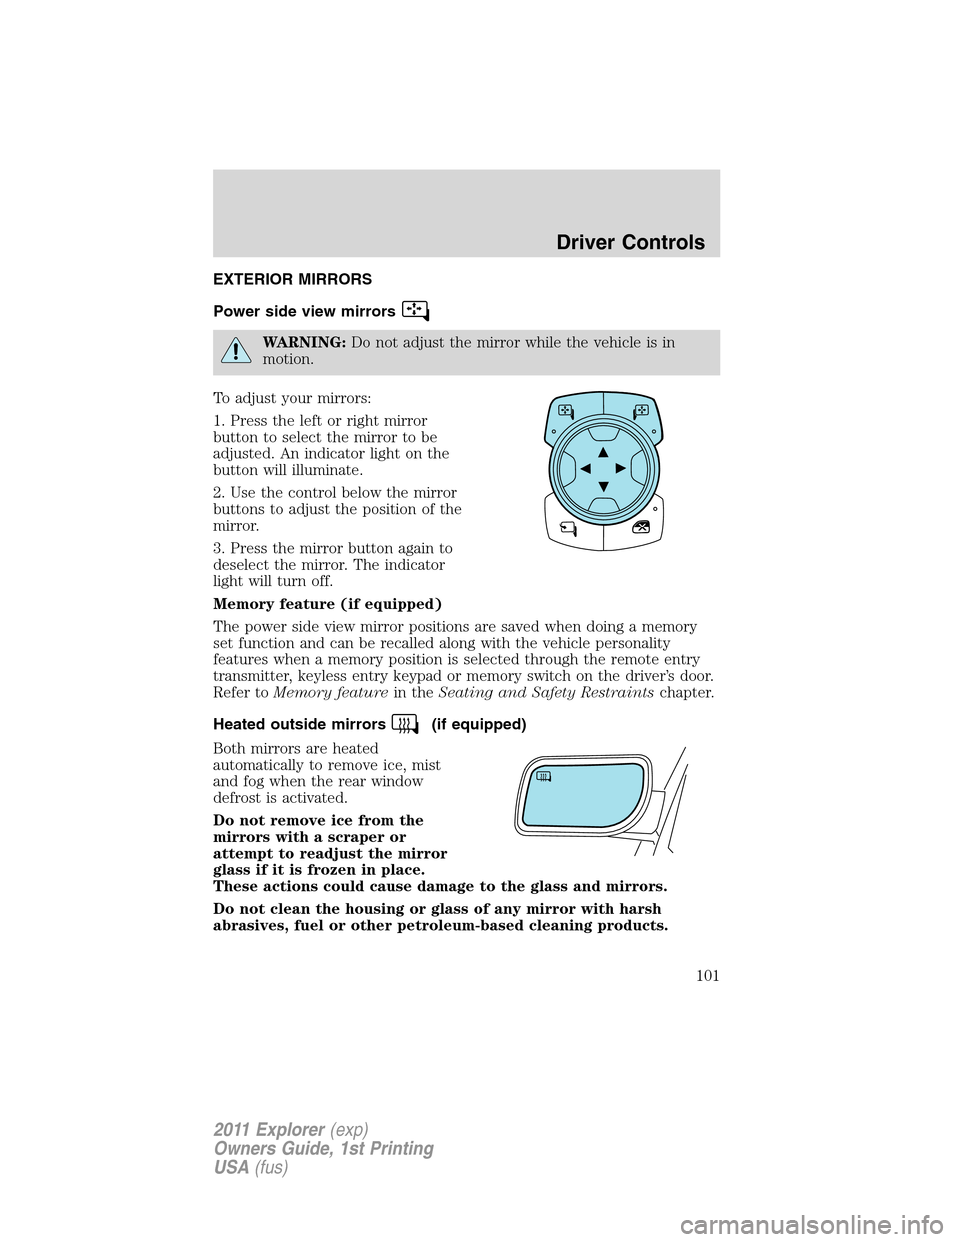
To adjust your mirrors:
1. Press the left or right mirror
button to select the mirror to be
adjusted. An indicator light on the
button will illuminate.
2. Use the control below the mirror
buttons to adjust the position of the
mirror.
3. Press the mirror button again to
deselect the mirror. The indicator
light will turn off.
Memory feature (if equipped)
The power side view mirror positions are saved when doing a memory
set function and can be recalled along with the vehicle personality
features when a memory position is selected through the remote entry
transmitter, keyless entry keypad or memory switch on the driver’s door.
Refer toMemory featurein theSeating and Safety Restraintschapter.
Heated outside mirrors
(if equipped)
Both mirrors are heated
automatically to remove ice, mist
and fog when the rear window
defrost is activated.
Do not remove ice from the
mirrors with a scraper or
attempt to readjust the mirror
glass if it is frozen in place.
These actions could cause damage to the glass and mirrors.
Do not clean the housing or glass of any mirror with harsh
abrasives, fuel or other petroleum-based cleaning products.
Driver Controls
101
2011 Explorer(exp)
Owners Guide, 1st Printing
USA(fus)
Page 129 of 449
Note:If the power liftgate system is turned off in the message center,
the system cannot be activated with the outside release handle or
control button on the liftgate. The system will need to be turned on to
resume operation with the outside release handle or control button on
the liftgate. The power liftgate is still operational through the use of the
transmitter and instrument panel button when the power liftgate is
turned off in the message center.
ROOF RACK SYSTEM (IF EQUIPPED)
Loads should never be placed directly on the roof panel. For proper
function of the roof rack system, loads must be placed directly on
crossbars affixed to the roof rack side rails. Your vehicle may be
equipped with factory-installed crossbars. Ford Genuine Accessory
crossbars, designed specifically for your vehicle, are also recommended
for use with your roof rack system.
The vehicle’s roof panel isNOTdesigned to directly carry a load.The
maximum recommended load is 100 lb (45 kg), evenly distributed
on the crossbars.Ensure that the load is securely fastened. When the
rail system is loaded, check the tightness of the load before driving and
at each fuel stop.
WARNING:When loading the roof rail crossbars, it is
recommended to evenly distribute the load, as well as maintain a
low center of gravity. Loaded vehicles, with higher centers of gravity,
may handle differently than unloaded vehicles. Extra precautions, such
as slower speeds and increased stopping distance, should be taken
when driving a heavily loaded vehicle.
Your vehicle may be equipped with
factory or dealer-installed crossbars
that may be easily adjusted to
accommodate a wide range of roof
mounted accessories.
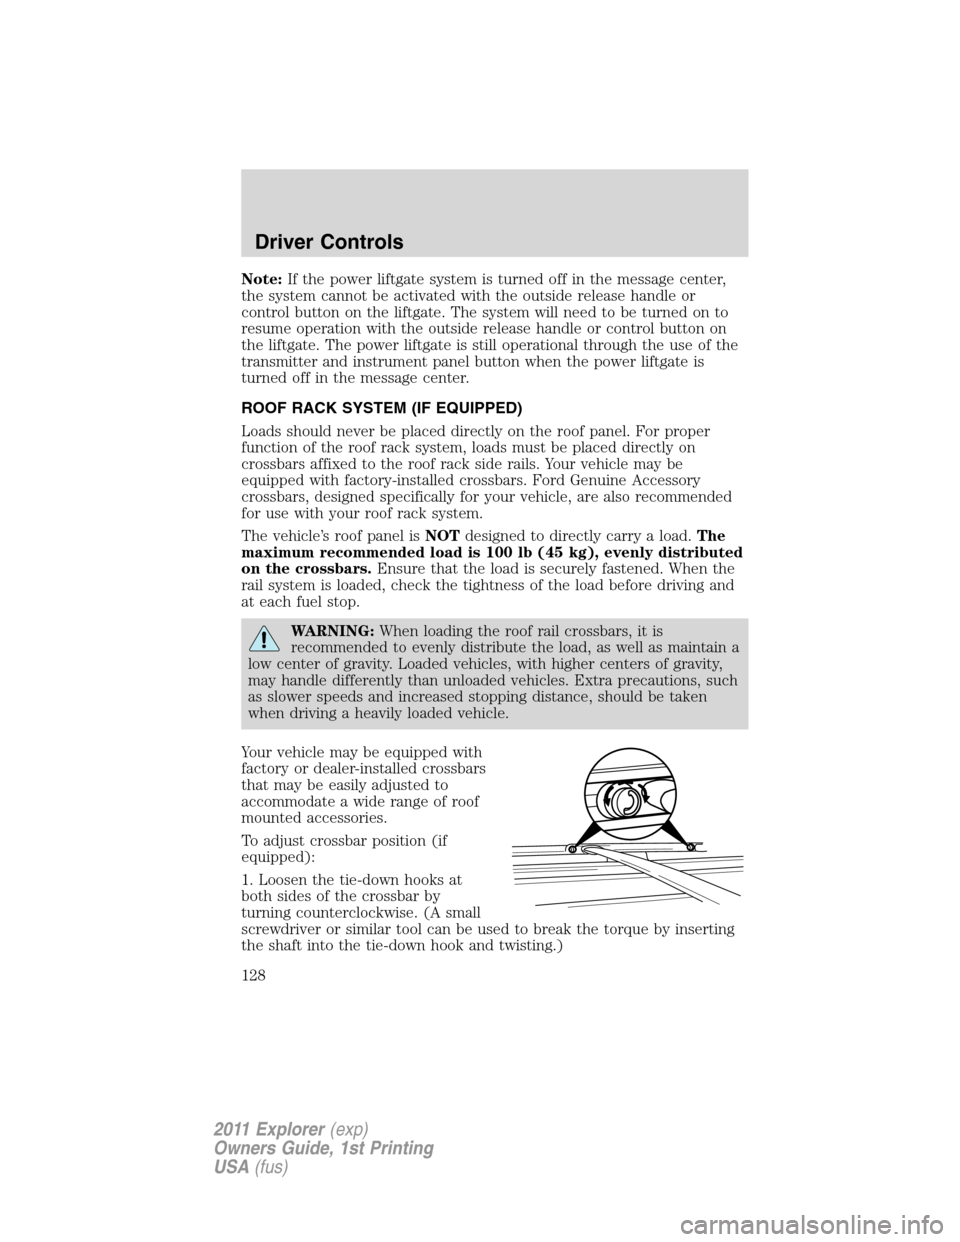
To adjust crossbar position (if
equipped):
1. Loosen the tie-down hooks at
both sides of the crossbar by
turning counterclockwise. (A small
screwdriver or similar tool can be used to break the torque by inserting
the shaft into the tie-down hook and twisting.)
Driver Controls
128
2011 Explorer(exp)
Owners Guide, 1st Printing
USA(fus)