Page 293 of 395
WARNING:Turn off the running boards (if equipped) before
jacking or placing any object under the vehicle. Never place your
hand between the extended running board and the vehicle. A moving
running board may cause injury.
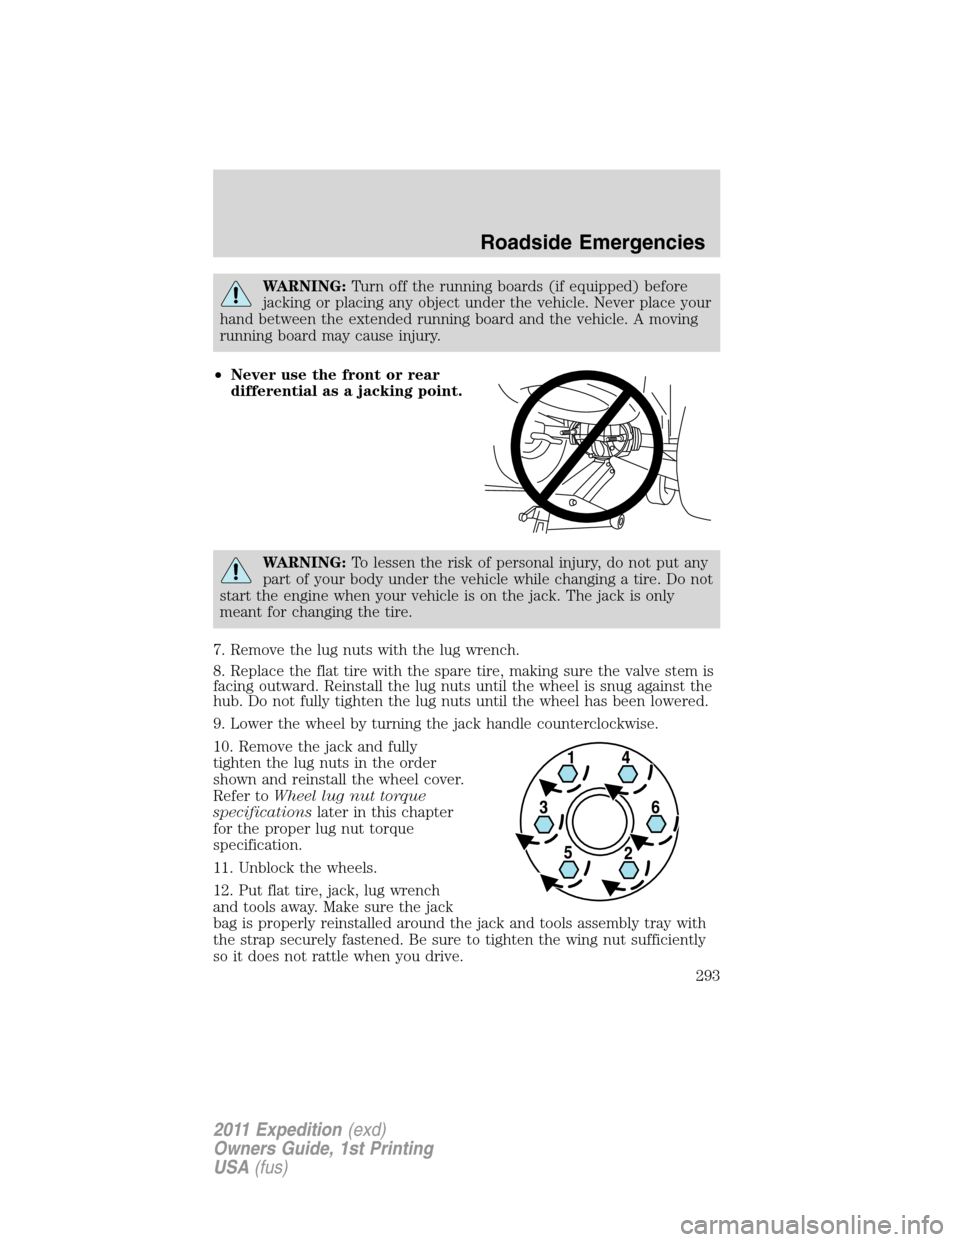
•Never use the front or rear
differential as a jacking point.
WARNING:To lessen the risk of personal injury, do not put any
part of your body under the vehicle while changing a tire. Do not
start the engine when your vehicle is on the jack. The jack is only
meant for changing the tire.
7. Remove the lug nuts with the lug wrench.
8. Replace the flat tire with the spare tire, making sure the valve stem is
facing outward. Reinstall the lug nuts until the wheel is snug against the
hub. Do not fully tighten the lug nuts until the wheel has been lowered.
9. Lower the wheel by turning the jack handle counterclockwise.
10. Remove the jack and fully
tighten the lug nuts in the order
shown and reinstall the wheel cover.
Refer toWheel lug nut torque
specificationslater in this chapter
for the proper lug nut torque
specification.
11. Unblock the wheels.
12. Put flat tire, jack, lug wrench
and tools away. Make sure the jack
bag is properly reinstalled around the jack and tools assembly tray with
the strap securely fastened. Be sure to tighten the wing nut sufficiently
so it does not rattle when you drive.
Roadside Emergencies
293
2011 Expedition(exd)
Owners Guide, 1st Printing
USA(fus)
Page 297 of 395
3. Park the booster vehicle close to the hood of the disabled vehicle
making sure the two vehiclesdo nottouch. Set the parking brake on
both vehicles and stay clear of the engine cooling fan and other moving
parts.
4. Check all battery terminals and remove any excessive corrosion before
you attach the battery cables. Ensure that vent caps are tight and level.
5. Turn the heater fan on in both vehicles to protect from any electrical
surges. Turn all other accessories off.
Connecting the jumper cables
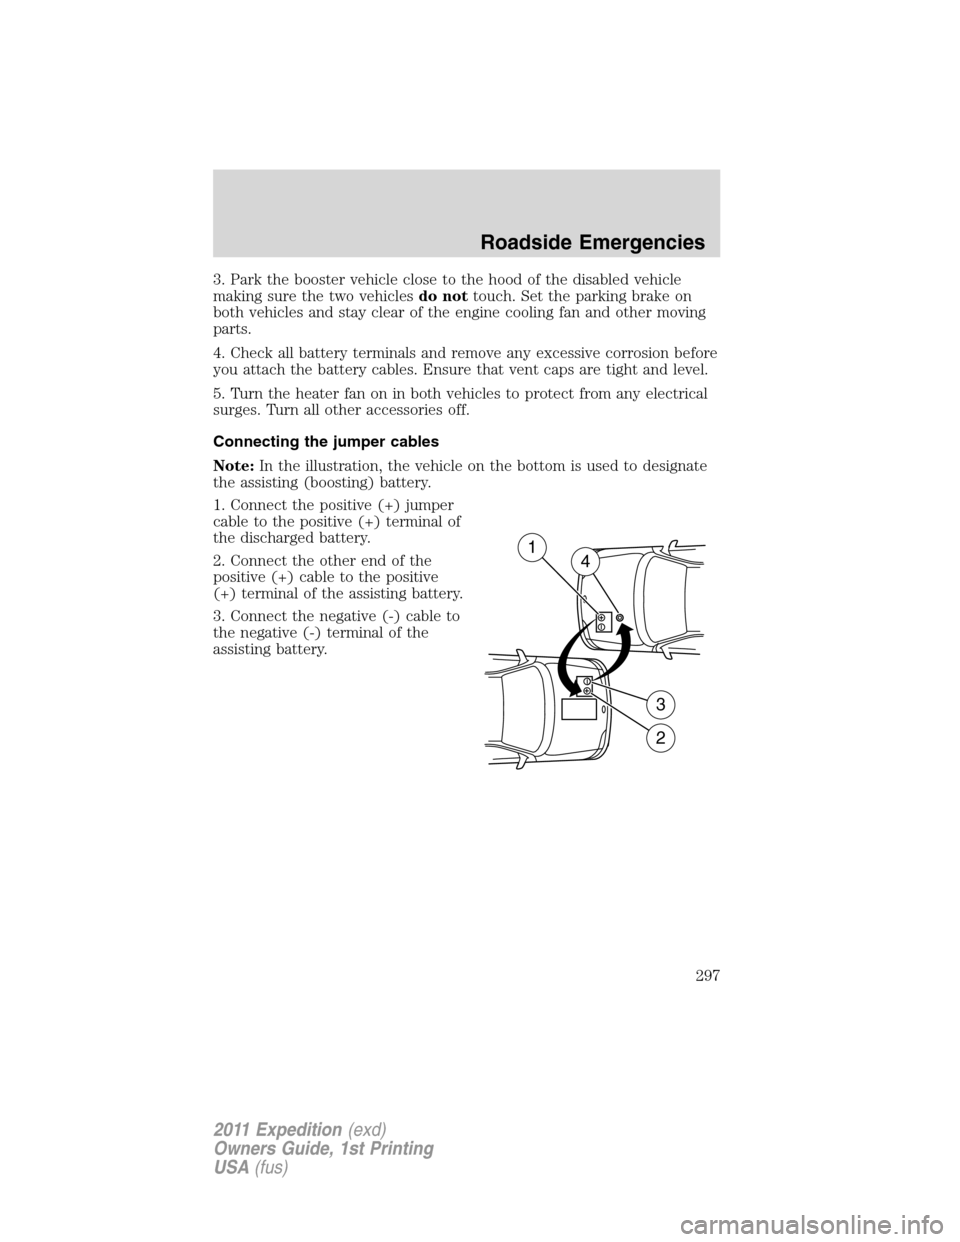
Note:In the illustration, the vehicle on the bottom is used to designate
the assisting (boosting) battery.
1. Connect the positive (+) jumper
cable to the positive (+) terminal of
the discharged battery.
2. Connect the other end of the
positive (+) cable to the positive
(+) terminal of the assisting battery.
3. Connect the negative (-) cable to
the negative (-) terminal of the
assisting battery.
+–
+–
2
3
14
Roadside Emergencies
297
2011 Expedition(exd)
Owners Guide, 1st Printing
USA(fus)
Page 298 of 395
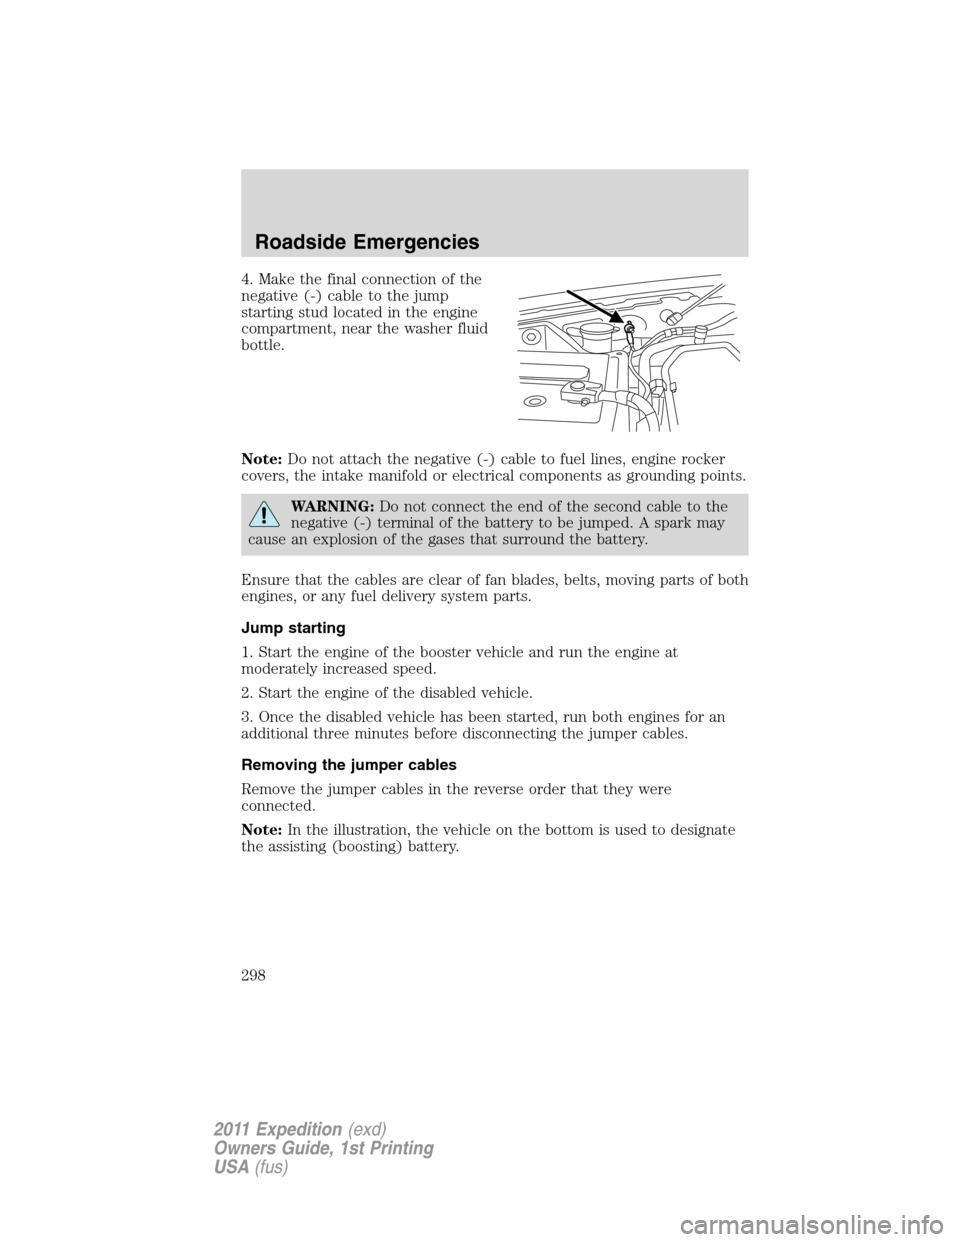
4. Make the final connection of the
negative (-) cable to the jump
starting stud located in the engine
compartment, near the washer fluid
bottle.
Note:Do not attach the negative (-) cable to fuel lines, engine rocker
covers, the intake manifold or electrical components as grounding points.
WARNING:Do not connect the end of the second cable to the
negative (-) terminal of the battery to be jumped. A spark may
cause an explosion of the gases that surround the battery.
Ensure that the cables are clear of fan blades, belts, moving parts of both
engines, or any fuel delivery system parts.
Jump starting
1. Start the engine of the booster vehicle and run the engine at
moderately increased speed.
2. Start the engine of the disabled vehicle.
3. Once the disabled vehicle has been started, run both engines for an
additional three minutes before disconnecting the jumper cables.
Removing the jumper cables
Remove the jumper cables in the reverse order that they were
connected.
Note:In the illustration, the vehicle on the bottom is used to designate
the assisting (boosting) battery.
Roadside Emergencies
298
2011 Expedition(exd)
Owners Guide, 1st Printing
USA(fus)
Page 299 of 395
1. Remove the jumper cable from
the jump starting stud.
2. Remove the jumper cable on the
negative (-) terminal of the booster
vehicle’s battery.
3. Remove the jumper cable from
the positive (+) terminal of the
booster vehicle’s battery.
4. Remove the jumper cable from
the positive (+) terminal of the
disabled vehicle’s battery.
After the disabled vehicle has been started and the jumper cables
removed, allow it to idle for several minutes so the engine computer can
relearn its idle conditions.
+–
+–
DA
B
C
4D1
2
3
Roadside Emergencies
299
2011 Expedition(exd)
Owners Guide, 1st Printing
USA(fus)
Page 307 of 395
The use of leaded fuel in your vehicle without proper conversion may
damage the effectiveness of your emission control system and may cause
engine knocking or serious engine damage. Ford Motor Company/Ford of
Canada is not responsible for any damage caused by use of improper
fuel. Using leaded fuel may also result in difficulty importing your vehicle
back into the U.S.
If your vehicle must be serviced while you are traveling or living in
Asia-Pacific Region, Sub-Saharan Africa, U.S. Virgin Islands, Central
America, the Caribbean, and Israel, contact the nearest authorized
dealer. If the authorized dealer cannot help you, contact:
FORD MOTOR COMPANY
FORD EXPORT OPERATIONS & GLOBAL INITIATIVES
1555 Fairlane Drive
Fairlane Business Park #3
Allen Park, Michigan 48101
U.S.A.
Telephone: (313) 594-4857
For customers in Guam, the Commonwealth of the Northern Mariana
Islands (CNMI), America Samoa, and the U.S. Virgin Islands, please feel
free to call our Toll-Free Number: (800) 841-FORD (3673).
FAX: (313) 390-0804
Email: [email protected]
If your vehicle must be serviced while you are traveling or living in
Puerto Rico, contact the nearest authorized dealer. If the authorized
dealer cannot help you, contact:
Ford International Business Development Inc.
Customer Relationship Center
P.O. Box 11957
Caparra Heights Station
San Juan, Puerto Rico 00922-1957
Telephone: (800) 841-FORD (3673)
FAX: (313) 390-0804
Email: [email protected]
www.ford.com.pr
Customer Assistance
307
2011 Expedition(exd)
Owners Guide, 1st Printing
USA(fus)
Page 312 of 395
ENGINE
Engines are more efficient when they are clean because grease and dirt
buildup keep the engine warmer than normal. When washing:
•Take care when using a power washer to clean the engine. The
high-pressure fluid could penetrate the sealed parts and cause
damage.
•Do not spray a hot engine with cold water to avoid cracking the
engine block or other engine components.
•Spray Motorcraft Engine Shampoo and Degreaser (ZC-20) on all parts
that require cleaning and pressure rinse clean. In Canada use
Motorcraft Engine Shampoo (CXC-66-A).
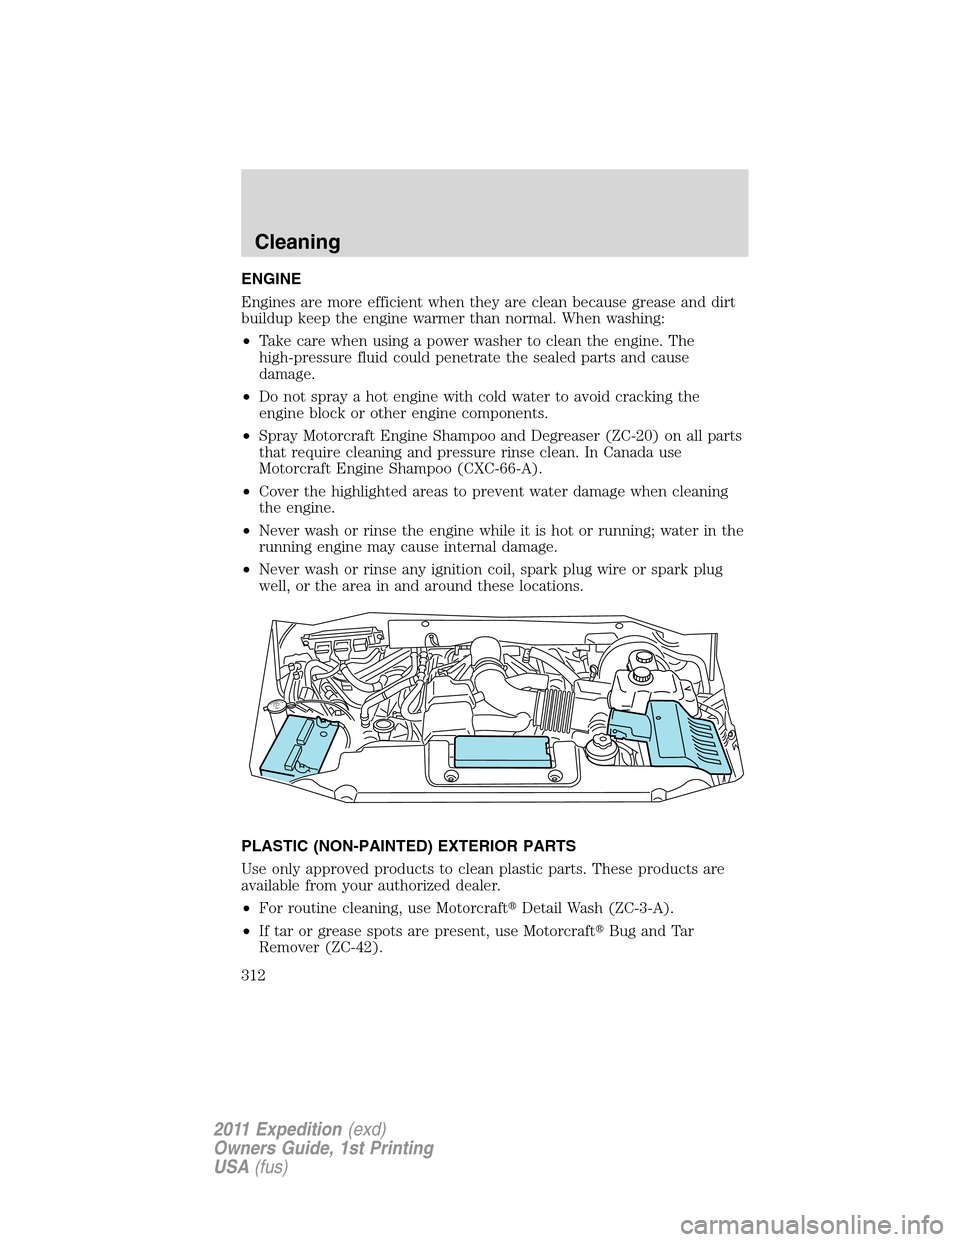
•Cover the highlighted areas to prevent water damage when cleaning
the engine.
•Never wash or rinse the engine while it is hot or running; water in the
running engine may cause internal damage.
•Never wash or rinse any ignition coil, spark plug wire or spark plug
well, or the area in and around these locations.
PLASTIC (NON-PAINTED) EXTERIOR PARTS
Use only approved products to clean plastic parts. These products are
available from your authorized dealer.
•For routine cleaning, use Motorcraft�Detail Wash (ZC-3-A).
•If tar or grease spots are present, use Motorcraft�Bug and Tar
Remover (ZC-42).
WASHERFLUIDO
N
L
YWASHERFLUIDO
N
L
Y
Cleaning
312
2011 Expedition(exd)
Owners Guide, 1st Printing
USA(fus)
Page 317 of 395
UNDERBODY
Flush the complete underside of your vehicle frequently. Keep body and
door drain holes free from packed dirt.
FORD AND LINCOLN MERCURY CAR CARE PRODUCTS
Your Ford or Lincoln Mercury authorized dealer has many quality
products available to clean your vehicle and protect its finishes. These
quality products have been specifically engineered to fulfill your
automotive needs; they are custom designed to complement the style
and appearance of your vehicle. Each product is made from high quality
materials that meet or exceed rigid specifications. For best results, use
the following products or products of equivalent quality:
Motorcraft�Bug and Tar Remover (ZC-42)
Motorcraft�Custom Bright Metal Cleaner (ZC-15)
Motorcraft�Detail Wash (ZC-3-A)
Motorcraft�Dusting Cloth (ZC-24)
Motorcraft�Engine Shampoo and Degreaser (U.S. only) (ZC-20)
Motorcraft�Engine Shampoo (Canada only) (CXC-66-A)
Motorcraft�Multi-Purpose Cleaner (Canada only) (CXC-101)
Motorcraft�Premium Glass Cleaner (Canada only) (CXC-100)
Motorcraft�Premium Quality Windshield Washer Fluid (Canada only)
[CXC-37-(A, B, D or F)]
Motorcraft�Premium Windshield Washer Concentrate (U.S. only)
(ZC-32-A)
Motorcraft�Professional Strength Carpet & Upholstery Cleaner (ZC-54)
Motorcraft�Spot and Stain Remover (U.S. only) (ZC-14)
Motorcraft�Ultra-Clear Spray Glass Cleaner (ZC-23)
Motorcraft�Vinyl Cleaner (Canada only) (CXC-93)
Motorcraft�Wheel and Tire Cleaner (ZC-37-A)
Cleaning
317
2011 Expedition(exd)
Owners Guide, 1st Printing
USA(fus)
Page 318 of 395
SERVICE RECOMMENDATIONS
To help you service your vehicle, we providescheduled maintenance
informationwhich makes tracking routine service easy.
If your vehicle requires professional service, your authorized dealer can
provide the necessary parts and service. Check yourWarranty Guideto
find out which parts and services are covered.
Use only recommended fuels, lubricants, fluids and service parts
conforming to specifications. Motorcraft�parts are designed and built to
provide the best performance in your vehicle.
PRECAUTIONS WHEN SERVICING YOUR VEHICLE
•Do not work on a hot engine.
•Make sure that nothing gets caught in moving parts.
•Do not work on a vehicle with the engine running in an enclosed
space, unless you are sure you have enough ventilation.
•Keep all open flames and other lit material away from the battery and
all fuel related parts.
WARNING:Turn off the power running boards, if equipped,
before working under the vehicle, jacking or placing any object
under the vehicle. Never place your hand between the extended
running board and the vehicle. A moving running board may cause
injury.
Working with the engine off
1. Set the parking brake and ensure the gearshift is securely latched in P
(Park).
2. Turn off the engine and remove the key.
3. Block the wheels to prevent the vehicle from moving unexpectedly.
Working with the engine on
1. Set the parking brake and shift to P (Park).
2. Block the wheels.
WARNING:To reduce the risk of vehicle damage and/or
personal burn injuries, do not start your engine with the air
cleaner removed and do not remove it while the engine is running.
Maintenance and Specifications
318
2011 Expedition(exd)
Owners Guide, 1st Printing
USA(fus)