2011 FORD ESCAPE HYBRID clock
[x] Cancel search: clockPage 263 of 363
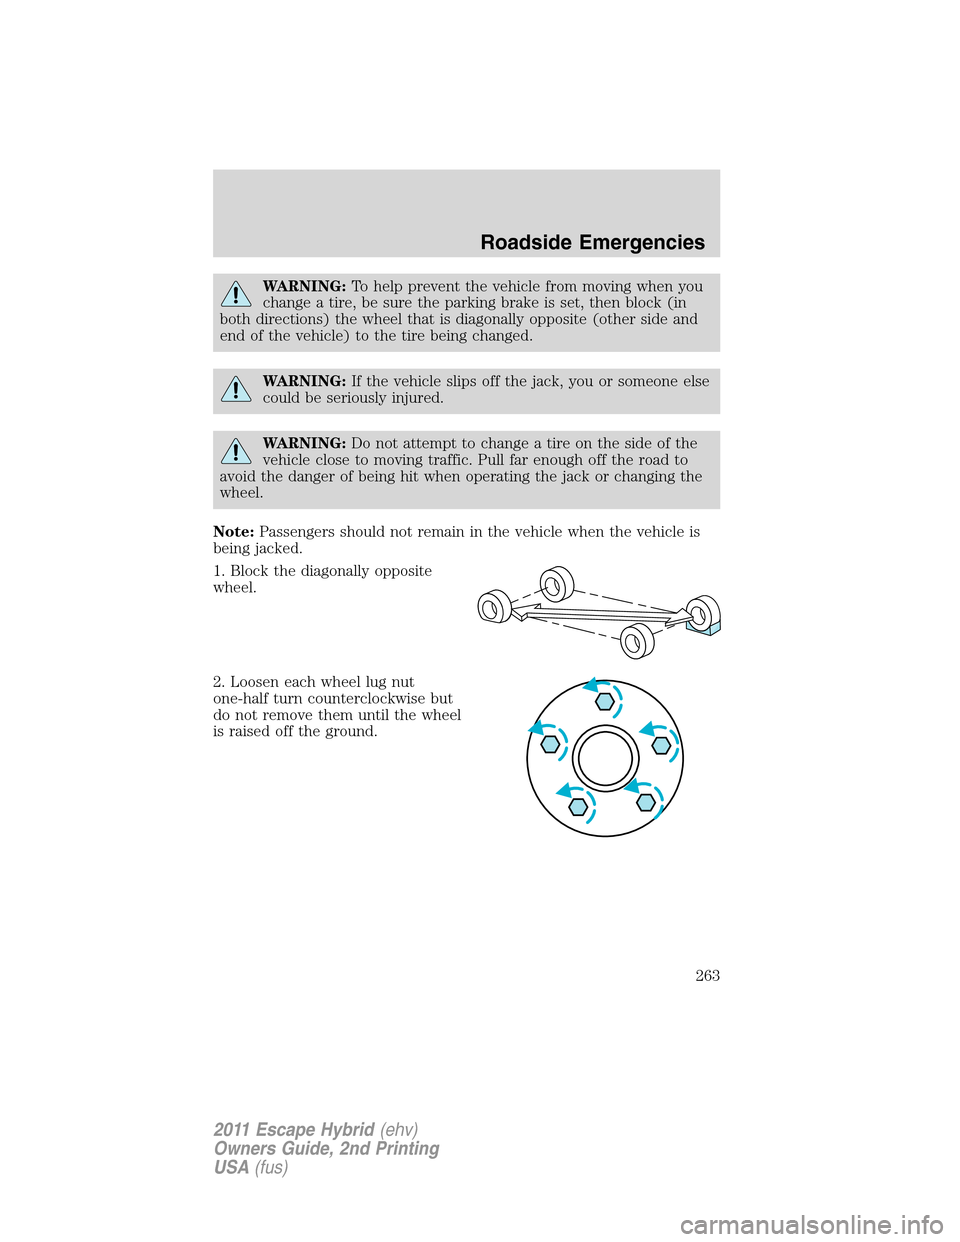
WARNING:To help prevent the vehicle from moving when you
change a tire, be sure the parking brake is set, then block (in
both directions) the wheel that is diagonally opposite (other side and
end of the vehicle) to the tire being changed.
WARNING:If the vehicle slips off the jack, you or someone else
could be seriously injured.
WARNING:Do not attempt to change a tire on the side of the
vehicle close to moving traffic. Pull far enough off the road to
avoid the danger of being hit when operating the jack or changing the
wheel.
Note:Passengers should not remain in the vehicle when the vehicle is
being jacked.
1. Block the diagonally opposite
wheel.
2. Loosen each wheel lug nut
one-half turn counterclockwise but
do not remove them until the wheel
is raised off the ground.
Roadside Emergencies
263
2011 Escape Hybrid(ehv)
Owners Guide, 2nd Printing
USA(fus)
Page 265 of 363
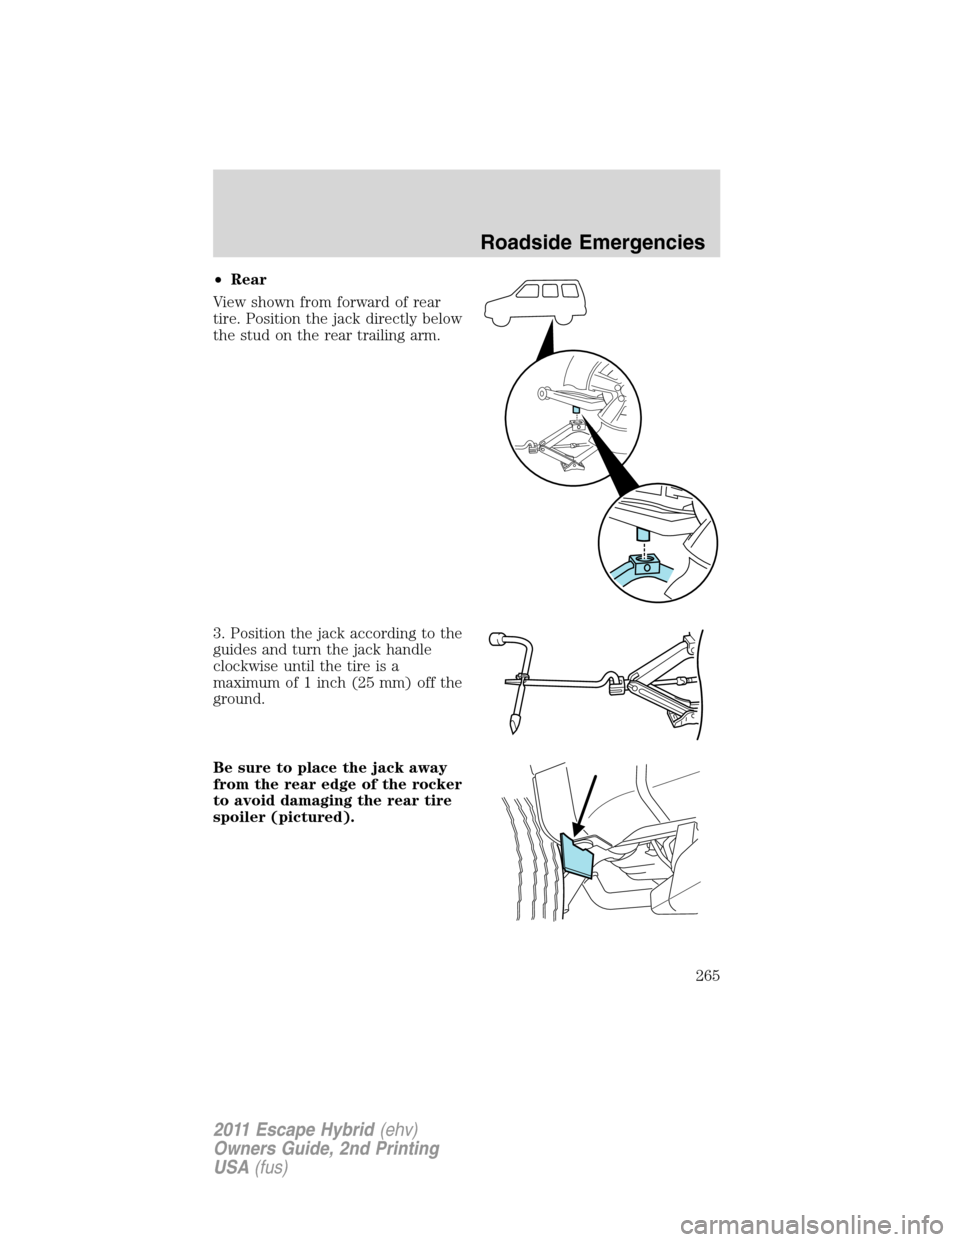
•Rear
View shown from forward of rear
tire. Position the jack directly below
the stud on the rear trailing arm.
3. Position the jack according to the
guides and turn the jack handle
clockwise until the tire is a
maximum of 1 inch (25 mm) off the
ground.
Be sure to place the jack away
from the rear edge of the rocker
to avoid damaging the rear tire
spoiler (pictured).
Roadside Emergencies
265
2011 Escape Hybrid(ehv)
Owners Guide, 2nd Printing
USA(fus)
Page 266 of 363
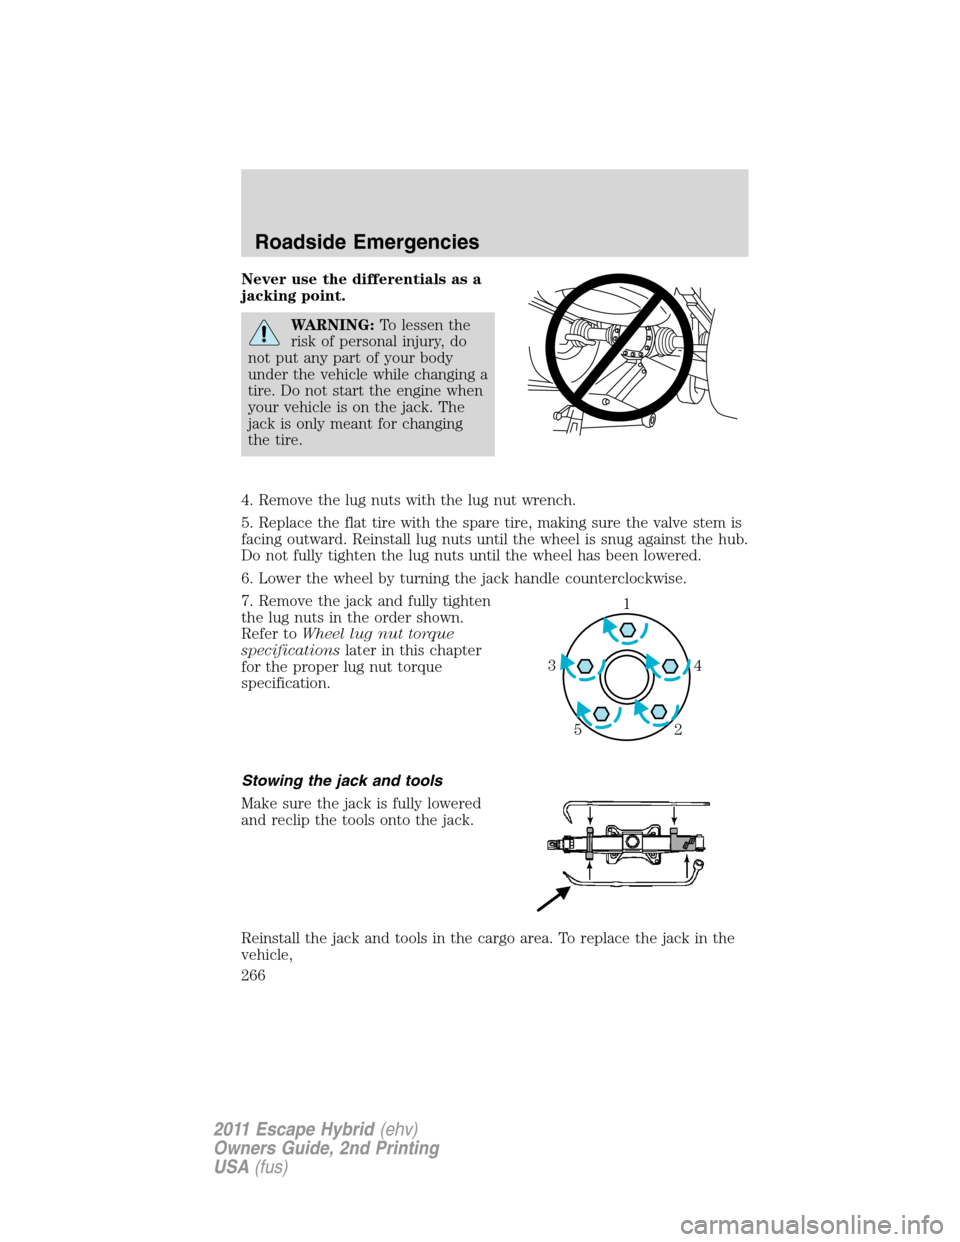
Never use the differentials as a
jacking point.
WARNING:To lessen the
risk of personal injury, do
not put any part of your body
under the vehicle while changing a
tire. Do not start the engine when
your vehicle is on the jack. The
jack is only meant for changing
the tire.
4. Remove the lug nuts with the lug nut wrench.
5. Replace the flat tire with the spare tire, making sure the valve stem is
facing outward. Reinstall lug nuts until the wheel is snug against the hub.
Do not fully tighten the lug nuts until the wheel has been lowered.
6. Lower the wheel by turning the jack handle counterclockwise.
7. Remove the jack and fully tighten
the lug nuts in the order shown.
Refer toWheel lug nut torque
specificationslater in this chapter
for the proper lug nut torque
specification.
Stowing the jack and tools
Make sure the jack is fully lowered
and reclip the tools onto the jack.
Reinstall the jack and tools in the cargo area. To replace the jack in the
vehicle,
1
4 3
2 5
Roadside Emergencies
266
2011 Escape Hybrid(ehv)
Owners Guide, 2nd Printing
USA(fus)
Page 268 of 363
4. Slide the wheel partially under the vehicle and install the retainer
through the center of the wheel.
5. Turn the jack handle clockwise until the tire is raised to its original
position underneath the vehicle. The effort to turn the jack handle
increases significantly as the tire contacts the frame. The spare tire
carrier will ratchet when the tire is in the fully stowed position. The
spare tire carrier has a built-in ratchet feature that will not allow you to
overtighten. If the spare tire carrier ratchets with very little effort, take
the vehicle to your authorized dealer for assistance at your earliest
convenience.If your vehicle is equipped with a trailer hitch, guide
the tire with one hand; keep the rear of the tire tilted down until
the tire clears the bumper.
6. Check that the tire lies flat against the frame assembly. Push against
the tire to make sure it is tightly seated under the vehicle. Loosen and
retighten, if necessary. Failure to properly stow the spare tire may result
in failure of the winch cable and loss of the spare tire.(Make sure that
the tire does not contact the bumper.)
7. Repeat this tightness check procedure (every six months, per
scheduled maintenance information),when servicing the spare tire
pressure or at any time that the spare tire is disturbed through service of
other components.
WHEEL LUG NUT TORQUE SPECIFICATIONS
Retighten the lug nuts to the specified torque at 500 miles (800 km)
after any wheel disturbance (tire rotation, changing a flat tire, wheel
removal, etc.).
Bolt size Wheel lug nut torque*
ft-lb N•m
M12 x 1.5 100 135
* Torque specifications are for nut and bolt threads free of dirt and
rust. Use only Ford recommended replacement fasteners.
WARNING:When a wheel is installed, always remove any
corrosion, dirt or foreign materials present on the mounting
surfaces of the wheel or the surface of the wheel hub, brake drum or
brake disc that contacts the wheel. Ensure that any fasteners that
attach the rotor to the hub are secured so they do not interfere with
the mounting surfaces of the wheel. Installing wheels without correct
metal-to-metal contact at the wheel mounting surfaces can cause the
wheel nuts to loosen and the wheel to come off while the vehicle is in
motion, resulting in loss of control.
Roadside Emergencies
268
2011 Escape Hybrid(ehv)
Owners Guide, 2nd Printing
USA(fus)
Page 298 of 363
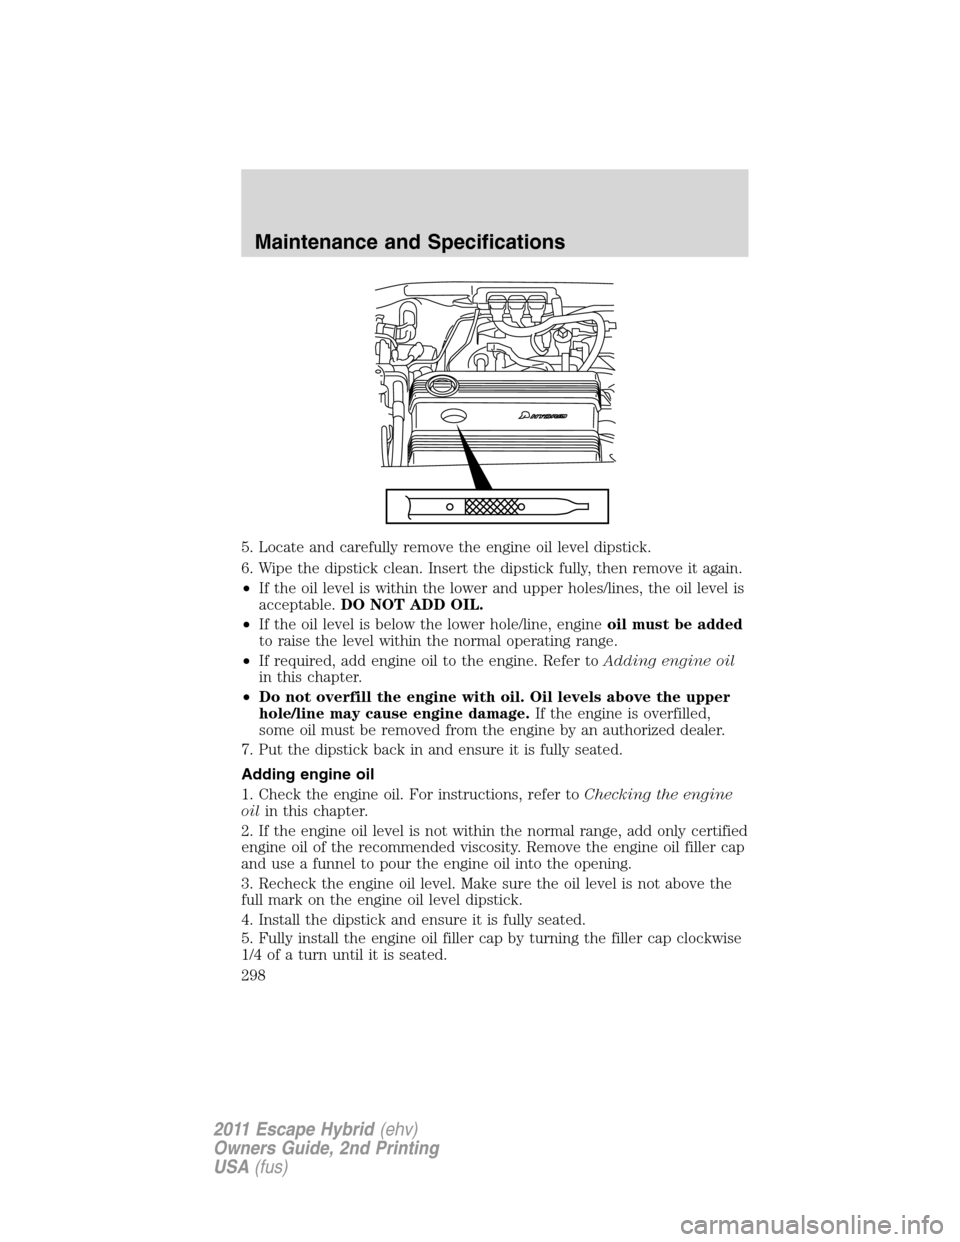
5. Locate and carefully remove the engine oil level dipstick.
6. Wipe the dipstick clean. Insert the dipstick fully, then remove it again.
•If the oil level is within the lower and upper holes/lines, the oil level is
acceptable.DO NOT ADD OIL.
•If the oil level is below the lower hole/line, engineoil must be added
to raise the level within the normal operating range.
•If required, add engine oil to the engine. Refer toAdding engine oil
in this chapter.
•Do not overfill the engine with oil. Oil levels above the upper
hole/line may cause engine damage.If the engine is overfilled,
some oil must be removed from the engine by an authorized dealer.
7. Put the dipstick back in and ensure it is fully seated.
Adding engine oil
1. Check the engine oil. For instructions, refer toChecking the engine
oilin this chapter.
2. If the engine oil level is not within the normal range, add only certified
engine oil of the recommended viscosity. Remove the engine oil filler cap
and use a funnel to pour the engine oil into the opening.
3. Recheck the engine oil level. Make sure the oil level is not above the
full mark on the engine oil level dipstick.
4. Install the dipstick and ensure it is fully seated.
5. Fully install the engine oil filler cap by turning the filler cap clockwise
1/4 of a turn until it is seated.
Maintenance and Specifications
298
2011 Escape Hybrid(ehv)
Owners Guide, 2nd Printing
USA(fus)
Page 301 of 363
WARNING:Keep batteries out of reach of children. Batteries
contain sulfuric acid. Avoid contact with skin, eyes or clothing.
Shield your eyes when working near the battery to protect against
possible splashing of acid solution. In case of acid contact with skin or
eyes, flush immediately with water for a minimum of 15 minutes and
get prompt medical attention. If acid is swallowed, call a physician
immediately.
WARNING:Battery posts, terminals and related accessories
contain lead and lead compounds.Wash hands after handling.
Because your vehicle’s engine is electronically-controlled by a computer,
some control conditions are maintained by power from the battery. When
the battery is disconnected or a new battery is installed, the engine must
relearn its idle and fuel trim strategy for optimum driveability and
performance. To begin this process:
1. With the vehicle at a complete stop, set the parking brake.
2. Put the gearshift in P (Park), turn off all accessories and start the
vehicle. Step on the accelerator to start the engine.
3. Run the vehicle until the engine reaches normal operating
temperature.
4. Allow the engine to idle for at least one minute.
5. Step on the accelerator to start the engine. While the engine is
running, shift the vehicle to neutral.
6. Allow the vehicle to run for at least one minute by pressing on the
accelerator pedal.
7. Drive the vehicle to complete the relearning process.
•The vehicle may need to be driven 10 miles (16 km) or more to
relearn the idle and fuel trim strategy.
•If you do not allow the engine to relearn its idle trim, the idle
quality of your vehicle may be adversely affected until the idle
trim is eventually relearned.
If the battery has been disconnected or a new battery has been installed,
the clock and the preset radio stations must be reset once the battery is
reconnected.
Maintenance and Specifications
301
2011 Escape Hybrid(ehv)
Owners Guide, 2nd Printing
USA(fus)
Page 306 of 363
•Do not add extra inhibitors or additives to the coolant.These
can be harmful and compromise the corrosion protection of the engine
coolant.
For vehicles with overflow coolant systems with a non-pressurized cap
on the coolant recovery system, add coolant to the coolant recovery
reservoir when the engine is cool. Add the proper mixture of coolant and
distilled water to the FULL COLD level. For all other vehicles which have
a coolant degas system with a pressurized cap, or if it is necessary to
remove the coolant pressure relief cap on the radiator of a vehicle with
an overflow system, follow these steps to add engine coolant.
WARNING:To reduce the risk of personal injury, make sure the
engine is cool before unscrewing the coolant pressure relief cap.
The cooling system is under pressure; steam and hot liquid can come
out forcefully when the cap is loosened slightly.
Add the proper mixture of coolant and water to the cooling system by
following these steps:
1. Before you begin, turn the engine off and let it cool.
2. When the engine is cool, wrap a thick cloth around the coolant
pressure relief cap on the coolant reservoir (a translucent plastic bottle).
Slowly turn cap counterclockwise (left) until pressure begins to release.
3. Step back while the pressure releases.
4. When you are sure that all the pressure has been released, use the
cloth to turn it counterclockwise and remove the cap.
5. Fill the coolant reservoir slowly with the proper coolant mixture, to
within the COLD FILL RANGE or the FULL COLD level on the reservoir.
If you removed the radiator cap in an overflow system, fill the radiator
until the coolant is visible and radiator is almost full.
6. Replace the cap. Turn until tightly installed. Cap must be tightly
installed to prevent coolant loss.
After any coolant has been added, check the coolant concentration (refer
toChecking engine coolant). If the concentration is not 50/50
(protection to –34°F/–36°C), drain some coolant and adjust the
concentration. It may take several drains and additions to obtain a 50/50
coolant concentration.
Whenever coolant has been added, the coolant level in the coolant
reservoir should be checked the next few times you drive the vehicle. If
necessary, add enough 50/50 concentration of engine coolant and
distilled water to bring the liquid level to the proper level.
Maintenance and Specifications
306
2011 Escape Hybrid(ehv)
Owners Guide, 2nd Printing
USA(fus)
Page 358 of 363
Child safety seats ......................162
attaching with tether
straps .......................................169
in front seat ............................163
in rear seat ..............................163
LATCH .....................................166
recommendations ...................160
Child safety seats - booster
seats ...........................................171
Cleaning your vehicle
engine compartment ..............284
instrument panel ....................286
interior .....................................287
plastic parts ............................285
washing ....................................283
waxing .....................................283
wheels ......................................284
wiper blades ............................285
Climate control (see Air
conditioning or Heating) ............52
Clock ............................................34
Compass, electronic ....................71
calibration .................................72
set zone adjustment .................72
Console ........................................73
Controls
power seat ...............................118
steering column ........................81
Coolant
checking and adding ......302–304
refill capacities ................307, 325
specifications ..........................325
Cruise control
(see Speed control) ....................79
Customer Assistance ................246
Ford Extended Service
Plan ..................................334, 337
Getting assistance outside the
U.S. and Canada .....................280Getting roadside assistance ...246
Getting the service you
need .........................................275
Ordering additional owner’s
literature .................................281
Utilizing the
Mediation/Arbitration
Program ...................................279
D
Daytime running lamps
(see Lamps) ................................59
Dipstick
automatic transmission
fluid ..........................................320
engine oil .................................297
Driving under special
conditions ..................228, 240, 242
sand .........................................241
snow and ice ...........................243
through water .................242, 245
E
Electronic message center .........25
Emergencies, roadside
jump-starting ..........................269
running out of fuel .........269, 313
Emission control system ..........317
Engine ........................................328
cleaning ...................................284
idle speed control ...................300
lubrication specifications .......325
refill capacities ........................325
service points ..................294–295
Engine block heater .................214
Engine oil ..................................297
checking and adding ..............297
dipstick ....................................297
Index
358
2011 Escape Hybrid(ehv)
Owners Guide, 2nd Printing
USA(fus)