2011 FORD C MAX phone
[x] Cancel search: phonePage 260 of 296

Downloaded from www.Manualslib.com manuals search engine To enable voice control for custom
playlists and folders, follow the procedure
below:
•
Create folders named with the
structure "Ford<*>" where <*> is a
number 1-10. For example "Ford3"
without an extension.
• Create playlists named with the
structure "Ford<*>.m3u" where <*>
is a number 1-10. For example
"Ford5.m3u" without any space
between "Ford" and the number.
Thereafter, custom folders and playlists
will be selectable with voice control. See
Audio unit commands (page 242).
iPod
To enable voice control for custom
playlists, create playlists named with the
structure "Ford<*>" where <*> is a
number 1-10. For example "Ford7" without
any space between "Ford" and the
number.
Thereafter, playlists will be selectable with
voice control. See Audio unit commands
(page 242).
CONNECTING AN EXTERNAL
DEVICE WARNING
Make sure the external device is
securely mounted within the vehicle,
and that trailing connections do not
obstruct any of the driving controls. External devices may be connected using
the auxiliary input socket and the USB port.
See Auxiliary input (AUX IN) socket
(page 125). See USB port (page 125). Connection
Plug in the device, and if necessary secure
it to prevent movement within the vehicle.
Connecting an iPod
For optimum convenience and audio
quality, we recommend that you purchase
a dedicated single connection lead
available from your dealer.
Alternatively, it is possible to connect your
iPod using the standard iPod USB cable
and a separate 3.5mm audio jack lead. If
using this method preset the iPod volume
to maximum and turn off any equalizer
settings before making the connections:
•
Connect the headphone output of the
iPod to the AUX IN socket.
• Connect the USB cable from the iPod
to the vehicle USB socket.
CONNECTING AN EXTERNAL
DEVICE - VEHICLES WITH:
BLUETOOTH
Connecting a Bluetooth audio
device CAUTION
As various standards exist,
manufacturers are able to implement
a variety of profiles in their Bluetooth
devices. Because of this, an incompatibility
can occur between the Bluetooth device
and the system, which in some cases may
limit system functionality. To avoid this
situation, only recommended devices
should be used.
Please visit the website
www.ford-mobile-connectivity.com
for full details. 258
Connectivity
Page 261 of 296

Downloaded from www.Manualslib.com manuals search engine Bonding the device
To connect the device to the system follow
the same procedure as for Bluetooth hands
free phones. See Bluetooth setup (page
237).
Operating the device
Note:
The seek buttons and file information
will only work on certain phones and
devices.
Select Bluetooth audio as the active
source.
1. Select AUX.
2. Press the up and down arrow buttons to select the desired function.
3. Press the OK button.
Tracks can be accessed by skipping
forwards and backwards using the steering
wheel controls, or directly from the audio
unit controls.
Audio control
Press the seek up and down keys to skip
backwards and forwards through tracks.
Press and hold the seek keys to enable fast
rewind/fast forward through track content.
Press the INFO button or function button
4 to display the following:
• Title.
• Artist.
• Album.
• File name.
USING A USB DEVICE
Various icons are used to identify types of
audio file, folders etc. USB device is the active source Folder
Playlist
Album
Artist
Filename
Track title
Information not available
Operation
Select the USB device as the audio source
by repeatedly pressing the AUX button
until the USB screen appears in the display.
After first connecting the USB device, the
first track within the first folder will start
to play automatically. Subsequently,
following audio source switching, the
position of playback on the USB device is
remembered.
To browse the device contents, press the
up/down arrow key or the OK button once.
259
ConnectivityE100029 E100022 E100023 E100024 E100025 E100026 E100027 E100028
Page 266 of 296

Downloaded from www.Manualslib.com manuals search engine Vehicles with mobile navigation
system
CAUTION
Using the system with the engine off
will drain the battery.
Note:
You will be charged when sending
and receiving text messages.
Note: Refer to your phone handbook for all
phone functions and operation.
Note: Keep the activation code (printed on
the installation guide) in a safe place.
Note: Retain the activation text message
in your mobile phone inbox.
Compatibility of phones CAUTION
As no common agreement exists,
mobile phone manufacturers are able
to implement a variety of profiles in
their Bluetooth devices. Because of this,
an incompatibility can occur between the
phone and hands-free system, which in
some cases may significantly degrade the
system performance. To avoid this
situation, only recommended phones
should be used. Please visit the website
www.ford-mobile-connectivity.com for
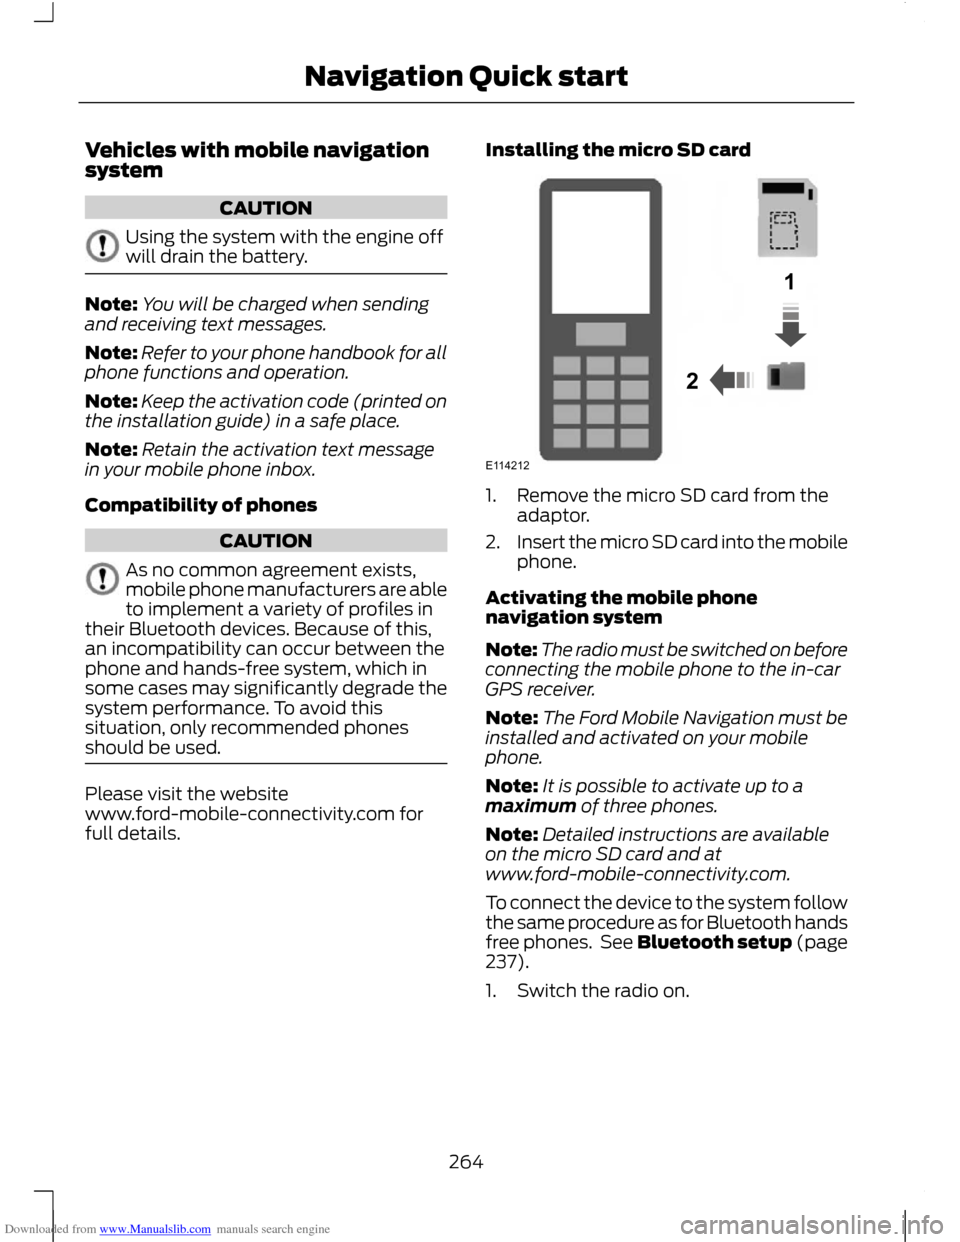
full details. Installing the micro SD card 1. Remove the micro SD card from the
adaptor.
2. Insert the micro SD card into the mobile
phone.
Activating the mobile phone
navigation system
Note: The radio must be switched on before
connecting the mobile phone to the in-car
GPS receiver.
Note: The Ford Mobile Navigation must be
installed and activated on your mobile
phone.
Note: It is possible to activate up to a
maximum of three phones.
Note: Detailed instructions are available
on the micro SD card and at
www.ford-mobile-connectivity.com.
To connect the device to the system follow
the same procedure as for Bluetooth hands
free phones. See Bluetooth setup (page
237).
1. Switch the radio on.
264
Navigation Quick start12E114212
Page 267 of 296

Downloaded from www.Manualslib.com manuals search engine 2.
Switch your mobile phone on and start
the "Ford Mobile Navigation".
3. Choose "Select Destination".
4. Choose "Enter Address".
5. Change route options if necessary and
start the route guidance.
6. The vehicle display will show the turn information. Voice instructions are
heard via the vehicle speakers.
Note: Your mobile phone will display your
current position.
7. You are able to exit the application and
continue your route guidance after
restarting the application.
Vehicles with CD-SD navigation
system or Sony CD-SD navigation
system
The system has a large range of features,
yet is easy and intuitive to use. Route
guidance is shown on the display screen.
The screen provides full information for
operating the system through the use of
menus, text screens and map displays.
Screen selections are made by scrolling
through the menus using the up, down, left
and right arrow buttons and pressing the
OK button to activate the desired setting.
Basic operation
1. Press either the NAV or MENU button
to enter the menu structure.
2. Use the up, down, left and right arrow buttons and scroll through the various
selection lists. 3. Press the OK button to activate your
selection.
Selection lists
Various screens are presented which offer
a selection list of available options.
1. Select the option you require, or if it is not shown on the screen use the up
and down arrow buttons to view the
remainder of the selection list.
2. Press the OK button to confirm your selection.
Alphanumeric keypad entry
When it is necessary to enter an address,
a keypad will appear prompting you to
enter a postcode, city, or street.
1. Use the up, down, left and right arrow buttons to select the letter or number
that you require.
Note: As you spell the entry the results will
appear in the display.
Note: The system will limit your entries to
only those characters which spell a valid
entry.
2. Press the OK button to activate your selection.
Route setting example
Navigation main screen
• To select the navigation system, press
the NAV button. The road safety
caution will be displayed. To use the
system, read the caution and press the
OK button.
Destination input screen
• Use the up and down arrow buttons
and scroll to Destination input.
• Press the OK button to activate your
selection.
Note: A list with several options is shown.
265
Navigation Quick startE114213
Page 270 of 296

Downloaded from www.Manualslib.com manuals search engine Vehicles with CD-SD navigation system
CD eject.
A
Navigation arrows.
B
CD aperture.
C
OK.D
Information.
E
Map select. See Route displays (page 276).
F
Menu select. See System settings (page 272).
G
Telephone keypad and station presets. See Audio unit operation (page 227).
See Audio unit menus (page 230). See Telephone (page 237).
H
Clock. See System settings (page 272).
I
Traffic announcement. See Traffic Message Channel (page 277).
J
Function 4.
K
268
Navigation unit overviewABEFDGHKIJQRTUVSPOMNLCE129241
Page 271 of 296

Downloaded from www.Manualslib.com manuals search engine Function 3.
L
Seek up. CD track selection. See Station tuning control (page 227). See Track
selection (page 232).
M
On/off and volume control. See On/off control (page 227).
N
Seek down. CD track selection. See Station tuning control (page 227). See
Track selection (page 232).
O
Function 2.
P
Function 1.
Q
Phone select. See Telephone (page 237).
R
Auxiliary select. See Auxiliary input (AUX IN) socket (page 235).
S
Radio select. See Audio unit operation (page 227). See Audio unit menus
(page 230).
T
CD select. See Compact disc player (page 232).
U
Navigation select. See System settings (page 272).
V
269
Navigation unit overview
Page 272 of 296

Downloaded from www.Manualslib.com manuals search engine Vehicles with Sony CD-SD navigation system
On/off control. See On/off control (page 227).
A
Navigation select. See System settings (page 272).
B
Telephone keypad and station presets. See Audio unit operation (page 227).
See Audio unit menus (page 230). See Telephone (page 237).
C
CD aperture.
D
Navigation arrows.
E
Map select. See Route displays (page 276).
F
CD eject.
G
Information.
H
Clock. See System settings (page 272).
I
Seek up. CD track selection. end call. See Station tuning control (page 227).
See Track selection (page 232). See Using the telephone (page 238).
J
270
Navigation unit overviewACBFEYIGHJLKTUWXVQSRNMOPDE129242
Page 273 of 296

Downloaded from www.Manualslib.com manuals search engine Home select. See System settings (page 272).
K
Traffic announcement. See Traffic Message Channel (page 277).
L
Function 4.
M
Sound select. See Sound button (page 227).
N
Function 3.
O
OK.P
Function 2.
Q
Menu select. See System settings (page 272).
R
Function 1.
S
Phone select. See Telephone (page 237).
T
Auxiliary select. See Auxiliary input (AUX IN) socket (page 235).
U
Seek down. CD track selection. accept call. See Station tuning control (page
227). See Track selection (page 232). See Using the telephone (page 238).
V
Radio select. See Audio unit operation (page 227). See Audio unit menus
(page 230).
W
CD select. See Compact disc player (page 232).
X
Volume control.
Y
LOADING THE NAVIGATION
DATA
Loading the navigation data 1. Load the navigation SD card into the
aperture.
2. Press the NAV button. The road safety warning will be shown in the display. 3.
Use the up and down arrow buttons to
select the required feature.
4. Press the OK button to confirm your selection.
For map updates and system upgrades
please refer to your dealer.
271
Navigation unit overviewE129900