Page 34 of 195

32
On some versions, when a door is
opened / closed with the key
removed, the display shows the total
milometer reading and the clock for
10 seconds; others will display the
time permanently.
The display can also show the
following:
– through the flashing “spanner”
icon, when the vehicle must be
taken to a Fiat Dealership for
Scheduled Servicing;
– TRIP COMPUTER indications;
– FIAT MY CAR menu;
– warning messages in the event of
failures;
– notification that the previously set
speed has been exceeded. – select one of the various TRIP
COMPUTER functions
– confirm / modify a selected
function
– enter TRIP mode.
Before carrying out any operation,
you are advised to read the whole of
this section carefully.
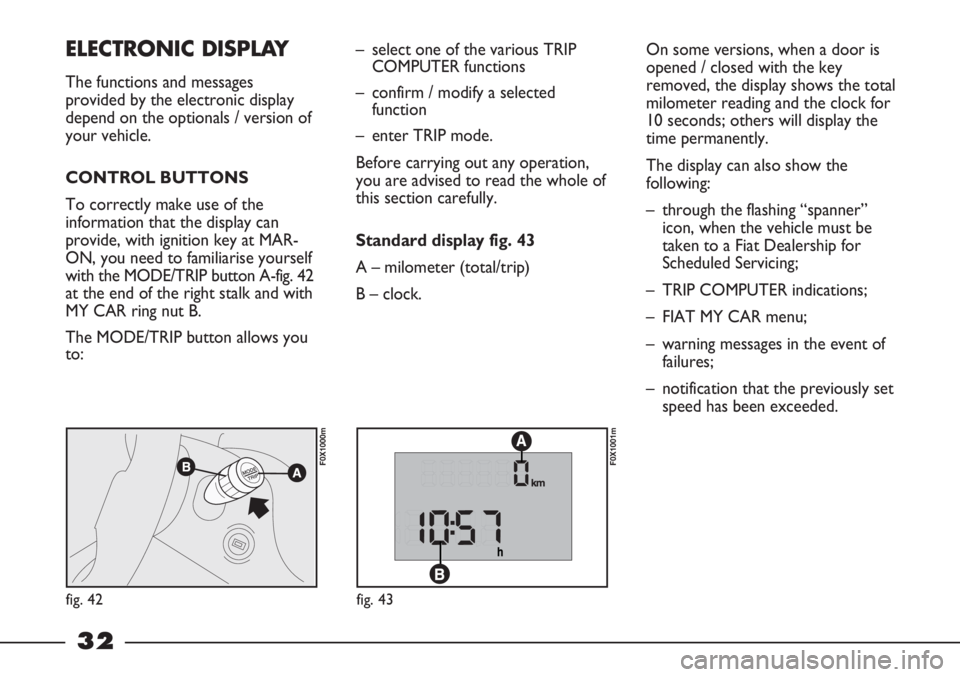
Standard display fig. 43
A – milometer (total/trip)
B – clock.ELECTRONIC DISPLAY
The functions and messages
provided by the electronic display
depend on the optionals / version of
your vehicle.
CONTROL BUTTONS
To correctly make use of the
information that the display can
provide, with ignition key at MAR-
ON, you need to familiarise yourself
with the MODE/TRIP button A-fig. 42
at the end of the right stalk and with
MY CAR ring nut B.
The MODE/TRIP button allows you
to:
fig. 42
F0X1000m
fig. 43
F0X1001m
Page 36 of 195

34
To change the speed limit, rotate the
MY CAR ring nut: the value flashes.
The value can vary on a scale from
OFF to 220 km/h.
When the desired value is reached,
confirm by pressing MODE/TRIP.
If the ring nut remains turned for
more than 2 seconds, the value
increases / decreases rapidly.
When the function is selected, the
Üicon will appear on the display.
Dimmer
This function allows the brightness
level of some dashboard instruments
to be set: instrument panel, on-
board instruments, car radio display
etc. Doors open warning
This warning appears on the display
automatically when the vehicle speed
is greater than 4 km/h and one of
the doors is not shut correctly. On
some versions the
´warning light
switches on at the same time.
Set speed limit exceeded
This function allows the vehicle
speed limit to be set (km/h). When
this is exceeded, the driver is
notified through an acoustic signal
and the message SPEED LIMIT on
the display.
To navigate through the menu,
rotate the MY CAR ring nut. To
make adjustment and store them,
use the MODE/TRIP.
F0X1004m
F0X1005m
▼
F0X1012m
MODE
TRIP
F0X1005m
▼
MODE
TRIP
F0X1007m
F0X1008m
▼
MODE
TRIP
F0X1009m
▼
MODE
TRIP
F0X1010m
F0X1011m
▼
MODE
TRIP MODE
TRIP
Page 38 of 195

36
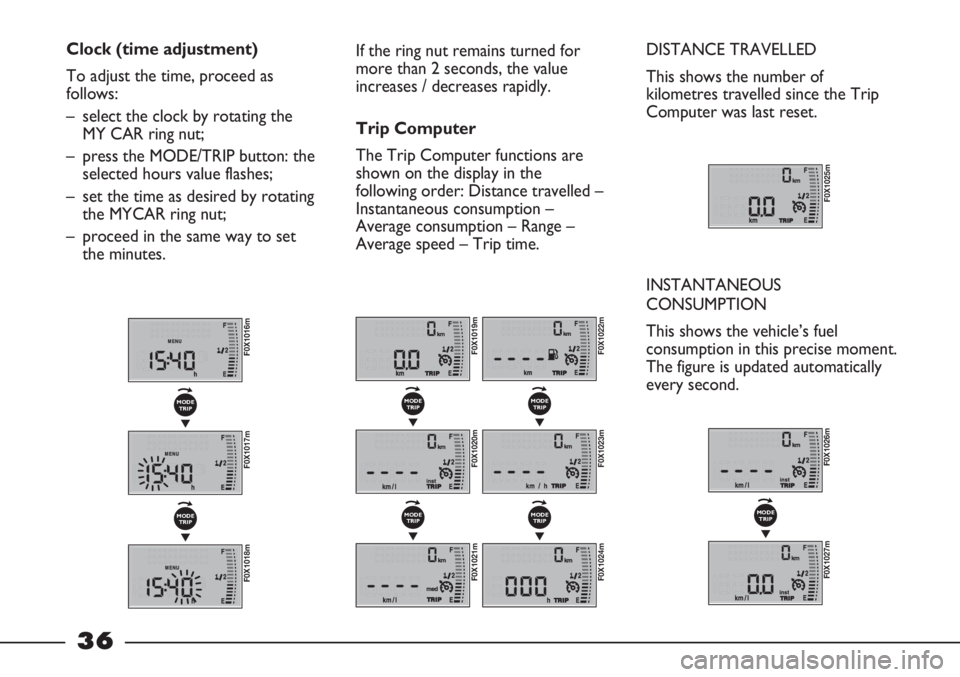
Clock (time adjustment)
To adjust the time, proceed as
follows:
– select the clock by rotating the
MY CAR ring nut;
– press the MODE/TRIP button: the
selected hours value flashes;
– set the time as desired by rotating
the MYCAR ring nut;
– proceed in the same way to set
the minutes.If the ring nut remains turned for
more than 2 seconds, the value
increases / decreases rapidly.
Trip Computer
The Trip Computer functions are
shown on the display in the
following order: Distance travelled –
Instantaneous consumption –
Average consumption – Range –
Average speed – Trip time.DISTANCE TRAVELLED
This shows the number of
kilometres travelled since the Trip
Computer was last reset.
INSTANTANEOUS
CONSUMPTION
This shows the vehicle’s fuel
consumption in this precise moment.
The figure is updated automatically
every second.
F0X1025m
F0X1019m
F0X1020m
▼
MODE
TRIP
F0X1021m
▼
MODE
TRIP
F0X1022m
F0X1023m
▼
MODE
TRIP
F0X1024m
▼
MODE
TRIP
F0X1016m
F0X1017m
▼
MODE
TRIP
F0X1018m
▼
MODE
TRIP
F0X1026m
F0X1027m
▼
MODE
TRIP
Page 39 of 195

37
AVERAGE CONSUMPTION
This is the relationship between the
distance travelled and the number of
litres of fuel used, since the
beginning of the journey. The figure
is updated automatically every 10
seconds.
The calculation starts after having
driven at least 500 metres from the
beginning of the journey.RANGE
This is an estimate of the maximum
distance in kilometres, that can be
driven with the volume of fuel
currently present in the tank
(assuming that the driving style
adopted up to this point continues).
The calculation is based on the
average consumption in the last 5
minutes. If the car is refuelled,
another range value will be
calculated automatically.
With the vehicle stationary and
engine running or when driving at
less than 4 km/h, the display will
show the previous range value; if this
vehicle condition persists for more
than 3 minutes, this will change and
the following will be displayed: - - - -.
F0X1028m
F0X1029m
▼
MODE
TRIP
F0X1030m
F0X1031m
▼
MODE
TRIP
AVERAGE SPEED
This is an estimate of the average
speed, calculated from the beginning
of the journey.
F0X1032m
F0X1033m
MODE
TRIP
▼
Page 40 of 195

38
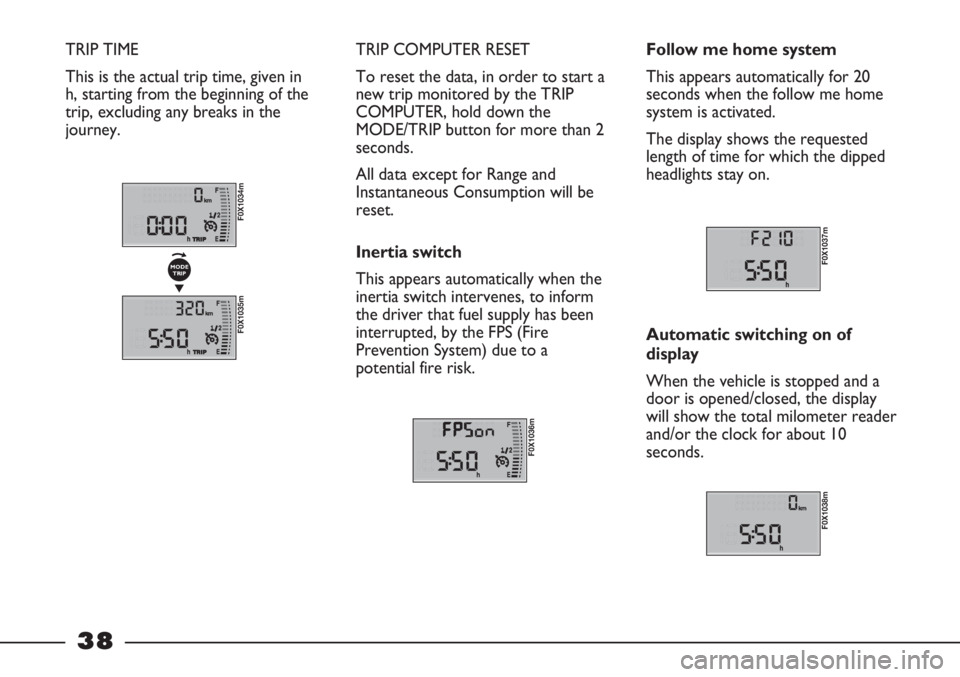
TRIP TIME
This is the actual trip time, given in
h, starting from the beginning of the
trip, excluding any breaks in the
journey. TRIP COMPUTER RESET
To reset the data, in order to start a
new trip monitored by the TRIP
COMPUTER, hold down the
MODE/TRIP button for more than 2
seconds.
All data except for Range and
Instantaneous Consumption will be
reset.
Inertia switch
This appears automatically when the
inertia switch intervenes, to inform
the driver that fuel supply has been
interrupted, by the FPS (Fire
Prevention System) due to a
potential fire risk.
F0X1036m
Follow me home system
This appears automatically for 20
seconds when the follow me home
system is activated.
The display shows the requested
length of time for which the dipped
headlights stay on.
F0X1037m
Automatic switching on of
display
When the vehicle is stopped and a
door is opened/closed, the display
will show the total milometer reader
and/or the clock for about 10
seconds.
F0X1038m
F0X1034m
F0X1035m
▼
MODE
TRIP
Page 47 of 195

45
Initial checks
When the key is turned to MAR-
ON, the display begins a process of
diagnosis for the vehicle’s on-board
systems. This may last for a few
seconds. If, with the engine running,
the system does not detect any
faults, the system displays OK.
If the display indicates a fault, see
WARNING LIGHTS AND
MESSAGES in this section.
Speed limit exceeded
(Spd. Lim.)
This function allows the vehicle
speed limit to be set (km/h). When
this is exceeded, the driver is
notified through a dedicated
indication on the display, an acoustic
signal and a warning light (triangle
logo).
This indications are interrupted
immediately when the MODE
button is pressed. The indication on
the displayTo set the speed limit, proceed as
follows:
– press the MODE button briefly to
enter the menu;
– press the ▼button; Spd. Lim. will
appear on the display;
– press the MODE button briefly,
then ▼or ▲to select ON or
OFF;
– to activate the function, press the
MODE button briefly when ON
flashes;
– press the ▼button: a speed value
will appear on the display;
– press the MODE button briefly:
the value will flash;
– set the new values as desired,
corresponding to the new speed
limit, by pressing the ▼and/or ▲
buttons.
– press the MODE button briefly to
confirm;
– hold down the MODE button to
return to the standard display.The speed limit can only be set to a
value of 30 km/h (or 20 mph) or
above. Every time the ▼or ▲
buttons are pressed, the value is
decreased/increased by 5 units
respectively When the buttons are
held down, the value decreases or
increases rapidly, as appropriate. It is
advisable to release the button as
you approach the desired value, then
complete the adjustment with single
presses.
The indication on the display is
interrupted automatically if the
vehicle speed falls below the set
value by at least 5 km/h (or 5 mph).
Page 53 of 195

51
Exit menu
This is the last option concluding the
menu function cycle.
– Press the MODE button briefly:
the display returns to the standard
screen.
– Pressing the ▼button returns to
the first menu option: Spd. Lim.Doors open warning
On some versions, the display
indicates which door has
inadvertently been left open.
On others, the “doors open”
warning light on the instrument
panel switches on in the same
circumstances. On some versions,
the system informs the driver that a
speed of 4 km/h has been exceeded
through an acoustic signal.
Exterior lighting check
The
Wwarning light switches on to
indicate a failure in one of the
external lights. On some versions,
the display can indicate the electrical
circuit where the fault is present.Interior lighting adjustment
(dimmer)
This function permits a decrease
and/or increase in light intensity for
the instrument panel, car radio
display and control button
serigraphy.
To adjust to the desired level, simply
press the ▼or ▲buttons; after a
few seconds, the display returns to
the previous screen automatically.
Page 78 of 195

fig. 68
F0X0044m
fig. 69
F0X0045m
fig. 70
F0X0046m
GLASSES HOLDER fig. 68
For some versions, there is a glasses
holder on the driver side door. To
open, operate in the direction of the
arrow as illustrated.
FRONT ROOF LIGHTS
With tilting lens fig. 69
The roof light is switched on using
the lens, as follows:
pressed to 1: off;
normal position: switches on when a
door is opened;
pressed to 2: always onWith switches
and spot light fig. 70
The roof light switches on in 2
different situations according to the
position of switch A:
1: always on (ON) even with doors
closed;
2: switches on when a door is
opened;
3: always off (OFF).
Spot light
Switch B controls the spot light,
depending on the position:
1: spot light on (ON);
2: spot light off (OFF).Roof light timing
On some versions, to facilitate
getting into/out of the vehicle,
especially at night or with poor
lighting, 2 different timing modes are
available.
Entrance timing
The roof lights switch on as follows:
– for a period of 15 seconds when
the front doors are unlocked;
– for a period of 3 minutes when
one of the doors is opened;
76