Page 103 of 497
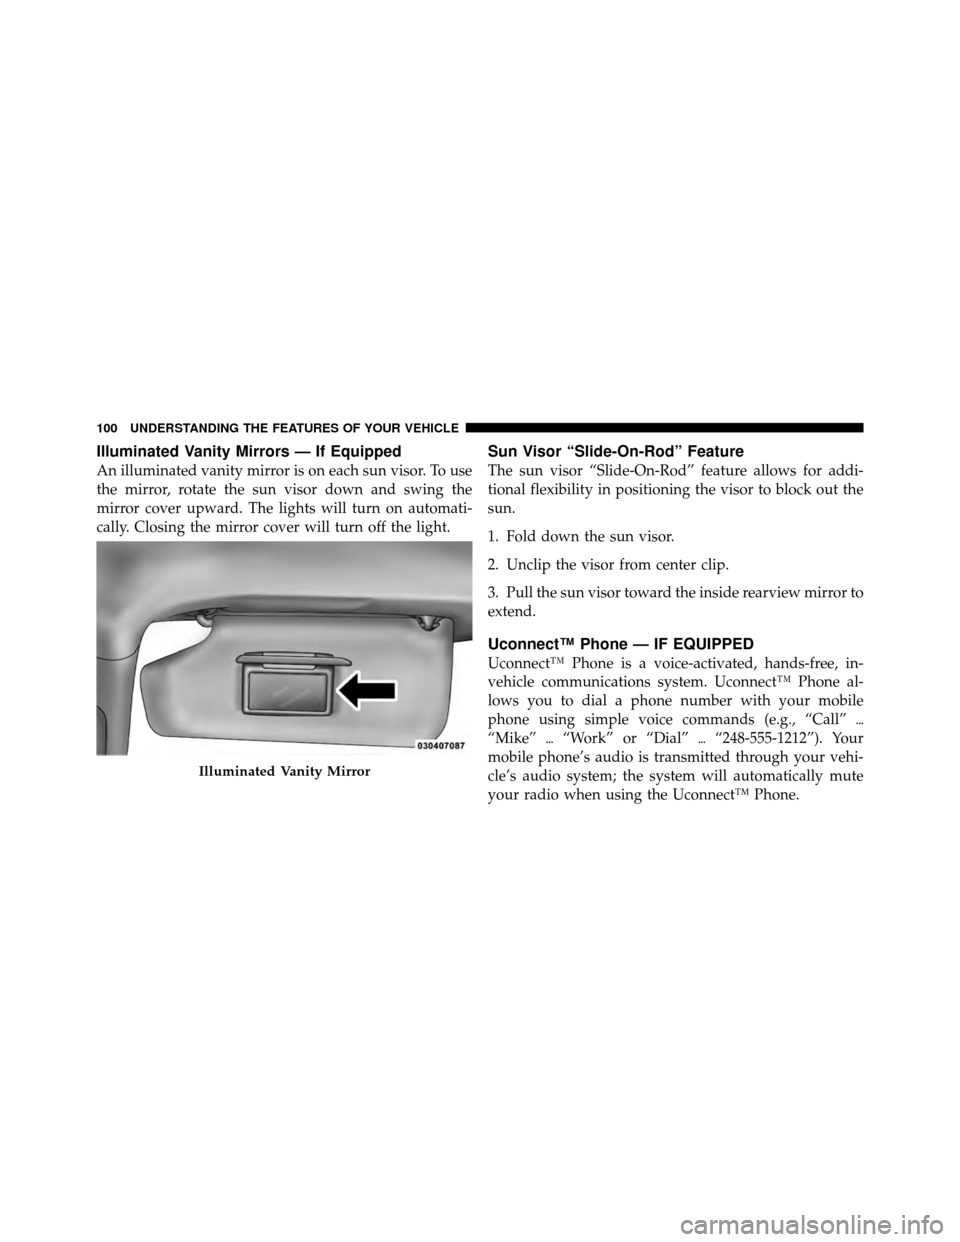
Illuminated Vanity Mirrors — If Equipped
An illuminated vanity mirror is on each sun visor. To use
the mirror, rotate the sun visor down and swing the
mirror cover upward. The lights will turn on automati-
cally. Closing the mirror cover will turn off the light.
Sun Visor “Slide-On-Rod” Feature
The sun visor “Slide-On-Rod” feature allows for addi-
tional flexibility in positioning the visor to block out the
sun.
1. Fold down the sun visor.
2. Unclip the visor from center clip.
3. Pull the sun visor toward the inside rearview mirror to
extend.
Uconnect™ Phone — IF EQUIPPED
Uconnect™ Phone is a voice-activated, hands-free, in-
vehicle communications system. Uconnect™ Phone al-
lows you to dial a phone number with your mobile
phone using simple voice commands (e.g., “Call”\b
“Mike” \b“Work” or “Dial” \b“248-555-1212”). Your
mobile phone’s audio is transmitted through your vehi-
cle’s audio system; the system will automatically mute
your radio when using the Uconnect™ Phone.
Illuminated Vanity Mirror
100 UNDERSTANDING THE FEATURES OF YOUR VEHICLE
Page 117 of 497
Canada and 060 for Mexico). The number dialed may
not be applicable with the available mobile service and
area.
•If supported, this number may be programmable on
some systems. To do this, press the
button and
say “Setup”, followed by “Emergency”.
•The Uconnect™ Phone does slightly lower your
chances of successfully making a phone call as to that
for the mobile phone directly.
WARNING!
To use your Uconnect™ Phone System in an emer-
gency, your mobile phone must be:
•turned on,
•paired to the Uconnect™ System,
•and have network coverage.
Towing Assistance
If you need towing assistance:
•Press thebutton to begin.
•After the “Ready” prompt and the following beep, say
“Towing Assistance”.
NOTE:
•The towing assistance number dialed is based on the
country where the vehicle is purchased (1-800-528-
2069 for the U.S., 1-877-213-4525 for Canada, 55-14-
3454 for Mexico City and 1-800-712-3040 for outside
Mexico City in Mexico). Please refer to the 24-Hour
“Towing Assistance” coverage details on the DVD in
the Warranty Information Booklet and the 24-Hour
Towing Assistance references.
•If supported, this number may be programmable on
some systems. To do this, press the
button and
say “Setup”, followed by “Towing Assistance”.
114 UNDERSTANDING THE FEATURES OF YOUR VEHICLE
Page 141 of 497
You can choose from HIGH, LOW or OFF heat settings.
Amber indicator lights in each switch indicate the level of
heat in use. Two indicator lights will illuminate for
HIGH, one for LOW and none for OFF.Press the switch once to select HIGH-level
heating. Press the switch a second time to select
LOW-level heating. Press the switch a third
time to shut the heating elements OFF.
When the HIGH-level setting is selected, the heater will
provide a boosted heat level during the first four minutes
of operation. Then, the heat output will drop to the
normal HIGH-level. If the HIGH-level setting is selected,
the system will automatically switch to LOW-level after
approximately 30 minutes of continuous operation. At
that time, the number of illuminated LEDs changes from
two to one, indicating the change. The LOW-level setting
will turn OFF automatically after approximately 30 min-
utes. NOTE:
Once a heat setting is selected, heat will be felt
within two to five minutes.
WARNING!
•Persons who are unable to feel pain to the skin
because of advanced age, chronic illness, diabetes,
spinal cord injury, medication, alcohol use, ex-
haustion or other physical condition must exercise
care when using the seat heater. It may cause burns
even at low temperatures, especially if used for
long periods of time.
•Do not place anything on the seat that insulates
against heat, such as a blanket or cushion. This
may cause the seat heater to overheat. Sitting in a
seat that has been overheated could cause serious
burns due to the increased surface temperature of
the seat.
138 UNDERSTANDING THE FEATURES OF YOUR VEHICLE
Page 154 of 497
LIGHTS
Multifunction Lever
The multifunction lever controls the operation of the
parking lights, headlights, headlight beam selection,
passing light, fog lights, instrument panel light dimming
and turn signals. The multifunction lever is located on
the left side of the steering column.
Headlights and Parking Lights
Turn the end of the multifunction lever to the first detent
for parking lights and instrument panel lights. Turn to
the second detent for headlight operation.
Multifunction Lever
Headlight Switch
3
UNDERSTANDING THE FEATURES OF YOUR VEHICLE 151
Page 155 of 497
To change the brightness of the instrument panel lights,
rotate the center portion of the multifunction lever up or
down.
NOTE:If the driver’s door is left open, and the head-
lights or parking lights are left on, a chime will sound.
Daytime Running Lights — If Equipped
The high beam headlights will turn on as Daytime
Running Lights (DRL) and operate at lower intensity
whenever the ignition is ON, the engine is running, the
headlight switch is off, the parking brake is released and
the shift lever is in any position except PARK.
NOTE: The Daytime Running Lights will turn off
automatically when a turn signal is in operation and turn
on again when the turn signal is not operating.
Lights-On Reminder
If the headlights or parking lights are on after the ignition
is turned OFF, a chime will sound when the driver’s door
is opened.
High/Low Beam Switch
Push the multifunction lever away from you to switch
the headlights to high beams. Pull the lever toward you
to switch the headlights back to low beams.
Flash-to-Pass
You can signal another vehicle with your headlights by
lightly pulling the multifunction lever toward the steer-
ing wheel. This will turn on the high beam headlights
until the lever is released.
Front Fog Lights — If Equipped
The front fog light switch is in the multifunction
lever. To activate the front fog lights, turn on the
parking or low beam headlights and pull out the
end of the lever.
152 UNDERSTANDING THE FEATURES OF YOUR VEHICLE
Page 156 of 497
NOTE:The fog lights will only operate with the parking
lights or the headlights on low beam. Selecting high
beam headlights will turn off the fog lights.
Turn Signals
Move the multifunction lever up or down and the arrows
on each side of the instrument cluster flash to show
proper operation of the front and rear turn signal lights.
Fog Light Operation
Turn Signal Operation
3
UNDERSTANDING THE FEATURES OF YOUR VEHICLE 153
Page 157 of 497
NOTE:
•If either light remains on and does not flash, or there is
a very fast flash rate, check for a defective outside light
bulb. If an indicator fails to light when the lever is
moved, it would suggest that the indicator bulb is
defective.
•A tone will chime if the turn signals are left on for
more than 1 mile (2 km).
Lane Change Assist
Tap the lever up or down once, without moving beyond
the detent, and the turn signal (right or left) will flash
three times then automatically turn off.
Instrument Panel Dimmer
Rotate the center portion of the lever to the extreme
bottom position to fully dim the instrument panel lights
and prevent the interior lights from illuminating when a
door is opened.
Rotate the center portion of the lever up to increase the
brightness of the instrument panel lights when the park-
ing lights or headlights are on.
Rotate the center portion of the lever upward to the next
detent position to brighten the odometer and radio when
the parking lights or headlights are on.
Rotate the center portion of the lever upward to the last
detent to turn on the interior lighting.
154 UNDERSTANDING THE FEATURES OF YOUR VEHICLE
Page 158 of 497
Interior Lights
The overhead light comes on when a door is opened. It
may also be turned on by rotating the control for the
dimmer switch on the multifunction lever fully upward.
The overhead light will automatically turn off in approxi-
mately 10 minutes if a door is left open or the dimmer
control is left in the dome light position and the key is not
in the ignition. Turn the ignition switch ON to restore the
overhead light operation.
Daytime Brightness Feature
Certain instrument panel components (odometer, radio
display) can be illuminated at full brightness during the
daytime. This can be helpful when driving with your
headlights on during the daytime, such as in a parade or
a funeral procession. To activate this feature, rotate the
left stalk one detent lower than the dome light.
Dimmer Control
3
UNDERSTANDING THE FEATURES OF YOUR VEHICLE 155