Page 365 of 497

The GCWR is the total permissible weight of your vehicle
and trailer when weighed in combination.
NOTE:The GCWR rating includes a 150 lbs (68 kg)
allowance for t")
Gross Combination Weight Rating (GCWR)
The GCWR is the total permissible weight of your vehicle
and trailer when weighed in combination.
NOTE:The GCWR rating includes a 150 lbs (68 kg)
allowance for the presence of a driver.
Gross Axle Weight Rating (GAWR)
The GAWR is the maximum capacity of the front and rear
axles. Distribute the load over the front and rear axles
evenly. Make sure that you do not exceed either front or
rear GAWR. Refer to “Vehicle Loading/Vehicle Certifica-
tion Label” in Starting and Operating” for further infor-
mation.
WARNING!
It is important that you do not exceed the maximum
front or rear GAWR. A dangerous driving condition
can result if either rating is exceeded. You could lose
control of the vehicle and have a collision.
Tongue Weight
The tongue weight is the downward force exerted on the
hitch ball by the trailer. In most cases it should not be less
than 10% or more than 15% of the trailer load. You must
consider this as part of the load on your vehicle.
Frontal Area
The frontal area is the maximum height multiplied by the
maximum width of the front of a trailer.
Trailer Sway Control
The trailer sway control is a telescoping link that can be
installed between the hitch receiver and the trailer tongue
that typically provides adjustable friction associated with
the telescoping motion to dampen any unwanted trailer
swaying motions while traveling.
362 STARTING AND OPERATING
Page 372 of 497
Trailer And Tongue Weight
Always load a trailer with 60% to 65% of the weight in
the front of the trailer. This places 10% to 15% of the
Gross Trailer Weight (GTW) on the tow hitch of your
vehicle. Loads balanced over the wheels or heavier in the
rear can cause the trailer to swayseverelyfrom side-to-
side which will cause loss of control of vehicle and trailer.
Failure to load trailers heavier in front is the cause of
many trailer collisions.
Consider the following items when computing the
weight on the rear axle of the vehicle:
•The tongue weight of the trailer.
•The weight of any other type of cargo or equipment
put in or on your vehicle.
•The weight of the driver and all passengers.
5
STARTING AND OPERATING 369
Page 389 of 497
4. Locate the jack as shown. For the front tires, place it
(rearward) of the notch on the body weld seam behind
wheel to be changed.
For the rear tires, place it under the axle by the wheel to
be changed.Position the jack handle on the jack.
Do not raise the
vehicle until you are sure the jack is fully engaged.
5. Raise the vehicle by turning the jack screw to the right.
Raise the vehicle only until the tire just clears the surface
and enough clearance is obtained to install the spare tire.
Minimum tire lift provides maximum stability.
Front Jacking Location
Rear Jacking Location
386 WHAT TO DO IN EMERGENCIES
Page 403 of 497

▫Exhaust System ..................... 415
▫ Cooling System ..................... 417
▫ Brake System ....................... 422
▫ Automatic Transmission ............... 424
▫ Transfer Case ....................... 426
▫ Front/Rear Axle Fluid ................. 427
▫ Appearance Care And Protection From
Corrosion .......................... 427
� Fuses .............................. 432
▫ Totally Integrated Power Module ......... 432
� Replacement Bulbs .................... 438
� Bulb Replacement ..................... 438
▫ Headlamp ......................... 438 ▫
Left Front Turn Signal ................. 439
▫ Right Front Turn Signal ................ 440
▫ Front Side Marker .................... 440
▫ Front Fog Lamp (Front Fascia Mounted) .... 440
▫ Rear Tail, Stop, Turn Signal, And Backup
Lamp ............................. 441
▫ Center High Mounted Stop Lamp
(CHMSL) .......................... 442
� Fluid Capacities ...................... 443
� Fluids, Lubricants And Genuine Parts ....... 444
▫ Engine ............................ 444
▫ Chassis ........................... 445
400 MAINTAINING YOUR VEHICLE
Page 430 of 497

Frequency Of Fluid Change
Under normal operating conditions, the fluid installed at
the factory will give satisfactory lubrication for the life of
the vehicle. Fluid changes are not necessary unless the
fluid becomes contaminated with water. Change the fluid
immediately if contaminated with water.
Front/Rear Axle Fluid
For normal service, periodic fluid level checks are not
required. When the vehicle is serviced for other reasons
the exterior surfaces of the axle assembly should be
inspected. If gear oil leakage is suspected inspect the
fluid level. Refer to “Fluids, Lubricants, and Genuine
Parts” in “Maintaining Your Vehicle” for further informa-
tion.
Fluid Level Check
•
Front axle lubricant should be at the bottom edge of
the oil fill hole when the vehicle is in a level position.
•Rear axle lubricant should be 0.5 in (11 mm) below the
bottom edge of the oil fill hole when the vehicle is in a
level position.
Adding Fluid
Add lubricant only at the fill hole and only to the level
specified above.
Selection Of Lubricant
Use only manufacturer’s recommended fluid. Refer to
“Fluids, Lubricants, and Genuine Parts” in “Maintaining
Your Vehicle” for further information.
Appearance Care And Protection From Corrosion
Protection Of Body And Paint From Corrosion
Vehicle body care requirements vary according to geo-
graphic locations and usage. Chemicals that make roads
passable in snow and ice, and those that are sprayed on
trees and road surfaces during other seasons, are highly
corrosive to the metal in your vehicle. Outside parking,
7
MAINTAINING YOUR VEHICLE 427
Page 437 of 497
Cavity CartridgeFuseMini-
Fuse Description
J21 20 Amp Blue Front/Rear Washer
J22 25 Amp Natural Sunroof Module – If
Equipped
M1 15 Amp
Blue Rear Center Brake
Lamp, Brake Switch
M2 20 Amp
Yellow Trailer Lighting
M3 20 Amp
Yellow Frt/Rear Axle Lockers
M4 10 Amp
Red Trailer Tow
M5 25 Amp
Natural 115V AC Inverter – If
Equipped
M6 20 Amp
Yellow Rain Sensor – If
EquippedCavity Cartridge
FuseMini-
Fuse Description
M7 20 Amp
Yellow Cigar Lighter
M8 20 Amp
Yellow Front Heated Seat – If
Equipped
M9 — —
M10 15 Amp
Blue Ignition Off Draw –
Video System, Satel-
lite Radio, DVD,
Hands-Free Module,
Antenna, Universal
Garage Door Opener,
Vanity Lamp
M11 10 Amp
Red Ignition Off Draw –
Climate Control Sys-
tem, MW SENSR, Un-
derhood Lamp
434 MAINTAINING YOUR VEHICLE
Page 448 of 497
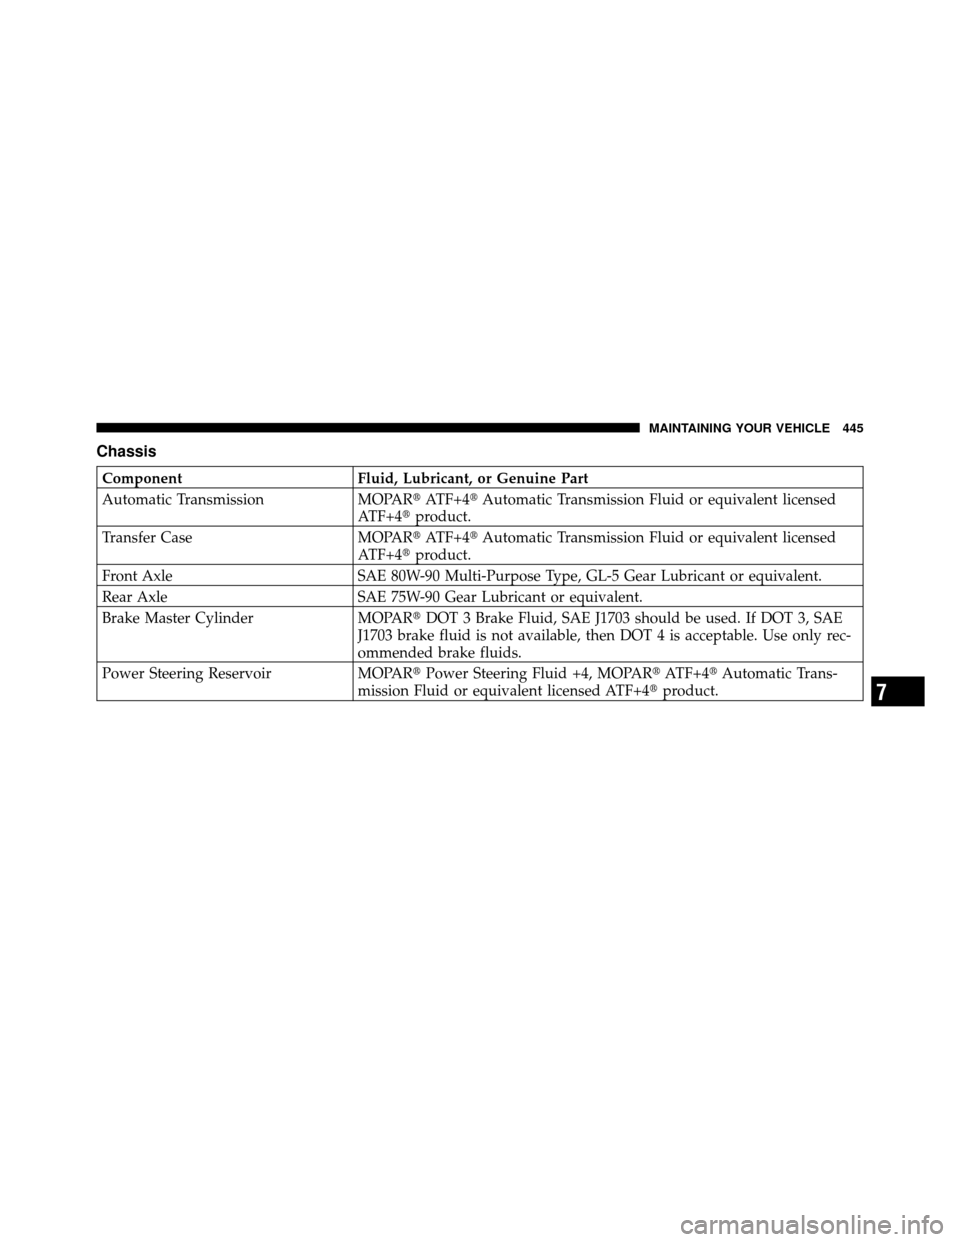
Chassis
ComponentFluid, Lubricant, or Genuine Part
Automatic Transmission MOPAR�ATF+4�Automatic Transmission Fluid or equivalent licensed
ATF+4� product.
Transfer Case MOPAR�ATF+4�Automatic Transmission Fluid or equivalent licensed
ATF+4� product.
Front Axle SAE 80W-90 Multi-Purpose Type, GL-5 Gear Lubricant or equivalent.
Rear Axle SAE 75W-90 Gear Lubricant or equivalent.
Brake Master Cylinder MOPAR�DOT 3 Brake Fluid, SAE J1703 should be used. If DOT 3, SAE
J1703 brake fluid is not available, then DOT 4 is acceptable. Use only rec-
ommended brake fluids.
Power Steering Reservoir MOPAR�Power Steering Fluid +4, MOPAR� ATF+4�Automatic Trans-
mission Fluid or equivalent licensed ATF+4� product.
7
MAINTAINING YOUR VEHICLE 445
Page 455 of 497
 or
18 Months Maintenance
Service Schedule
❏Change the engine oil and engine oil
filter.
❏ Rotate the tires, rotate at the first sign of
irregular wear, even if it occurs b")
24,000 Miles (39,000 km) or
18 Months Maintenance
Service Schedule
❏Change the engine oil and engine oil
filter.
❏ Rotate the tires, rotate at the first sign of
irregular wear, even if it occurs before
24,000 miles (39 000 km).
❏ Inspect the CV joints.
❏ Inspect exhaust system.
❏ Inspect the front and rear axle fluid,
change if using your vehicle for police,
taxi, fleet, off-road or frequent trailer
towing.
Odometer Reading Date
Repair Order #Dealer Code
Signature, Authorized Service Center
32,000 Miles (52,000 km) or 24 Months Maintenance Service
Schedule
❏Change the engine oil and engine oil filter.
❏ Rotate the tires, rotate at the first sign of irregular wear, even if it occurs before
32,000 miles (52 000 km).
❏ Replace the engine air cleaner filter.
❏ Replace the spark plugs (3.7L Engine).
❏ Adjust parking brake on vehicles equipped with four-wheel disc brakes.
❏ Inspect the transfer case fluid.
❏ Inspect the brake linings, replace if necessary.
❏ Inspect the front suspension, tie rod ends and boot seals for cracks or leaks and all parts for
damage, wear, improper looseness or end play; replace if necessary.
Odometer Reading Date
Repair Order #Dealer Code
Signature, Authorized Service Center
8
M
A I
N T
E
N A
N CE
S
C
H E
D
U L
E
S452 MAINTENANCE SCHEDULES
 on the tow hitch of your
vehicle. Lo")
 of the notch on the body weld seam behind
wheel to be changed.
For the rear tires, place it under the axle by the wheel to
be chan")