Page 301 of 452

•The TPMS is not a substitute for proper tire mainte-
nance, and it is the driver ’s responsibility to maintain
correct tire pressure using an accurate tire gauge, even
if under-inflation has not reached the level to trigger
illumination of the “Tire Pressure Monitoring Telltale
Light.”
•Seasonal temperature changes will affect tire pressure,
and the TPMS will monitor the actual tire pressure in
the tire.
Base System
The Tire Pressure Monitor System (TPMS) uses wireless
technology with wheel rim mounted electronic sensors to
monitor tire pressure levels. Sensors, mounted to each
wheel as part of the valve stem, transmit tire pressure
readings to the receiver module.
NOTE:It is particularly important for you to check the
tire pressure in all of your tires regularly and to maintain
the proper pressure. The TPMS consists of the following components:
•Receiver module
•Four tire pressure monitoring sensors
•Tire Pressure Monitoring Telltale Light
The “Tire Pressure Monitoring Telltale Light” will
illuminate in the instrument cluster, and an au-
dible chime will be activated when one or more of
the four active road tire pressures are low. Should this
occur, you should stop as soon as possible, check the
inflation pressure of each tire on your vehicle, and inflate
each tire to the vehicle’s recommended cold placard
pressure value. The system will automatically update
and the “Tire Pressure Monitoring Telltale Light” will
extinguish once the updated tire pressures have been
received. The vehicle may need to be driven for up to
20 minutes above 15 mph (24 km/h) to receive this
information.
5
STARTING AND OPERATING 299
Page 302 of 452

The “Tire Pressure Monitoring Telltale Light” will flash on
and off for 75 seconds, and remain on solid when a system
fault is detected. The system fault will also sound a chime.
If the ignition key is cycled, this sequence will repeat,
providing the system fault still exists. The “Tire Pressure
Monitoring Telltale Light” will turn off when the fault
condition no longer exists. A system fault can occur by any
of the following scenarios: 1) Jamming due to electronic
devices or driving next to facilities emitting the same radio
frequencies as the TPM sensors; 2) Installing some form of
aftermarket window tinting that affects radio wave sig-
nals; 3) Lots of snow or ice around the wheels or wheel
housings; 4) Using tire chains on the vehicle; 5) Using
wheels/tires not equipped with TPM sensors.
NOTE: Your vehicle is equipped with a non-matching
full size spare wheel and tire assembly.
1. This spare tire does not have a tire pressure monitor-
ing sensor. Therefore, the TPMS will not monitor the tire
pressure in the spare tire.2. If you install the full size spare tire in place of a road
tire that has a pressure below the low-pressure warning
limit, upon the next ignition key cycle a chime will sound
and the “TPM Telltale Light” will still turn ON due to the
low tire.
3. However, after driving the vehicle for up to 20 min-
utes above 15 mph (24 km/h), the “TPM Telltale Light”
will flash on and off for 75 seconds and then remain on
solid.
4. For each subsequent ignition key cycle, a chime will
sound and the “TPM Telltale Light” will flash on and off
for 75 seconds and then remain on solid.
5. Once you repair or replace the original road tire, and
reinstall it on the vehicle in place of the full size spare tire,
the TPMS will update automatically and the “TPM
Telltale Light” will turn OFF, as long as no tire pressure is
below the low-pressure warning limit in any of the four
300 STARTING AND OPERATING
Page 315 of 452
Gross Axle Weight Rating (GAWR)
The GAWR is the maximum permissible load on the front
and rear axles. The load must be distributed in the cargo
area so that the GAWR of each axle is not exceeded.
Each axle GAWR is determined by the component in the
system with the lowest load carrying capacity (axle,
springs, tires, or wheels).
Heavier axles or suspension components sometimes
specified by purchasers for increased durability do not
necessarily increase the vehicle’s GVWR.
Tire Size
This is the minimum allowable tire size for your vehicle.
Replacement tires must be equal to the load capacity of
this tire size.
Rim Size
This is the rim size that is appropriate for the tire size
listed.
Inflation Pressure (Cold)
This is the cold tire inflation pressure for your vehicle for
all loading conditions up to full GAWR.
Curb Weight
The curb weight of a vehicle is defined as the total weight
of the vehicle with all fluids, including vehicle fuel, at full
capacity conditions, and with no occupants or cargo
loaded into the vehicle. The front and rear curb weight
values are determined by weighing your vehicle on a
commercial scale before any occupants or cargo are
added.
Loading
The actual total weight and the weight of the front and
rear of your vehicle at the ground can best be determined
by weighing it when it is loaded and ready for operation.
5
STARTING AND OPERATING 313
Page 321 of 452
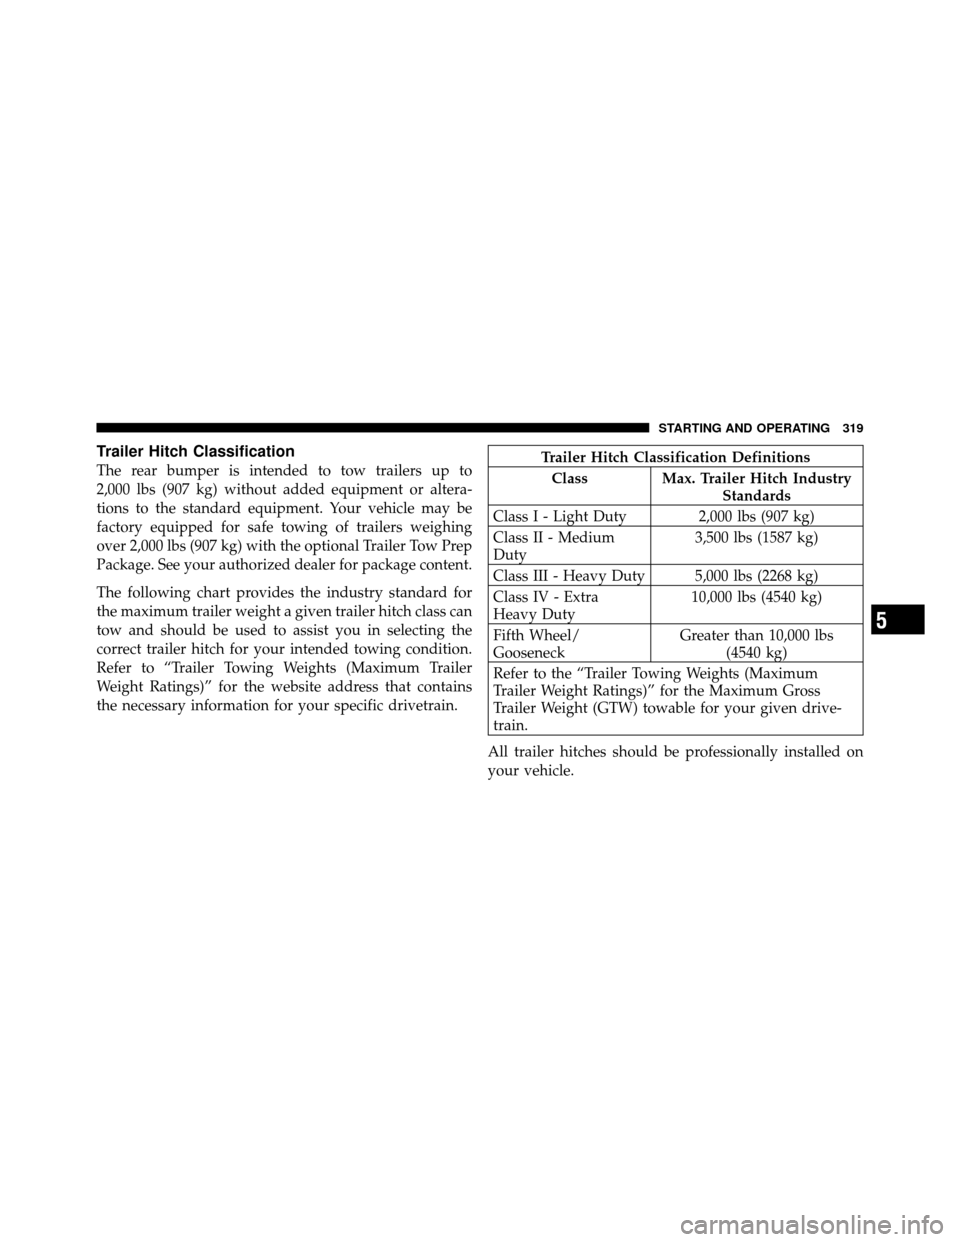
Trailer Hitch Classification
The rear bumper is intended to tow trailers up to
2,000 lbs (907 kg) without added equipment or altera-
tions to the standard equipment. Your vehicle may be
factory equipped for safe towing of trailers weighing
over 2,000 lbs (907 kg) with the optional Trailer Tow Prep
Package. See your authorized dealer for package content.
The following chart provides the industry standard for
the maximum trailer weight a given trailer hitch class can
tow and should be used to assist you in selecting the
correct trailer hitch for your intended towing condition.
Refer to “Trailer Towing Weights (Maximum Trailer
Weight Ratings)” for the website address that contains
the necessary information for your specific drivetrain.Trailer Hitch Classification DefinitionsClass Max. Trailer Hitch Industry Standards
Class I - Light Duty 2,000 lbs (907 kg)
Class II - Medium
Duty 3,500 lbs (1587 kg)
Class III - Heavy Duty 5,000 lbs (2268 kg)
Class IV - Extra
Heavy Duty 10,000 lbs (4540 kg)
Fifth Wheel/
Gooseneck Greater than 10,000 lbs
(4540 kg)
Refer to the “Trailer Towing Weights (Maximum
Trailer Weight Ratings)” for the Maximum Gross
Trailer Weight (GTW) towable for your given drive-
train.
All trailer hitches should be professionally installed on
your vehicle.
5
STARTING AND OPERATING 319
Page 322 of 452
Trailer Towing Weights
(Maximum Trailer Weight Ratings)
NOTE:For additional trailer towing information in-
cluding maximum trailer and tongue weight rating for
your vehicle, refer to the following website addresses:
•http:// www.ramtrucks.com
•http:// www.dodge.ca (Canada)
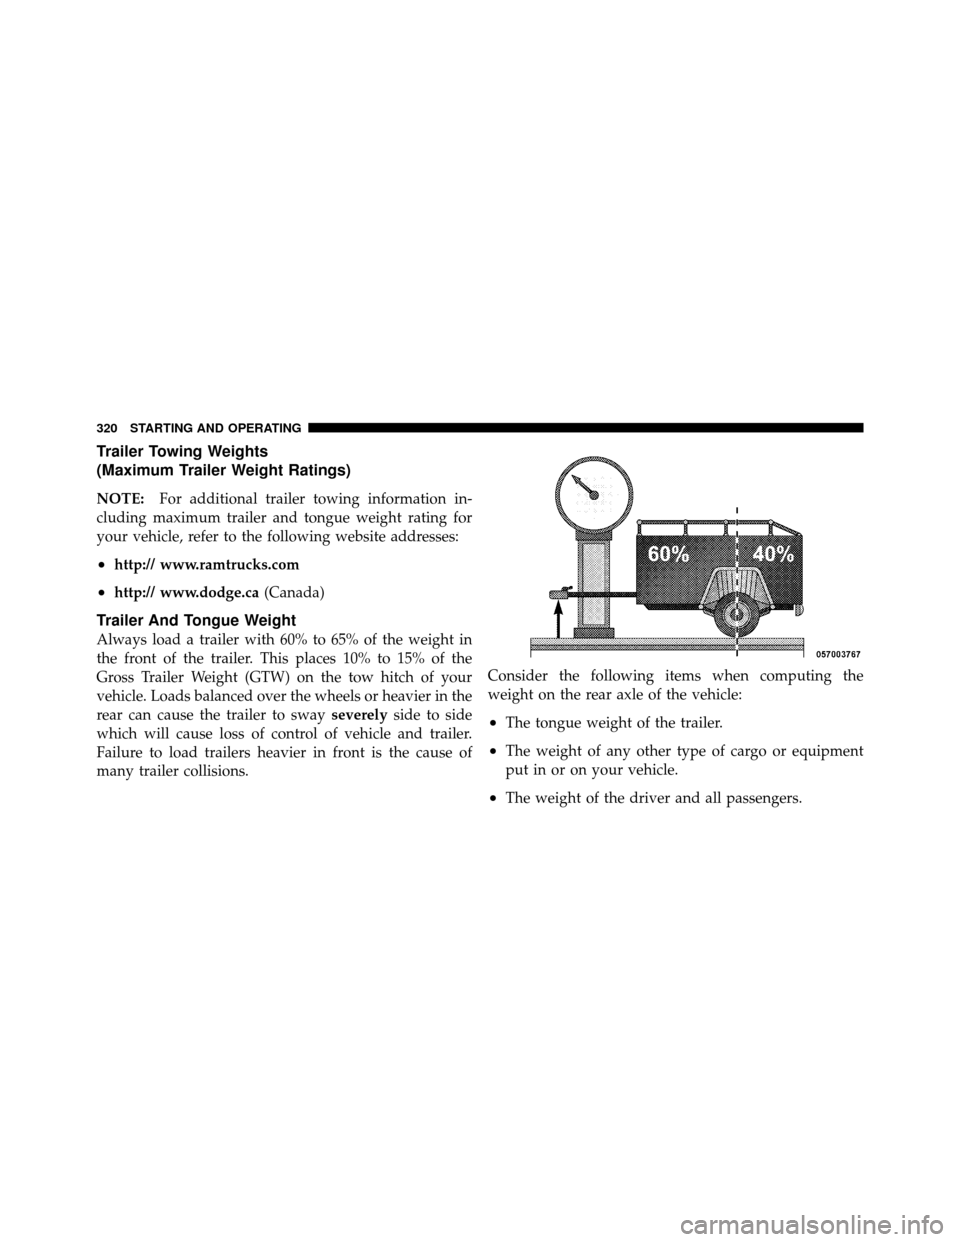
Trailer And Tongue Weight
Always load a trailer with 60% to 65% of the weight in
the front of the trailer. This places 10% to 15% of the
Gross Trailer Weight (GTW) on the tow hitch of your
vehicle. Loads balanced over the wheels or heavier in the
rear can cause the trailer to sway severelyside to side
which will cause loss of control of vehicle and trailer.
Failure to load trailers heavier in front is the cause of
many trailer collisions. Consider the following items when computing the
weight on the rear axle of the vehicle:
•The tongue weight of the trailer.
•The weight of any other type of cargo or equipment
put in or on your vehicle.
•The weight of the driver and all passengers.
320 STARTING AND OPERATING
Page 324 of 452
WARNING! (Continued)
•Make certain that the load is secured in the trailer
and will not shift during travel. When trailering
cargo that is not fully secured, dynamic load shifts
can occur that may be difficult for the driver to
control. You could lose control of your vehicle and
have a collision.
•When hauling cargo or towing a trailer, do not
overload your vehicle or trailer. Overloading can
cause a loss of control, poor performance or dam-
age to brakes, axle, engine, transmission, steering,
suspension, chassis structure or tires.
•Safety chains must always be used between your
vehicle and trailer. Always connect the chains to
the frame or hook retainers of the vehicle hitch.
Cross the chains under the trailer tongue and
allow enough slack for turning corners.(Continued)
WARNING! (Continued)
•Vehicles with trailers should not be parked on a
grade. When parking, apply the parking brake on
the tow vehicle. Put the tow vehicle automatic
transmission in PARK. For four-wheel drive ve-
hicles, make sure the transfer case is not in NEU-
TRAL. Always, block or�chock�the trailer wheels.
•GCWR must not be exceeded.
•Total weight must be distributed between the tow
vehicle and the trailer so that the following four
ratings are not exceeded:
1. GVWR
2. GTW
3. GAWR
4. Tongue weight rating for the trailer hitch uti-
lized (This requirement may limit the ability to
always achieve the 10% to 15% range of tongue
weight as a percentage of total trailer weight.)
322 STARTING AND OPERATING
Page 330 of 452
WARNING!
Do not add a snow plow, winches, or any other
aftermarket equipment to the front of your vehicle.
This could adversely affect the functioning of the
airbag system in a collision and you could be injured.
RECREATIONAL TOWING (BEHIND
MOTORHOME, ETC.)
Two-Wheel Drive Models
Recreational towing of two-wheel drive models is not
allowable. Towing the vehicle with the transmission in
NEUTRAL can cause severe transmission damage. Re-
moval of the driveshaft for towing is not recommended,
since this would allow fluid to drain from the
transmission.
Four-Wheel Drive Models
CAUTION!
•Internal damage to the transfer case will occur if a
front or rear wheel lift is used when recreational
towing.
•The transfer case must be shifted into NEUTRAL
for recreational towing. The NEUTRAL button is
located on the lower left hand corner of the trans-
fer case switch. Shifts into and out of transfer case
NEUTRAL can take place with the transfer case
switch in any mode position.
•Automatic transmissions must be placed in PARK
position for recreational towing.
•Failure to follow these procedures can cause se-
vere transmission and/or transfer case damage.
328 STARTING AND OPERATING
Page 335 of 452
WHAT TO DO IN EMERGENCIES
CONTENTS
�Hazard Warning Flashers ................ 334
� Jacking And Tire Changing ............... 335
▫ Jack Location ....................... 335
▫ Removing The Spare Tire ............... 337
▫ Preparations ........................ 340
▫ Instructions ........................ 341
▫ To Stow The Flat Or Spare .............. 345�
Jump-Starting Procedures ................ 345
▫ Preparations For Jump-Start ............. 346
▫ Jump-Starting Procedure ............... 347
� Freeing A Stuck Vehicle ................. 349
� Emergency Tow Hooks — If Equipped ...... 351
� Towing A Disabled Vehicle ............... 352
▫ Four-Wheel Drive Vehicles .............. 352
▫ Two-Wheel Drive Vehicles .............. 352
6