2011 DODGE CALIBER fuse
[x] Cancel search: fusePage 426 of 486

Instrument Panel Bezels
CAUTION!
When installing hanging air fresheners in your ve-
hicle, read the installation instructions carefully.
Some air fresheners will damage the finish of
painted or decorated parts if allowed to directly
contact any surface.
Cleaning Plastic Instrument Cluster Lenses
The lenses in front of the instruments in this vehicle are
molded in clear plastic. When cleaning the lenses, care
must be taken to avoid scratching the plastic.
1. Clean with a wet, soft rag. A mild soap solution may
be used, but do not use high alcohol content or abrasive
cleaners. If soap is used, wipe clean with a clean, damp
rag.
2. Dry with a soft cloth.
Seat Belt Maintenance
Do not bleach, dye or clean the seat belts with chemical
solvents or abrasive cleaners. This will weaken the fabric.
Sun damage can also weaken the fabric.
If the seat belts need cleaning, use a mild soap solution or
lukewarm water. Do not remove the seat belts from the
car to wash them. Dry with a soft cloth.
Replace the seat belts if they appear frayed or worn or if
the buckles do not work properly.
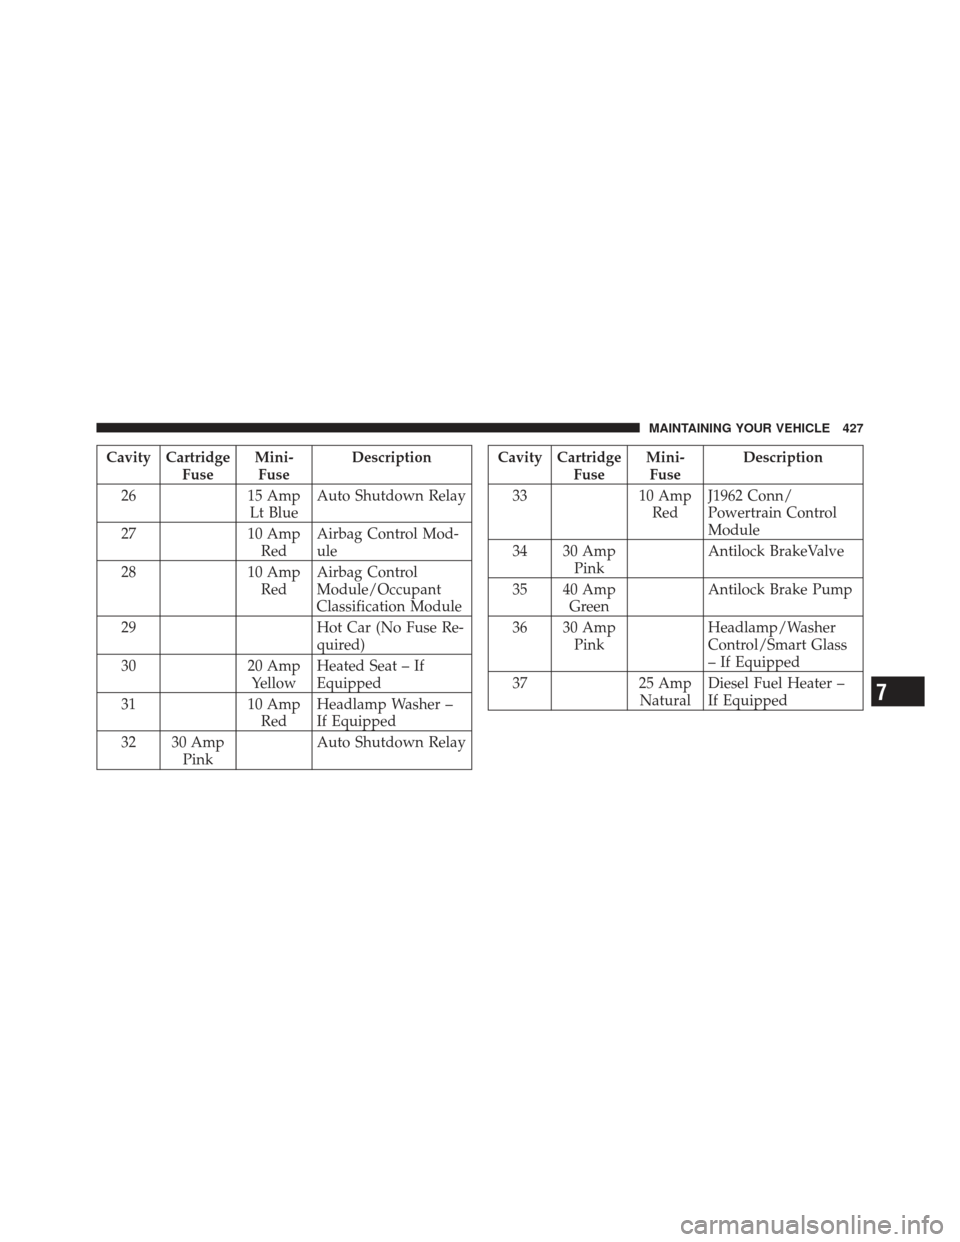
FUSES
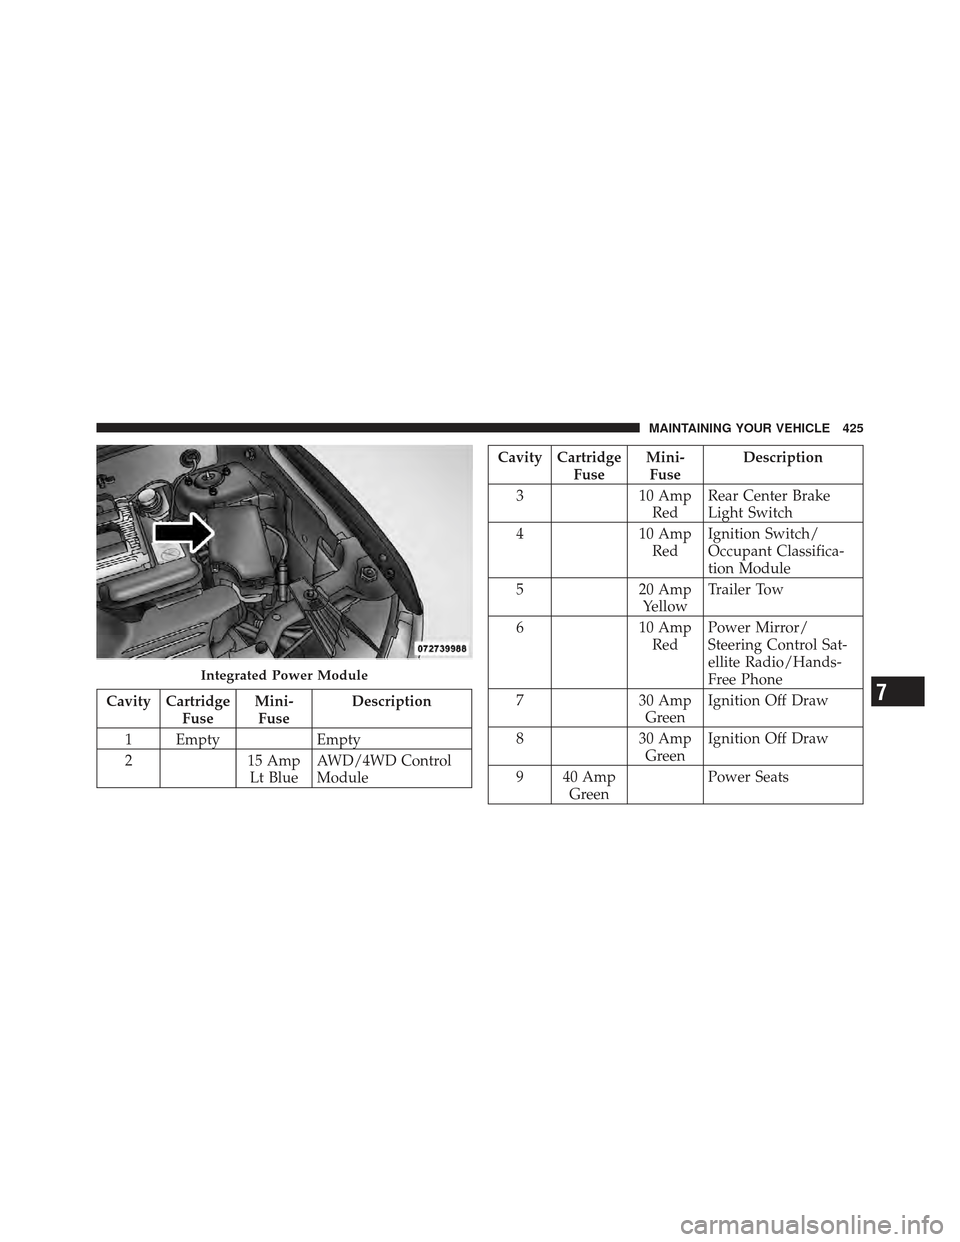
Integrated Power Module
The Integrated Power Module is located in the engine
compartment near the air cleaner assembly. This center
contains cartridge fuses and mini-fuses. A label that
identifies each component may be printed on the inside
of the cover. Refer to “Engine Compartment” in “Main-
taining Your Vehicle” for further information.
424 MAINTAINING YOUR VEHICLE
Page 427 of 486

Cavity CartridgeFuseMini-
Fuse Description
1 Empty Empty
2 15 Amp
Lt Blue AWD/4WD Control
Module
Cavity Cartridge
FuseMini-
Fuse Description
3 10 Amp
Red Rear Center Brake
Light Switch
4 10 Amp
Red Ignition Switch/
Occupant Classifica-
tion Module
5 20 Amp
Yellow Trailer Tow
6 10 Amp
Red Power Mirror/
Steering Control Sat-
ellite Radio/Hands-
Free Phone
7 30 Amp
Green Ignition Off Draw
8 30 Amp
Green Ignition Off Draw
9 40 Amp Green Power Seats
Integrated Power Module
7
MAINTAINING YOUR VEHICLE 425
Page 428 of 486

Cavity CartridgeFuseMini-
Fuse Description
10 20 Amp
Yellow Power Locks/Interior
Lighting
11 15 Amp
Lt Blue Power Outlet
12 20 Amp
Yellow 115V AC Inverter
13 20 Amp
Yellow Cigar Lighter
14 10 Amp
Red Instrument Cluster
15 40 Amp Green Radiator Fan
16 15 Amp
Lt Blue Dome Lamp/
Sunroof/Rear Wiper
Motor
17 10 Amp
Red Wireless Control
ModuleCavity Cartridge
FuseMini-
Fuse Description
18 40 Amp Green Auto Shutdown Relay
19 20 Amp
Yellow Radio Amplifiers
20 15 Amp
Lt Blue Radio
21 10 Amp
Red Intrusion Module/
Siren – If Equipped
22 10 Amp
Red Heating, AC/
Compass
23 15 Amp
Lt Blue Auto Shutdown Relay
24 15 Amp
Lt Blue Power Sunroof
25 10 Amp
Red Heated Mirror – If
Equipped
426 MAINTAINING YOUR VEHICLE
Page 429 of 486

Cavity CartridgeFuseMini-
Fuse Description
26 15 Amp
Lt Blue Auto Shutdown Relay
27 10 Amp
Red Airbag Control Mod-
ule
28 10 Amp
Red Airbag Control
Module/Occupant
Classification Module
29 Hot Car (No Fuse Re-
quired)
30 20 Amp
Yellow Heated Seat – If
Equipped
31 10 Amp
Red Headlamp Washer –
If Equipped
32 30 Amp Pink Auto Shutdown RelayCavity Cartridge
FuseMini-
Fuse Description
33 10 Amp
Red J1962 Conn/
Powertrain Control
Module
34 30 Amp Pink Antilock BrakeValve
35 40 Amp Green Antilock Brake Pump
36 30 Amp Pink Headlamp/Washer
Control/Smart Glass
– If Equipped
37 25 Amp
Natural Diesel Fuel Heater –
If Equipped
7
MAINTAINING YOUR VEHICLE 427
Page 430 of 486

CAUTION!
•When installing the IPM cover, it is important to
ensure the cover is properly positioned and fully
latched. Failure to do so may allow water to get
into the IPM, and possibly result in an electrical
system failure.
•When replacing a blown fuse, it is important to
use only a fuse having the correct amperage rating.
The use of a fuse with a rating other than indicated
may result in a dangerous electrical system over-
load. If a properly rated fuse continues to blow, it
indicates a problem in the circuit that must be
corrected.
VEHICLE STORAGE
If you will not be using your vehicle for more than
21 days, you may want to take steps to preserve your
battery.
•Disengage the mini-fuse in the Power Distribution
Center labeled IOD (Ignition Off-Draw).
•Or disconnect the negative cable from the battery.
•Anytime you store your vehicle, or keep it out of
service (i.e., vacation) for two weeks or more, run the
air conditioning system at idle for about five minutes
in the fresh air and high blower setting. This will
ensure adequate system lubrication to minimize the
possibility of compressor damage when the system is
started again.
428 MAINTAINING YOUR VEHICLE
Page 473 of 486

Engine Oil....................... 402,436
Flashers .............................. 372
Hazard Warning ..................... 372
Turn Signal .................... 88,199,431
Flooded Engine Starting ................... 294
Fluid Capacities ......................... 435
Fluid Leaks ............................. 88
Fluid Level Checks Automatic Transaxle .................. 418
Power Steering ...................... 308
Fluid, Brake ........................... 437
Fluids ................................ 436
Fluids, Lubricants and Genuine Parts .......... 436
Fog Lights ....................... 148,200,430
Folding Rear Seat ........................ 142
Folding Rear Seat (Sedan) .................. 142
Freeing A Stuck Vehicle ................... 386
Front Position Light ...................... 429 Fuel
.............................. 350,436
Adding ........................... 354
Additives .......................... 352
Capacity ........................... 435
Clean Air .......................... 350
Ethanol ........................... 351
Filler Cap (Gas Cap) ...............192,354
Filler Door (Gas Cap) .................. 192
Gasoline ........................... 350
Gauge ............................ 192
Light ............................. 192
Materials Added ..................... 352
Methanol .......................... 351
Octane Rating ....................... 350
Requirements ....................... 350
Tank Capacity ....................... 435
Fuel System Caution ..................... 355
Fueling ............................... 354
Fuses ................................ 424
10
INDEX 471
Page 475 of 486

HitchesTrailer Towing ....................... 361
HomeLink® (Garage Door Opener) Transmitter . . 158
Hood Release .......................... 144
Ignition ............................... 12
Key ............................... 12
Ignition Key Removal ..................... 12
Immobilizer (Sentry Key) ................... 14
Infant Restraint .......................... 75
Information Center, Vehicle ................. 205
Inside Rearview Mirror .................... 93
Instrument Cluster .................... 189,191
Instrument Panel and Controls .............. 188
Instrument Panel Cover ................... 423
Instrument Panel Lens Cleaning ............. 424
Integrated Power Module (Fuses) ............ 424
Interior Appearance Care .................. 422
Intermittent Wipers (Delay Wipers) ........... 153Introduction
............................. 4
Jack Location ........................... 374
Jack Operation ....................... 374,376
Jacking Instructions ...................... 376
Jump Starting .......................... 381
Key-In Reminder ......................... 14
Key, Programming ........................ 16
Key, Replacement ........................ 15
Key, Sentry (Immobilizer) ................... 14
Keyless Entry System (Sedan) ................ 18
Keys ................................. 12
Lane Change and Turn Signals .............. 431
Lap/Shoulder Belts ....................... 41
Latches ................................ 88
Hood ............................. 144
Lead Free Gasoline ...................... 350
10
INDEX 473
Page 485 of 486

291686.ps 11Y532-126-AA Chrysler 1" gutter 07/14/2010 08:26:13
VEHICLES SOLD IN CANADA
With respect to any Vehicles Sold in Canada, the name
Chrysler Group LLC shall be deemed to be deleted and
the name Chrysler Canada Inc. used in substitution
therefore.
DRIVING AND ALCOHOL
Drunken driving is one of the most frequent causes of
accidents.
Your driving ability can be seriously impaired with blood
alcohol levels far below the legal minimum. If you are
drinking, don’t drive. Ride with a designated non-drinking
driver, call a cab, a friend, or use public transportation.
WARNING!
Driving after drinking can lead to an accident. Your
perceptions are less sharp, your reflexes are slower,
and your judgment is impaired when you have been
drinking. Never drink and then drive.
This manual illustrates and describes the operation of
features and equipment that are either standard or op-
tional on this vehicle. This manual may also include a
description of features and equipment that are no longer
available or were not ordered on this vehicle. Please
disregard any features and equipment described in this
manual that are not on this vehicle.
Chrysler Group LLC reserves the right to make changes
in design and specifications, and/or make additions to or
improvements to its products without imposing any
obligation upon itself to install them on products previ-
ously manufactured.
Copyright © 2010 Chrysler Group LLC
INSTALLATION OF RADIO TRANSMITTING
EQUIPMENT
Special design considerations are incorporated into this
vehicle’s electronic system to provide immunity to radio
frequency signals. Mobile two-way radios and telephone
equipment must be installed properly by trained person-
nel. The following must be observed during installation.
The positive power connection should be made directly
to the battery and fused as close to the battery as possible.
The negative power connection should be made to body
sheet metal adjacent to the negative battery connection.
This connection should not be fused.
Antennas for two-way radios should be mounted on the
roof or the rear area of the vehicle. Care should be used
in mounting antennas with magnet bases. Magnets may
affect the accuracy or operation of the compass on
vehicles so equipped.The antenna cable should be as short as practical and
routed away from the vehicle wiring when possible. Use
only fully shielded coaxial cable.
Carefully match the antenna and cable to the radio to
ensure a low Standing Wave Ratio (SWR).
Mobile radio equipment with output power greater than
normal may require special precautions.
All installations should be checked for possible interfer-
ence between the communications equipment and the
vehicle’s electronic systems.