Page 79 of 494
seats such that two seats share a common lower anchor-
age. If you are installing LATCH-compatible child re-
straints in adjacent rear seating positions, you can use the
LATCH anchors or the vehicle’s seat belt for the outboard
position, but you must use the vehicle’s seat belt at the
center position. If your child restraints are not LATCH-
compatible, you can only install the child restraints using
the vehicle’s seat belts. Please refer to “Installing The
LATCH-Compatible Child Restraint System” for typical
installation instructions.
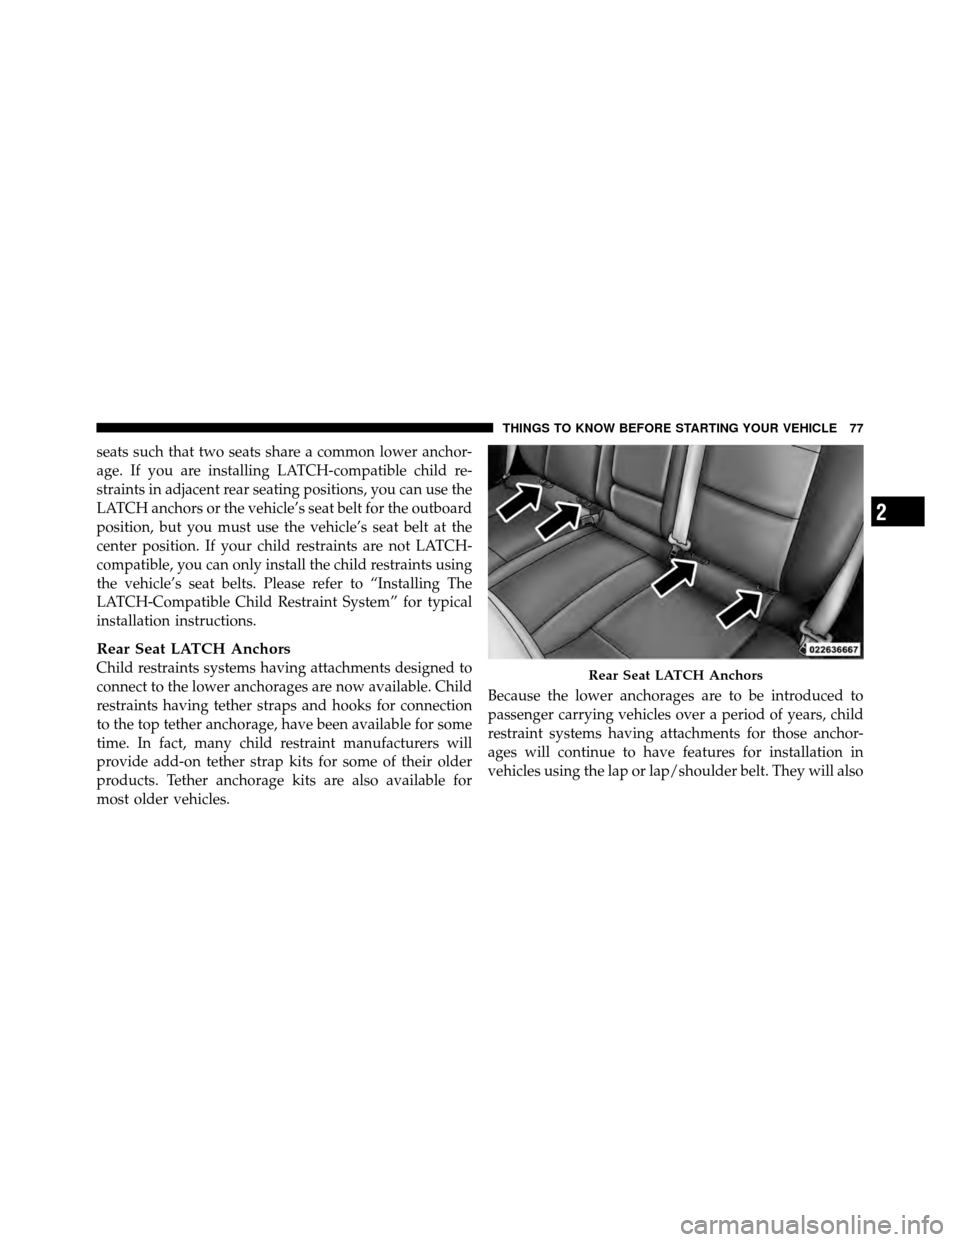
Rear Seat LATCH Anchors
Child restraints systems having attachments designed to
connect to the lower anchorages are now available. Child
restraints having tether straps and hooks for connection
to the top tether anchorage, have been available for some
time. In fact, many child restraint manufacturers will
provide add-on tether strap kits for some of their older
products. Tether anchorage kits are also available for
most older vehicles.Because the lower anchorages are to be introduced to
passenger carrying vehicles over a period of years, child
restraint systems having attachments for those anchor-
ages will continue to have features for installation in
vehicles using the lap or lap/shoulder belt. They will alsoRear Seat LATCH Anchors
2
THINGS TO KNOW BEFORE STARTING YOUR VEHICLE 77
Page 84 of 494
•N/A — Not Applicable
•ALR — Automatic Locking Retractor
Installing a Child Restraint with an ALR:
1. To install a child restraint with ALR, first, pull enough
of the seat belt webbing from the retractor to route it
through the belt path of the child restraint. Slide the latch
plate into the buckle until you hear a “click.” Next,
extract all the seat belt webbing out of the retractor and
then allow the belt to retract into the retractor. As the belt
retracts, you will hear a ratcheting sound. This indicates
the safety belt is now in the Automatic Locking mode.
2. Finally, pull on any excess webbing to tighten the lap
portion around the child restraint. Any seat belt system
will loosen with time, so check the belt occasionally, and
pull it tight if necessary.
In the rear seat, you may have trouble tightening the
lap/shoulder belt on the child restraint because the buckle or latch plate is too close to the belt path opening
on the restraint. Disconnect the latch plate from the
buckle and twist the short buckle-end belt several times
to shorten it. Insert the latch plate into the buckle with the
release button facing out.
If the belt still can’t be tightened, or if pulling and
pushing on the restraint loosens the belt, disconnect the
latch plate from the buckle, turn the buckle around, and
insert the latch plate into the buckle again. If you still
can’t make the child restraint secure, try a different
seating position.
Children Too Large For Booster Seats
Children who are large enough to wear the shoulder belt
comfortably, and whose legs are long enough to bend
over the front of the seat when their back is against the
seatback, should use the lap/shoulder belt in a rear seat.
Make sure that:
•The child is upright in the seat.
82 THINGS TO KNOW BEFORE STARTING YOUR VEHICLE
Page 86 of 494
A new engine may consume some oil during its first few
thousand miles (kilometers) of operation. This should be
considered a normal part of the break-in and not inter-
preted as an indication of difficulty.
SAFETY TIPS
Transporting Passengers
NEVER TRANSPORT PASSENGERS IN THE CARGO
AREA.
WARNING!
•Do not leave children or animals inside parked
vehicles in hot weather. Interior heat build-up may
cause serious injury or death.(Continued)
WARNING! (Continued)
•It is extremely dangerous to ride in a cargo area,
inside or outside of a vehicle. In a collision, people
riding in these areas are more likely to be seri-
ously injured or killed.
•Do not allow people to ride in any area of your
vehicle that is not equipped with seats and seat
belts.
•Be sure everyone in your vehicle is in a seat and
using a seat belt properly.
84 THINGS TO KNOW BEFORE STARTING YOUR VEHICLE
Page 92 of 494

�Voice Command — If Equipped ........... 128
▫ Voice Command System Operation ........ 128
▫ Commands ........................ 129
▫ Voice Training ...................... 133
� Seats .............................. 133
▫ Power Seats — If Equipped ............. 133
▫ Heated Seats — If Equipped ............ 136
▫ Manual Front Seat Adjustments .......... 137
▫ Driver Seat Manual Height Adjuster — If
Equipped .......................... 138
▫ Reclining Seats ...................... 139
▫ Lumbar Support — If Equipped .......... 140
▫ Fold-Flat Front Passenger Seat ........... 140▫
Head Restraints ..................... 141
▫ Folding Rear Seat .................... 145
▫ Folding Rear Seat Center Armrest ........ 146
� To Open And Close The Hood ............ 146
� Lights ............................. 148
▫ Multifunction Lever .................. 148
▫ Headlights And Parking Lights .......... 149
▫ Automatic Headlights — If Equipped ...... 149
▫ Headlight Time Delay ................. 150
▫ Turn Signals ........................ 150
▫ Lane Change Assist ................... 151
▫ High/Low Beam Switch ............... 151
▫ Flash-To-Pass ....................... 151
90 UNDERSTANDING THE FEATURES OF YOUR VEHICLE
Page 135 of 494
Voice Training
For users experiencing difficulty with the system recog-
nizing their voice commands or numbers the Uconnect™
Voice “Voice Training” feature may be used.
1. Press the Voice Command
button, say “System
Setup” and once you are in that menu then say “Voice
Training.” This will train your own voice to the system
and will improve recognition.
2. Repeat the words and phrases when prompted by
Uconnect™ Voice. For best results, the “Voice Training”
session should be completed when the vehicle is parked,
engine running, all windows closed, and the blower fan
switched off. This procedure may be repeated with a new
user. The system will adapt to the last trained voice only.
SEATS
Seats are a part of the Occupant Restraint System of the
vehicle.
WARNING!
•It is dangerous to ride in a cargo area, inside or
outside of a vehicle. In a collision, people riding in
these areas are more likely to be seriously injured
or killed.
•Do not allow people to ride in any area of your
vehicle that is not equipped with seats and seat
belts. In a collision, people riding in these areas
are more likely to be seriously injured or killed.
•Be sure everyone in your vehicle is in a seat and
using a seat belt properly.
Power Seats — If Equipped
The power seat switches are on the outboard side of the
seat near the floor. Use the seat control switch to move
3
UNDERSTANDING THE FEATURES OF YOUR VEHICLE 133
Page 136 of 494
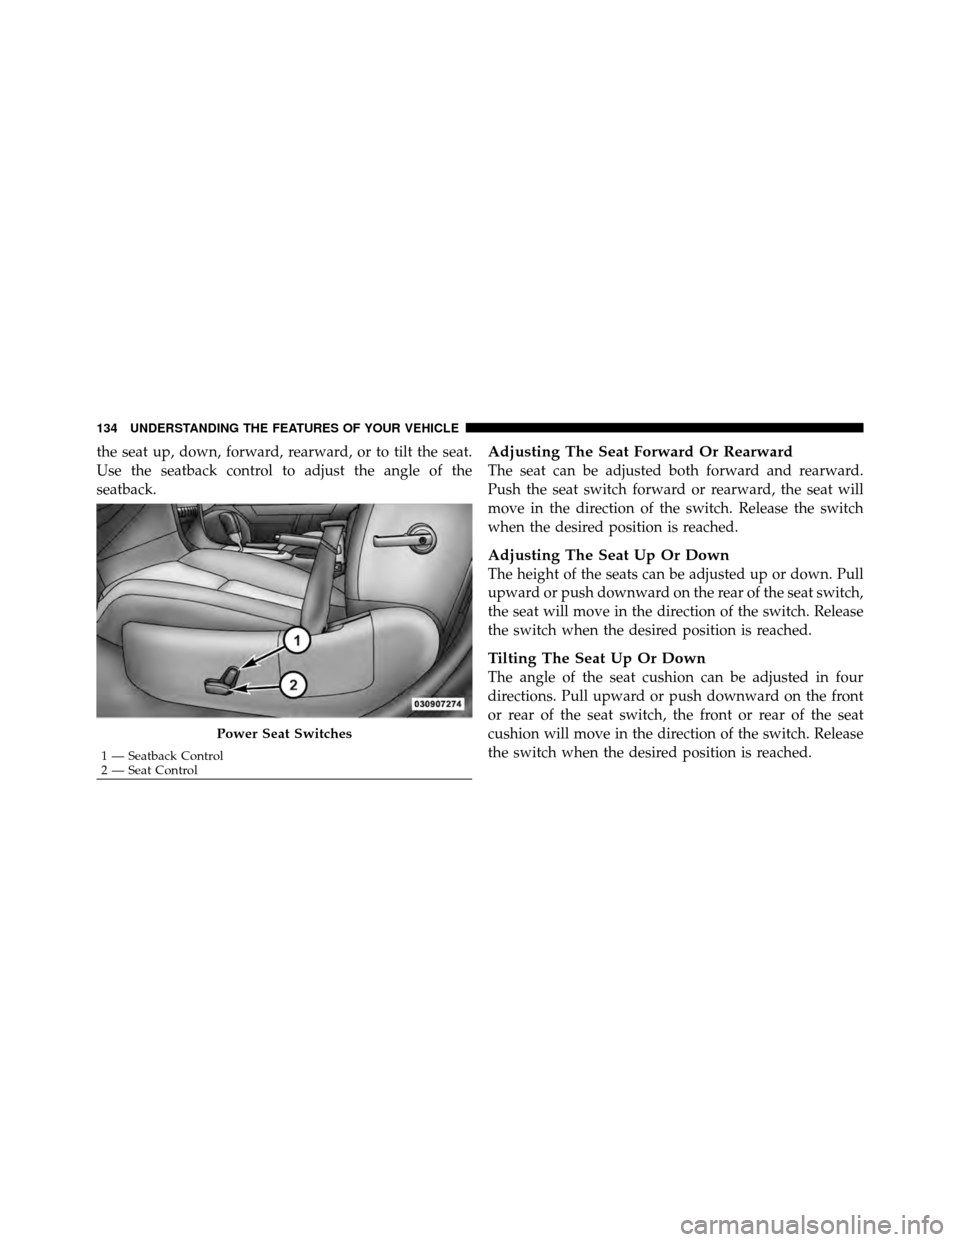
the seat up, down, forward, rearward, or to tilt the seat.
Use the seatback control to adjust the angle of the
seatback.Adjusting The Seat Forward Or Rearward
The seat can be adjusted both forward and rearward.
Push the seat switch forward or rearward, the seat will
move in the direction of the switch. Release the switch
when the desired position is reached.
Adjusting The Seat Up Or Down
The height of the seats can be adjusted up or down. Pull
upward or push downward on the rear of the seat switch,
the seat will move in the direction of the switch. Release
the switch when the desired position is reached.
Tilting The Seat Up Or Down
The angle of the seat cushion can be adjusted in four
directions. Pull upward or push downward on the front
or rear of the seat switch, the front or rear of the seat
cushion will move in the direction of the switch. Release
the switch when the desired position is reached.
Power Seat Switches
1 — Seatback Control
2 — Seat Control
134 UNDERSTANDING THE FEATURES OF YOUR VEHICLE
Page 137 of 494
Reclining The Seatback
The angle of the seatback can be adjusted forward or
backward. Push the seatback switch forward or rear-
ward, the seat will move in the direction of the switch.
Release the switch when the desired position is reached.
WARNING!
•Adjusting a seat while driving may be dangerous.
Moving a seat while driving could result in loss of
control which could cause a collision and serious
injury or death.
•Seats should be adjusted before fastening the seat
belts and while the vehicle is parked. Serious
injury or death could result from a poorly adjusted
seat belt.(Continued)
WARNING! (Continued)
•Do not ride with the seatback reclined so that the
shoulder belt is no longer resting against your
chest. In a collision you could slide under the seat
belt, which could result in serious injury or death.
CAUTION!
Do not place any article under a power seat or
impede its ability to move as it may cause damage to
the seat controls. Seat travel may become limited if
movement is stopped by an obstruction in the seat’s
path.
3
UNDERSTANDING THE FEATURES OF YOUR VEHICLE 135
Page 138 of 494

Heated Seats — If Equipped
There are two heated seat switches that allow the driver
and passenger to operate the seats independently. The
controls for each heater are located near the bottom
center of the instrument panel (below the climate con-
trols).
You can choose from HIGH, LOW or OFF heat settings.
Amber indicator lights in each switch indicate the level of
heat in use. Two indicator lights will illuminate for
HIGH, one for LOW and none for OFF.Press the switch once to select HIGH-level
heating. Press the switch a second time to select
LOW-level heating. Press the switch a third
time to shut the heating elements OFF. NOTE:
Once a heat setting is selected, heat will be felt
within two to five minutes.
When the HIGH-level setting is selected, the heater will
provide a boosted heat level during the first four minutes
of operation. Then, the heat output will drop to the
normal HIGH-level. If the HIGH-level setting is selected,
the system will automatically switch to LOW-level after a
maximum of 60 minutes of continuous operation. At that
time, the number of illuminated LEDs changes from two
to one, indicating the change. The LOW-level setting will
turn OFF automatically after a maximum of 45 minutes.
136 UNDERSTANDING THE FEATURES OF YOUR VEHICLE