Page 56 of 396

A few seconds after the ignition is switched
on, the distance recorder resumes its normal
operation. The spanner remains on
.
The distance remaining may be
weighted by the time factor, depending
on the type of driving.
Therefore, the spanner may also come
on if you have exceeded the two year
ser vice inter val.
Service indicator zero reset
After each ser vice, the ser vice indicator must
be reset to zero.
The procedure for resetting to zero is as
follows:
�)
switch off the ignition,
�)
press and hold the ".../000"
trip distance
recorder zero reset button,
�)
switch on the ignition; the distance recorder
display begins a countdown,
�)
when the screen indicates "=/0"
and the
spanner disappears, release the button. This operation cannot be carried
out while a reminder of the ser vicing
information is being displayed.
Following this operation, if you wish to
disconnect the battery, lock the vehicle
and wait at least five minutes for the
zero reset to be registered.
Recalling the service information
You can recall the ser vice information at any
time.
�)
Briefly press the ".../000"
trip distance
recorder zero reset button.
The ser vice information is displayed for a
few seconds, in the total distance recorder
line or in the instrument panel central
colour screen, according to version.
Service overdue
For a few seconds after the ignition is switched on,
the spanner flashes
to indicate that the ser vice
must be carried out as soon as possible.
Example:
the ser vice is overdue by 180 miles
(300 km).
For a few seconds after the ignition is switched on,
the screen indicates:
Page 57 of 396
55Monitoring
Manual test in the central colour screen associated with the satellite navigation system
This function allows you to check the status of the vehicle systems (reminder of the "activated"/"deactivated" status of the configurable functions) and
to display the alerts log.
�)
With the engine running, to star t a manual
test, briefly press the ".../000"
button on
the instrument panel. The following information appears successively
in the instrument panel central colour screen:
- engine oil level indicator
(see corresponding section),
- ser vice indicator (see corresponding
section),
- under-inflation detection (if your vehicle
is fitted with this system; see the "Safety"
section),
- current warnings and aler t messages, if
any (see corresponding section for the
warning lamp or system concerned),
- status of configurable functions
(see "Multifunction screens"). This information also appears every
time the ignition is switched on
(automatic test).
Page 59 of 396

57Monitoring
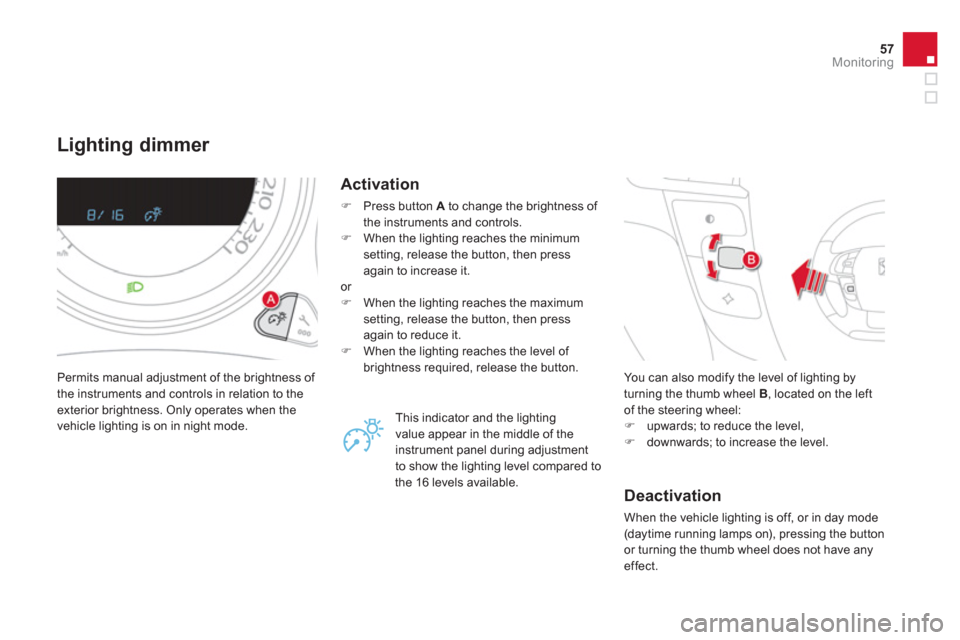
Lighting dimmer
Permits manual adjustment of the brightness of
the instruments and controls in relation to the
exterior brightness. Only operates when the
vehicle lighting is on in night mode.
Activation
�)
Press button A
to change the brightness of
the instruments and controls.
�)
When the lighting reaches the minimum
setting, release the button, then press
again to increase it.
or
�)
When the lighting reaches the maximum
setting, release the button, then press
again to reduce it.
�)
When the lighting reaches the level of
brightness required, release the button.
This indicator and the lighting
value appear in the middle of the
instrument panel during adjustment
to show the lighting level compared to
the 16 levels available. You can also modify the level of lighting by
turning the thumb wheel B
, located on the left
of the steering wheel:
�)
upwards; to reduce the level,
�)
downwards; to increase the level.
Deactivation
When the vehicle lighting is off, or in day mode
(daytime running lamps on), pressing the button
or turning the thumb wheel does not have any
effect.
Page 60 of 396
System allowing cer tain screens to be switched
off for night driving.
The instrument panel remains on with the
vehicle speed, electronic or automatic gearbox
gear selected, cruise control or speed limiter
information, if in use, and the low fuel alerts as
appropriate.
If there is an aler t or a change in a function
or to a setting, the black panel mode is
interrupted.
Black panel (black screen)
Activation
�)
With the vehicle lighting on, press this
button again to activate the black panel.
�)
Press once more to illuminate on the
various screens again.
In the instrument panel, you can change the
colour of its dials (button A
) independently from
that of the screens (button B
).
There are five colour variants, from white to
blue.
�)
press the appropriate button as many times
as needed to obtain the desired colour.
Customising the instrument
panel colours
Page 61 of 396

59Monitoring
Customising the
polyphonic sounds
This menu allows you to choose a family of
polyphonic sounds from the four available.
These sounds are grouped together in a family
and are adapted to suit the situation and
context (alert, confirmation, rejection, direction
indicators, lighting left on, key in ignition...).
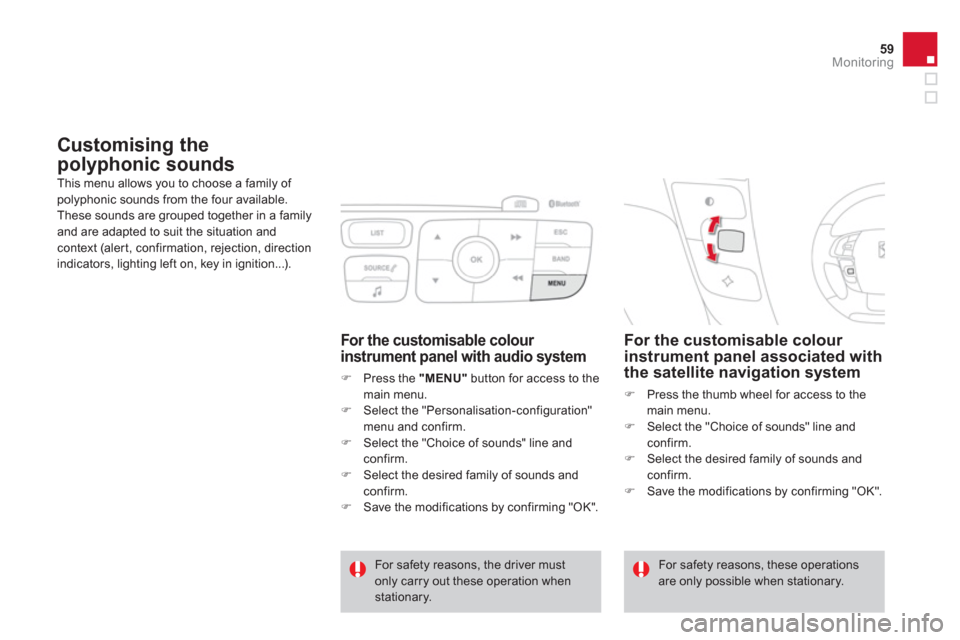
For the customisable colour
instrument panel associated with
the satellite navigation system
�)
Press the thumb wheel for access to the
main menu.
�)
Select the "Choice of sounds" line and
confirm.
�)
Select the desired family of sounds and
confirm.
�)
Save the modifications by confirming "OK".
For safety reasons, the driver must
only carry out these operation when
stationary. For safety reasons, these operations
are only possible when stationary.
For the customisable colour
instrument panel with audio system
�)
Press the "MENU"
button for access to the
main menu.
�)
Select the "Personalisation-configuration"
menu and confirm.
�)
Select the "Choice of sounds" line and
confirm.
�)
Select the desired family of sounds and
confirm.
�)
Save the modifications by confirming "OK".
Page 70 of 396

Central colour screen and instrument panel controls
associated with the satellite navigation system
This group of controls allows:
- when stationary
, configuration of the
vehicle, central screen and instrument
panel parameters (driving and comfor t
systems, language, units, sounds...),
- when stationar y and while driving
,
scrolling the active functions available
(trip computer, navigation-guidance...).
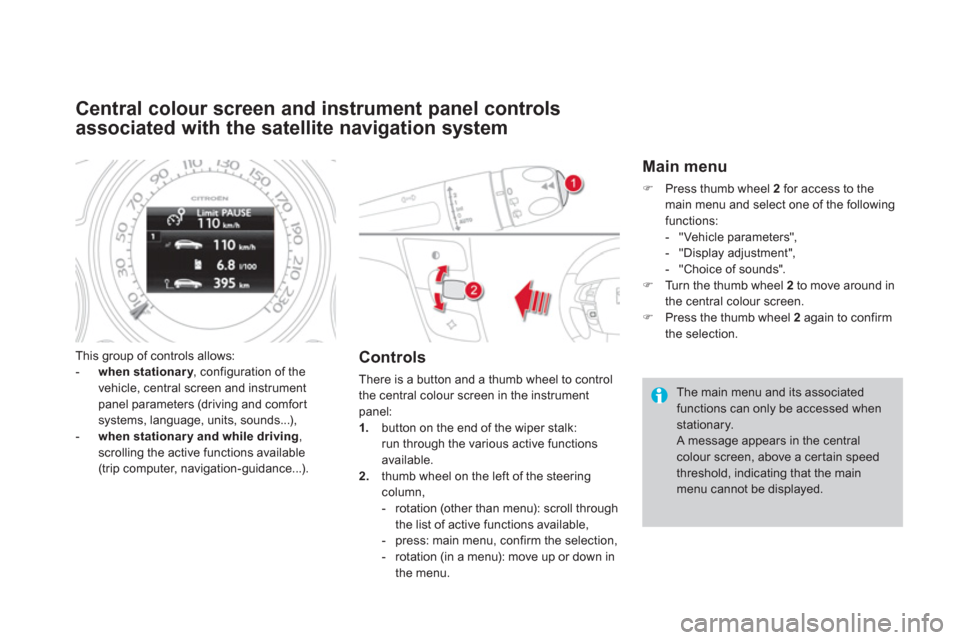
Controls
There is a button and a thumb wheel to control
the central colour screen in the instrument
panel:
1.
button on the end of the wiper stalk:
run through the various active functions
available.
2.
thumb wheel on the left of the steering
column,
- rotation (other than menu): scroll through
the list of active functions available,
- press: main menu, confirm the selection,
- rotation (in a menu): move up or down in
the menu.
Main menu
�)
Press thumb wheel 2
for access to the
main menu and select one of the following
functions:
- "Vehicle parameters",
- "Display adjustment",
- "Choice of sounds".
�)
Turn the thumb wheel 2
to move around in
the central colour screen.
�)
Press the thumb wheel 2
again to confirm
the selection.
The main menu and its associated
functions can only be accessed when
stationary.
A message appears in the central
colour screen, above a cer tain speed
threshold, indicating that the main
menu cannot be displayed.
Page 110 of 396

This system allows automatic simultaneous locking of the doors and boot as soon as the speed of the vehicle exceeds 6 mph (10 km/h).
Anti-intrusion security
Operation
Activation/Deactivation
You can activate or deactivate this function
permanently.
�)
With the ignition on, press this button
until an audible signal star ts and a
corresponding message is displayed. If one of the doors or the boot is open,
the automatic central locking does not take
place.
This is signalled by the sound of the
locks rebounding, accompanied by
illumination of this warning lamp in the
instrument panel, an audible signal
and the display of an aler t message.
Carr ying long and voluminous
objects
If you want to drive with the boot open,
you should press the central locking
button to lock the the doors. Other wise,
every time the speed of the vehicle
exceeds 6 mph (10 km/h), the locks
will rebound and the alerts mentioned
above will appear.
In the event of a serious impact with
deployment of an airbag, the vehicle's
doors unlock automatically to allow the
exit of occupants and access for the
security services.
Pressing the central locking button unlocks
the vehicle.
Above 6 mph (10 km/h), this locking is
temporary. The state of the system stays in memory when
switching off the ignition.
Page 119 of 396

11 7Access
Fuel tank
Capacity of the tank: approximately 60 litres.
Low fuel level
Refuelling
Additions of fuel must be of at least 5 litres to
be registered by the fuel gauge.
Opening the filler cap may result in an inrush of
air. This vacuum is entirely normal and results
from the sealing of the fuel system.
�)
Press control A
until the automatic opening
of the fuel flap is heard.
This control remains active for a few minutes
after switching off the ignition. If necessary,
switch the ignition on again to reactivate it.
�)
Take care to select the pump that delivers
the correct fuel for your vehicle.
�)
Introduce the nozzle so as to push in the
metal non-return flap B.
�)
Make sure that the nozzle is pushed in as
far as possible before star ting to refuel (risk
of blowback).
�)
Maintain this position while refuelling.
�)
Push the fuel flap to close it.
If you are filling your tank to the top, do not
persist after the third cut- off; this could
cause your vehicle to malfunction.
When the low fuel level in the tank
is reached, this warning lamp on
the instrument panel comes on,
accompanied by an audible warning
and a message in the screen.
When it first comes on, around 6 litres of fuel
remain in the tank.
You must refuel as soon as possible to avoid
running out.
With Stop & Star t, never refuel with the
system in STOP mode; you must switch
off the ignition with the key.