Page 33 of 573
WARNING! (Continued)
•Keep Remote Keyless Entry (RKE) transmitters
away from children. Operation of the Remote Start
System, windows, door locks or other controls
could cause serious injury or death.
Remote Start Abort Message On Electronic Vehicle
Information Center (EVIC) — If Equipped
The following messages will display in the EVIC if the
vehicle fails to remote start or exits remote start prema-
turely:
•Remote Start Aborted - Door Ajar
•Remote Start Aborted - Hood Ajar
•Remote Start Aborted - Fuel Low
•Remote Start Disabled - Start Vehicle To ResetThe EVIC message stays active until the ignition is turned
to the ON/RUN position.
To Enter Remote Start Mode
Press and release the REMOTE START button
on the RKE transmitter twice within five sec-
onds. The vehicle doors will lock, the parking
lights will flash and horn will chirp twice (if
programmed). Then, the engine will start and the vehicle
will remain in the Remote Start mode for a 15-minute
cycle.
NOTE:
•If your power door locks were unlocked, Remote Start
will automatically lock the doors.
•The park lights will turn on and remain on during
Remote Start mode.
30 THINGS TO KNOW BEFORE STARTING YOUR VEHICLE
Page 36 of 573
When To Reset Remote Start
The vehicle can be started remotely up to a maximum of
two times. The vehicle is also allowed a maximum of one
failed start, where the Remote Starting sequence was
initiated but the engine stopped cranking without start-
ing. After either of these conditions, or if the Vehicle
Security Alarm system is alarming, or if the PANIC
button was pressed, the vehicle must be reset by cycling
the START/STOP button to the ON/RUN position.
DOOR LOCKS
Manual Door Locks
Lock the front doors by pushing down on the lock knobs
on each door trim panel.If the lock knob is down when you shut either front door,
the door will lock. Make sure the keys are not inside the
vehicle before closing the door.
Manual Door Lock
2
THINGS TO KNOW BEFORE STARTING YOUR VEHICLE 33
Page 48 of 573
WARNING!
There is no anti-pinch protection when the window
is almost closed. To avoid personal injury be sure to
clear your arms, hands, fingers and all objects from
the window path before closing.
Auto Up Reset — If Equipped
To reactivate the Auto Up feature, perform the following
steps after vehicle power is restored:
1. Pull the window switch up to close the window
completely and continue to hold the switch up for an
additional two seconds after the window is closed.2. Push the window switch down firmly to the second
detent to open the window completely and continue to
hold the switch down for an additional two seconds after
the window is fully open.
Sliding Side Door Power Window Switch —
If Equipped
Second row passengers may open and close the sliding
door window by a single switch on the door handle
assembly.
The switches will operate only when the ignition switch
is in the ON/RUN or ACC position and during power
accessory delay.
2
THINGS TO KNOW BEFORE STARTING YOUR VEHICLE 45
Page 74 of 573
CAUTION!
All occupants, including the driver, should not oper-
ate a vehicle or sit in a vehicle’s seat until the head
restraints are placed in their proper positions in order
to minimize the risk of neck injury in the event of an
accident.
NOTE: For more information on properly adjusting and
positioning the head restraint, refer to “Adjusting Active
Head Restraints” in “Understanding The Features Of
Your Vehicle”.
Resetting Active Head Restraints (AHR)
If the Active Head Restraints are triggered in an accident,
you must reset the head restraint on the driver ’s and
front passenger seat. You can recognize when the Active
Head Restraint has been triggered by the fact that they
have moved forward (as shown in step three of the
resetting procedure).
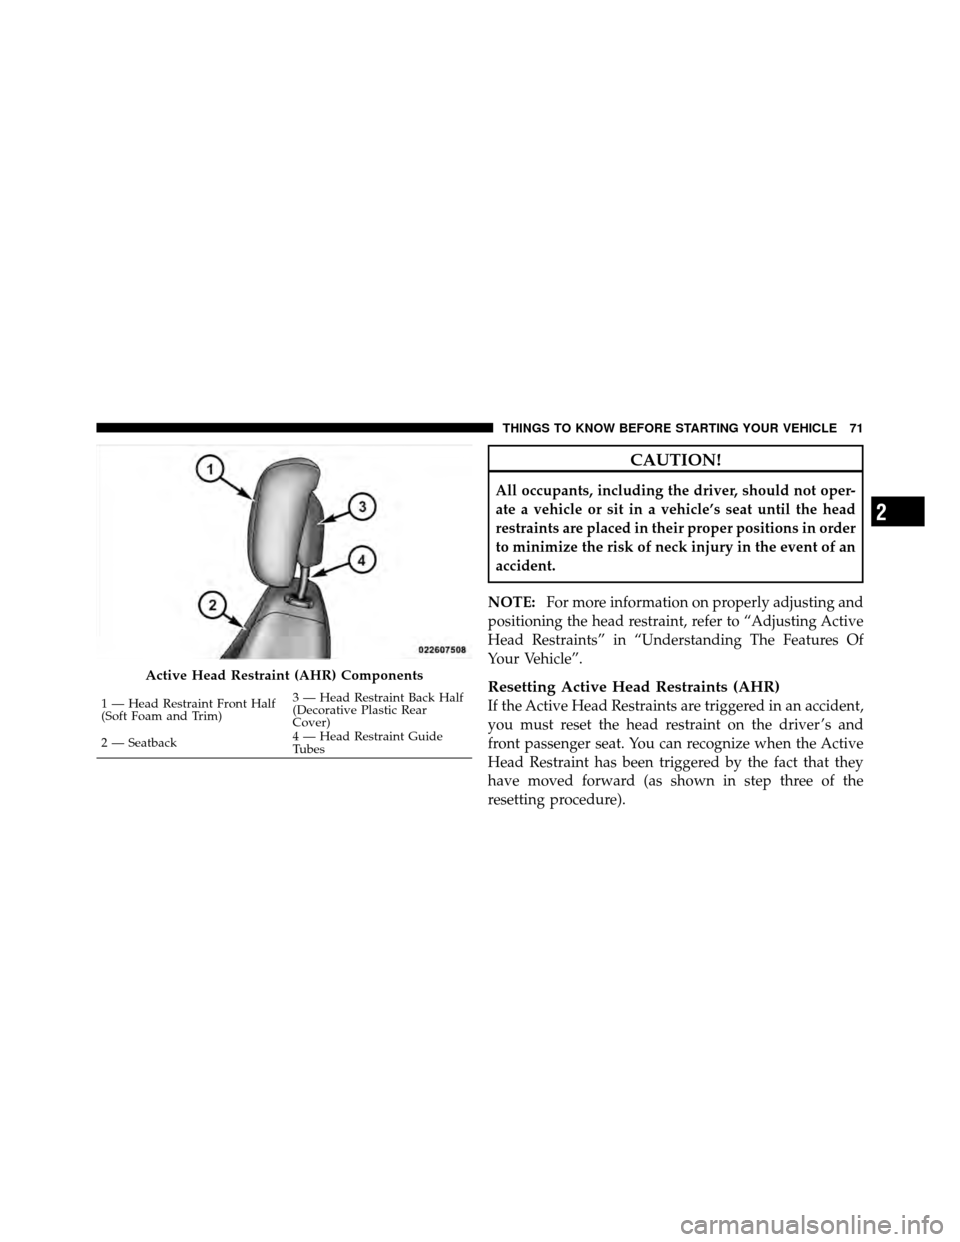
Active Head Restraint (AHR) Components
1 — Head Restraint Front Half
(Soft Foam and Trim) 3 — Head Restraint Back Half
(Decorative Plastic Rear
Cover)
2 — Seatback 4 — Head Restraint Guide
Tubes
2
THINGS TO KNOW BEFORE STARTING YOUR VEHICLE 71
Page 76 of 573
4. The AHR front soft foam and trim half should lock
into the back decorative plastic half.NOTE:•If you have difficulties or problems resetting the
Active Head Restraints, see an authorized dealer.
•For safety reasons, have the Active Head Restraints
checked by a qualified specialist at an authorized
dealer.
3—Final Downward Movement To Engage Locking MechanismAHR In Reset Position
2
THINGS TO KNOW BEFORE STARTING YOUR VEHICLE 73
Page 144 of 573
NOTE:
•The head restraints should only be removed by quali-
fied technicians, for service purposes only. If either of
the head restraints require removal, see your autho-
rized dealer.
•In the event of deployment of an Active Head Re-
straint, refer to “Occupant Restraints/Resetting Active
Head Restraints (AHR)” in “Things To Know Before
Starting Your Vehicle” for further information.
WARNING!
•Do not place items over the top of the Active Head
Restraint, such as coats, seat covers or portable
DVD players. These items may interfere with the
operation of the Active Head Restraint in the event
of a collision and could result in serious injury or
death.(Continued)
Active Head Restraint (Tilted)
3
UNDERSTANDING THE FEATURES OF YOUR VEHICLE 141
Page 165 of 573
3. Pulling strap “4” releases the seatback to return to its
full upright position.
4. Raise the head restraint to its upright position.
WARNING!
In a collision, you or others in your vehicle could be
injured if seats are not properly latched to their floor
attachments. Always be sure the seats are fully
latched.
Tailgate Mode
1. Pull release strap “3”, then pull release strap “4” to
rotate the entire seat rearward.
2. To restore the seat to its upright position, lift up on the
seatback and push forward until the anchors latch.
WARNING!
To avoid serious injury or death, never operate the
vehicle with occupants in the third row seat while in
the tailgate mode.
Plastic Grocery Bag Retainer Hooks
Retainer hooks which will hold plastic grocery bag
handles are built into the seatbacks of all rear seats and
some front seats. The floor supports the partial weight of
the bagged goods.
DRIVER MEMORY SEAT — IF EQUIPPED
The Memory Buttons 1 and 2 on the driver’s door panel
can be programmed to recall the driver’s seat, driver’s
outside mirror, adjustable brake and accelerator pedals,
and radio station preset settings. Your Remote Keyless
Entry (RKE) transmitters can also be programmed to
recall the same positions when the UNLOCK button is
pressed.
162 UNDERSTANDING THE FEATURES OF YOUR VEHICLE
Page 167 of 573
5. Turn on the radio and set the radio station presets (up
to 10 AM and 10 FM stations can be set).
6. Turn the ignition switch to the OFF position and
remove the key.
7. Press and release the SET (S) button located on the
driver’s door.
8. Within five seconds, press and release MEMORY
button 1 or 2 on the driver’s door. The next step must be
performed within 5 seconds if you desire to also use a
RKE transmitter to recall memory positions.
9. Press and release the LOCK button on one of the RKE
transmitters.
10. Insert the ignition key and turn the ignition switch to
the ON position.
11. Select “Remote Linked to Memory” in the Electronic
Vehicle Information Center (EVIC) and enter “Yes”. Referto “Electronic Vehicle Information Center (EVIC)/
Customer-Programmable Features” in “Understanding
Your Instrument Panel” for further information.
12. Repeat the above steps to set the next Memory
position using the other numbered Memory button or to
link another RKE transmitter to memory.
Memory Position Recall
NOTE:
The vehicle must be in PARK to recall memory
positions. If a recall is attempted when the vehicle is not
in PARK, a message will be displayed in the EVIC.
To recall the memory settings for driver one, press
MEMORY button 1 on the driver’s door or the UNLOCK
button on the RKE transmitter linked to memory position 1.
To recall the memory setting for driver two, press
MEMORY button 2 on the driver’s door or the UNLOCK
button on the RKE transmitter linked to Memory Position 2.
164 UNDERSTANDING THE FEATURES OF YOUR VEHICLE