Page 112 of 573
Periodic Safety Checks You Should Make Outside
The Vehicle
Tires
Examine tires for excessive tread wear and uneven wear
patterns. Check for stones, nails, glass, or other objects
lodged in the tread or sidewall. Inspect the tread for cuts
and cracks. Inspect sidewalls for cuts, cracks and bulges.
Check the wheel nuts for tightness. Check the tires
(including spare) for proper cold inflation pressure.
Lights
Have someone observe the operation of exterior lights
while you work the controls. Check turn signal and high
beam indicator lights on the instrument panel.
Door Latches
Check for positive closing, latching, and locking.
Fluid Leaks
Check area under vehicle after overnight parking for fuel,
engine coolant, oil, or other fluid leaks. Also, if gasoline
fumes are detected or if fuel, power steering fluid, or
brake fluid leaks are suspected, the cause should be
located and corrected immediately.2
THINGS TO KNOW BEFORE STARTING YOUR VEHICLE 109
Page 118 of 573
▫Reprogramming A Single
HomeLink� Button................... 207
▫ Security ........................... 207
▫ Troubleshooting Tips .................. 208
▫ General Information .................. 208
� Power Sunroof — If Equipped ............ 209
▫ Opening Sunroof — Express ............ 210
▫ Opening The Sunroof — Manual Mode ..... 210
▫ Closing Sunroof — Express ............. 210
▫ Closing Sunroof — Manual Mode ........ 210
▫ Pinch Protect Feature ................. 210
▫ Pinch Protect Override ................ 211
▫ Venting Sunroof — Express ............. 211▫
Sunshade Operation .................. 211
▫ Wind Buffeting ...................... 211
▫ Sunroof Maintenance ................. 212
▫ Ignition Off Operation ................. 212
▫ Sunroof Fully Closed .................. 212
� Electrical Power Outlets — If Equipped ...... 212
� Power Inverter — If Equipped ............ 217
� Cupholders .......................... 218
▫ Instrument Panel Cupholders ............ 218
▫ Super Console — If Equipped ........... 219
▫ Premium Console Cupholders —
If Equipped ........................ 220
▫ Interior Bottle Holders ................ 220
3
UNDERSTANDING THE FEATURES OF YOUR VEHICLE 115
Page 123 of 573
Using the mirror control switch, press on any of the four
arrows for the direction that you want the mirror to
move.
Driver’s side power mirror preselected positions can be
controlled by the optional Driver Memory Seat Feature.
Refer to “Driver Memory Seat” in “Understanding The
Features Of Your Vehicle” for further information.
Heated Mirrors — If Equipped
These mirrors are heated to melt frost or ice. This
feature is activated whenever you turn on the rear
window defroster. Refer to “Rear Window Features” in
“Understanding The Features Of Your Vehicle” for fur-
ther information.
Tilt Mirrors In Reverse (Available With Memory
Seat Only) — If Equipped
Tilt Mirrors in Reverse provides automatic outside mirror
positioning which will aid the drivers view of the ground
rearward of the front doors. The driver’s outside mirror
will move slightly downward from the present position
when the vehicle is shifted into REVERSE. The driver’s
outside mirror will then return to the original position
when the vehicle is shifted out of REVERSE position.
Each stored memory setting will have an associated Tilt
Mirrors in Reverse position.
NOTE: The Tilt Mirrors in Reverse feature is not en-
abled when delivered from the factory. The Tilt Mirrors in
Reverse feature can be enabled or disabled in the Elec-
tronic Vehicle Information Center (EVIC). Refer to “Elec-
tronic Vehicle Information Center (EVIC)/Customer-
Programmable Features” in “Understanding Your
Instrument Panel” for further information.
120 UNDERSTANDING THE FEATURES OF YOUR VEHICLE
Page 132 of 573

NOTE:In a parking lot situation, oncoming vehicles can
be obscured by vehicles parked on either side. If the
sensors are blocked by other structures or vehicles, the
system will not be able to alert the driver.
When RCP is on and the vehicle is in REVERSE, the
driver is alerted using both the visual and audible
alarms, including radio muting.
WARNING!
RCP is not a Back Up Aid system. It is intended to be
used to help a driver detect an oncoming vehicle in a
parking lot situation. Drivers must be careful when
backing up, even when using RCP. Always check
carefully behind your vehicle, look behind you, and
be sure to check for pedestrians, animals, other
vehicles, obstructions, and blind spots before back-
ing up. Failure to do so can result in serious injury or
death.
Modes Of Operation
Three selectable modes of operation are available in the
Electronic Vehicle Information Center (EVIC). Refer to
�Electronic Vehicle Information Center (EVIC)/Personal
Settings (Customer-Programmable Features)” in “Under-
standing Your Instrument Panel” for further information.
Blind Spot Alert
When operating in Blind Spot Alert mode, the BSM
system will provide a visual alert in the appropriate side
view mirror based on a detected object. However, when
the system is operating in RCP, the system will respond
with both visual and audible alerts when a detected
object is present. Whenever an audible alert is requested,
the radio is muted.
Blind Spot Alert Lights/Chime
When operating in Blind Spot Alert Lights/Chime mode,
the BSM system will provide a visual alert in the appro-
priate side view mirror based on a detected object. If the
3
UNDERSTANDING THE FEATURES OF YOUR VEHICLE 129
Page 167 of 573
5. Turn on the radio and set the radio station presets (up
to 10 AM and 10 FM stations can be set).
6. Turn the ignition switch to the OFF position and
remove the key.
7. Press and release the SET (S) button located on the
driver’s door.
8. Within five seconds, press and release MEMORY
button 1 or 2 on the driver’s door. The next step must be
performed within 5 seconds if you desire to also use a
RKE transmitter to recall memory positions.
9. Press and release the LOCK button on one of the RKE
transmitters.
10. Insert the ignition key and turn the ignition switch to
the ON position.
11. Select “Remote Linked to Memory” in the Electronic
Vehicle Information Center (EVIC) and enter “Yes”. Referto “Electronic Vehicle Information Center (EVIC)/
Customer-Programmable Features” in “Understanding
Your Instrument Panel” for further information.
12. Repeat the above steps to set the next Memory
position using the other numbered Memory button or to
link another RKE transmitter to memory.
Memory Position Recall
NOTE:
The vehicle must be in PARK to recall memory
positions. If a recall is attempted when the vehicle is not
in PARK, a message will be displayed in the EVIC.
To recall the memory settings for driver one, press
MEMORY button 1 on the driver’s door or the UNLOCK
button on the RKE transmitter linked to memory position 1.
To recall the memory setting for driver two, press
MEMORY button 2 on the driver’s door or the UNLOCK
button on the RKE transmitter linked to Memory Position 2.
164 UNDERSTANDING THE FEATURES OF YOUR VEHICLE
Page 168 of 573
A recall can be cancelled by pressing any of the
MEMORY buttons on the driver’s door during a recall (S,
1, or 2). When a recall is cancelled, the driver’s seat,
driver’s mirror, and the pedals stop moving. A delay of
one second will occur before another recall can be
selected.
To Disable RKE Transmitter Linked To Memory
1. Turn the ignition switch to the OFF position and
remove the key.
2. Press and release MEMORY button 1. The system will
recall any memory settings stored in position 1. Wait for
the system to complete the memory recall before continu-
ing to Step 3.
3. Press and release the memory SET (S) button located
on the driver’s door. A chime will sound signaling that
you are in the memory set mode.4. Within five seconds, press and release MEMORY
button 1 on the driver’s door. A chime will sound
signaling to you that the driver memory has been set.
5. Within five seconds, press and release the UNLOCK
button on the RKE transmitter. A chime will sound
signaling to you that the RKE transmitter link has been
successfully disabled.
To disable another RKE transmitter linked to either
Memory Position, repeat Steps 1 to 5 for each RKE
transmitter.
NOTE:
Once programmed, all RKE transmitters linked
to memory can be easily enabled or disabled at one time.
Refer to “Electronic Vehicle Information Center (EVIC)/
Customer-Programmable Features� in “Understanding
Your Instrument Panel” for further information.
3
UNDERSTANDING THE FEATURES OF YOUR VEHICLE 165
Page 170 of 573
Customer-Programmable Features” in “Understanding
Your Instrument Panel” for further information.
TO OPEN AND CLOSE THE HOOD
To open the hood, two latches must be released.
1. Pull the hood release lever located on the instrument
panel, below the steering column.2. Move to the front of the vehicle and look inside the
center of the hood opening. Locate, then push the safety
catch lever downward while raising the hood at the same
time.
Use the hood prop rod to secure the hood in the open
position.
Hood Release
Safety Catch Location
3
UNDERSTANDING THE FEATURES OF YOUR VEHICLE 167
Page 173 of 573
Dimmer Control
With the parking lights or headlights on, rotating the
dimmer control for the interior lights on the instrument
panel upward will increase the brightness of the instru-
ment panel lights.
Parade Mode (Daytime Brightness Feature)
Rotate the dimmer control to the first detent. This feature
brightens the odometer, radio and overhead displays
when the parking lights or headlights are on.
Interior Lights On
Rotate the dimmer control completely upward to the
second detent (extreme top position) to turn on the
interior lights. The interior lights will remain on when the
dimmer control is in this position.
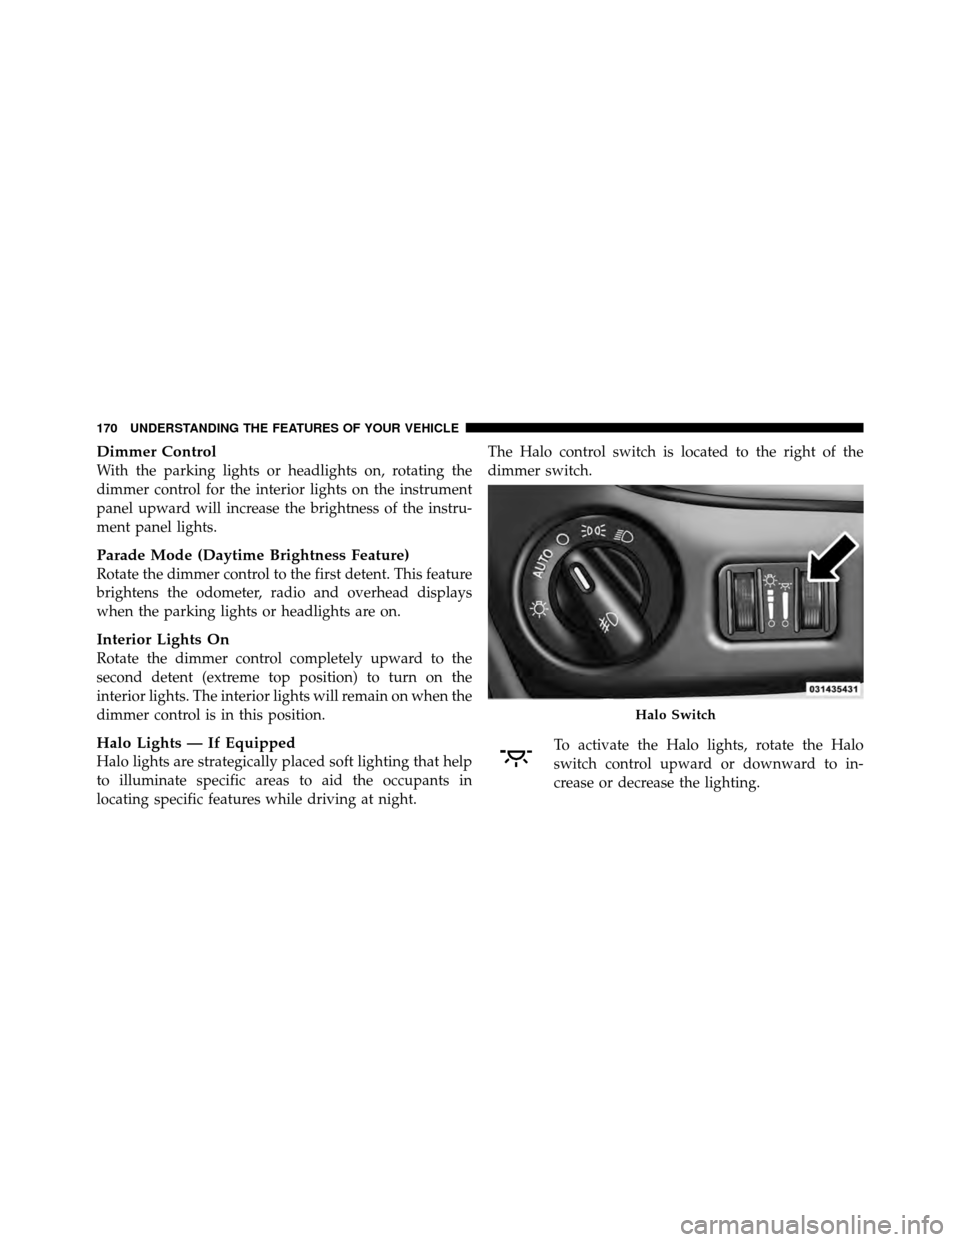
Halo Lights — If Equipped
Halo lights are strategically placed soft lighting that help
to illuminate specific areas to aid the occupants in
locating specific features while driving at night.The Halo control switch is located to the right of the
dimmer switch.
To activate the Halo lights, rotate the Halo
switch control upward or downward to in-
crease or decrease the lighting.
Halo Switch
170 UNDERSTANDING THE FEATURES OF YOUR VEHICLE