Page 165 of 573
3. Pulling strap “4” releases the seatback to return to its
full upright position.
4. Raise the head restraint to its upright position.
WARNING!
In a collision, you or others in your vehicle could be
injured if seats are not properly latched to their floor
attachments. Always be sure the seats are fully
latched.
Tailgate Mode
1. Pull release strap “3”, then pull release strap “4” to
rotate the entire seat rearward.
2. To restore the seat to its upright position, lift up on the
seatback and push forward until the anchors latch.
WARNING!
To avoid serious injury or death, never operate the
vehicle with occupants in the third row seat while in
the tailgate mode.
Plastic Grocery Bag Retainer Hooks
Retainer hooks which will hold plastic grocery bag
handles are built into the seatbacks of all rear seats and
some front seats. The floor supports the partial weight of
the bagged goods.
DRIVER MEMORY SEAT — IF EQUIPPED
The Memory Buttons 1 and 2 on the driver’s door panel
can be programmed to recall the driver’s seat, driver’s
outside mirror, adjustable brake and accelerator pedals,
and radio station preset settings. Your Remote Keyless
Entry (RKE) transmitters can also be programmed to
recall the same positions when the UNLOCK button is
pressed.
162 UNDERSTANDING THE FEATURES OF YOUR VEHICLE
Page 167 of 573
5. Turn on the radio and set the radio station presets (up
to 10 AM and 10 FM stations can be set).
6. Turn the ignition switch to the OFF position and
remove the key.
7. Press and release the SET (S) button located on the
driver’s door.
8. Within five seconds, press and release MEMORY
button 1 or 2 on the driver’s door. The next step must be
performed within 5 seconds if you desire to also use a
RKE transmitter to recall memory positions.
9. Press and release the LOCK button on one of the RKE
transmitters.
10. Insert the ignition key and turn the ignition switch to
the ON position.
11. Select “Remote Linked to Memory” in the Electronic
Vehicle Information Center (EVIC) and enter “Yes”. Referto “Electronic Vehicle Information Center (EVIC)/
Customer-Programmable Features” in “Understanding
Your Instrument Panel” for further information.
12. Repeat the above steps to set the next Memory
position using the other numbered Memory button or to
link another RKE transmitter to memory.
Memory Position Recall
NOTE:
The vehicle must be in PARK to recall memory
positions. If a recall is attempted when the vehicle is not
in PARK, a message will be displayed in the EVIC.
To recall the memory settings for driver one, press
MEMORY button 1 on the driver’s door or the UNLOCK
button on the RKE transmitter linked to memory position 1.
To recall the memory setting for driver two, press
MEMORY button 2 on the driver’s door or the UNLOCK
button on the RKE transmitter linked to Memory Position 2.
164 UNDERSTANDING THE FEATURES OF YOUR VEHICLE
Page 173 of 573
Dimmer Control
With the parking lights or headlights on, rotating the
dimmer control for the interior lights on the instrument
panel upward will increase the brightness of the instru-
ment panel lights.
Parade Mode (Daytime Brightness Feature)
Rotate the dimmer control to the first detent. This feature
brightens the odometer, radio and overhead displays
when the parking lights or headlights are on.
Interior Lights On
Rotate the dimmer control completely upward to the
second detent (extreme top position) to turn on the
interior lights. The interior lights will remain on when the
dimmer control is in this position.
Halo Lights — If Equipped
Halo lights are strategically placed soft lighting that help
to illuminate specific areas to aid the occupants in
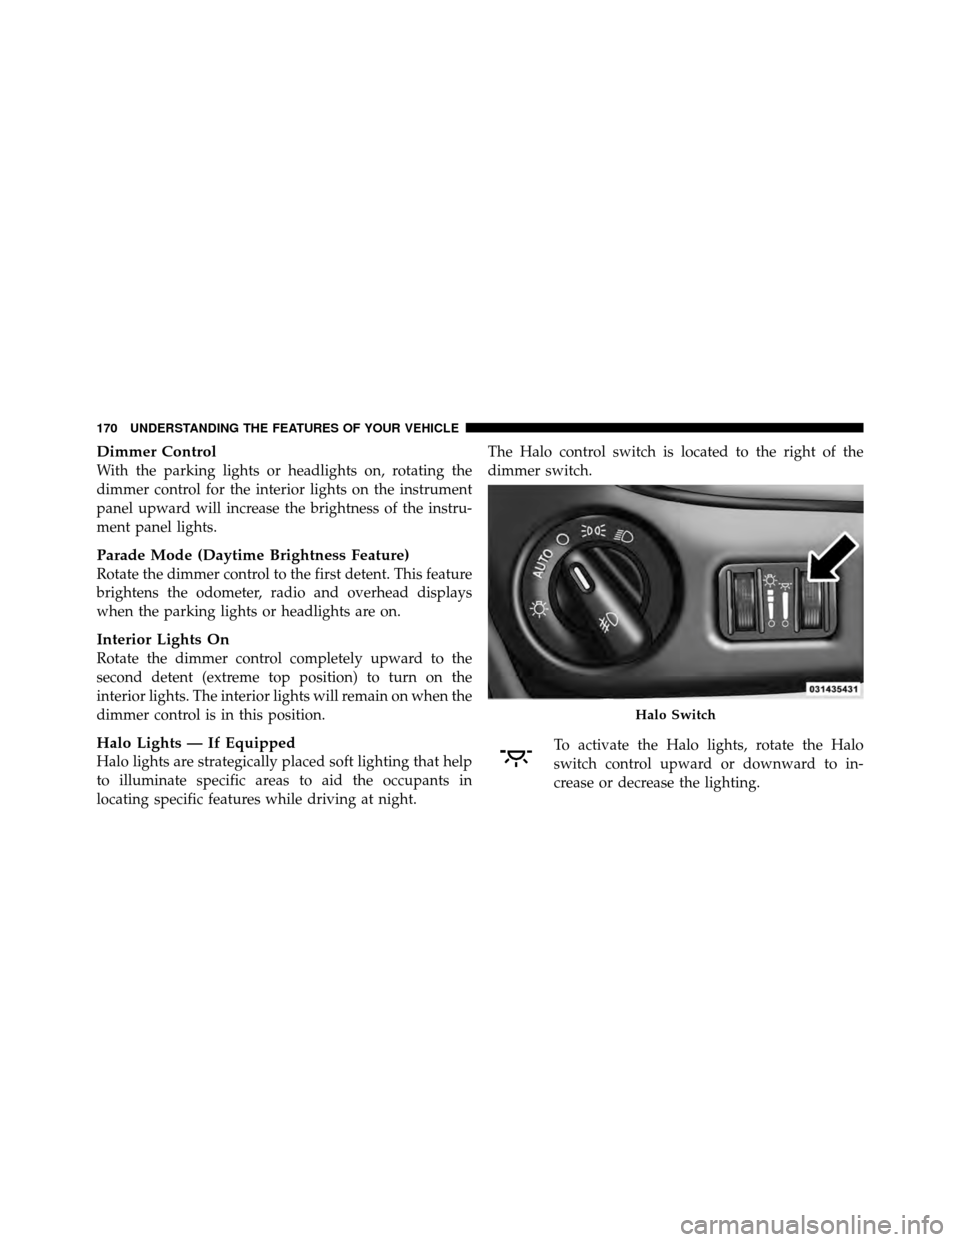
locating specific features while driving at night.The Halo control switch is located to the right of the
dimmer switch.
To activate the Halo lights, rotate the Halo
switch control upward or downward to in-
crease or decrease the lighting.
Halo Switch
170 UNDERSTANDING THE FEATURES OF YOUR VEHICLE
Page 194 of 573
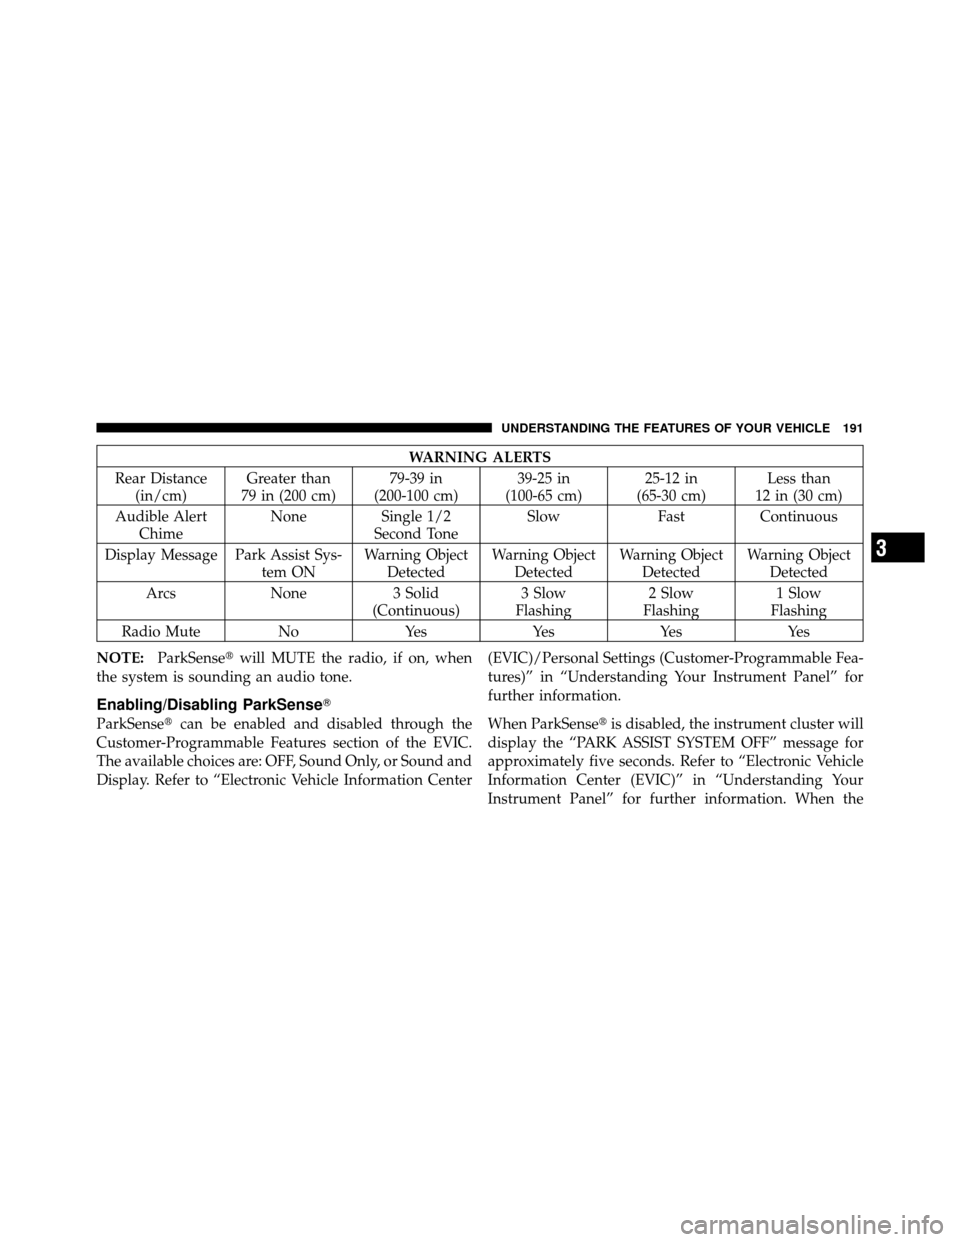
WARNING ALERTS
Rear Distance (in/cm) Greater than
79 in (200 cm) 79-39 in
(200-100 cm) 39-25 in
(100-65 cm) 25-12 in
(65-30 cm) Less than
12 in (30 cm)
Audible Alert Chime None
Single 1/2
Second Tone Slow
FastContinuous
Display Message Park Assist Sys- tem ONWarning Object
Detected Warning Object
Detected Warning Object
Detected Warning Object
Detected
Arcs None3 Solid
(Continuous) 3 Slow
Flashing 2 Slow
Flashing 1 Slow
Flashing
Radio Mute NoYes YesYesYes
NOTE: ParkSense� will MUTE the radio, if on, when
the system is sounding an audio tone.
Enabling/Disabling ParkSense�
ParkSense� can be enabled and disabled through the
Customer-Programmable Features section of the EVIC.
The available choices are: OFF, Sound Only, or Sound and
Display. Refer to “Electronic Vehicle Information Center (EVIC)/Personal Settings (Customer-Programmable Fea-
tures)” in “Understanding Your Instrument Panel” for
further information.
When ParkSense�
is disabled, the instrument cluster will
display the “PARK ASSIST SYSTEM OFF” message for
approximately five seconds. Refer to “Electronic Vehicle
Information Center (EVIC)” in “Understanding Your
Instrument Panel” for further information. When the
3
UNDERSTANDING THE FEATURES OF YOUR VEHICLE 191
Page 196 of 573
•Jackhammers, large trucks, and other vibrations could
affect the performance of ParkSense�.
•When you turn ParkSense�off, the instrument cluster
will display “PARK ASSIST SYSTEM OFF.” Further-
more, once you turn ParkSense� off, it remains off
until you turn it on again, even if you cycle the ignition
key.
•When you move the shift lever to the REVERSE
position and ParkSense� is turned off, the EVIC will
display “PARK ASSIST SYSTEM OFF” message for as
long as the vehicle is in REVERSE.
•ParkSense�, when on, will MUTE the radio when it is
sounding a tone.
•Clean the ParkSense� sensors regularly, taking care
not to scratch or damage them. The sensors must not
be covered with ice, snow, slush, mud, dirt or debris.
Failure to do so can result in the system not working properly. The ParkSense�
system might not detect an
obstacle behind the fascia/bumper, or it could provide
a false indication that an obstacle is behind the fascia/
bumper.
•Objects such as bicycle carriers, trailer hitches, etc.,
must not be placed within 12 in (30 cm) from the rear
fascia/bumper while driving the vehicle. Failure to do
so can result in the system misinterpreting a close
object as a sensor problem, causing the “SERVICE
PARK ASSIST SYSTEM” message to be displayed in
the EVIC.
•On vehicles equipped with a tailgate, ParkSense�
should be disabled when the tailgate is in the lowered
or open position and the vehicle is in REVERSE. A
lowered tailgate could provide a false indication that
an obstacle is behind the vehicle.
3
UNDERSTANDING THE FEATURES OF YOUR VEHICLE 193
Page 198 of 573
WARNING! (Continued)
•Before using the ParkSense�Rear Park Assist
System, it is strongly recommended that the ball
mount and hitch ball assembly is disconnected
from the vehicle when the vehicle is not used for
towing. Failure to do so can result in injury or
damage to vehicles or obstacles because the hitch
ball will be much closer to the obstacle than the
rear fascia when the warning display turns on the
single flashing arc and sounds the continuous
tone. Also, the sensors could detect the ball mount
and hitch ball assembly, depending on its size and
shape, giving a false indication that an obstacle is
behind the vehicle.
PARKVIEW� REAR BACK UP CAMERA —
IF EQUIPPED
Your vehicle may be equipped with the ParkView� Rear
Back Up Camera that allows you to see an on-screen
image of the rear surroundings of your vehicle whenever
the shift lever is put into REVERSE. The image will be
displayed on the Navigation/Multimedia radio display
screen along with a caution note to “check entire sur-
roundings” across the top of the screen. After five sec-
onds this note will disappear. The ParkView� camera is
located on the rear of the vehicle above the rear License
plate.
When the vehicle is shifted out of REVERSE, the rear
camera mode is exited and the navigation or audio screen
appears again.
3
UNDERSTANDING THE FEATURES OF YOUR VEHICLE 195
Page 200 of 573

WARNING!
Drivers must be careful when backing up even when
using the ParkView�Rear Back Up Camera. Always
check carefully behind your vehicle, and be sure to
check for pedestrians, animals, other vehicles, ob-
structions, or blind spots before backing up. You are
responsible for the safety of your surroundings and
must continue to pay attention while backing up.
Failure to do so can result in serious injury or death.
CAUTION!
•To avoid vehicle damage, ParkView� should only
be used as a parking aid. The camera is unable to
view every obstacle or object in your drive path.
(Continued)
CAUTION! (Continued)
•To avoid vehicle damage, the vehicle must be
driven slowly when using ParkView�to be able to
stop in time when an obstacle is seen. It is recom-
mended that the driver look frequently over his/
her shoulder when using ParkView�.
NOTE: If snow, ice, mud, or any foreign substance
builds up on the camera lens, clean the lens, rinse with
water, and dry with a soft cloth. Do not cover the lens.
Turning ParkView� On Or Off —
With Navigation/Multimedia Radio
1. Press the “menu” hard-key.
2. Select “system setup” soft-key.
3. Press the “camera setup” soft-key.
3
UNDERSTANDING THE FEATURES OF YOUR VEHICLE 197
Page 201 of 573
4. Enable or disable the rear camera feature by selecting
“enable rear camera in reverse” soft key and pressing the
“save” soft-key.
Turning ParkView�On Or Off —
Without Navigation/Multimedia Radio
1. Press the “menu” hard-key.
2. Select “system setup” soft-key.
3. Enable or disable the rear camera feature by selecting
“enable rear camera in reverse” soft-key.
OVERHEAD CONSOLES
Front Overhead Console
Two versions of the overhead console are available. The
base front overhead console model featured fixed incan-
descent courtesy/reading lights, flip-down sunglass stor-
age and conversation mirror. The premium front over-
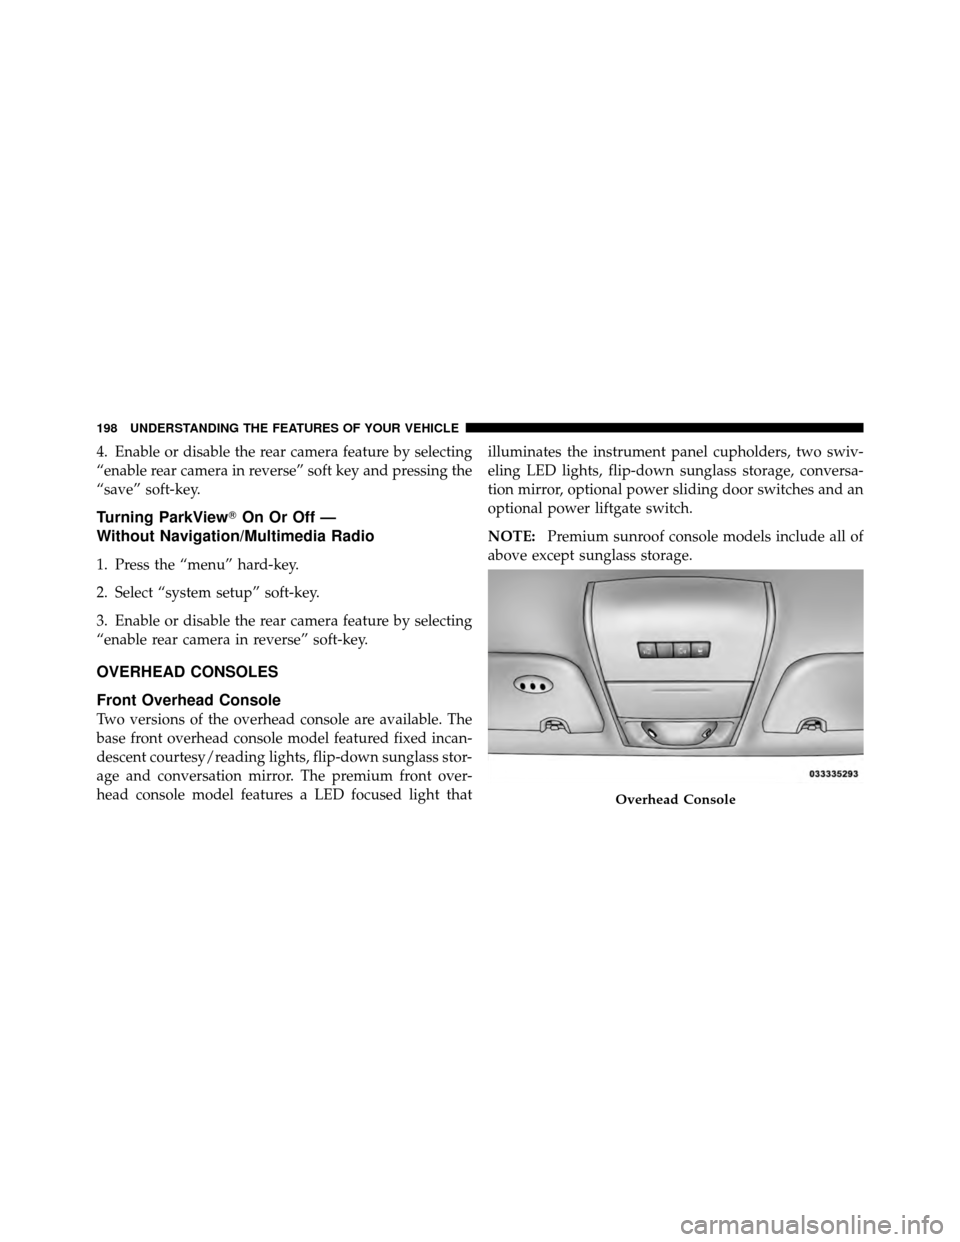
head console model features a LED focused light that illuminates the instrument panel cupholders, two swiv-
eling LED lights, flip-down sunglass storage, conversa-
tion mirror, optional power sliding door switches and an
optional power liftgate switch.
NOTE:
Premium sunroof console models include all of
above except sunglass storage.
Overhead Console
198 UNDERSTANDING THE FEATURES OF YOUR VEHICLE