2011 CHRYSLER 300 door lock
[x] Cancel search: door lockPage 10 of 92

KEY FOB
Locking And Unlocking The Doors
• Press the LOCK button once to lock all thedoors. Press the UNLOCK button once to
unlock the driver’s door only and twice within
five seconds to unlock all the doors.
• All doors can be programmed to unlock on the first press of the UNLOCK button. Refer
to Programmable Features in this guide.
Opening The Trunk
• Press the TRUNK button two times within five seconds to open the trunk.
Panic Alarm
• Press the PANIC button once to turn the panic alarm on.
• Wait approximately three seconds and press the button a second time to turn the panic alarm
off.
Express Window Feature
• To remotely lower both front door windows at the same time, press and release the UNLOCKbutton and then immediately press and hold the UNLOCK button until the windows lower to
the level desired or until they lower completely.
Emergency Key
• Should the battery in the vehicle or the Key Fob transmitter go dead, there is an emergency keylocated in the Key Fob. To remove the emergency key, slide the button at the back of the Key
Fob sideways with your thumb and then pull the key out with your other hand.
• The emergency key is also for locking the glove compartment.
WARNING!
• Leaving unattended children in a vehicle is dangerous for a number of reasons. A child or others could be severely injured or killed. Children should be warned not to touch the
parking brake, brake pedal, or the shift lever. Do not leave the Key Fob in the ignition. A
child could operate power windows, other controls, or move the vehicle.
REMOTE START
• Press the REMOTE START button
x2twice within five seconds. Pressing the REMOTE
START button a third time shuts the engine off.
• To drive the vehicle, press the UNLOCK button and cycle the ignition to the ON/RUN position.
GETTING STARTED
08
Page 11 of 92

• With remote start, the engine will only run for 15 minutes (timeout) unless the ignition is cycledto the ON/RUN position.
• The vehicle must be cycled to the ON/RUN position after two consecutive timeouts.
WARNING!
• Do not start or run an engine in a closed garage or confined area. Exhaust gas contains Carbon Monoxide (CO) which is odorless and colorless. Carbon Monoxide is poisonous
and can cause you or others to be severely injured or killed when inhaled.
• Keep Key Fob transmitters away from children. Operation of the Remote Start System, windows, door locks or other controls could cause you and others to be severely injured
or killed.
KEYLESS ENTER-N-GO
• The Keyless Enter-N-Go system is an enhancement to the vehicle's Key Fob. This featureallows you to lock and unlock the vehicle's door(s) and trunk without having to press the Key
Fob lock or unlock buttons, as well as starting and stopping the vehicle with the press of a
button.
To Unlock From The Driver or Passenger Side:
• With a valid Keyless Enter-N-Go Key Fob located outside the vehicle and within 5 ft (1.5m) ofthe driver or passenger side door handle, grab either front door handle to unlock the door
automatically.
To Lock the Vehicle:
• Both front door handles have LOCK buttonslocated on the outside of the handle. With
one of the vehicle's Keyless Enter-N-Go Key
Fobs located outside the vehicle and within
5 ft (1.5m) of the driver's or passenger front
door handle, press the door handle LOCK
button to lock all four doors and trunk.
NOTE:
• If “Unlock All Doors 1st Press” is programmed all doors will unlock when you grab hold of the front driver's door handle. To select between “Unlock Driver Door 1st Press” and “Unlock All Doors 1st
Press”, refer to the Uconnect Touch™ Settings in your vehicle's Owner's Manual on the DVD or
Programmable Features in this guide for further information.
• If “Unlock All Doors 1st Press” is programmed all doors and trunk will unlock when you press the trunk button. If “Unlock Driver Door 1st Press” is programmed only the trunk will unlock when you
press the trunk button. To select between “Unlock Driver Door 1st Press” and “Unlock All Doors
1st Press”, refer to the Uconnect Touch™ Settings in your vehicle's Owner's Manual on the DVD
or Programmable Features in this guide for further information.
GETTING STARTED
09
Page 12 of 92

• If a Key Fob is detected in the vehicle when locking the vehicle using the power door lock switch,the doors and trunk will unlock and the horn will chirp three times. On the third attempt, your Key
Fob can be locked inside the vehicle.
• After pressing the Keyless Enter-N-Go LOCK button, you must wait 2 seconds before you can lock or unlock the vehicle using the door handle.
• If a Keyless Enter-N-Go door handle has not been used for 72 hours, the Keyless Enter-N-Go feature for that handle may time out. Pulling the deactivated front door handle will reactivate the
door handle's Keyless Enter-N-Go feature.
To Enter the Trunk:
• With a valid Keyless Enter-N-Go Key Foblocated outside the vehicle and within 3 ft
(1.0 m) of the deck lid, press the button on
the located on the center of the light bar
which is located on the deck lid above the
license plate.
NOTE:
• Refer to your Owner's Manual on the DVD for further information.
Engine Starting/Stopping
Starting
• With a valid Keyless Enter-N-Go Key Fob inside the vehicle.
• Place the shift lever in PARK or NEUTRAL.
• While pressing the brake pedal, press the ENGINE START/STOP button once. If the
engine fails to start, the starter will disengage
automatically after 10 seconds.
• To stop the cranking of the engine prior to the engine starting, press the button again.
Stopping • Place the shift lever in PARK.
• Press the ENGINE START/STOP button once. The ignition switch will return to the OFF position.
• If the shift lever is not in PARK, the ENGINE START/STOP button must be held for two
seconds and vehicle speed must be above 5 mph (8 km/h) before the engine will shut off.
Accessory Positions with Engine Off
NOTE: The following functions are with the driver’s foot OFF the Brake Pedal (Transmission in
PARK or NEUTRAL Position).
GETTING STARTED
10
Page 13 of 92

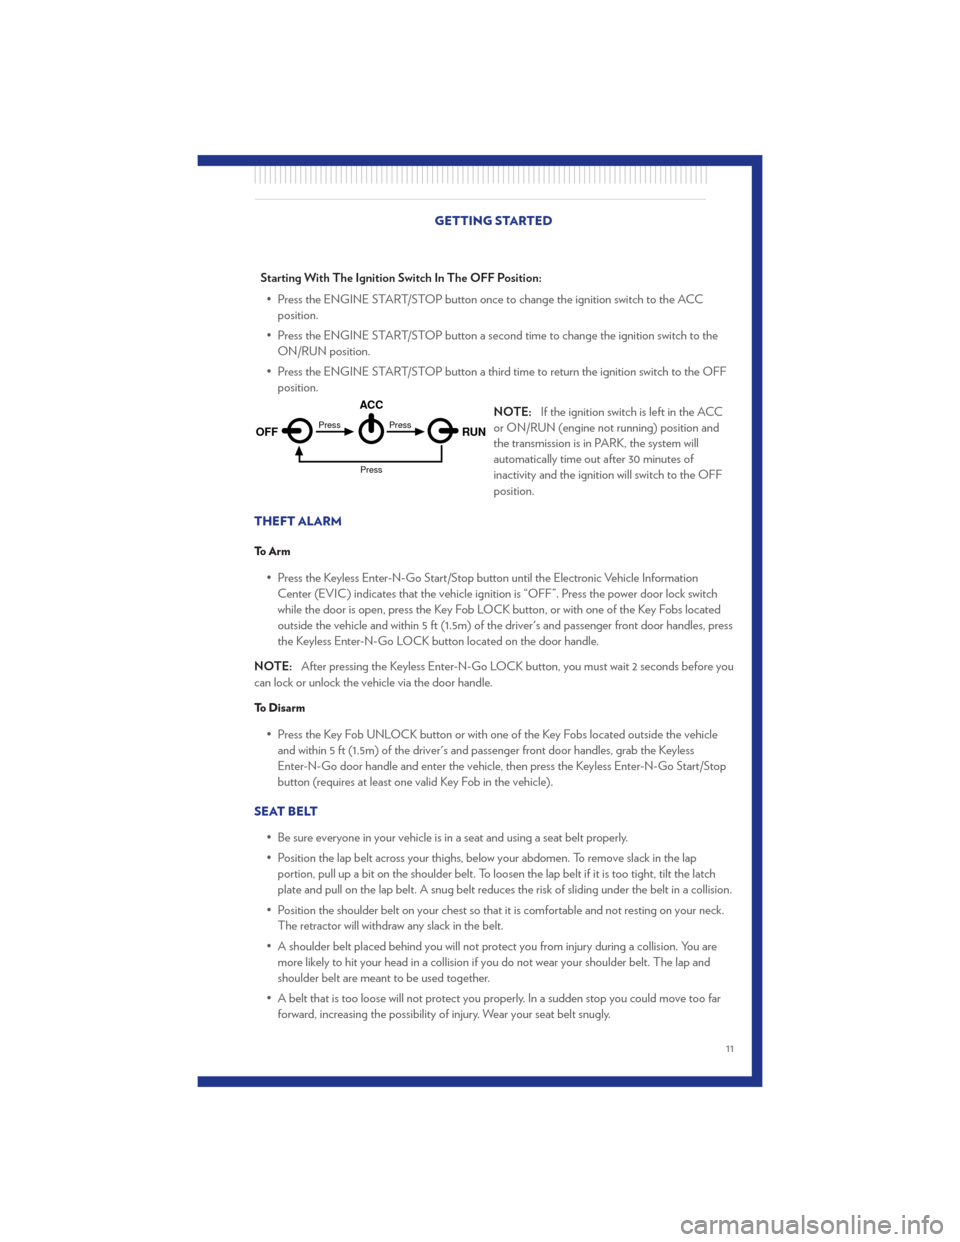
Starting With The Ignition Switch In The OFF Position:• Press the ENGINE START/STOP button once to change the ignition switch to the ACC position.
• Press the ENGINE START/STOP button a second time to change the ignition switch to the ON/RUN position.
• Press the ENGINE START/STOP button a third time to return the ignition switch to the OFF position.
NOTE:If the ignition switch is left in the ACC
or ON/RUN (engine not running) position and
the transmission is in PARK, the system will
automatically time out after 30 minutes of
inactivity and the ignition will switch to the OFF
position.
THEFT ALARM
To Arm
• Press the Keyless Enter-N-Go Start/Stop button until the Electronic Vehicle Information Center (EVIC) indicates that the vehicle ignition is “OFF”. Press the power door lock switch
while the door is open, press the Key Fob LOCK button, or with one of the Key Fobs located
outside the vehicle and within 5 ft (1.5m) of the driver's and passenger front door handles, press
the Keyless Enter-N-Go LOCK button located on the door handle.
NOTE: After pressing the Keyless Enter-N-Go LOCK button, you must wait 2 seconds before you
can lock or unlock the vehicle via the door handle.
To Disarm
• Press the Key Fob UNLOCK button or with one of the Key Fobs located outside the vehicle and within 5 ft (1.5m) of the driver's and passenger front door handles, grab the Keyless
Enter-N-Go door handle and enter the vehicle, then press the Keyless Enter-N-Go Start/Stop
button (requires at least one valid Key Fob in the vehicle).
SEAT BELT • Be sure everyone in your vehicle is in a seat and using a seat belt properly.
• Position the lap belt across your thighs, below your abdomen. To remove slack in the lapportion, pull up a bit on the shoulder belt. To loosen the lap belt if it is too tight, tilt the latch
plate and pull on the lap belt. A snug belt reduces the risk of sliding under the belt in a collision.
• Position the shoulder belt on your chest so that it is comfortable and not resting on your neck. The retractor will withdraw any slack in the belt.
• A shoulder belt placed behind you will not protect you from injury during a collision. You are more likely to hit your head in a collision if you do not wear your shoulder belt. The lap and
shoulder belt are meant to be used together.
• A belt that is too loose will not protect you properly. In a sudden stop you could move too far forward, increasing the possibility of injury. Wear your seat belt snugly.
OFF RUN
ACCPress
Press
Press
GETTING STARTED
11
Page 18 of 92

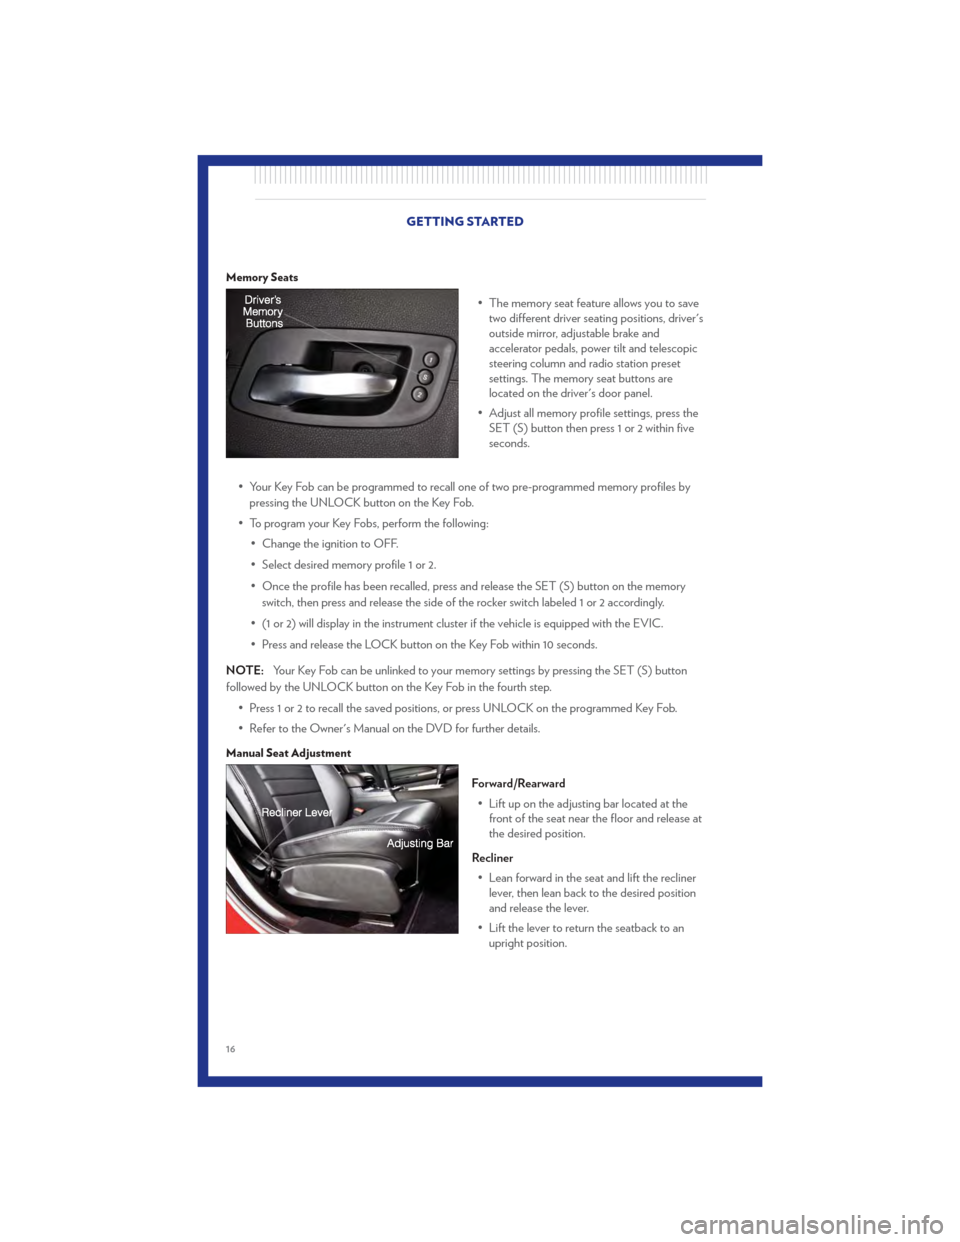
Memory Seats
• The memory seat feature allows you to savetwo different driver seating positions, driver's
outside mirror, adjustable brake and
accelerator pedals, power tilt and telescopic
steering column and radio station preset
settings. The memory seat buttons are
located on the driver's door panel.
• Adjust all memory profile settings, press the SET (S) button then press 1 or 2 within five
seconds.
• Your Key Fob can be programmed to recall one of two pre-programmed memory profiles by pressing the UNLOCK button on the Key Fob.
• To program your Key Fobs, perform the following: • Change the ignition to OFF.
• Select desired memory profile 1 or 2.
• Once the profile has been recalled, press and release the SET (S) button on the memoryswitch, then press and release the side of the rocker switch labeled 1 or 2 accordingly.
• (1 or 2) will display in the instrument cluster if the vehicle is equipped with the EVIC.
• Press and release the LOCK button on the Key Fob within 10 seconds.
NOTE: Your Key Fob can be unlinked to your memory settings by pressing the SET (S) button
followed by the UNLOCK button on the Key Fob in the fourth step.
• Press 1 or 2 to recall the saved positions, or press UNLOCK on the programmed Key Fob.
• Refer to the Owner's Manual on the DVD for further details.
Manual Seat Adjustment
Forward/Rearward• Lift up on the adjusting bar located at the front of the seat near the floor and release at
the desired position.
Recliner • Lean forward in the seat and lift the recliner lever, then lean back to the desired position
and release the lever.
• Lift the lever to return the seatback to an upright position.
GETTING STARTED
16
Page 51 of 92

Compass Calibration
• This compass is self-calibrating, which eliminates the need to set the compass manually. Whenthe vehicle is new, the compass may appear erratic and the EVIC will display “CAL” until the
compass is calibrated.
• You may also calibrate the compass by completing one or more 360 degree turns (in an area free from large metal or metallic objects) until the “CAL” message displayed in the EVIC turns
off. The compass will now function normally.
ECO
• The ECO message will appear in your EVIC display whenever you are driving in a fuel efficientmanner.
• This feature allows you to monitor when you are driving in a fuel efficient manner, and it can be used to modify driving habits in order to increase fuel economy.
PROGRAMMABLE FEATURES
Electronic Vehicle Information Center (EVIC) – If Equipped
• The EVIC can be used to view or change the following settings. Press the UPor
DOWN
button until System Setup displays, then press the SELECTbutton. Scroll
through the settings using the UP or DOWN buttons. Press the SELECT
button to
change the setting. Press the BACK button to scroll back to a previous menu or sub menu.
• Fuel Economy: • Average Fuel Economy/Fuel Saver Mode
• Distance To Empty (DTE)
• Miles Per Gallon (MPG) • Trip Info
• Trip A
• Trip B
• Elapsed Time
• Vehicle Speed • Units
• To Reset The Display • Vehicle Info (Customer Information Features)
Uconnect Touch™ Customer Programmable Features
• The Uconnect Touch™ 8.4 system allows you to access Customer Programmable feature
settings such as Display, Clock, Safety/Assistance, Lights, Doors & Locks, Heated Seats, Engine
Off Operation, Compass Settings, Audio, Phone/ Bluetooth and SIRIUS Setup through
soft-keys.
• Touch the More soft-key to on the bottom of the screen, then touch the Settings soft-key to access the Settings screen. When making a selection, scroll up or down until the preferred
setting is highlighted, then press and release the preferred setting until a check-mark appears
next to the setting, showing that setting has been selected. The following feature settings are
available:
• Display • Clock
• Safety / Assistance • Doors & Locks
• Auto-On Comfort & Remote Start • Engine Off Options
• Compass Settings • Audio
• Phone / Bluetooth • SIRIUS Setup
ELECTRONICS
49
Page 81 of 92

Cavity Cartridge Fuse Mini-Fuse Description2 60 Amp Yellow — Front PDC Feed #1
4 60 Amp Yellow — Front PDC Feed #2 5 30 Amp Pink — Sunroof
6 40 Amp Green — Exterior Lighting #1 7 40 Amp Green — Exterior Lighting #2
8 30 Amp Pink — Interior Lighting/Washer Pump 9 30 Amp Pink — Power Locks
10 30 Amp Pink — Driver Door 11 30 Amp Pink — Passenger Door
12 — 20 Amp Yellow Cigar Lighters (Selectable)
15 50 Amp Red — HVAC Blower
23 — 10 Amp Red Fuel Door/Diagnostic Port
24 — 15 Amp Blue Radio Screen 25 — 10 Amp Red Tire Pressure Monitor 27 — 25 Amp Neutral Amplifier 31 — 25 Amp Neutral Power Seats
32 — 15 Amp Blue HVAC Module/Cluster 33 — 15 Amp Blue Ignition Switch/Wireless Module
34 — 10 Amp Red Steering Column Module/Clock 35 — 10 Amp Red Battery Sensor 37 — 15 Amp Blue Radio
38 — 20 Amp Yellow Power Outlet
42 30 Amp Pink — Rear Defrost 43 — 25 Amp Neutral Rear Heated Seats/Steering Wheel
44 — 10 Amp Red Park Assist/Blind Spot/Camera 45 — 15 Amp Blue Cluster/Rearview Mirror/Compass
46 — 10 Amp Red Adaptive Cruise Control 47 — 10 Amp Red Adaptive Front Lighting
48 — 20 Amp Yellow Active Suspension 51 — 20 Amp Yellow Front Heated Seats
52 — 10 Amp Red Heated Cupholders/Rear Heated Seat Switches
53 — 10 Amp Red HVAC Module/In Car Temperature
Sensor
58 — 10 Amp Red Airbag Module
64 — 25 Amp Neutral Rear Windows
65 — 10 Amp Red Airbag Module
67 — 15 Amp Blue Run Sense
68 — 15 Amp Blue Power Outlet Illumination/Rear
Sunshade
MAINTAINING YOUR VEHICLE
79
Page 87 of 92

Adaptive Cruise Control (ACC) (Cruise
Control)..................23
Adjustable Pedals .............19
Airbag ...................12
Alarm, Panic ................8
Arming Theft System (Security Alarm) . . . 11
Automatic Headlights ...........22
Automatic Temperature Control (ATC) . . 26
Automatic Transmission Fluid Type ................71
Axle Fluid .................71
Belts, Seat .................11
Brake Fluid .................71
Bulb Replacement .............81
Calibration, Compass ...........49
Change Oil Indicator ...........58
Child Restraint ...............13
Child Restraint Tether Anchors .......13
Clock Setting ...............33
Compass Calibration ...........49
Cooling System Coolant Capacity ............71
Cruise Control (Speed Control) ......23
Cruise Light ................23
Cupholders Heated/Cooled (Beverage Holder) . . . 19
Customer Assistance ...........82
Customer Programmable Features .....49
Defects, Reporting .............83
Dimmer Control ..............22
Dimmer Switch, Headlight .........22
Disarming, Theft System ..........11
Driver Cockpit ...............4
ECO ...................49
Electronic Speed Control (Cruise
Control) ..................23
Electronic Vehicle Information Center
(EVIC) ................. 48,49
Engine Compartment ..............69
Oil Selection ..............71
Overheating ..............59
Starting .................10 Stopping
................10
EventDataRecorder ...........67
Express Down Windows ...........8
Exterior Lights ...............81
Fluid Capacities ..............71
Fluids ...................71
Fog Lights .................22
Folding Rear Seat .............17
Freeing A Stuck Vehicle ..........66
Front Heated Seats ............18
Fuel Specifications ..............71
Garage Door Opener (HomeLink®) ....50
Headlights Automatic ................22
Dimmer Switch .............22
HighBeam ...............21
Heated Seats ...............
1
8
High Beam/Low Beam Select (Dimmer)
Switch ...................21
HomeLink® (Garage Door Opener)
Transmitter ................50
Hood Release ...............68
Instrument Cluster .............6
Instrument Cluster Warning Lights ....6,55
Intermittent Wipers (Delay Wipers) ....21
Introduction .................2
Jack Location ...............60
Jump Starting ...............62
KeyFob...................8
Keyless Enter-N-Go ............9
Lane Change Assist ............21
LATCH (Lower Anchors and Tether for
CHildren) .................13
Lights Turn Signal ...............21
Warning (Instrument Cluster
Description) ...............6
INDEX
85