2011 CHRYSLER 300 change time
[x] Cancel search: change timePage 4 of 92

WELCOME FROM CHRYSLER GROUP LLC
Congratulations on selecting your new Chrysler Group LLC vehicle. Be assured that it represents
precision workmanship, distinctive styling, and high quality - all essentials that are traditional to our
vehicles.
Your new Chrysler Group LLC vehicle has characteristics to enhance the driver's control under some
driving conditions. These are to assist the driver and are never a substitute for attentive driving. They
can never take the driver's place. Always drive carefully.
Your new vehicle has many features for the comfort and convenience of you and your passengers.
Some of these should not be used when driving because they take your eyes from the road or your
attention from driving. Never text while driving or take your eyes more than momentarily off the
road.
This guide illustrates and describes the operation of features and equipment that are either standard
or optional on this vehicle. This guide may also include a description of features and equipment that
are no longer available or were not ordered on this vehicle. Please disregard any features and
equipment described in this guide that are not available on this vehicle. Chrysler Group LLC
reserves the right to make changes in design and specifications and/or make additions to or
improvements to its products without imposing any obligation upon itself to install them on products
previously manufactured.
This User Guide has been prepared to help you quickly become acquainted with the important
features of your vehicle. It contains most everything you will need to operate and maintain the
vehicle, including emergency information.
The DVD includes a computer application containing detailed owner's information which can be
viewed on a personal computer or MAC computer. The multimedia DVD also includes videos which
can be played on any standard DVD player (including the Media Center Touch-Screen Radios).
Additional DVD operational information is located on the back of the DVD sleeve.
For complete owner information, refer to your Owner's Manual on the DVD in the owner’s kit
provided at the time of new vehicle purchase. For your convenience, the information contained on
the DVD may also be printed and saved for future reference.
Chrysler Group LLC is committed to protecting our environment and natural resources. By
converting from paper to electronic delivery for the majority of the user information for your vehicle,
together we greatly reduce the demand for tree-based products and lessen the stress on our
environment.INTRODUCTION/WELCOME
02
Page 13 of 92

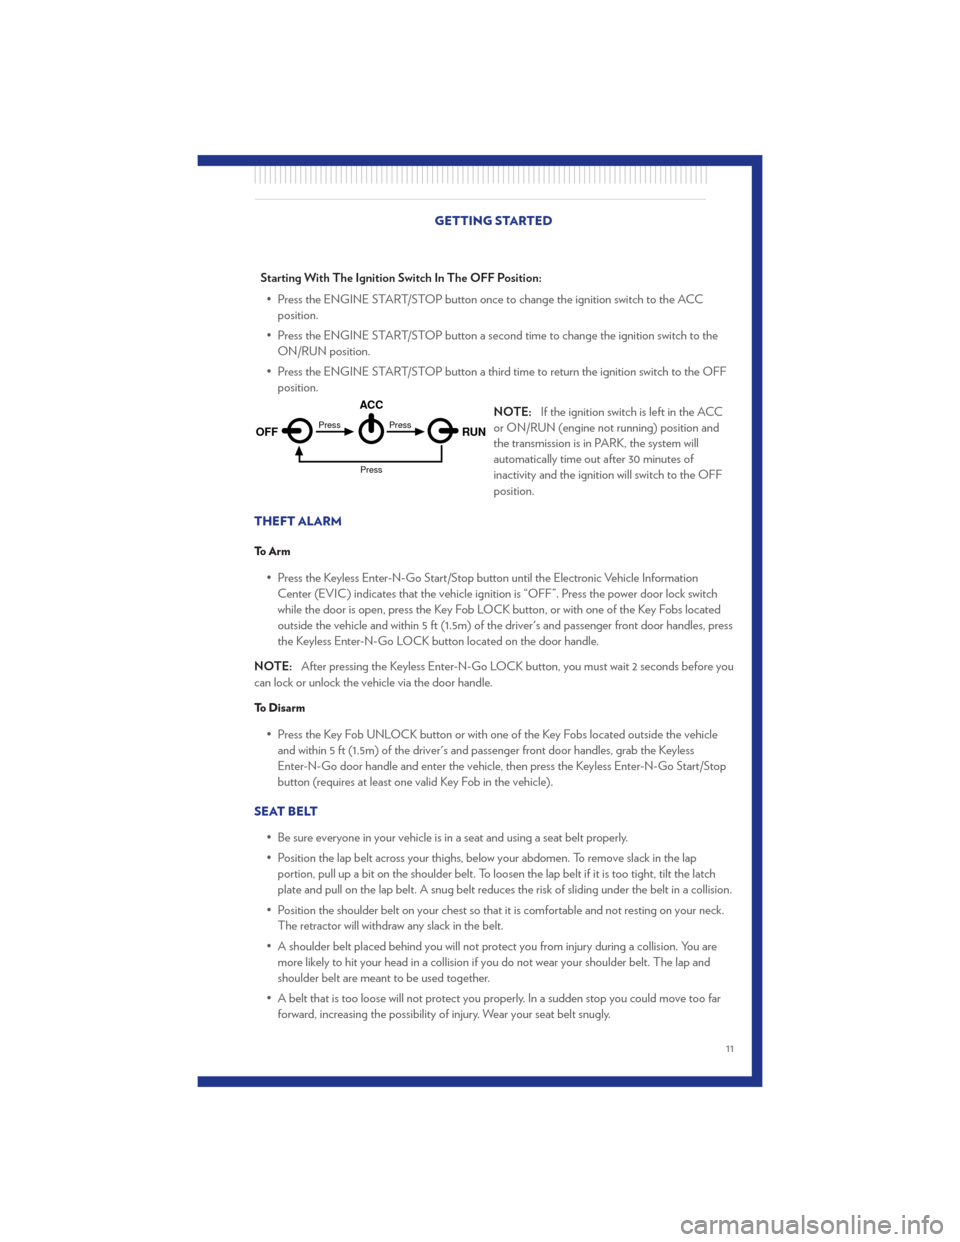
Starting With The Ignition Switch In The OFF Position:• Press the ENGINE START/STOP button once to change the ignition switch to the ACC position.
• Press the ENGINE START/STOP button a second time to change the ignition switch to the ON/RUN position.
• Press the ENGINE START/STOP button a third time to return the ignition switch to the OFF position.
NOTE:If the ignition switch is left in the ACC
or ON/RUN (engine not running) position and
the transmission is in PARK, the system will
automatically time out after 30 minutes of
inactivity and the ignition will switch to the OFF
position.
THEFT ALARM
To Arm
• Press the Keyless Enter-N-Go Start/Stop button until the Electronic Vehicle Information Center (EVIC) indicates that the vehicle ignition is “OFF”. Press the power door lock switch
while the door is open, press the Key Fob LOCK button, or with one of the Key Fobs located
outside the vehicle and within 5 ft (1.5m) of the driver's and passenger front door handles, press
the Keyless Enter-N-Go LOCK button located on the door handle.
NOTE: After pressing the Keyless Enter-N-Go LOCK button, you must wait 2 seconds before you
can lock or unlock the vehicle via the door handle.
To Disarm
• Press the Key Fob UNLOCK button or with one of the Key Fobs located outside the vehicle and within 5 ft (1.5m) of the driver's and passenger front door handles, grab the Keyless
Enter-N-Go door handle and enter the vehicle, then press the Keyless Enter-N-Go Start/Stop
button (requires at least one valid Key Fob in the vehicle).
SEAT BELT • Be sure everyone in your vehicle is in a seat and using a seat belt properly.
• Position the lap belt across your thighs, below your abdomen. To remove slack in the lapportion, pull up a bit on the shoulder belt. To loosen the lap belt if it is too tight, tilt the latch
plate and pull on the lap belt. A snug belt reduces the risk of sliding under the belt in a collision.
• Position the shoulder belt on your chest so that it is comfortable and not resting on your neck. The retractor will withdraw any slack in the belt.
• A shoulder belt placed behind you will not protect you from injury during a collision. You are more likely to hit your head in a collision if you do not wear your shoulder belt. The lap and
shoulder belt are meant to be used together.
• A belt that is too loose will not protect you properly. In a sudden stop you could move too far forward, increasing the possibility of injury. Wear your seat belt snugly.
OFF RUN
ACCPress
Press
Press
GETTING STARTED
11
Page 23 of 92

TURN SIGNAL/WIPER/WASHER/HIGH BEAM LEVER
Turn Signal/Lane Change Assist
• Tap the lever up or down once and the turn signal (right or left) will flash three times andautomatically turn off.
Front Wipers
Intermittent, Low And High Operation
• Rotate the end of the lever to the first detent position for one of four intermittent settings, the second detent for low wiper operation and the third detent for high wiper operation.
Mist
• Rotate the end of the lever downward when a single wipe is desired.
Washer Operation
• Push the end of the lever inward and hold for as long as spray is desired.
Rain Sensing Wipers
• This feature senses moisture on the vehicle's windshield and automatically activates the wipers for the driver when the switch is in the intermittent position. Rotate the end of the lever to one
of four settings to activate this feature and adjust sensitivity.
• Rain Sensing can be turned on and off using the Uconnect Touch™ System, refer to the Owner's Manual on the DVD for further details.
High Beam Operation
• Push the lever forward to activate the high beams. Pull the lever toward you for flash to pass.
NOTE: For safe driving, turn off the high beams when oncoming traffic is present to prevent
headlight glare and as a courtesy to other motorists.
OPERATING YOUR VEHICLE
21
Page 26 of 92

Distance Setting (ACC Only)
• To set or change the distance setting, press the Distance button and release. Each time thebutton is pressed, the distance setting adjusts between long (3), medium (2), and short (1). The
distance setting will default to the last set mode the next time the vehicle is restarted and the
ACC system is turned on.
• The specified following distance for ACC can be set by varying the distance setting between 3 (long), 2 (medium), and 1 (short). Using this distance setting and the vehicle speed, ACC
calculates and sets the distance to the vehicle ahead. This distance setting displays in the EVIC.
Mode (ACC Only)
• If desired, the Adaptive Cruise Control mode can be turned off and the system can beoperated as a standard (fixed speed) Cruise Control. When in the standard (fixed speed)
Cruise Control mode the distance setting feature will be disabled and the system will maintain
the speed you set.
• To change modes, press the MODE button when the system is in either the OFF, READY, or SET position. Cruise Ready will be displayed if the system was in ACC READY or ACC SET
position. Cruise Off will be displayed if the system was in the ACC OFF position. To switch
back to Adaptive Cruise Control mode, press the MODE button a second time.
• Refer to your Owner's Manual on the DVD for further information.
Forward Collision Warning
• Forward Collision Warning (FCW) warns the driver of a potential collision with the vehicle in front of you and prompts the driver to take action in order to avoid the collision. A warning
message (both audible and visual) will be displayed on the EVIC.
• Refer to your Owner's Manual on the DVD for further information.
WARNING!
• Leaving the Electronic or Adaptive Speed Control system on when not in use is dangerous. You could accidentally set the system or cause it to go faster than you want.
You could lose control and have a collision. Alway s leave the Electronic or Adaptive
Speed Control system off when you are not using it.
• Electronic Speed Control can be dangerous where the system cannot maintain a constant speed. Your vehicle could go too fast for the conditions, and you could lose
control. A collision could be the result. Do not use Electronic Speed Control in heavy
traffic or on roads that are winding, icy, snow-covered or slippery.
• Adaptive Cruise Control (ACC) is a convenience system. It is not a substitute for active driving involvement. Pay attention to road, traffic, and weather conditions, vehicle speed,
distance to the vehicle ahead; and, brake operation to ensure safe operation of the
vehicle under all road conditions. Your attention is always required while driving to
maintain safe control of your vehicle. Failure to follow these warnings can result in a
collision or serious personal injury.
(Continued)
OPERATING YOUR VEHICLE
24
Page 45 of 92

NOTE:
• When connecting your iPod® device for the first time, the system may take several minutes to readyour music, depending on the number of files. For example, the system will take approximately
5 minutes for every 1000 songs loaded on the device. Also during the reading process, the Shuffle
and Browse functions will be disabled. This process is needed to ensure the full use of your iPod®
features and only happens the first time it is connected. After the first time, the reading process of
your iPod® will take considerably less time unless changes are made or new songs are added to the
playlist.
• The USB port supports certain Mini, Classic, Nano, Touch, and iPhone® devices. The USB port also supports playing music from compatible external USB Mass Storage Class memory devices.
Some iPod® software versions may not fully support the USB port features. Please visit Apple’s
website for iPod® software updates.
3. SD Card
• Play songs stored on an SD card inserted into the SD card slot.
• Song playback can be controlled using the radio or Steering Wheel Audio Controls to play, skipto the next or previous track, browse, and list the contents.
4. Bluetooth® Streaming Audio
If equipped with Uconnect™ Voice Command, your Bluetooth-equipped iPod® devices, cell phones
or other media players, may also be able to stream music to your vehicle's sound system. Your
connected device must be Bluetooth-compatible, and paired with your Uconnect Touch® system
(see Uconnect™ Phone for pairing instructions). You can access the music from your connected
Bluetooth® device by touching the Source soft-key while in Player mode.
Uconnect™ Phone (Bluetooth® HANDS FREE CALLING)
• If the Uconnect™ Phone
Button exists on your steering wheel, then you have the
Uconnect™ Phone features.
• The Uconnect™ Phone is a voice-activated, hands-free, in-vehicle communications system with Voice Command Capability (see Voice Command section).
• The Uconnect™ Phone allows you to dial a phone number with your mobile phone using simple voice commands or using screen soft-keys.
• Refer to the Understand The Features Of Your Vehicle section of your vehicle's Owner's Manual on the DVD for further details.
NOTE: The Uconnect™ Phone requires a mobile phone equipped with the Bluetooth® Hands-Free
Profile, Version 1.0 or higher. For Uconnect™ customer support, call 1–877–855–8400 or visit
dodge.com/uconnect. ELECTRONICS
43
Page 51 of 92

Compass Calibration
• This compass is self-calibrating, which eliminates the need to set the compass manually. Whenthe vehicle is new, the compass may appear erratic and the EVIC will display “CAL” until the
compass is calibrated.
• You may also calibrate the compass by completing one or more 360 degree turns (in an area free from large metal or metallic objects) until the “CAL” message displayed in the EVIC turns
off. The compass will now function normally.
ECO
• The ECO message will appear in your EVIC display whenever you are driving in a fuel efficientmanner.
• This feature allows you to monitor when you are driving in a fuel efficient manner, and it can be used to modify driving habits in order to increase fuel economy.
PROGRAMMABLE FEATURES
Electronic Vehicle Information Center (EVIC) – If Equipped
• The EVIC can be used to view or change the following settings. Press the UPor
DOWN
button until System Setup displays, then press the SELECTbutton. Scroll
through the settings using the UP or DOWN buttons. Press the SELECT
button to
change the setting. Press the BACK button to scroll back to a previous menu or sub menu.
• Fuel Economy: • Average Fuel Economy/Fuel Saver Mode
• Distance To Empty (DTE)
• Miles Per Gallon (MPG) • Trip Info
• Trip A
• Trip B
• Elapsed Time
• Vehicle Speed • Units
• To Reset The Display • Vehicle Info (Customer Information Features)
Uconnect Touch™ Customer Programmable Features
• The Uconnect Touch™ 8.4 system allows you to access Customer Programmable feature
settings such as Display, Clock, Safety/Assistance, Lights, Doors & Locks, Heated Seats, Engine
Off Operation, Compass Settings, Audio, Phone/ Bluetooth and SIRIUS Setup through
soft-keys.
• Touch the More soft-key to on the bottom of the screen, then touch the Settings soft-key to access the Settings screen. When making a selection, scroll up or down until the preferred
setting is highlighted, then press and release the preferred setting until a check-mark appears
next to the setting, showing that setting has been selected. The following feature settings are
available:
• Display • Clock
• Safety / Assistance • Doors & Locks
• Auto-On Comfort & Remote Start • Engine Off Options
• Compass Settings • Audio
• Phone / Bluetooth • SIRIUS Setup
ELECTRONICS
49
Page 60 of 92

- Electronic Throttle Control (ETC) Light
• This light informs you of a problem with the Electronic Throttle Control (ETC) system.
• If a problem is detected, the light will come on while the engine is running. Cycle the ignitionwhen the vehicle has completely stopped and the shift lever is placed in the PARK position; the
light should turn off.
• If the light remains lit with the engine running, your vehicle will usually be drivable; however, see an authorized service center immediately. If the light is flashing when the engine is running,
immediate service is required and you may experience reduced performance, an
elevated/rough idle or engine stall and your vehicle may require towing.
- Airbag Warning Light
• If the light is not on during starting, stays on, or turns on while driving, have the vehicle servicedby an authorized service center immediately.
SERVICE AWD SYSTEM Message
• If the SERVICE AWD SYSTEM warning message appears after engine start up, or duringdriving, it means the AWD system is not functioning properly. We recommend you do not
operate the vehicle. Have the vehicle serviced immediately.
Oil Change Indicator
Message
• If an “oil change” message (shown as Oil Change Required) appears and a single chime sounds, it is time for your next required oil change.
Resetting The Light After Servicing
• Without pressing the brake pedal, push the ENGINE START/STOP button and cycle the ignition to the ON/RUN position (Do not start the engine.)
• Fully depress the accelerator pedal three times within 10 seconds.
• Without pressing the brake pedal, push the ENGINE START/STOP button once to return the ignition to the OFF/LOCK position. WHAT TO DO IN EMERGENCIES
58