2011 CHRYSLER 300 ad blue
[x] Cancel search: ad bluePage 3 of 92

INTRODUCTION/WELCOMEWelcome From Chrysler Group LLC......2
CONTROLS AT A GLANCEDriver Cockpit................4
Instrument Cluster ..............6
GETTING STARTEDKeyFOB...................8
Remote Start.................8
Keyless Enter-N-Go .............9
Theft Alarm .................11
Seat Belt ...................11
Supplemental Restraint System (SRS) —
Airbags ...................12
Child Restraints ................13
Front Seats ..................15
Rear Seat ...................17
Heated Seats .................18
Heated And Cooled Cupholders .......19
Adjustable Pedals ...............19
Tilt/Telescoping Steering Column .......20
OPERATING YOUR VEHICLETurn Signal/Wiper/Washer/High Beam Lever . . 21
Headlight Switch...............22
Speed Control ................23
Climate Controls ...............26
Power Sunroof ................28
Wind Buffeting ................29
ELECTRONICSYour Vehicle's Sound System .........30
Identifying Your Radio .............32
Uconnect Touch™ 8.4 & 8.4N At A Glance . . . 32
Radio ....................34
Sirius Satellite Radio ..............35
Player ....................37
Garmin® Navigation (8.4N Only) .......37
Sirius Travel Link (8.4N Only) .........41
Playing iPod/USB/MP3 Devices ........42
Uconnect™ Phone (Bluetooth® Hands
Free Calling) .................43
Uconnect™ Voice Command .........47
Electronic Vehicle Information Center
(EVIC) ....................48 Programmable Features
............49
Universal Garage Door Opener
(HomeLink®) .................50
Power Outlet .................52
UTILITY
Trailer Towing Weights (Maximum Trailer
Weight Ratings) ...............53
Recreational Towing
(Behind Motorhome, Etc.) ...........54
WHAT TO DO IN EMERGENCIES
24-Hour Towing Assistance ..........55
Instrument Cluster Warning Lights .......55
If Your Engine Overheats ...........59
Jacking, Tire Changing ............60
Jump-Starting ................62
Shift Lever Override .............64
Towing A Disabled Vehicle ..........65
Freeing A Stuck Vehicle ............66
Event Data Recorder (EDR) ..........67
MAINTAINING YOUR VEHICLE
Opening The Hood..............68
Engine Compartment .............69
Fluids And Capacities .............71
Maintenance Chart ..............73
Fuses .....................76
Tire Pressures .................80
Wheel And Wheel Trim Care .........80
Exterior Bulbs .................81
CONSUMER ASSISTANCE
Chrysler Group LLC Customer Center .....82
Chrysler Canada Inc. Customer Center ....82
Assistance For The Hearing Impaired .....82
Publications Ordering .............82
Reporting Safety Defects In The
50 United States And Washington, D.C. ....83
MOPAR ACCESSORIES
Authentic Accessories By MOPAR®......84
INDEX..................85
TABLE OF CONTENTS
Page 35 of 92

Setting the Time
• Model 8.4N synchronizes time automatically via GPS, so should not require any timeadjustment. If you do need to set the time manually, follow the instructions below for Model
8.4.
• For Model 8.4, turn the unit on, then touch the time display at the top of the screen. Touch Yes.
• If the time is not displayed at the top of the screen, touch More soft-key and then Settings soft-key. In the Settings screen, touch the Clock soft-key, then check or uncheck this option.
• Touch + or – next to Set Time Hours and Set Time Minutes to adjust the time.
• If these features are not available, uncheck the Sync with GPS box.
• Touch X to save your settings and exit out of the Clock Setting screen.
Audio Settings
• Touch of the Audio soft-key to activate the Audio settings screen to adjust Balance\Fade, Equalizer, And Speed Adjusted Volume.
• You can return to the Radio screen by touching the X located at the top right.
Balance/Fade • Touch the Balance/Fade soft-key to Balance audio between the front speakers or fade the audio between the rear and front speakers.
• Touching the Front, Rear, Left, or Right soft-keys or touch and drag the blue Speaker Icon to adjust the Balance/Fade.
Equalizer • Touch the Equalizer soft-key to activate the Equalizer screen.
• Touch the + or - soft-keys, or by touching and dragging over the level bar for each of the equalizer bands. The level value, which spans between 9, is displayed at the bottom of each of
the Bands.
Speed Adjusted Volume • Touch the Speed Adjusted Volume soft-key to activate the Speed Adjusted Volume screen. The Speed Adjusted Volume is adjusted by touching of the + and - buttons or by touching, and
dragging over the Level Bar This alters the automatic adjustment of the audio volume with
variation to vehicle speed. ELECTRONICS
33
Page 39 of 92

PLAYER• Select Player source by pressing the Playersoft-key to enter the Player main screen, then
touch the source soft-key and choose
between Disc, AUX, iPod® Bluetooth or SD
Card.
NOTE: Uconnect Touch™ will usually
automatically switch to the appropriate mode
when something is first connected or inserted into
the system.
GARMIN® NAVIGATION (8.4N ONLY) • Uconnect Touch 8.4N integrates Garmin’s consumer-friendly navigation into your vehicle.Garmin Navigation includes Lane Assist and Junction View, Speed Limit information, and a
database with over 6 million points of interest.
• Touch the NAV soft-key in the menu bar to access the Navigation system
ELECTRONICS
37
Page 45 of 92

NOTE:
• When connecting your iPod® device for the first time, the system may take several minutes to readyour music, depending on the number of files. For example, the system will take approximately
5 minutes for every 1000 songs loaded on the device. Also during the reading process, the Shuffle
and Browse functions will be disabled. This process is needed to ensure the full use of your iPod®
features and only happens the first time it is connected. After the first time, the reading process of
your iPod® will take considerably less time unless changes are made or new songs are added to the
playlist.
• The USB port supports certain Mini, Classic, Nano, Touch, and iPhone® devices. The USB port also supports playing music from compatible external USB Mass Storage Class memory devices.
Some iPod® software versions may not fully support the USB port features. Please visit Apple’s
website for iPod® software updates.
3. SD Card
• Play songs stored on an SD card inserted into the SD card slot.
• Song playback can be controlled using the radio or Steering Wheel Audio Controls to play, skipto the next or previous track, browse, and list the contents.
4. Bluetooth® Streaming Audio
If equipped with Uconnect™ Voice Command, your Bluetooth-equipped iPod® devices, cell phones
or other media players, may also be able to stream music to your vehicle's sound system. Your
connected device must be Bluetooth-compatible, and paired with your Uconnect Touch® system
(see Uconnect™ Phone for pairing instructions). You can access the music from your connected
Bluetooth® device by touching the Source soft-key while in Player mode.
Uconnect™ Phone (Bluetooth® HANDS FREE CALLING)
• If the Uconnect™ Phone
Button exists on your steering wheel, then you have the
Uconnect™ Phone features.
• The Uconnect™ Phone is a voice-activated, hands-free, in-vehicle communications system with Voice Command Capability (see Voice Command section).
• The Uconnect™ Phone allows you to dial a phone number with your mobile phone using simple voice commands or using screen soft-keys.
• Refer to the Understand The Features Of Your Vehicle section of your vehicle's Owner's Manual on the DVD for further details.
NOTE: The Uconnect™ Phone requires a mobile phone equipped with the Bluetooth® Hands-Free
Profile, Version 1.0 or higher. For Uconnect™ customer support, call 1–877–855–8400 or visit
dodge.com/uconnect. ELECTRONICS
43
Page 46 of 92

Pairing a Phone
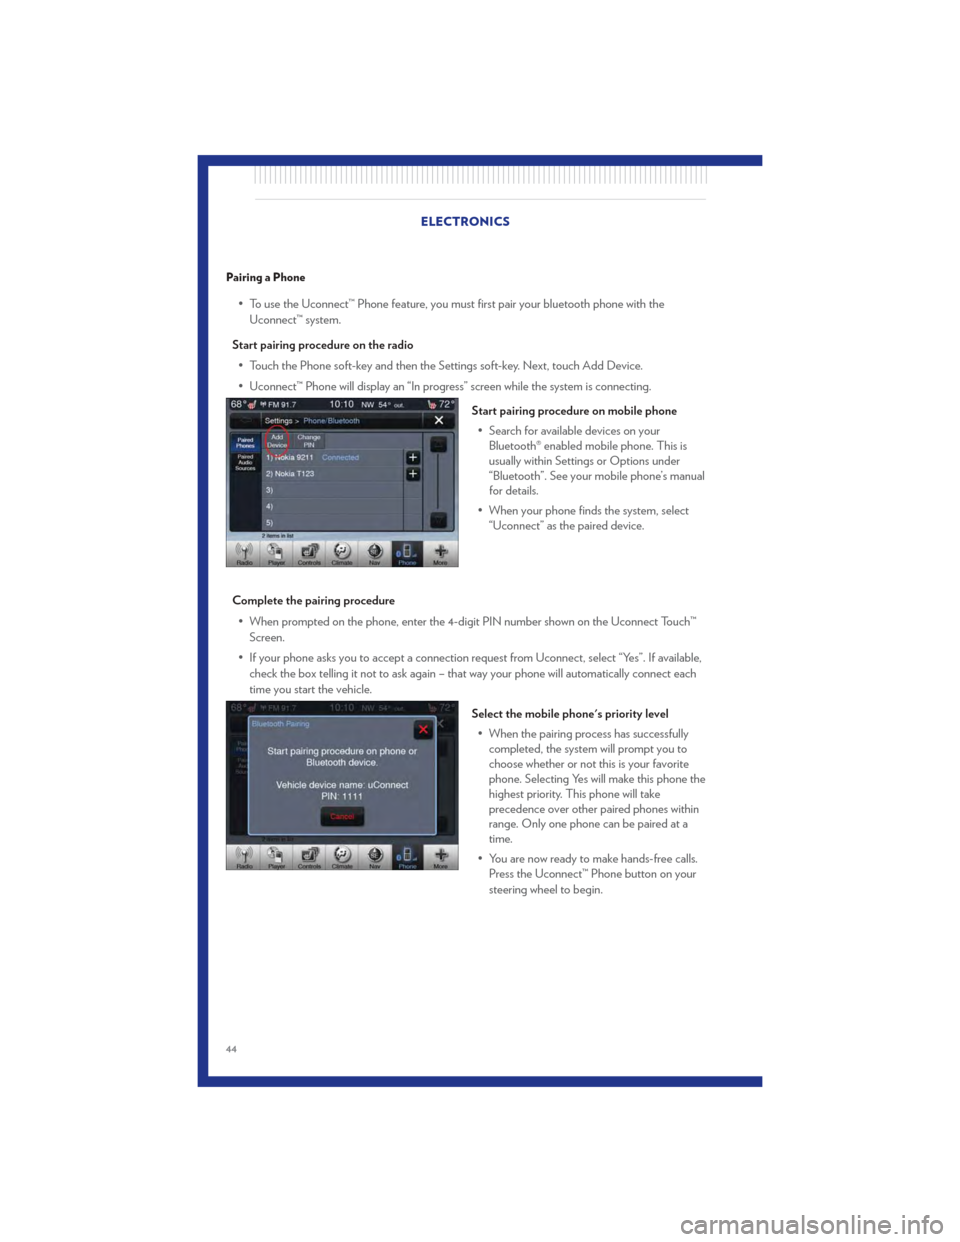
• To use the Uconnect™ Phone feature, you must first pair your bluetooth phone with theUconnect™ system.
Start pairing procedure on the radio • Touch the Phone soft-key and then the Settings soft-key. Next, touch Add Device.
• Uconnect™ Phone will display an “In progress” screen while the system is connecting.
Start pairing procedure on mobile phone• Search for available devices on your Bluetooth® enabled mobile phone. This is
usually within Settings or Options under
“Bluetooth”. See your mobile phone’s manual
for details.
• When your phone finds the system, select “Uconnect” as the paired device.
Complete the pairing procedure • When prompted on the phone, enter the 4-digit PIN number shown on the Uconnect Touch™ Screen.
• If your phone asks you to accept a connection request from Uconnect, select “Yes”. If available, check the box telling it not to ask again – that way your phone will automatically connect each
time you start the vehicle.
Select the mobile phone's priority level• When the pairing process has successfully completed, the system will prompt you to
choose whether or not this is your favorite
phone. Selecting Yes will make this phone the
highest priority. This phone will take
precedence over other paired phones within
range. Only one phone can be paired at a
time.
• You are now ready to make hands-free calls. Press the Uconnect™ Phone button on your
steering wheel to begin.
ELECTRONICS
44
Page 51 of 92

Compass Calibration
• This compass is self-calibrating, which eliminates the need to set the compass manually. Whenthe vehicle is new, the compass may appear erratic and the EVIC will display “CAL” until the
compass is calibrated.
• You may also calibrate the compass by completing one or more 360 degree turns (in an area free from large metal or metallic objects) until the “CAL” message displayed in the EVIC turns
off. The compass will now function normally.
ECO
• The ECO message will appear in your EVIC display whenever you are driving in a fuel efficientmanner.
• This feature allows you to monitor when you are driving in a fuel efficient manner, and it can be used to modify driving habits in order to increase fuel economy.
PROGRAMMABLE FEATURES
Electronic Vehicle Information Center (EVIC) – If Equipped
• The EVIC can be used to view or change the following settings. Press the UPor
DOWN
button until System Setup displays, then press the SELECTbutton. Scroll
through the settings using the UP or DOWN buttons. Press the SELECT
button to
change the setting. Press the BACK button to scroll back to a previous menu or sub menu.
• Fuel Economy: • Average Fuel Economy/Fuel Saver Mode
• Distance To Empty (DTE)
• Miles Per Gallon (MPG) • Trip Info
• Trip A
• Trip B
• Elapsed Time
• Vehicle Speed • Units
• To Reset The Display • Vehicle Info (Customer Information Features)
Uconnect Touch™ Customer Programmable Features
• The Uconnect Touch™ 8.4 system allows you to access Customer Programmable feature
settings such as Display, Clock, Safety/Assistance, Lights, Doors & Locks, Heated Seats, Engine
Off Operation, Compass Settings, Audio, Phone/ Bluetooth and SIRIUS Setup through
soft-keys.
• Touch the More soft-key to on the bottom of the screen, then touch the Settings soft-key to access the Settings screen. When making a selection, scroll up or down until the preferred
setting is highlighted, then press and release the preferred setting until a check-mark appears
next to the setting, showing that setting has been selected. The following feature settings are
available:
• Display • Clock
• Safety / Assistance • Doors & Locks
• Auto-On Comfort & Remote Start • Engine Off Options
• Compass Settings • Audio
• Phone / Bluetooth • SIRIUS Setup
ELECTRONICS
49
Page 78 of 92

FUSES
Integrated Power Module
• The Integrated Power Module (fuses) is located in the engine compartment on the right handside near the Washer Fluid Reservoir. This module contains fuses and relays.
Cavity Cartridge Fuse Mini-Fuse Description
2 40 Amp Green — Radiator Fan #13 50 Amp Red — Power Steering #1
4 30 Amp Pink — Starter 5 40 Amp Green — Anti-Lock Brakes
9 — 20 Amp Yellow All-Wheel Drive Module – If Equipped
10 — 10 Amp Red Security 11 — 20 Amp Yellow Horns
12 — 10 Amp Red Air Conditioning Clutch
14 — 25 Amp Neutral Anti-Lock Brakes 15 — 25 Amp Neutral Transmission
18 50 Amp Red — Radiator Fan #2 19 50 Amp Red — Power Steering #2
20 30 Amp Pink — Wiper Motor
21 30 Amp Pink — Headlamp Washers
28 — 25 Amp Neutral Fuel Pump
29 — 15 Amp Blue Transmission Shifter
31 — 25 Amp Neutral Engine Module
34 — 25 Amp Neutral Powertrain #1
MAINTAINING YOUR VEHICLE
76
Page 81 of 92

Cavity Cartridge Fuse Mini-Fuse Description2 60 Amp Yellow — Front PDC Feed #1
4 60 Amp Yellow — Front PDC Feed #2 5 30 Amp Pink — Sunroof
6 40 Amp Green — Exterior Lighting #1 7 40 Amp Green — Exterior Lighting #2
8 30 Amp Pink — Interior Lighting/Washer Pump 9 30 Amp Pink — Power Locks
10 30 Amp Pink — Driver Door 11 30 Amp Pink — Passenger Door
12 — 20 Amp Yellow Cigar Lighters (Selectable)
15 50 Amp Red — HVAC Blower
23 — 10 Amp Red Fuel Door/Diagnostic Port
24 — 15 Amp Blue Radio Screen 25 — 10 Amp Red Tire Pressure Monitor 27 — 25 Amp Neutral Amplifier 31 — 25 Amp Neutral Power Seats
32 — 15 Amp Blue HVAC Module/Cluster 33 — 15 Amp Blue Ignition Switch/Wireless Module
34 — 10 Amp Red Steering Column Module/Clock 35 — 10 Amp Red Battery Sensor 37 — 15 Amp Blue Radio
38 — 20 Amp Yellow Power Outlet
42 30 Amp Pink — Rear Defrost 43 — 25 Amp Neutral Rear Heated Seats/Steering Wheel
44 — 10 Amp Red Park Assist/Blind Spot/Camera 45 — 15 Amp Blue Cluster/Rearview Mirror/Compass
46 — 10 Amp Red Adaptive Cruise Control 47 — 10 Amp Red Adaptive Front Lighting
48 — 20 Amp Yellow Active Suspension 51 — 20 Amp Yellow Front Heated Seats
52 — 10 Amp Red Heated Cupholders/Rear Heated Seat Switches
53 — 10 Amp Red HVAC Module/In Car Temperature
Sensor
58 — 10 Amp Red Airbag Module
64 — 25 Amp Neutral Rear Windows
65 — 10 Amp Red Airbag Module
67 — 15 Amp Blue Run Sense
68 — 15 Amp Blue Power Outlet Illumination/Rear
Sunshade
MAINTAINING YOUR VEHICLE
79