2011 CHRYSLER 300 radio
[x] Cancel search: radioPage 38 of 92

Browse
• Lets you browse the SIRIUS channel listing, Favorites, Genres, Game Zone, and Weatherchannels. Jump setting, and also provides the SIRIUS channel list. Browse contains many
sub-menus.
Browse
Sub-Menu Sub-Menu Description
All Shows the channel listing.
Genre Provides a list of all genres, and lets you jump to a channel within the selected genre.
Presets Lets you scroll the list of Preset satellite channels. Touch the channel, or press Enter on the Tune knob, to go to that channel. Touch the trash can icon to
delete a preset. Your presets are also shown at the top of the main Satellite
Radio screen.
Favorites Lets you manage artists and songs in the Favorites list and configure Alert Settings to let you know when favorite songs or artists are playing on other
channels). Also, view a list of channels airing any of your Favorites.
Game Zone Provides alerts when your favorite sports teams are starting a game which is being aired on other SIRIUS channels, or when their game score is
announced. You can select and manage your Teams list here, and configure
alerts.
Jump Lets you select your favorite cities for Traffic & Weather information, which is used by the Jump feature on the main satellite radio screen.
Replay
• Lets you replay up to 44 minutes of the content of the current SIRIUS channel.
Replay Option Option Description
Play/Pause Touch to Pause content playback. Touch Pause/Play again to resumeplayback.
Rewind/RW Rewinds the channel content in steps of 5 seconds. Touch and hold to rewind continuously, then release to begin playing content at that point.
Fast Forward/FW Forwards the content, and works similarly to Rewind/RW. However, Fast Forward/FW can only be used when content has been previously rewound
Replay Time Displays the amount of time in the upper center of the screen by which your content lags the Live channel.
Live Resumes playback of Live content at any time while replaying rewound content.ELECTRONICS
36
Page 44 of 92
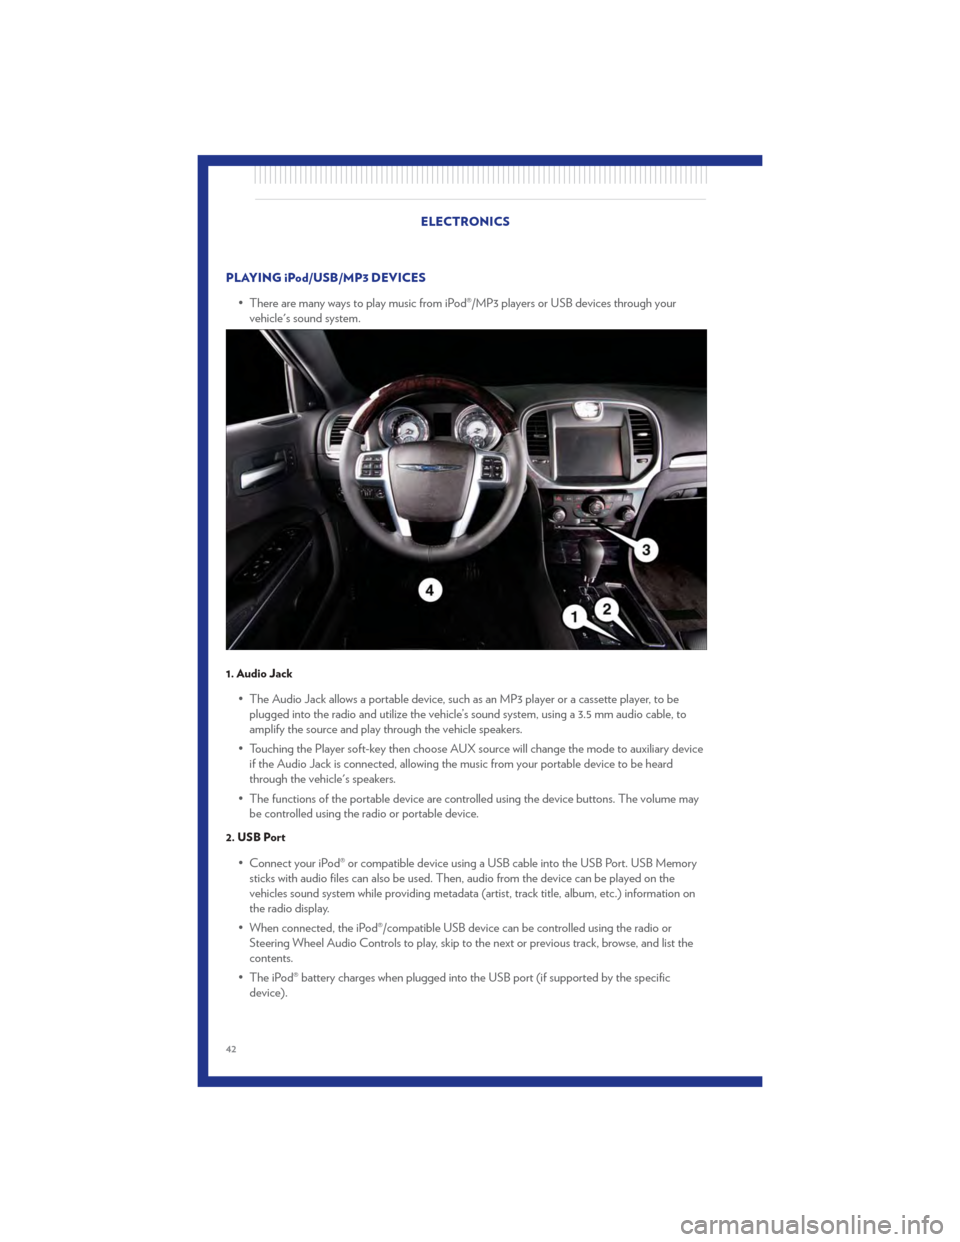
PLAYING iPod/USB/MP3 DEVICES• There are many ways to play music from iPod®/MP3 players or USB devices through yourvehicle's sound system.
1. Audio Jack
• The Audio Jack allows a portable device, such as an MP3 player or a cassette player, to beplugged into the radio and utilize the vehicle’s sound system, using a 3.5 mm audio cable, to
amplify the source and play through the vehicle speakers.
• Touching the Player soft-key then choose AUX source will change the mode to auxiliary device if the Audio Jack is connected, allowing the music from your portable device to be heard
through the vehicle's speakers.
• The functions of the portable device are controlled using the device buttons. The volume may be controlled using the radio or portable device.
2. USB Port
• Connect your iPod® or compatible device using a USB cable into the USB Port. USB Memorysticks with audio files can also be used. Then, audio from the device can be played on the
vehicles sound system while providing metadata (artist, track title, album, etc.) information on
the radio display.
• When connected, the iPod®/compatible USB device can be controlled using the radio or Steering Wheel Audio Controls to play, skip to the next or previous track, browse, and list the
contents.
• The iPod® battery charges when plugged into the USB port (if supported by the specific device).
ELECTRONICS
42
Page 45 of 92
NOTE:
• When connecting your iPod® device for the first time, the system may take several minutes to readyour music, depending on the number of files. For example, the system will take approximately
5 minutes for every 1000 songs loaded on the device. Also during the reading process, the Shuffle
and Browse functions will be disabled. This process is needed to ensure the full use of your iPod®
features and only happens the first time it is connected. After the first time, the reading process of
your iPod® will take considerably less time unless changes are made or new songs are added to the
playlist.
• The USB port supports certain Mini, Classic, Nano, Touch, and iPhone® devices. The USB port also supports playing music from compatible external USB Mass Storage Class memory devices.
Some iPod® software versions may not fully support the USB port features. Please visit Apple’s
website for iPod® software updates.
3. SD Card
• Play songs stored on an SD card inserted into the SD card slot.
• Song playback can be controlled using the radio or Steering Wheel Audio Controls to play, skipto the next or previous track, browse, and list the contents.
4. Bluetooth® Streaming Audio
If equipped with Uconnect™ Voice Command, your Bluetooth-equipped iPod® devices, cell phones
or other media players, may also be able to stream music to your vehicle's sound system. Your
connected device must be Bluetooth-compatible, and paired with your Uconnect Touch® system
(see Uconnect™ Phone for pairing instructions). You can access the music from your connected
Bluetooth® device by touching the Source soft-key while in Player mode.
Uconnect™ Phone (Bluetooth® HANDS FREE CALLING)
• If the Uconnect™ Phone
Button exists on your steering wheel, then you have the
Uconnect™ Phone features.
• The Uconnect™ Phone is a voice-activated, hands-free, in-vehicle communications system with Voice Command Capability (see Voice Command section).
• The Uconnect™ Phone allows you to dial a phone number with your mobile phone using simple voice commands or using screen soft-keys.
• Refer to the Understand The Features Of Your Vehicle section of your vehicle's Owner's Manual on the DVD for further details.
NOTE: The Uconnect™ Phone requires a mobile phone equipped with the Bluetooth® Hands-Free
Profile, Version 1.0 or higher. For Uconnect™ customer support, call 1–877–855–8400 or visit
dodge.com/uconnect. ELECTRONICS
43
Page 46 of 92
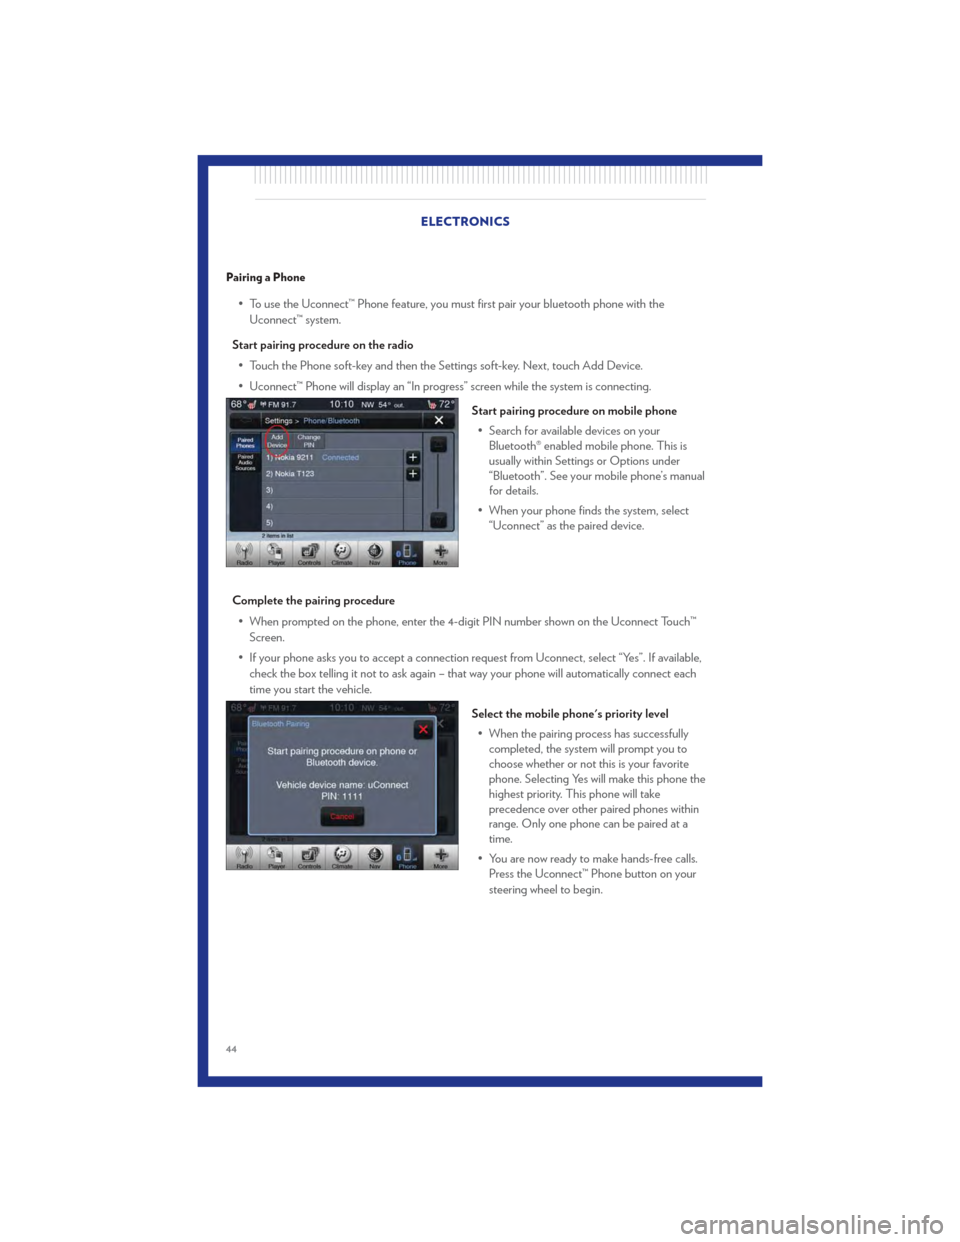
Pairing a Phone
• To use the Uconnect™ Phone feature, you must first pair your bluetooth phone with theUconnect™ system.
Start pairing procedure on the radio • Touch the Phone soft-key and then the Settings soft-key. Next, touch Add Device.
• Uconnect™ Phone will display an “In progress” screen while the system is connecting.
Start pairing procedure on mobile phone• Search for available devices on your Bluetooth® enabled mobile phone. This is
usually within Settings or Options under
“Bluetooth”. See your mobile phone’s manual
for details.
• When your phone finds the system, select “Uconnect” as the paired device.
Complete the pairing procedure • When prompted on the phone, enter the 4-digit PIN number shown on the Uconnect Touch™ Screen.
• If your phone asks you to accept a connection request from Uconnect, select “Yes”. If available, check the box telling it not to ask again – that way your phone will automatically connect each
time you start the vehicle.
Select the mobile phone's priority level• When the pairing process has successfully completed, the system will prompt you to
choose whether or not this is your favorite
phone. Selecting Yes will make this phone the
highest priority. This phone will take
precedence over other paired phones within
range. Only one phone can be paired at a
time.
• You are now ready to make hands-free calls. Press the Uconnect™ Phone button on your
steering wheel to begin.
ELECTRONICS
44
Page 48 of 92
Common Phone Commands
Common Phone Commands (Examples)
“Call John Smith”
“Call John Smith mobile”
“Dial 1 248 555 1212”
“Call Emergency”
“Call Towing Assistance”
“Redial”
Phonebook
• Uconnect Touch™ radios will automatically download your phonebook from your paired phone,if this feature is supported by your phone. Entries are updated each time that the phone is
paired. If your phone book entries do not appear, check the settings on your phone. Some
phones require you to enable this feature manually.
• Your phone book can be browsed on your radio screen, but editing can only be done on your phone. To browse, touch the Phone soft-key, then the Phonebook soft-key.
• Favorite phonebook entries can be saved as Favorites for quicker access. Favorites are shown at the top of your main phone screen.
Voice Recognition Tips
• Use longer names that are less easily mistaken for others. For examples, say “Call John Doe”instead of “Call John”.
• You can “chain” commands together for faster results. Say “Call John Doe, mobile”, for example.
• You can “barge in” while the system is talking to you, enabling you to enter your response without waiting. Just press the Voice Command button on the steering wheel to barge in.
Changing The Volume
• Start a dialogue by pressing the Phone button, then say a command for example - "Help".
• Use the radio ON/OFF VOLUME rotary knob to adjust the volume to a comfortable level while the Uconnect™ system is speaking. Please note the volume setting for Uconnect™ is
different than the audio system.
NOTE: To access help, press the Uconnect™ Phone
button on the steering wheel and say
"help." Touch the display or push either
orbutton and say "cancel" to cancel the help
session. ELECTRONICS
46
Page 49 of 92
WARNING!
• Any voice commanded system should be used only in safe driving conditions followinglocal laws and phone use. All attention should be kept on the roadway ahead. Failure to
do so may result in a collision causing you and others to be severely injured or killed.
• In an emergency, to use Uconnect™ Phone, your mobile phone must be: • turned on,
• paired to Uconnect™ Phone,
• and have network coverage.
Uconnect™ Voice Command
• If the Uconnect™ Voice Command
button exists on your steering wheel, then you have
the Voice Command feature.
• The Voice Command feature lets you keep your hands on the steering wheel, and your eyes on the road.
• When you press the Voice Command button
located on the radio faceplate or
steering wheel, you will hear a beep. The beep is your signal to give a command. If you do not
know what commands to say, you can say "help" and the system will provide options to you. If
you ever wish to interrupt the system while it lists options, press the Voice Command
button
, listen for the BEEP, and say your command.
• You can “chain” commands together for faster results. Say “Call John Doe, mobile”, for example.
Changing The Volume
• Start a dialogue by pressing the Voice Command button, then say a command (for
example, “help”).
• Use the radio ON/OFF VOLUME rotary knob to adjust the volume to a comfortable level while the Voice Command system is speaking. The volume setting for Voice Command is
different than the audio system.
• Refer to the Understand The Features Of Your Vehicle section of your vehicle's Owner's Manual on the DVD for further details. ELECTRONICS
47
Page 50 of 92
Common Voice Commands (Examples)
Switch Modes“AM”
“FM”
“Satellite”
Radio (FM, AM) “95.5”
“95.5 FM”
SIRIUS Satellite Radio “39”
“Tune to Satellite channel 39”
“Foxxhole”
SIRIUS Travel Link “Show fuel prices”
“Show movie listings”
“Show current weather”
“Show extended weather”
“Show Travel Link favorites”
“Show NFL headlines”
“Show NBA rankings”
“Show NFL schedules”
“Show NBA scores”
Navigation “Repeat guidance”
WARNING!
Any voice commanded system should be used only in safe driving conditions following
local laws and phone use. All attention should be kept on the roadway ahead. Failure to do
so may result in a collision causing you and others to be severely injured or killed.
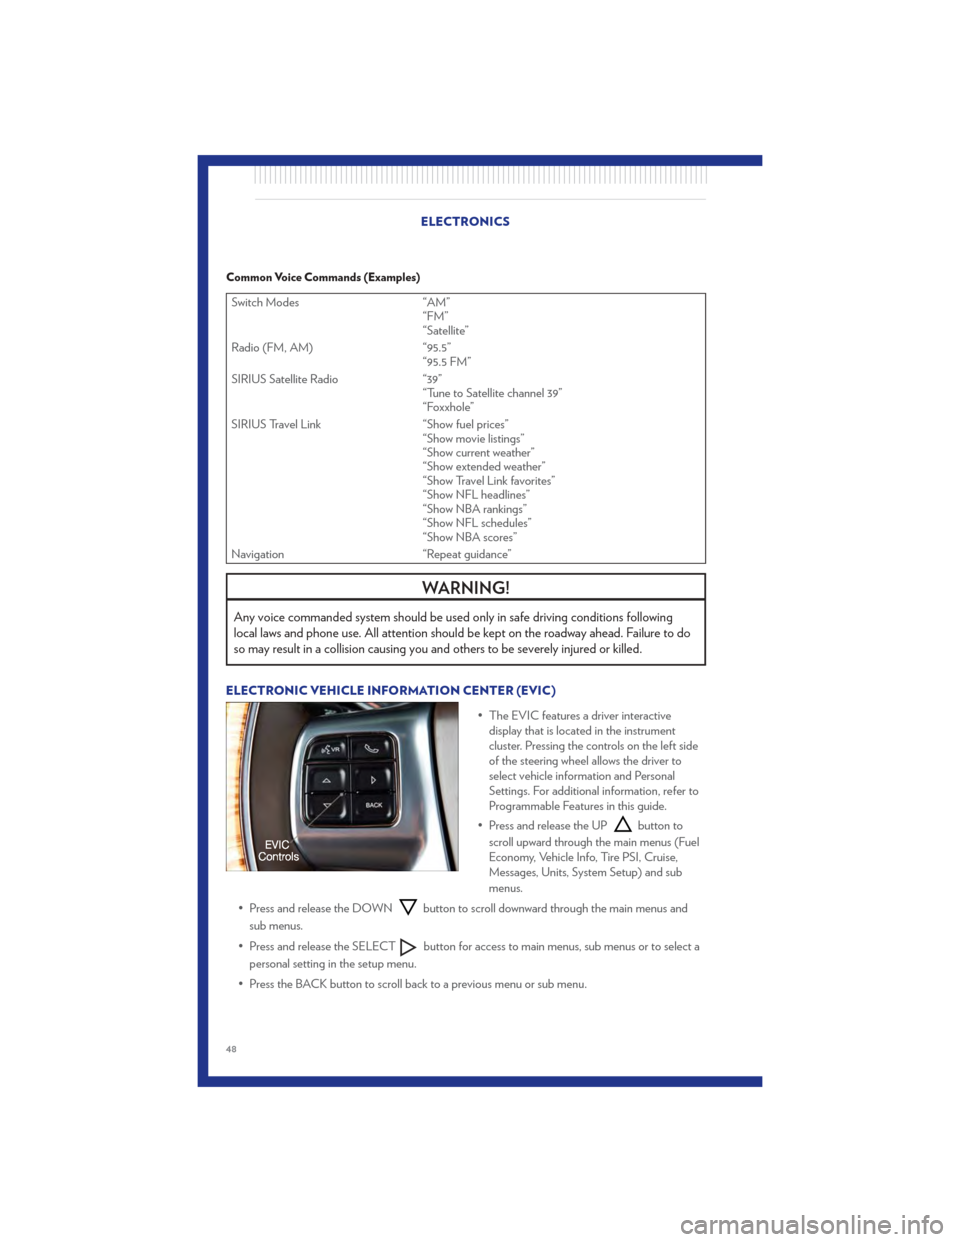
ELECTRONIC VEHICLE INFORMATION CENTER (EVIC)
• The EVIC features a driver interactivedisplay that is located in the instrument
cluster. Pressing the controls on the left side
of the steering wheel allows the driver to
select vehicle information and Personal
Settings. For additional information, refer to
Programmable Features in this guide.
• Press and release the UP
button to
scroll upward through the main menus (Fuel
Economy, Vehicle Info, Tire PSI, Cruise,
Messages, Units, System Setup) and sub
menus.
• Press and release the DOWN
button to scroll downward through the main menus and
sub menus.
• Press and release the SELECT
button for access to main menus, sub menus or to select a
personal setting in the setup menu.
• Press the BACK button to scroll back to a previous menu or sub menu.
ELECTRONICS
48
Page 65 of 92

• Set the parking brake, shift the automatic transmission into PARK and turn the ignition to OFF.
• Turn off the heater, radio, and all unnecessary electrical accessories.
• If using another vehicle to jump-start the battery, park the vehicle within the jumper cablesreach, set the parking brake and make sure the ignition is OFF.
Jump-Starting Procedure
• Connect the positive (+)end of the jumper cable to the remote positive (+)post of the
discharged vehicle.
• Connect the opposite end of the positive (+)jumper cable to the positive (+)post of the
booster battery.
• Connect the negative end (-)of the jumper cable to the negative (-)post of the booster
battery.
• Connect the opposite end of the negative (-)jumper cable to the remote negative (-)post of
the vehicle with the discharged battery.
• Start the engine in the vehicle that has the booster battery, let the engine idle a few minutes, and then start the engine in the vehicle with the discharged battery.
Once the engine is started, remove the jumper cables in the reverse sequence:
• Disconnect the negative (-)jumper cable from the remote negative (-)post of the vehicle with
the discharged battery.
• Disconnect the negative end (-)of the jumper cable from the negative (-)post of the booster
battery.
• Disconnect the opposite end of the positive (+)jumper cable from the positive (+)post of the
booster battery.
• Disconnect the positive (+)end of the jumper cable from the remote positive (+)post of the
discharged vehicle.
• If frequent jump-starting is required to start your vehicle you should have the battery and charging system inspected at your authorized dealer.
CAUTION!
• Do not use a portable battery booster pack or any other booster source with a systemvoltage greater than 12 Volts or damage to the battery, starter motor, alternator or
electrical system may occur.
• Failure to follow these procedures could result in damage to the charging system of the booster vehicle or the discharged vehicle.
• Accessories that can be plugged into the vehicle power outlets draw power from the vehicle’s battery, even when not in use (i.e., cellular phones, etc.). Eventually, if plugged
in long enough, the vehicle’s battery will discharge sufficiently to degrade battery life
and/or prevent the engine from starting.
WHAT TO DO IN EMERGENCIES
63